-

What is Desktop Automation?
Desktop Automation focuses on creating automated tests for computer Applications whether these are native Windows Apps or not.
This type of automation focuses on Front End Testing as the interactions and flows cover only the front of the app. It’s similar to Web and Mobile automation as it also uses “drivers” to create a connection that interacts with the App.
The are several tools and frameworks to automate Desktop Apps, but one of the most used and powerful tools to do it is WinAppDriver.
What Inspectors are?
Inspectors are tools that let us see the Document Object Model (DOM) of an app, this DOM is a representation of the structure of an app as an XML Document. By inspecting and seeing the DOM is possible to understand how the elements of the apps like buttons, text, and text boxes are structured, get the properties of these elements as its locators like ID, Name, ClassName, XPaths, and so on, and which of them are contained on specific Panels, Windows and Tabs.
Currently, on the market, we have different inspectors that we can use, the most common for any platform is Appium Inspector and for Windows is Inspect.exe which is contained directly on Windows SDK Kit.
What is WinAppDriver?
Windows Application Driver (WinAppDriver)is a service that supports Selenium UI Test Automation on Windows Applications like Universal Windows Platform (UWP), Windows Forms (WinForms), Windows Presentation Foundation (WPF), and Classic Windows (Win32) apps.
What is BDD?
Behavior Driven Development is an agile software development process that allows the design, creation, and product testing, using the behavior of the product itself and making it easier for technical and non-technical users to understand the product. This approach improves the understanding of Testing for all the Team Members, as instead of showing Testing Scripts full of technical verbose like classes, methods, and variables, we can show the Steps in Natural Language.
The most common tools to implement BDD in Testing are Cucumber and Specflow, the latter is the most used tool in Windows for Visual Studio and C#.
What is Specflow?
Specflow is a test solution to implement BDD in our framework, using Gherkin language and binding of steps definitions for Net-based apps. Currently is really easy to start using Specflow as it can be easily installed using Nuget Manager in any VS project.
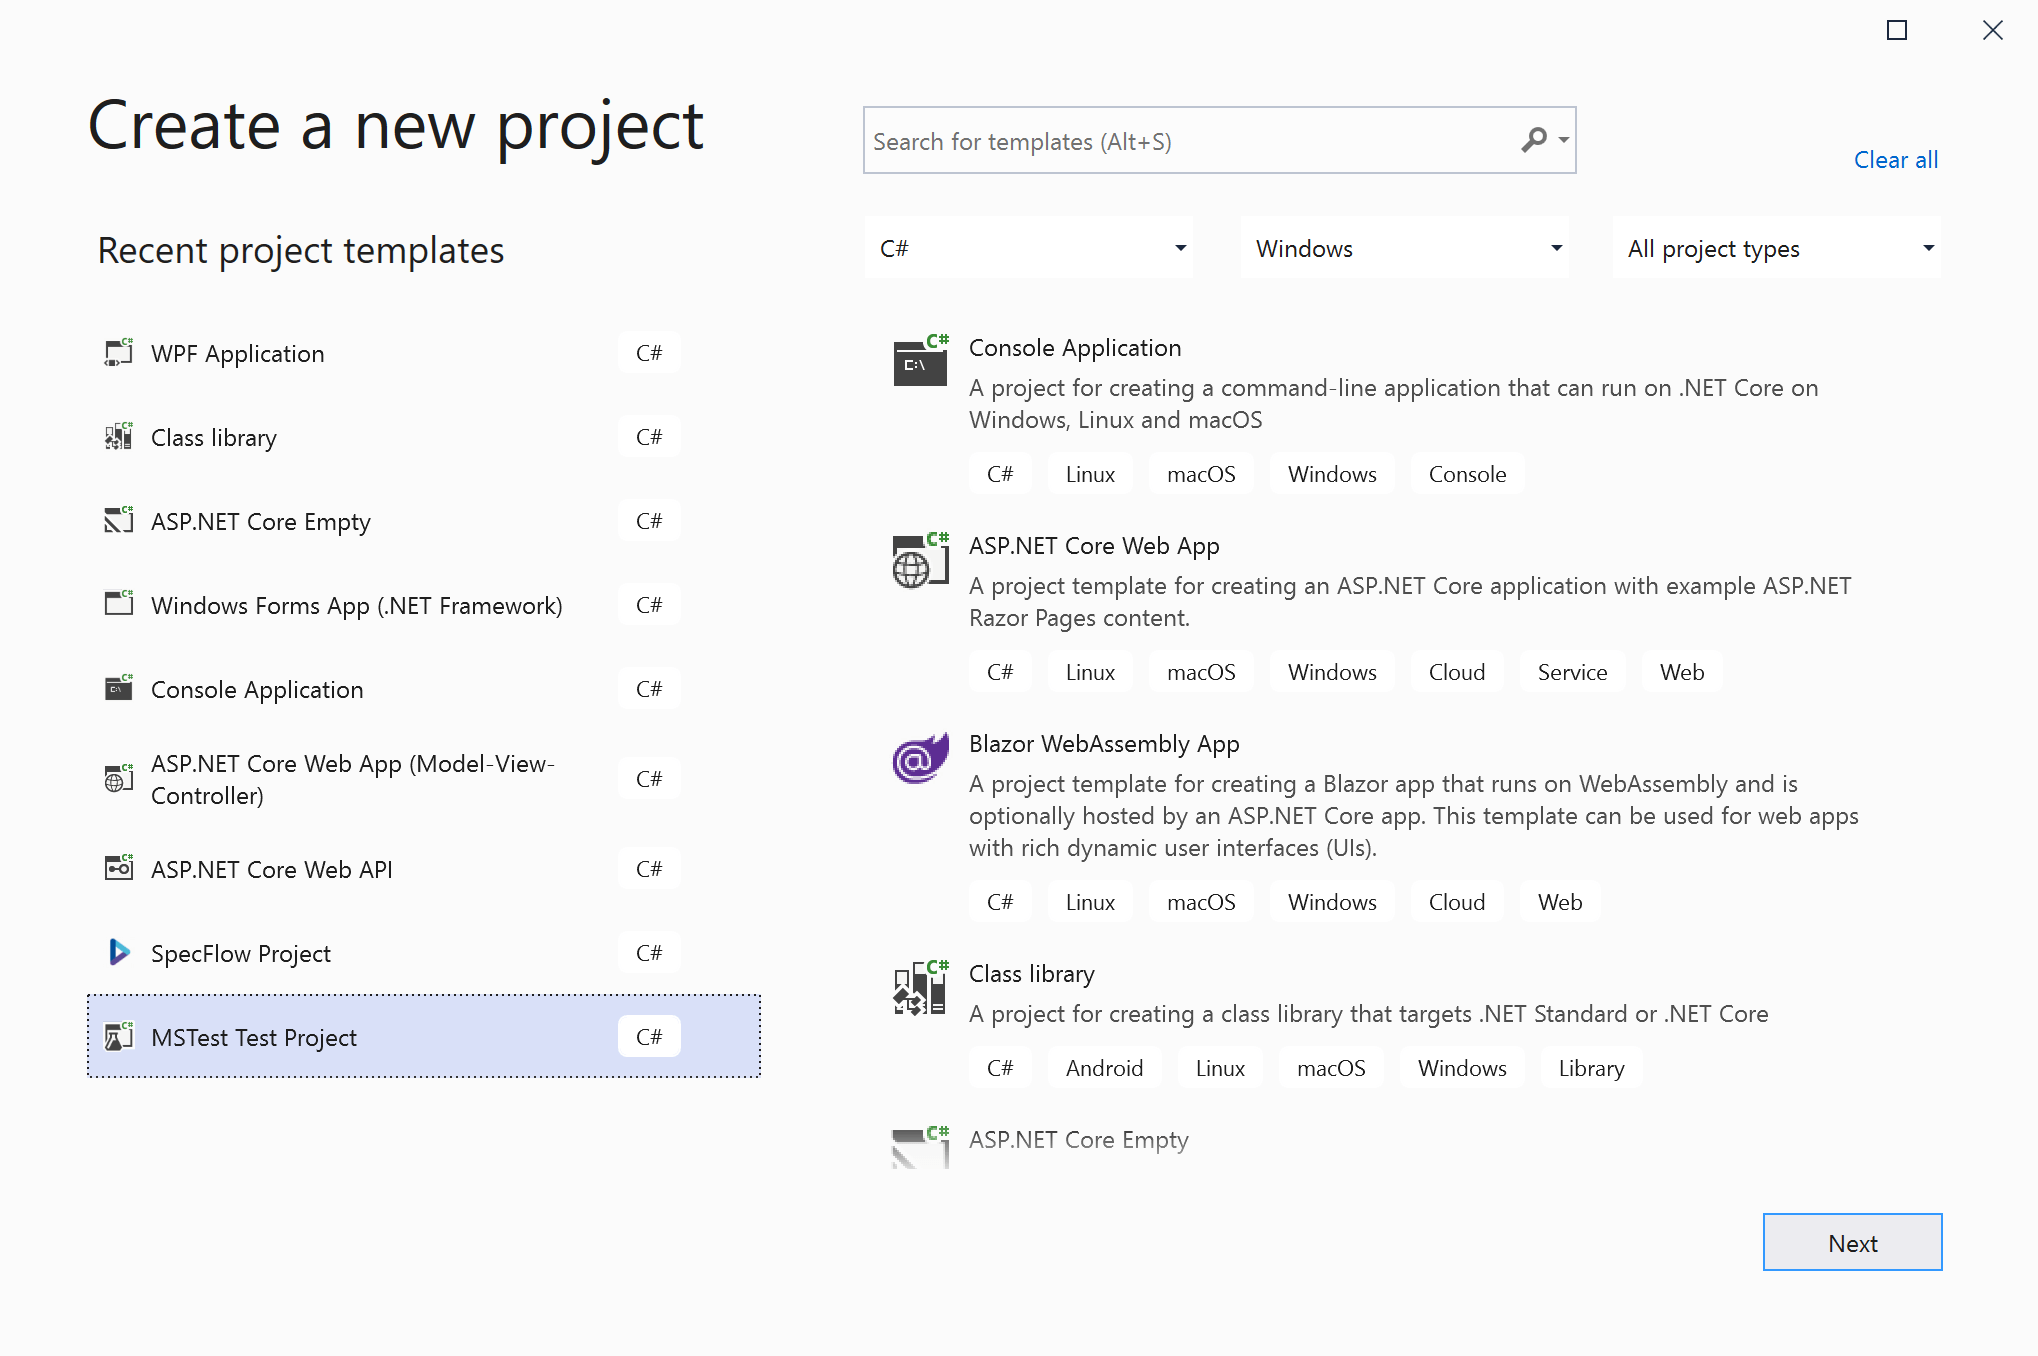
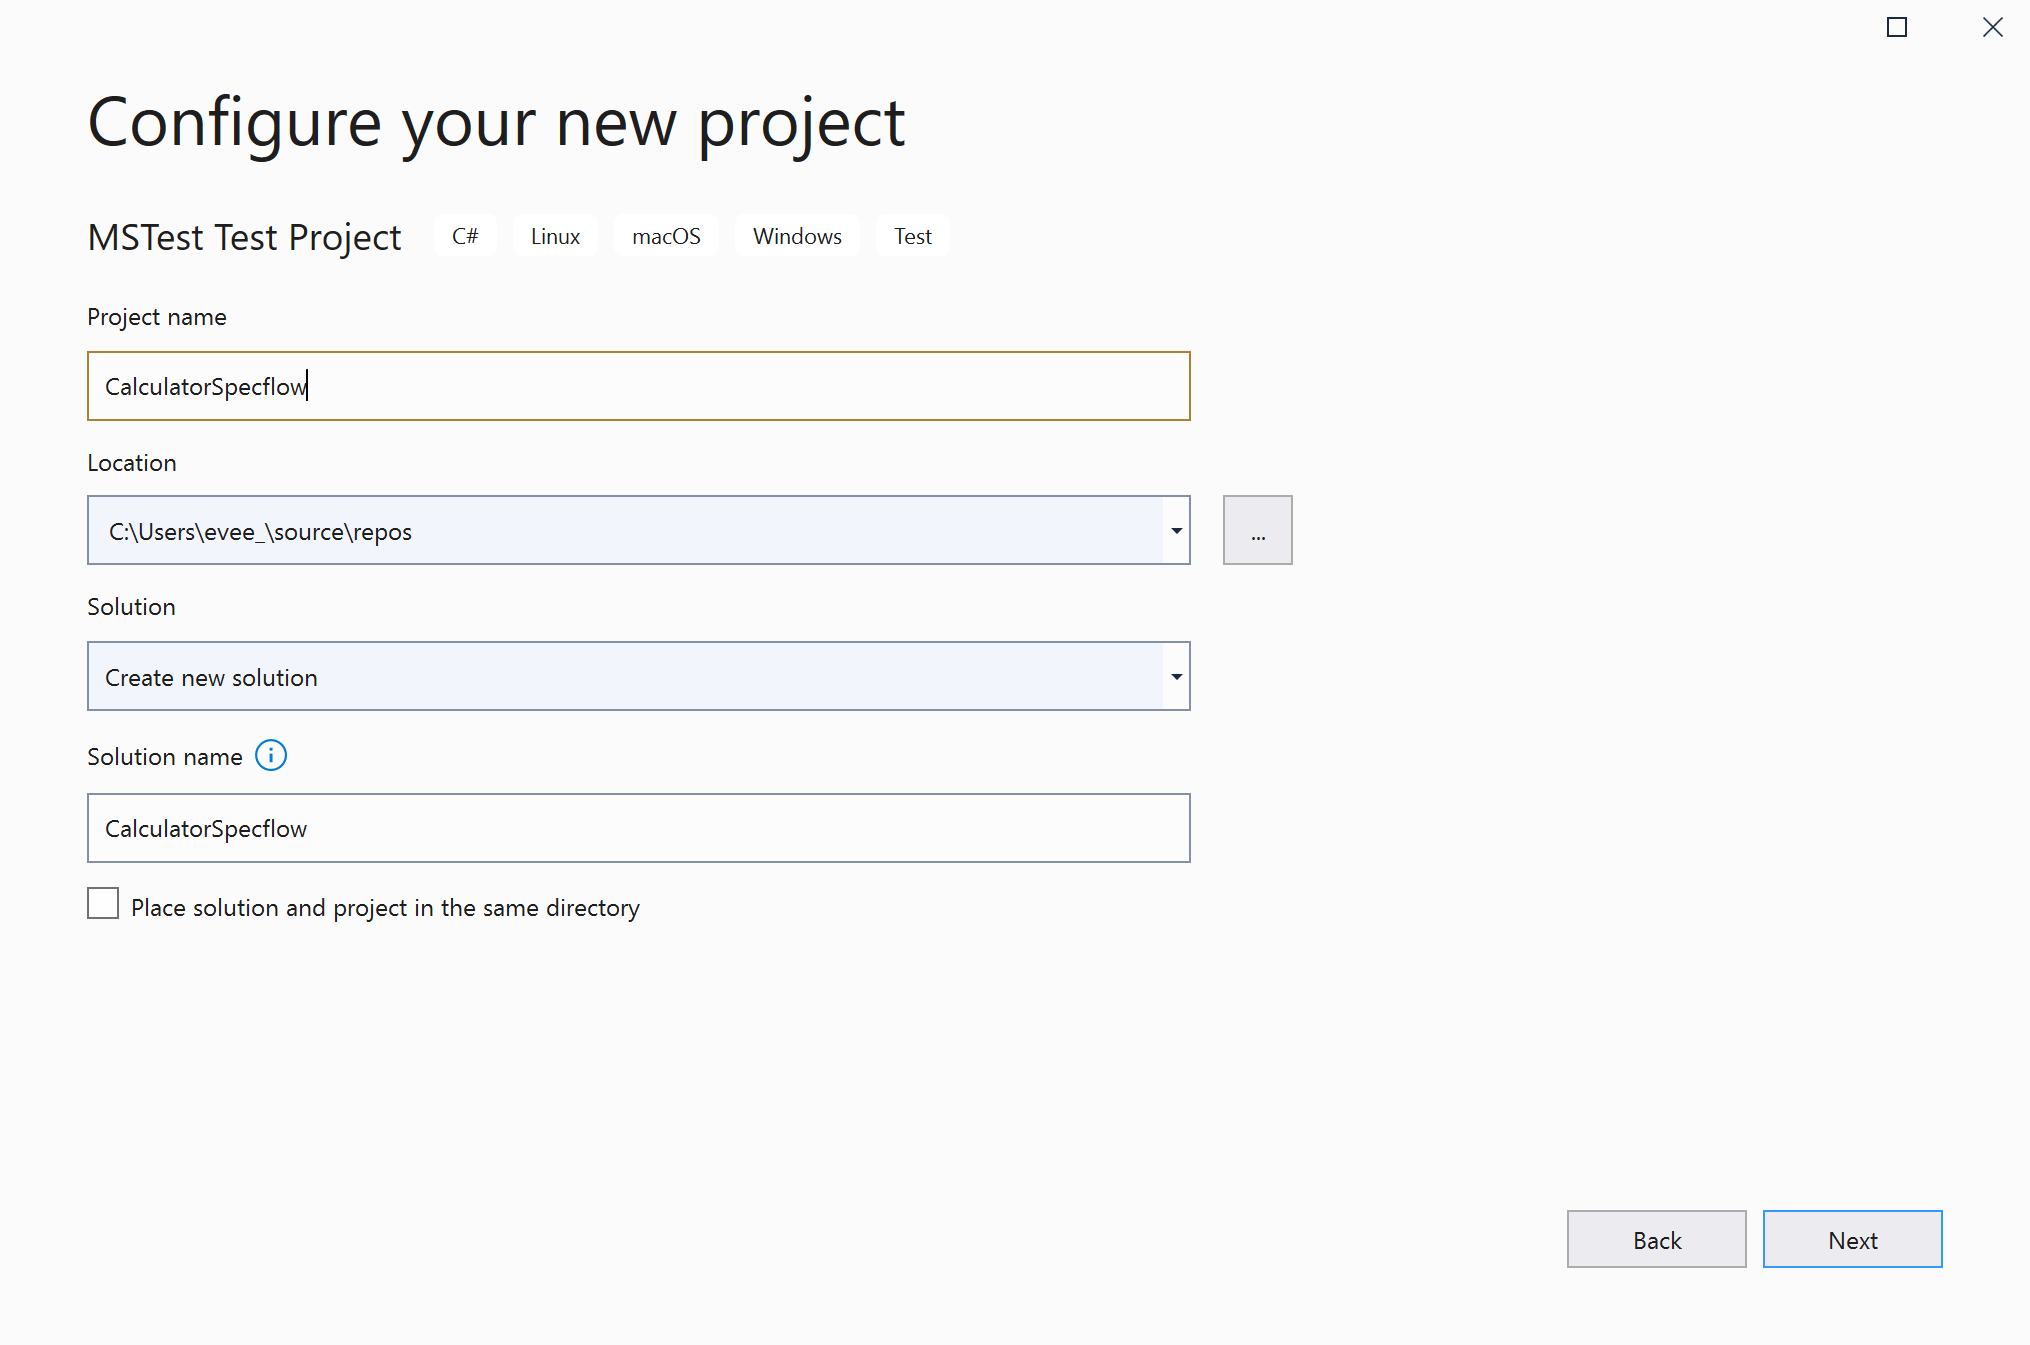
Creating an MSTest Test Project
For this example, we are going to create a VS Project of MSTest Test Project type, is important to notice that we can use any type of project to implement Specflow, even a Specflow-type project.
Enlarge

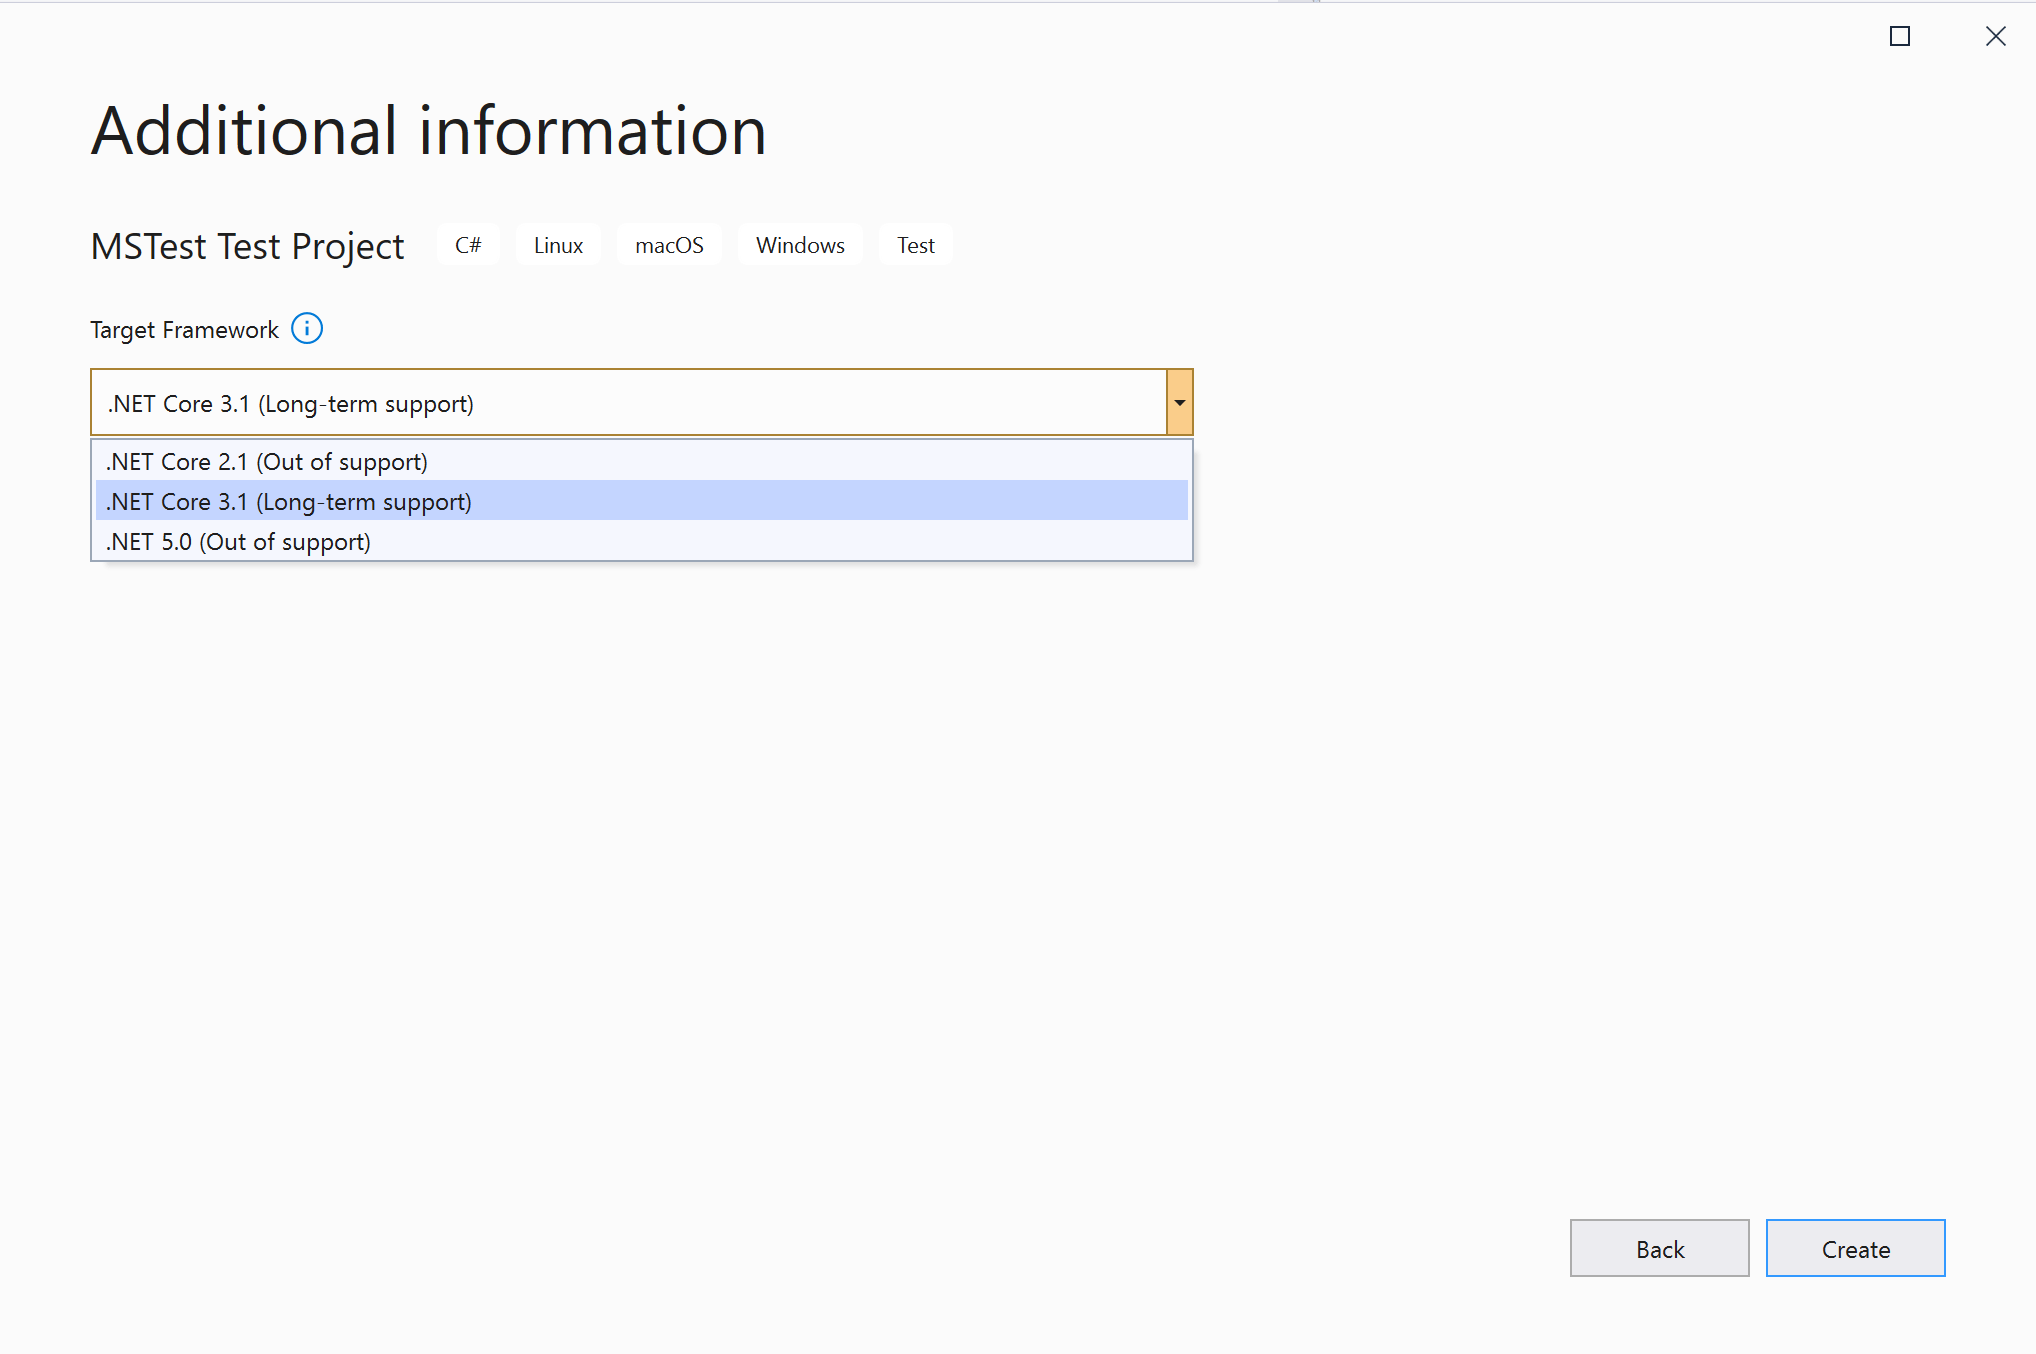
MNP Also is essential to choose the correct Net Core version for our Project, this may vary depending if the automation is going to be forcefully used by the old Net Core version, but keep in mind to always try to choose the latest version of Net Core.
Enlarge

NetCore Enlarge

Configure Project Adding Specflow to VS
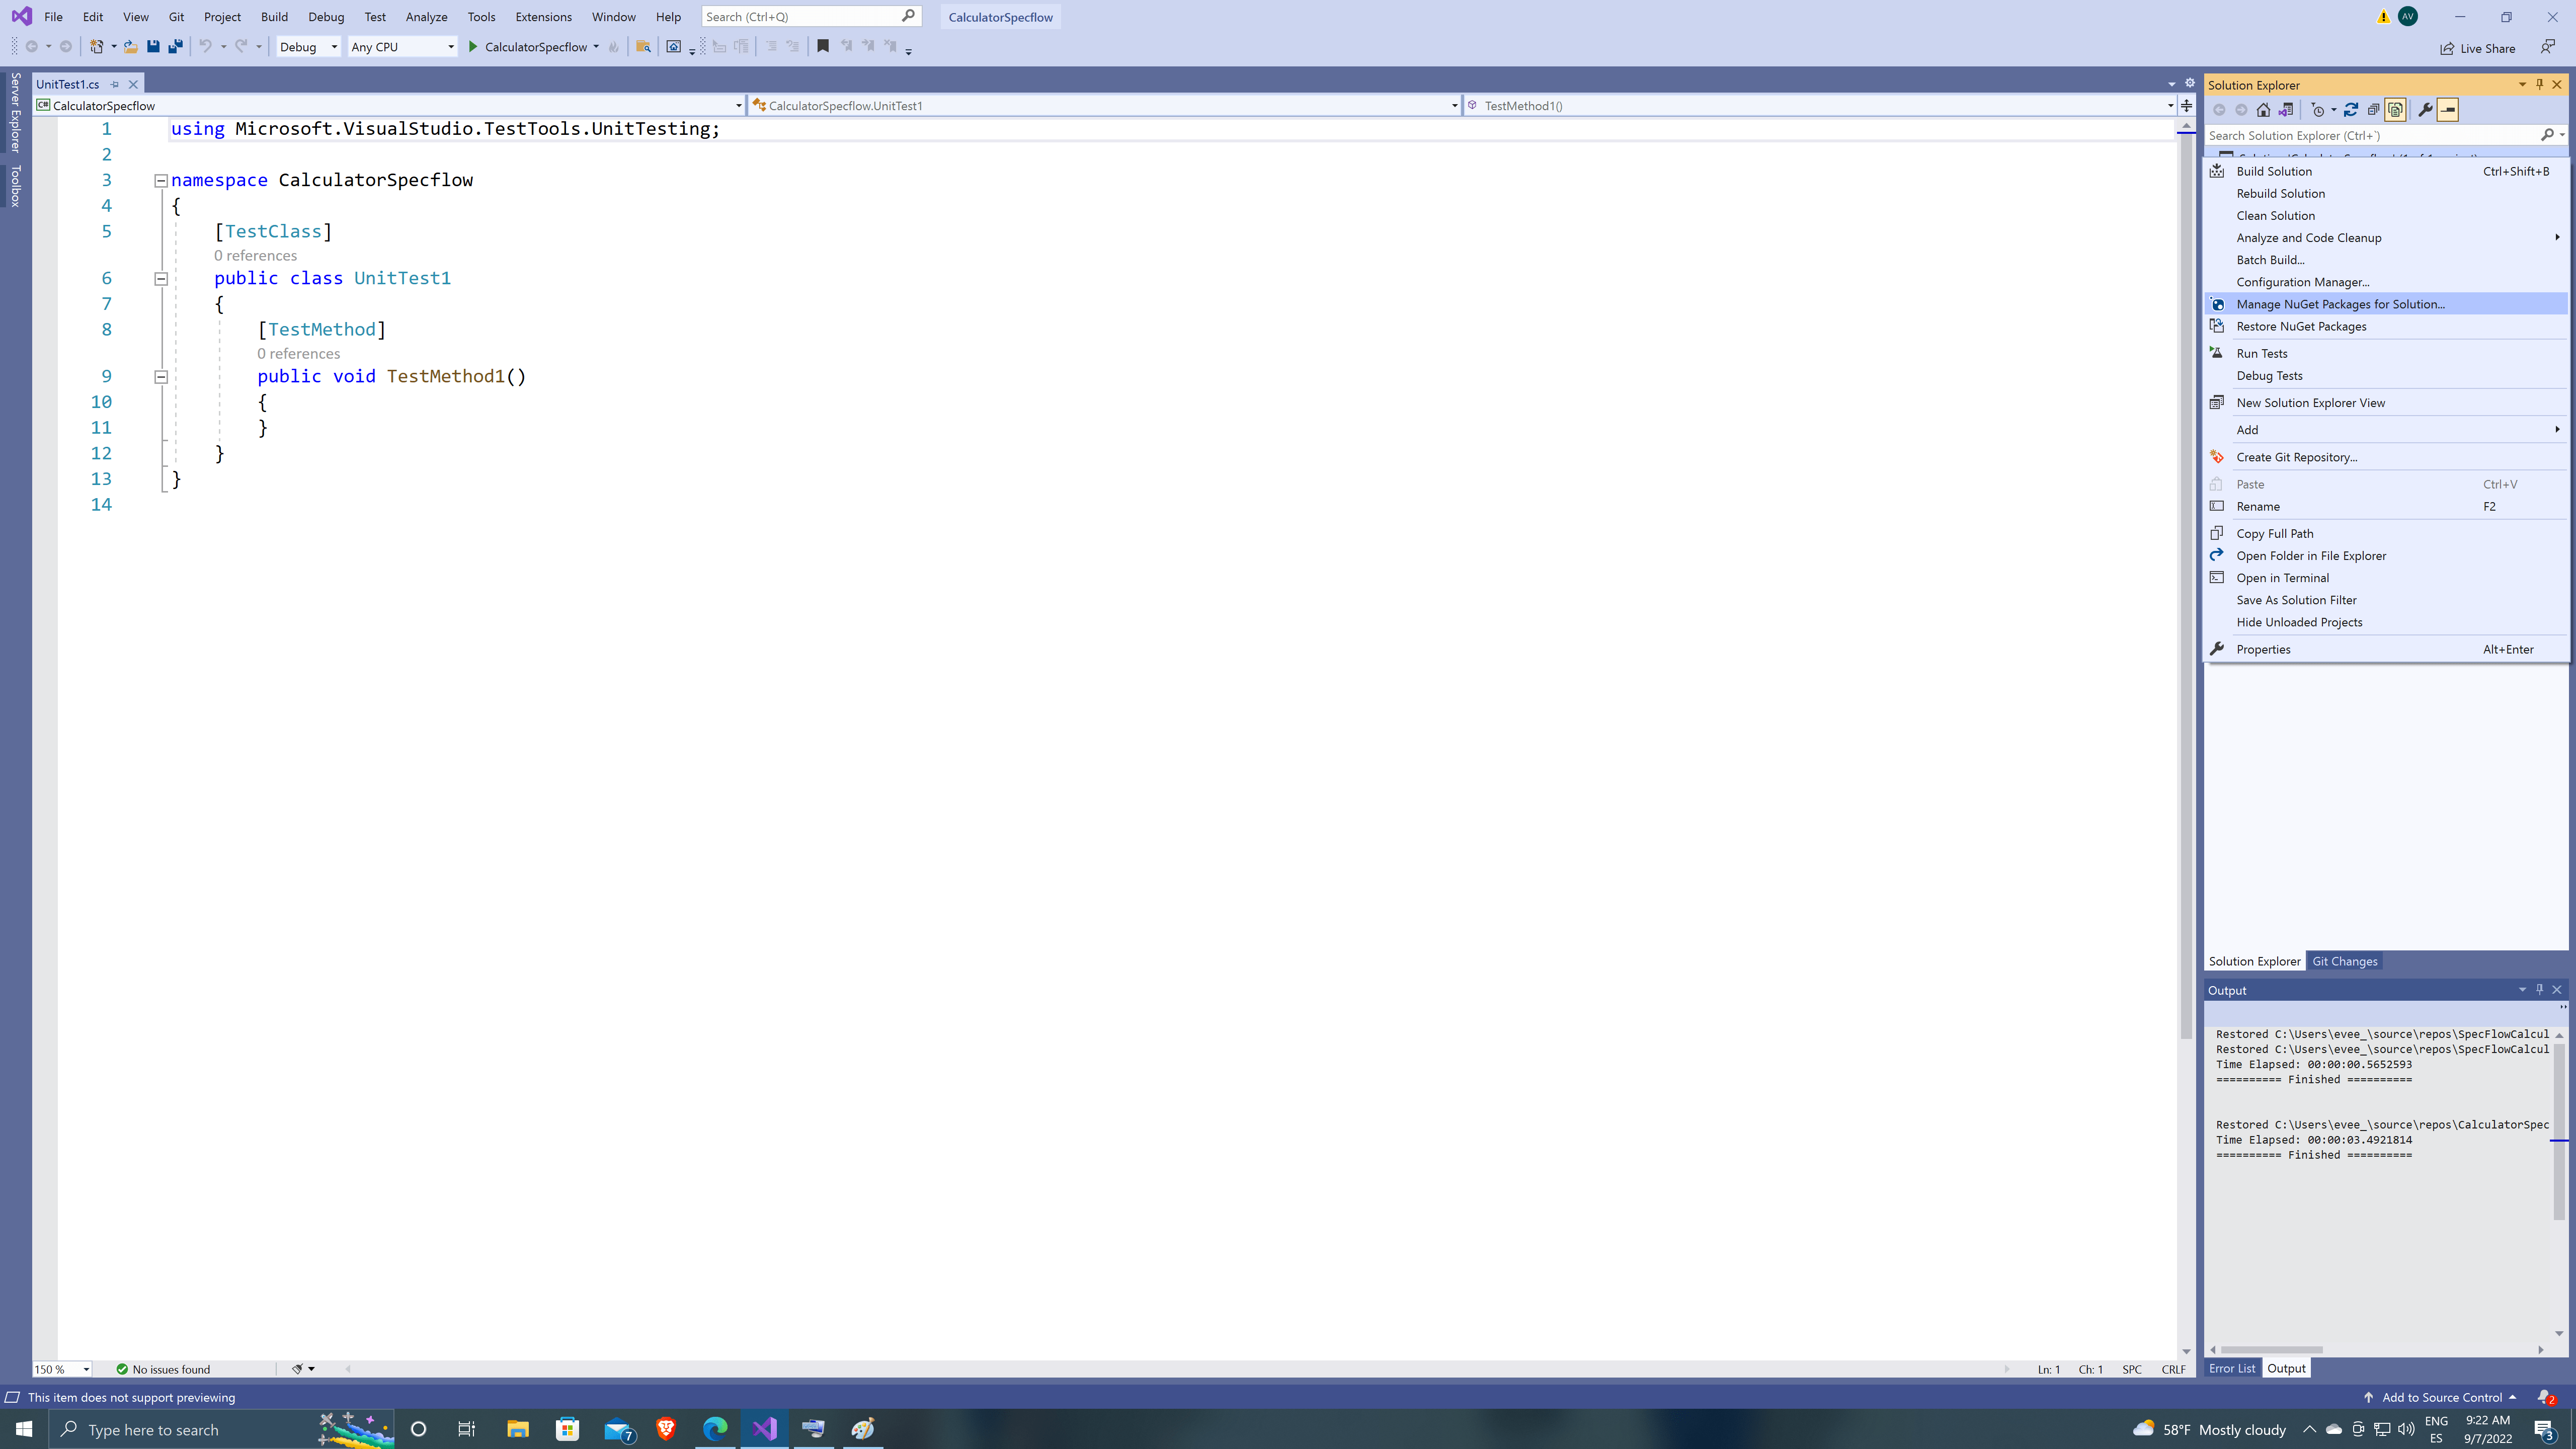
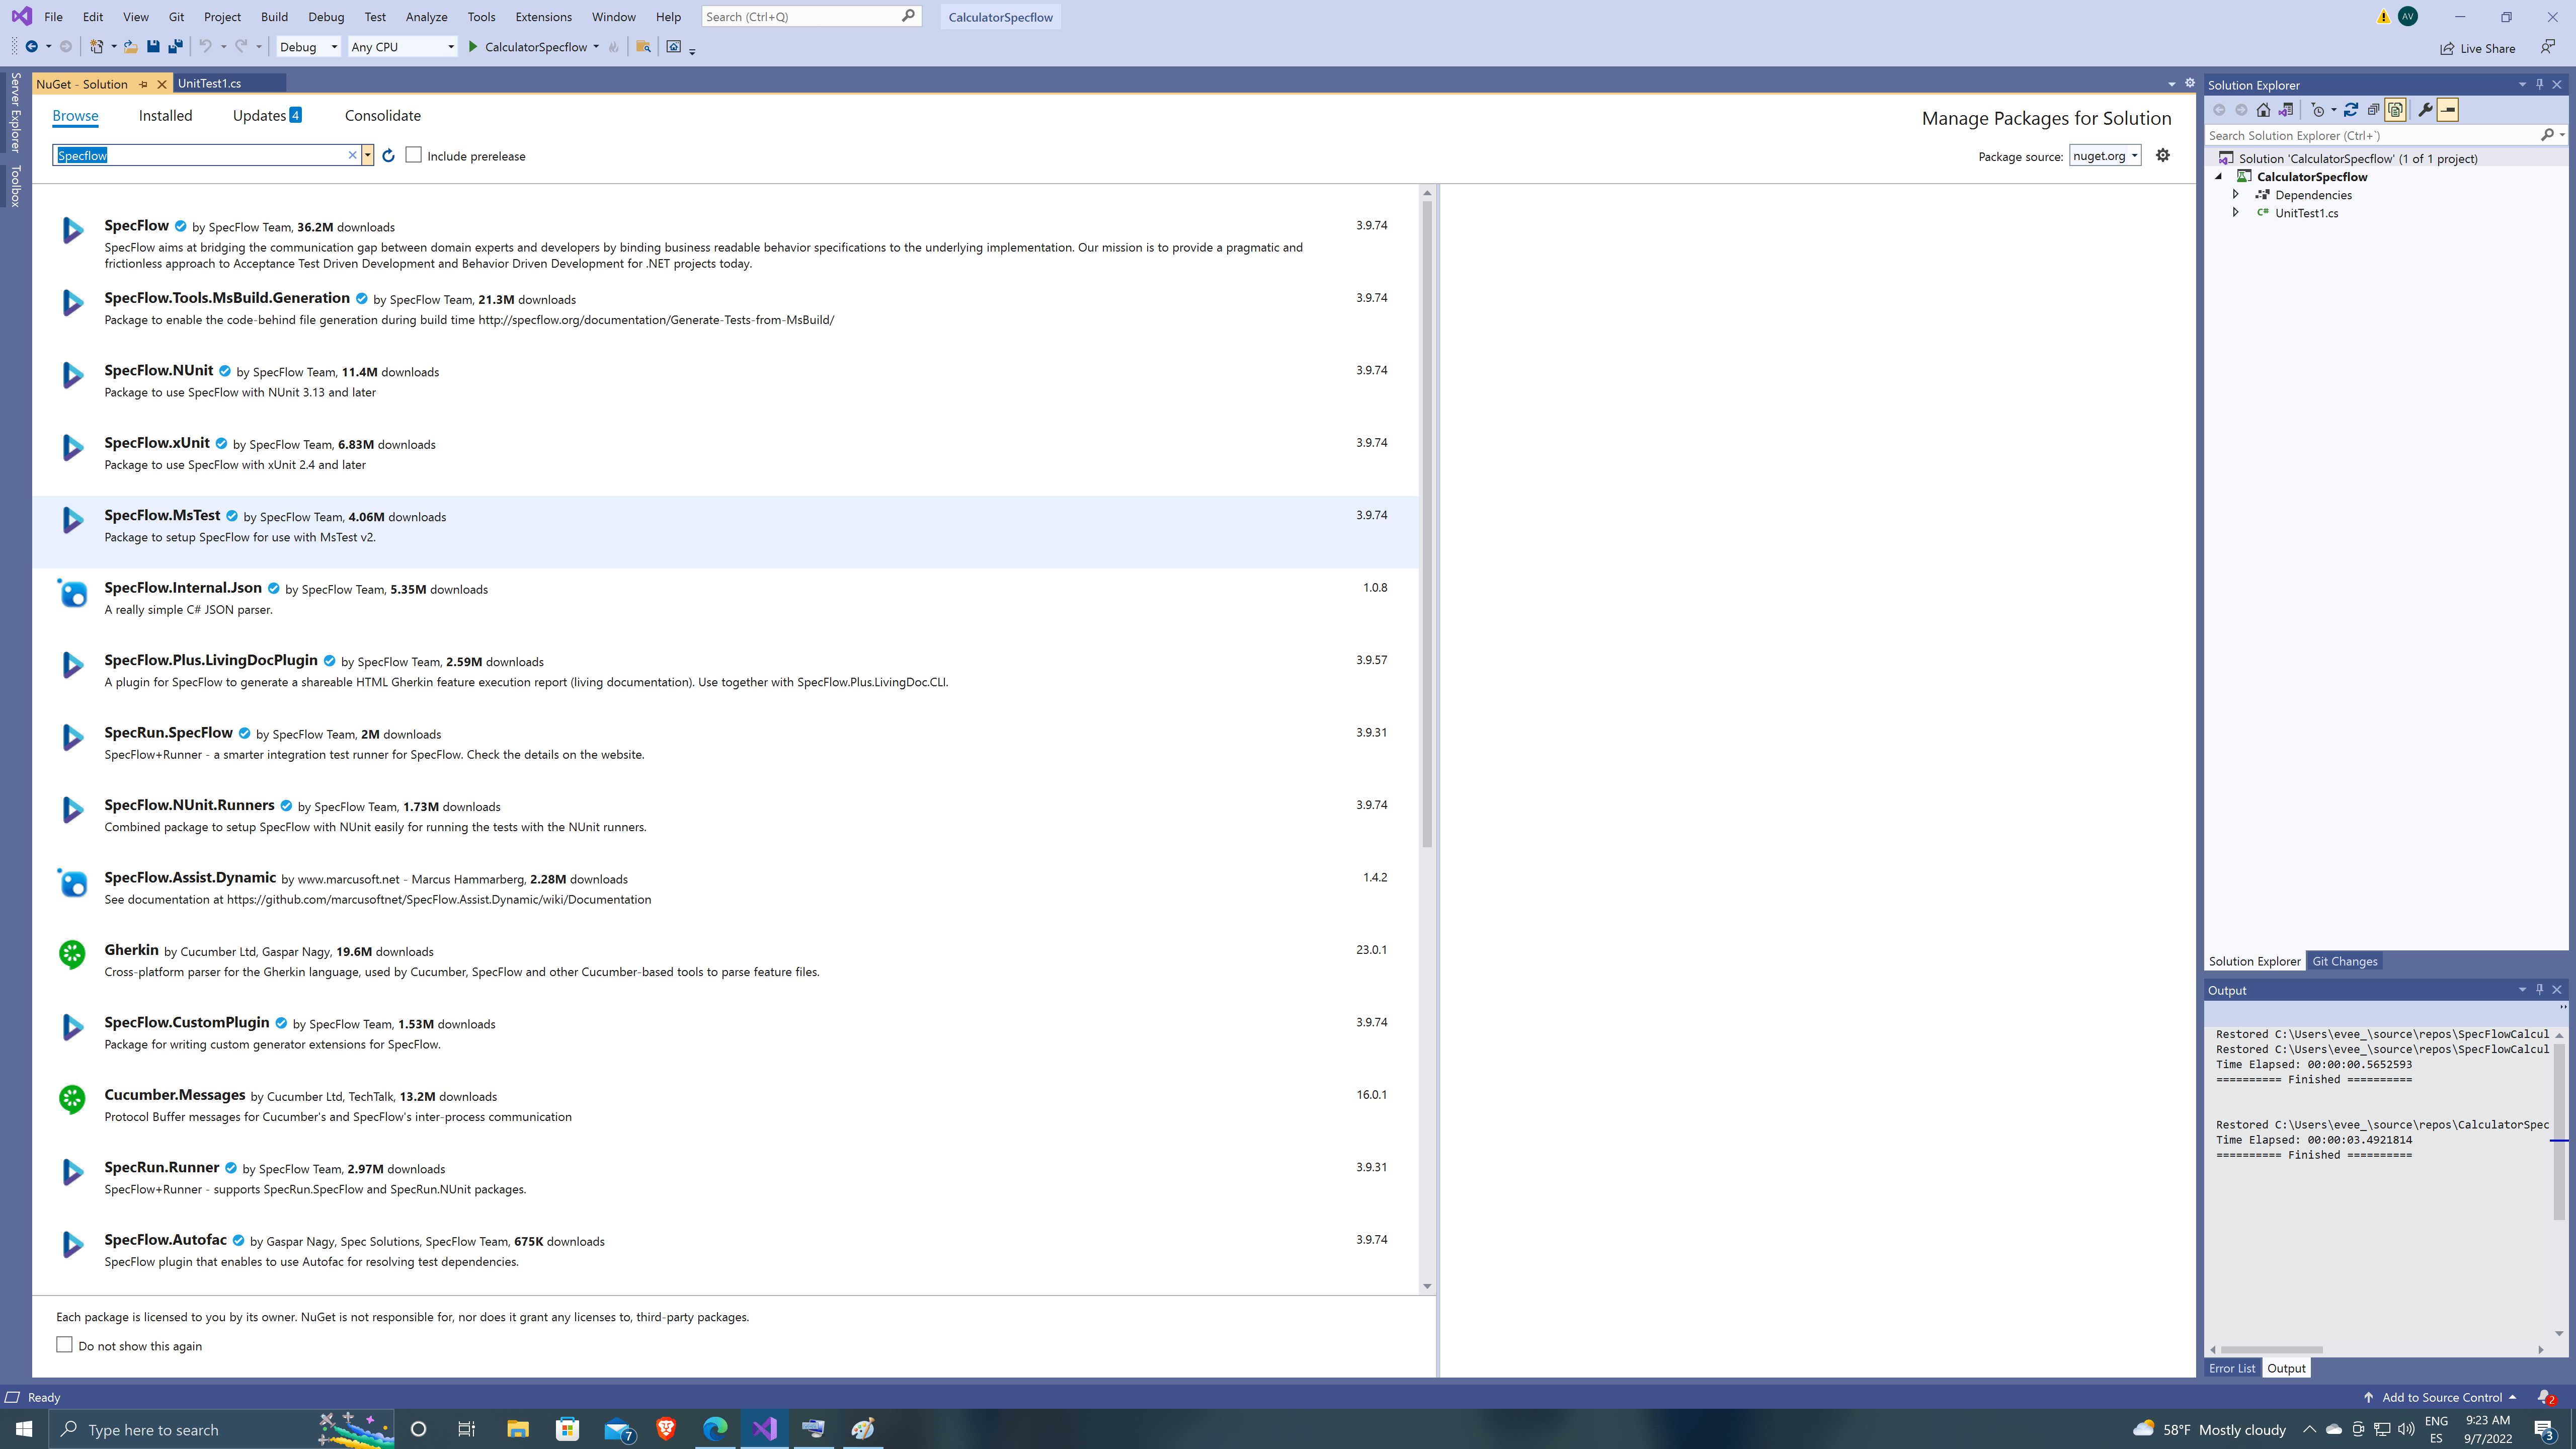
By default VS will create a UnitTest1.cs, we will dispose of this class later, first let’s add Specflow to our project by going to Manage Nuget Packages on our solution.
Specflow has different packages, for this solution we are going to use Specflow.MsTest as is the standard Specflow version to use on MsTest Projects, also we are going to install Specflow.Plus.LivingDocPlugin, to add some HTML results to our tests!
Enlarge

SpecflowMs Installing WinAppDriver and Setting up
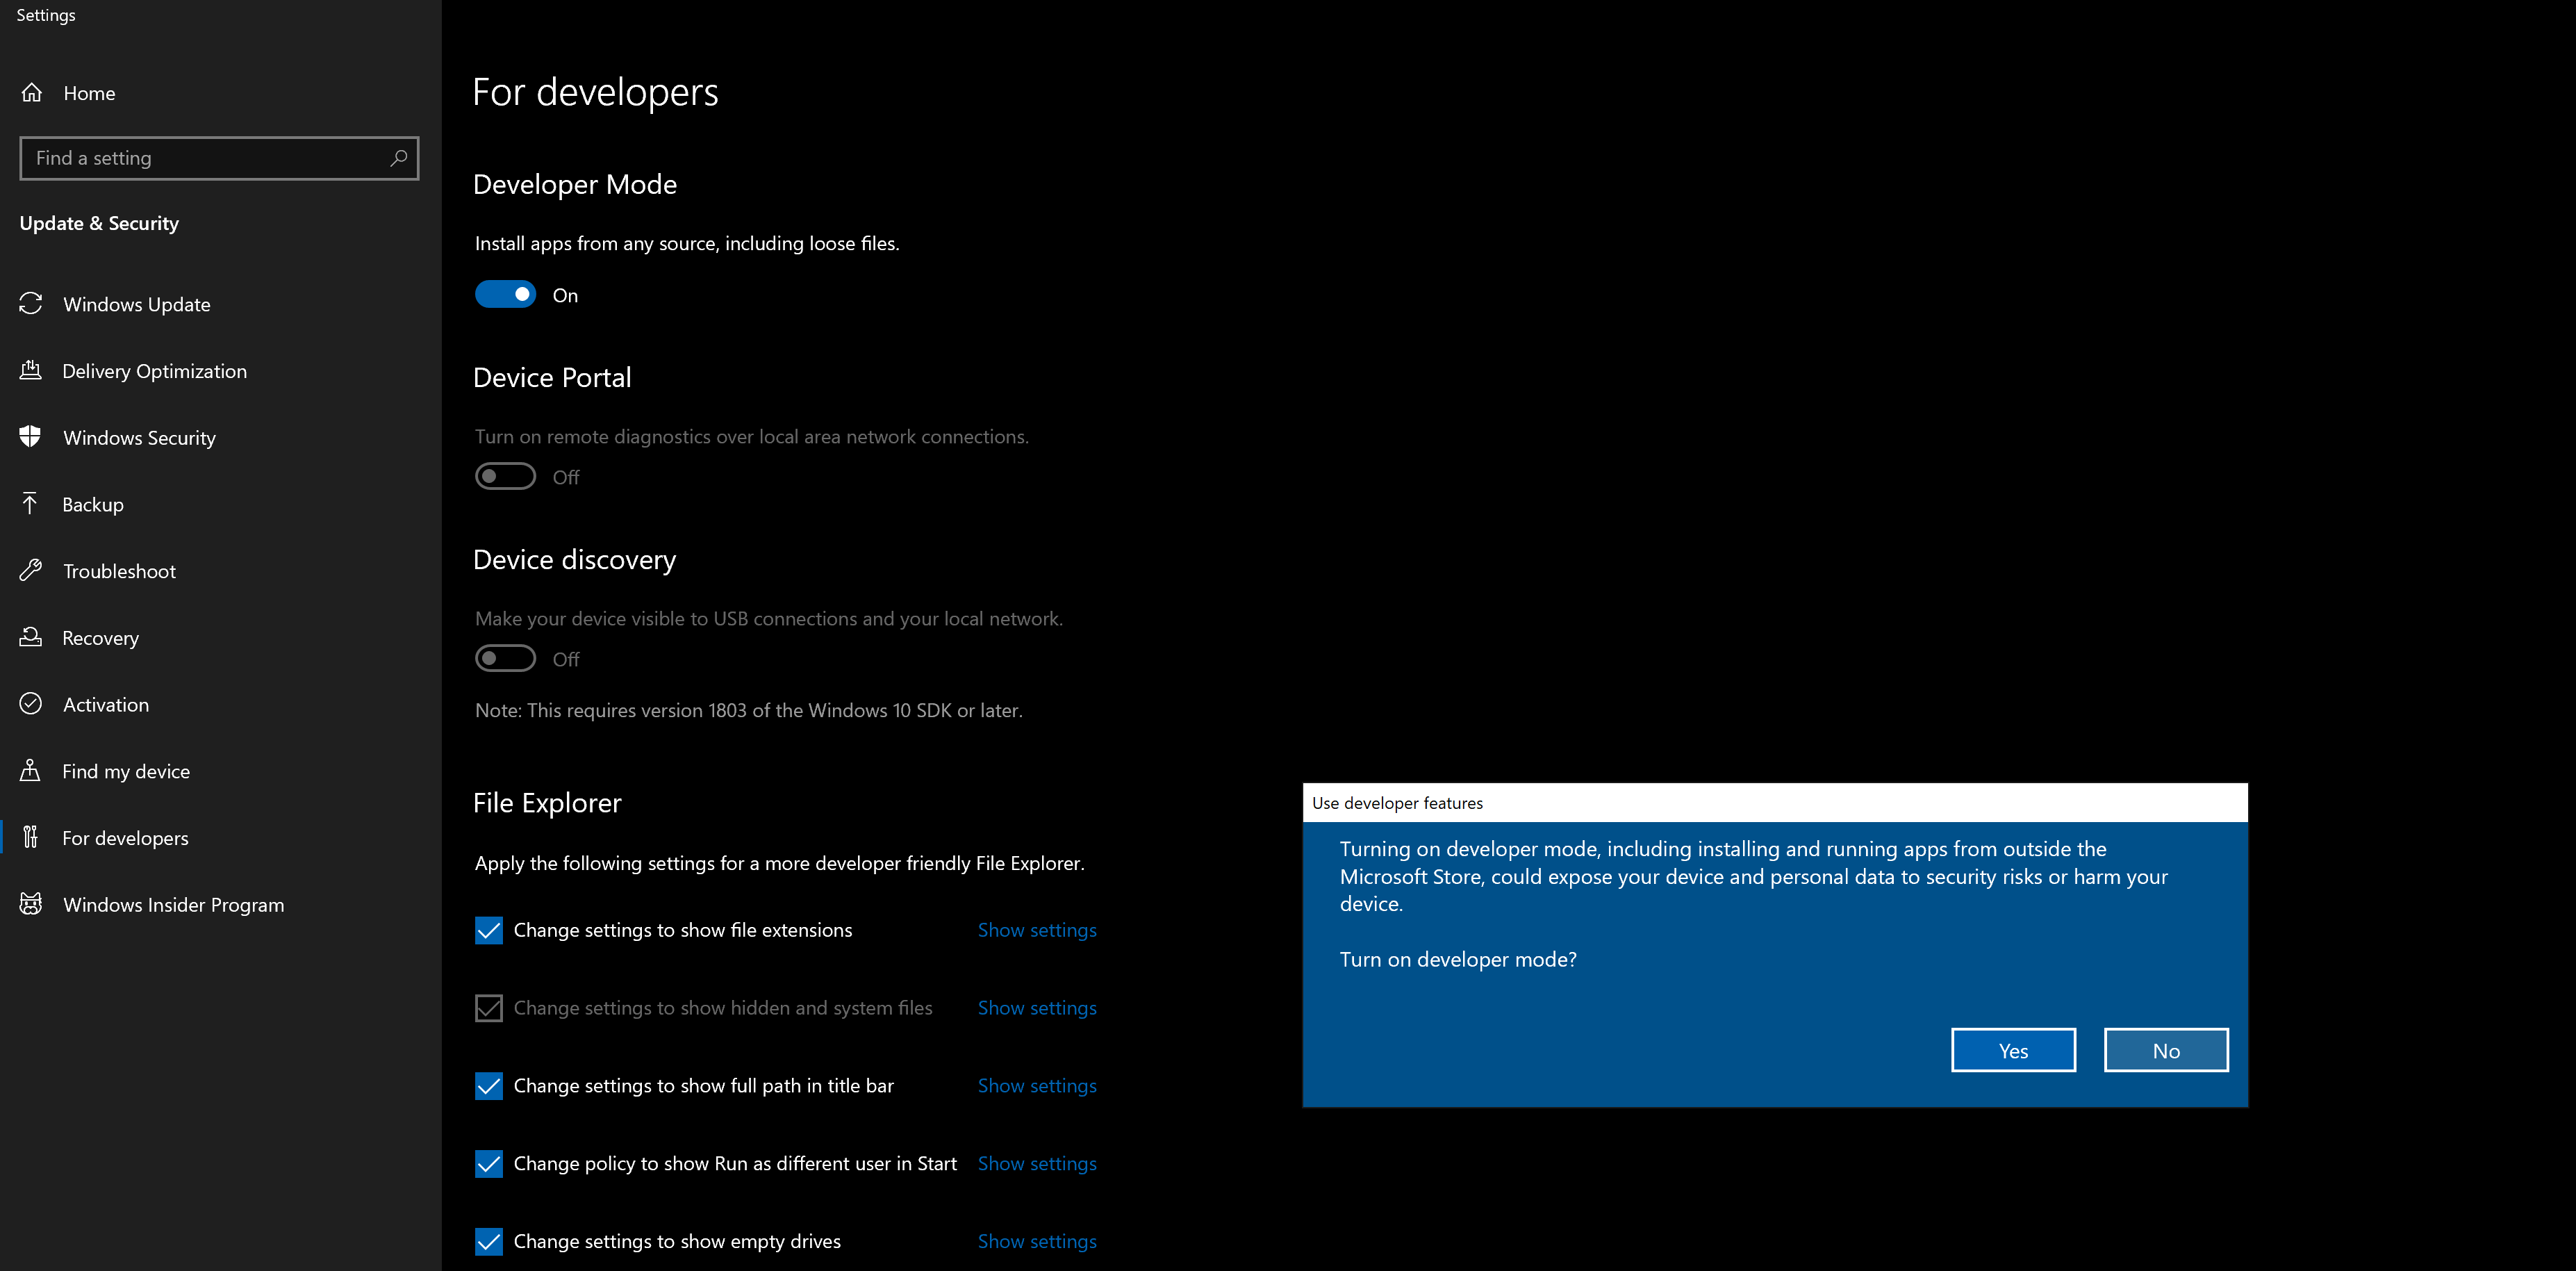
Before continuing we need to install WinAppDriver from GitHub – microsoft/WinAppDriver: Windows Application Driver, to be able to open and interact with the Desktop app, we use WinAppDriver, this app will create a session between the app and our tests.
Please be sure to enable Developer Mode in Windows to run WinAppDriver.
Enlarge

developerMoDE Let’s create our first class that will contain the basic Setup to open the app and create the WinAppDriver session.
To be able to use WinAppDriver classes and methods we need to add to our project more Nuget packages, in this case, Appium.WebDriver.
Using AppiumOptions we can add capabilities, like “app”, this one can get whether the path location to the app or its specific ID, for default Windows apps, it’s better to use this ID, by going to PowerShell and typing “get-StartApps” and locating the Calculator app to obtain it.
Additionally of just creating the session, we are going to add two more methods, one to validate if WinAppDriver Process is already running and the other to Start WinAppDriver else, these methods are useful to avoid having to run WinAppDriver manually.
We can avoid opening the cmd with WinAppDriver logs, but I recommend it to validate the commands and interactions received by WinAppDriver.
Automation Framework
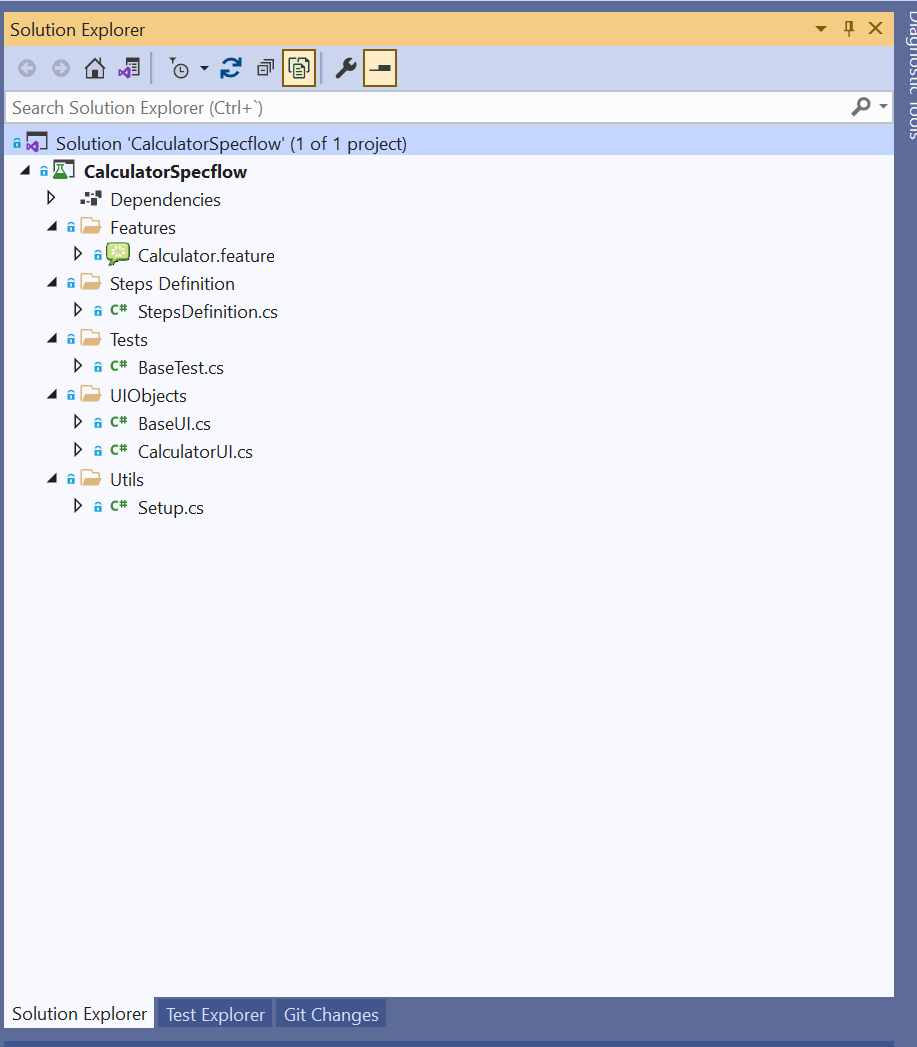
Create the Class “Setup“ under the folder “Utils“.
Let’s create our first feature file, which will contain all the steps need it to make a simple addition of two numbers, this feature file is made using Gherkin, which uses Natural Language. Keep in mind that steps in feature files have to be really simple and easy to understand by every person in the team.
Create the Feature file “Calculator.feature“ under the folder “Features“.
Once we have our Feature file, we have to bind these steps to our code, we are going to create a new class that will contain Methods bound to the steps in the feature.
To get the elements of the calculator, we need to use “inspect.exe” available inside Windows SDK Kit, located at “C:\Program Files (x86)\Windows Kits\10\bin\10.0.22621.0\x86\inspect.exe”.
Open Calculator, and then execute “inspect.exe“, hovering on the element you want to know the locator.
We have different types of locators, but it is always recommended for integrity and speed to use “AutomationID“, as it is unique, if this ID is not defined, we can use “ClassName“, “Name” or get the “XPath” of the element verifying the DOM of the application. It is also possible to use multiple locators.
To have a good handle of WinAppDriver Process, WinAppDriver CMD, and the Calculator App, we need to add two basic methods, one is “BeforeScenario” which contains the creation of WinAppDriver Process, CMD, and the opening of the Calculator.
Next, we have “AfterScenario” which contains the Teardown of all these objects, we can also add other actions that we want always to run when a test finishes, like the creation of evidence, upload of results, and so on.
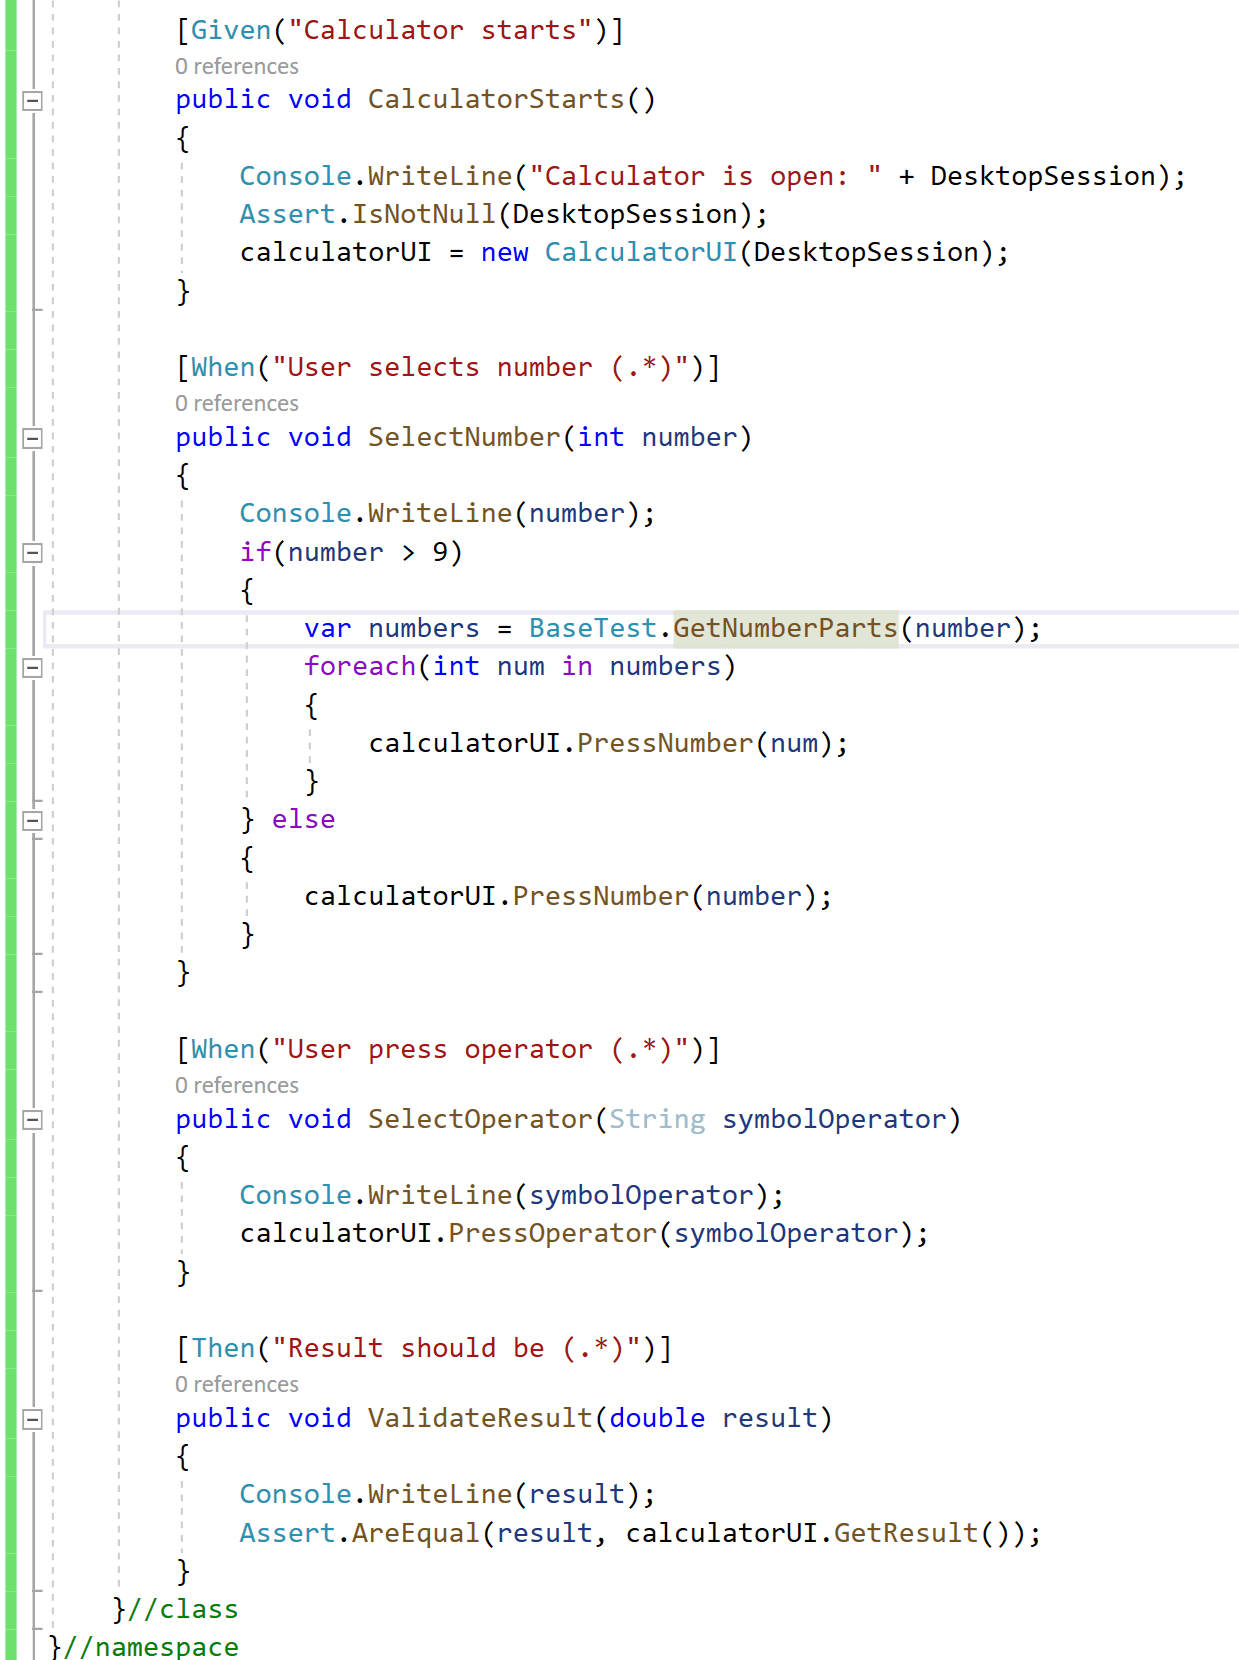
Create the Class “StepsDefinition“ under the folder “Steps Definition“.
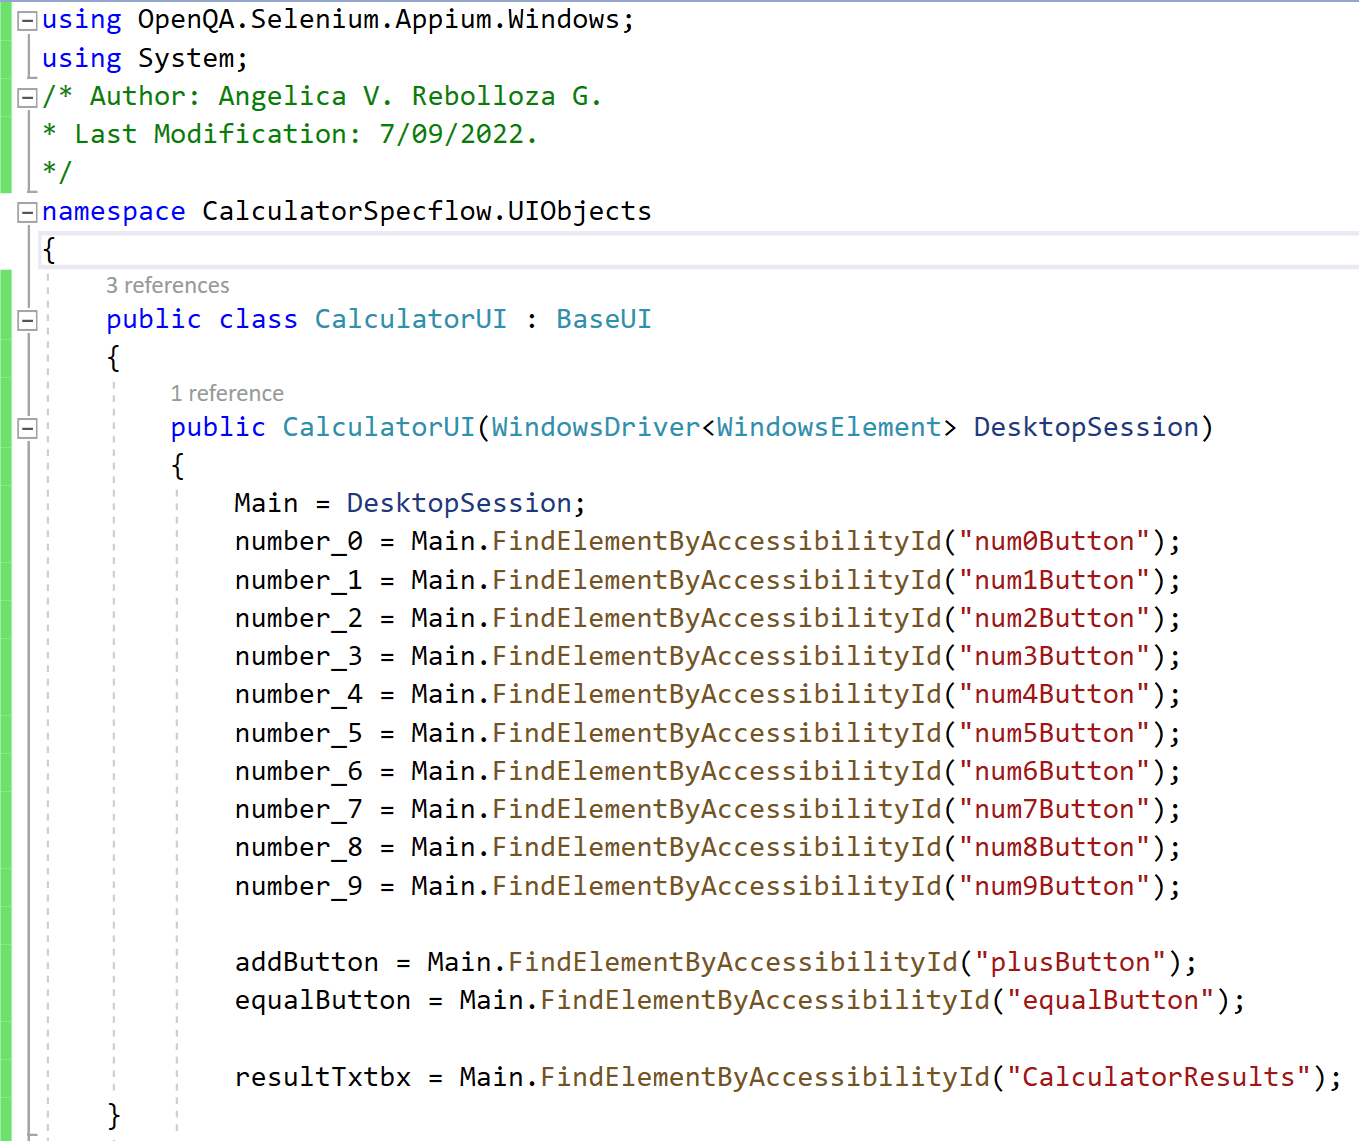
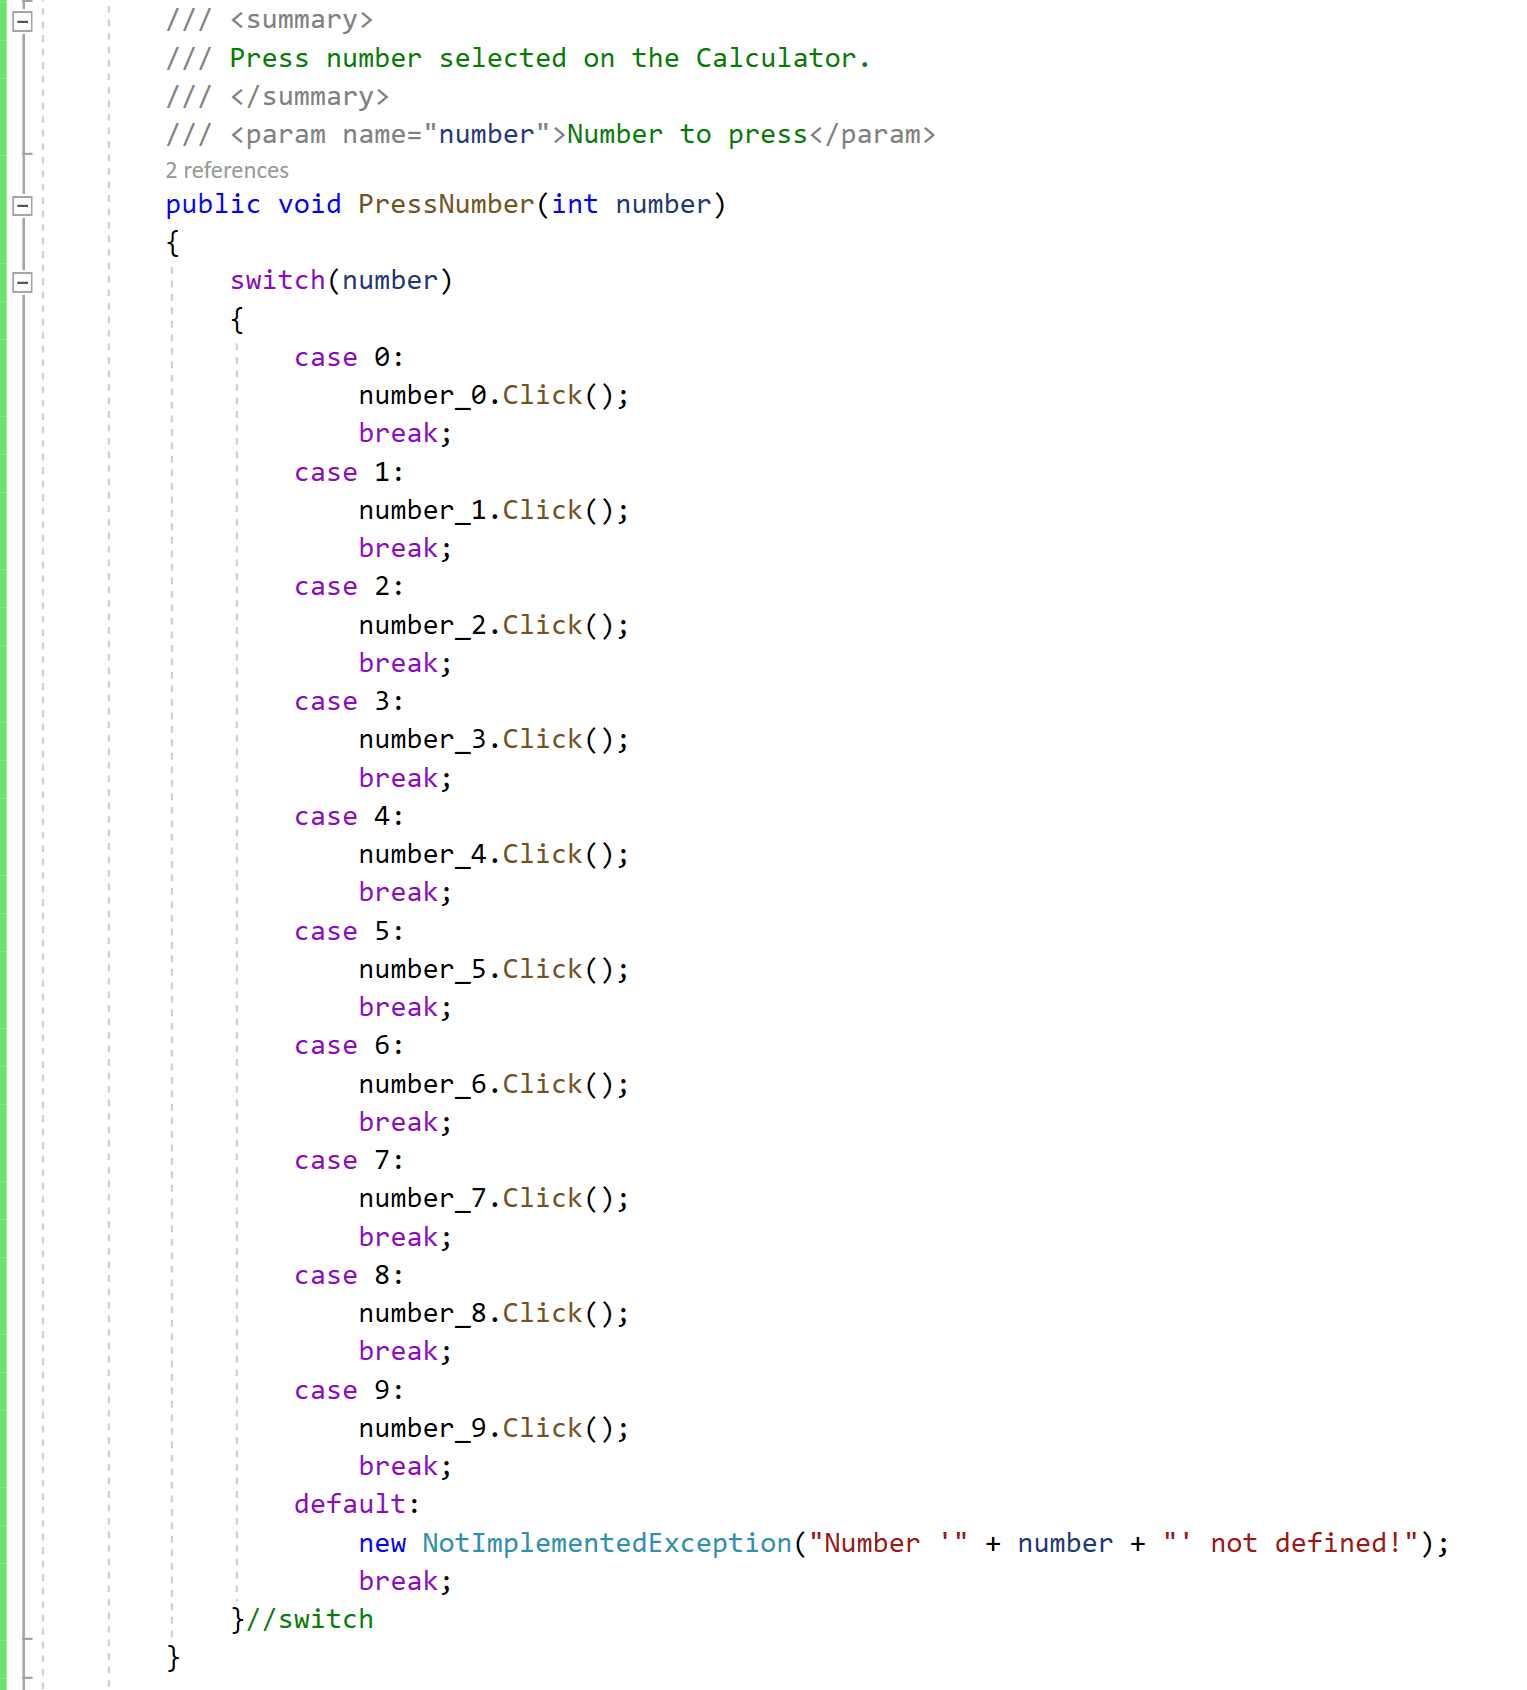
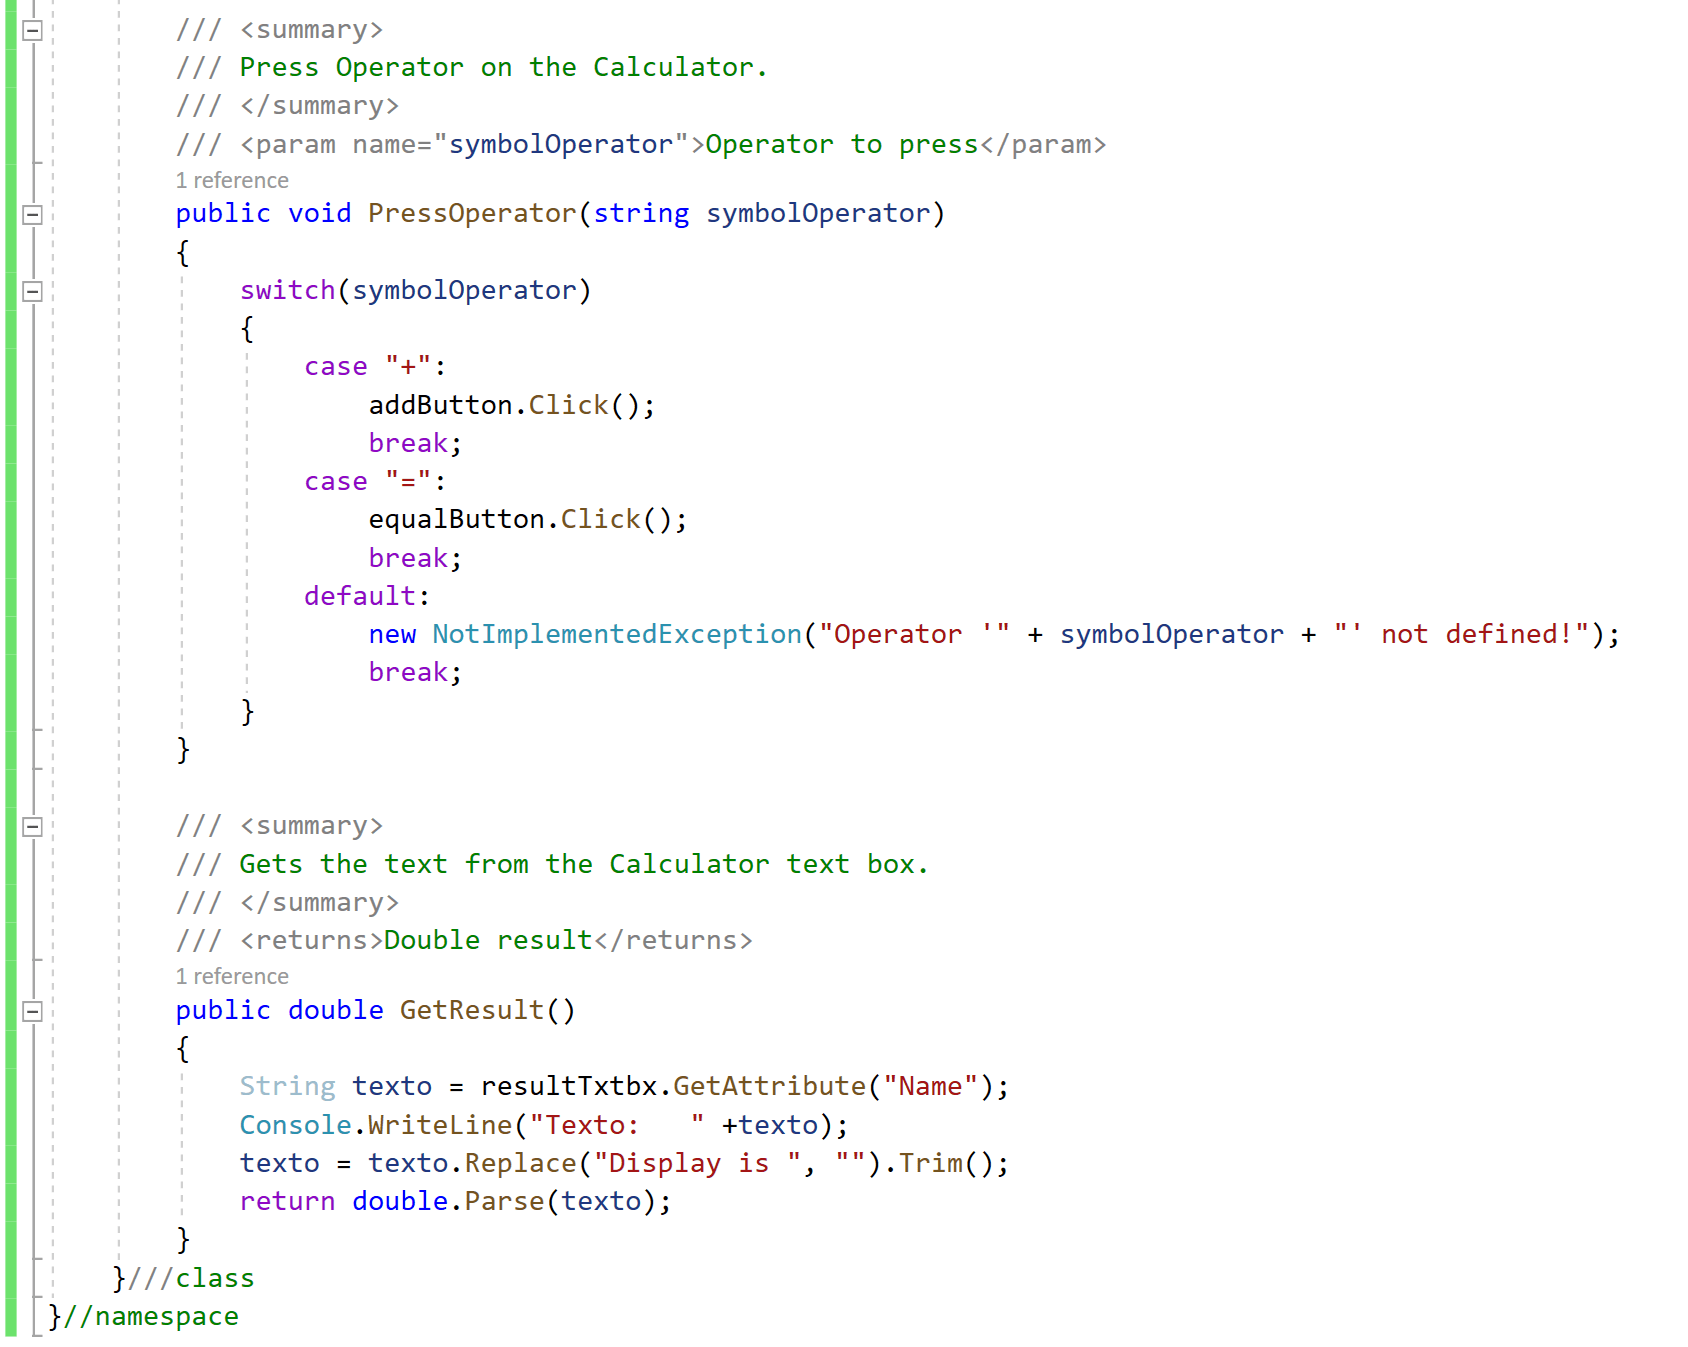
“CalculatorUI“ is a class that will contain all the actions on the UI, like pressing buttons.
Let’s take a look at the “CalculatorUI” class under the folder “UIObjects“.
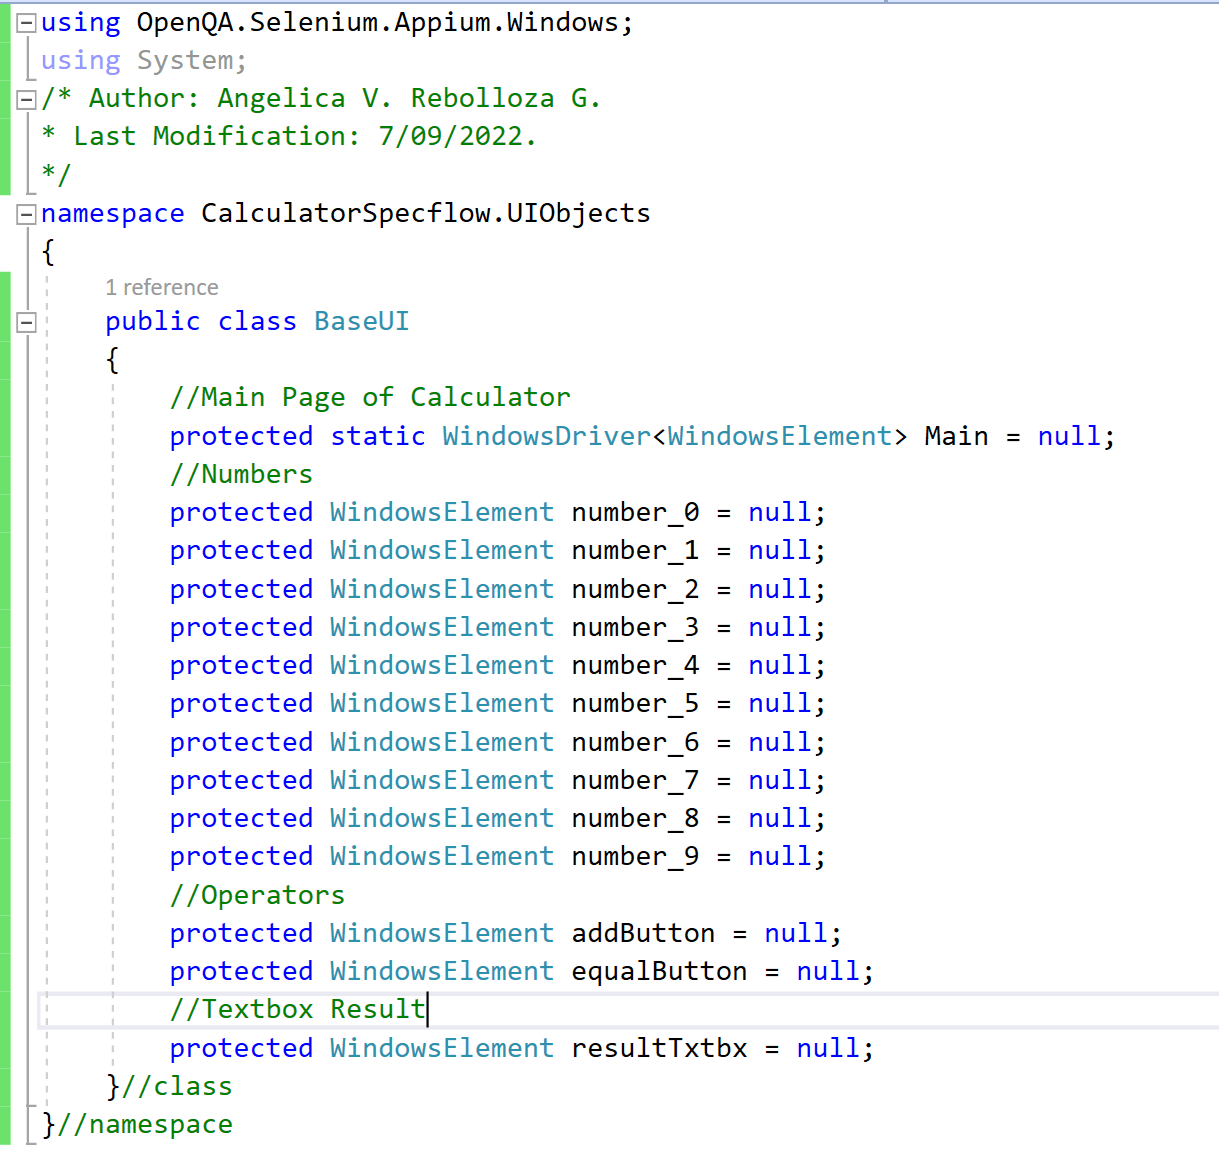
“CalculatorUI“ extends from “BaseUI“, under the same folder “UIObjects“, which contains the definition of all elements used on the Calculator Main Page, and these are initialized in “CalculatorUI“.
If we review “BaseUI“ it contains the definition of all elements used by “CalculatorUI“.
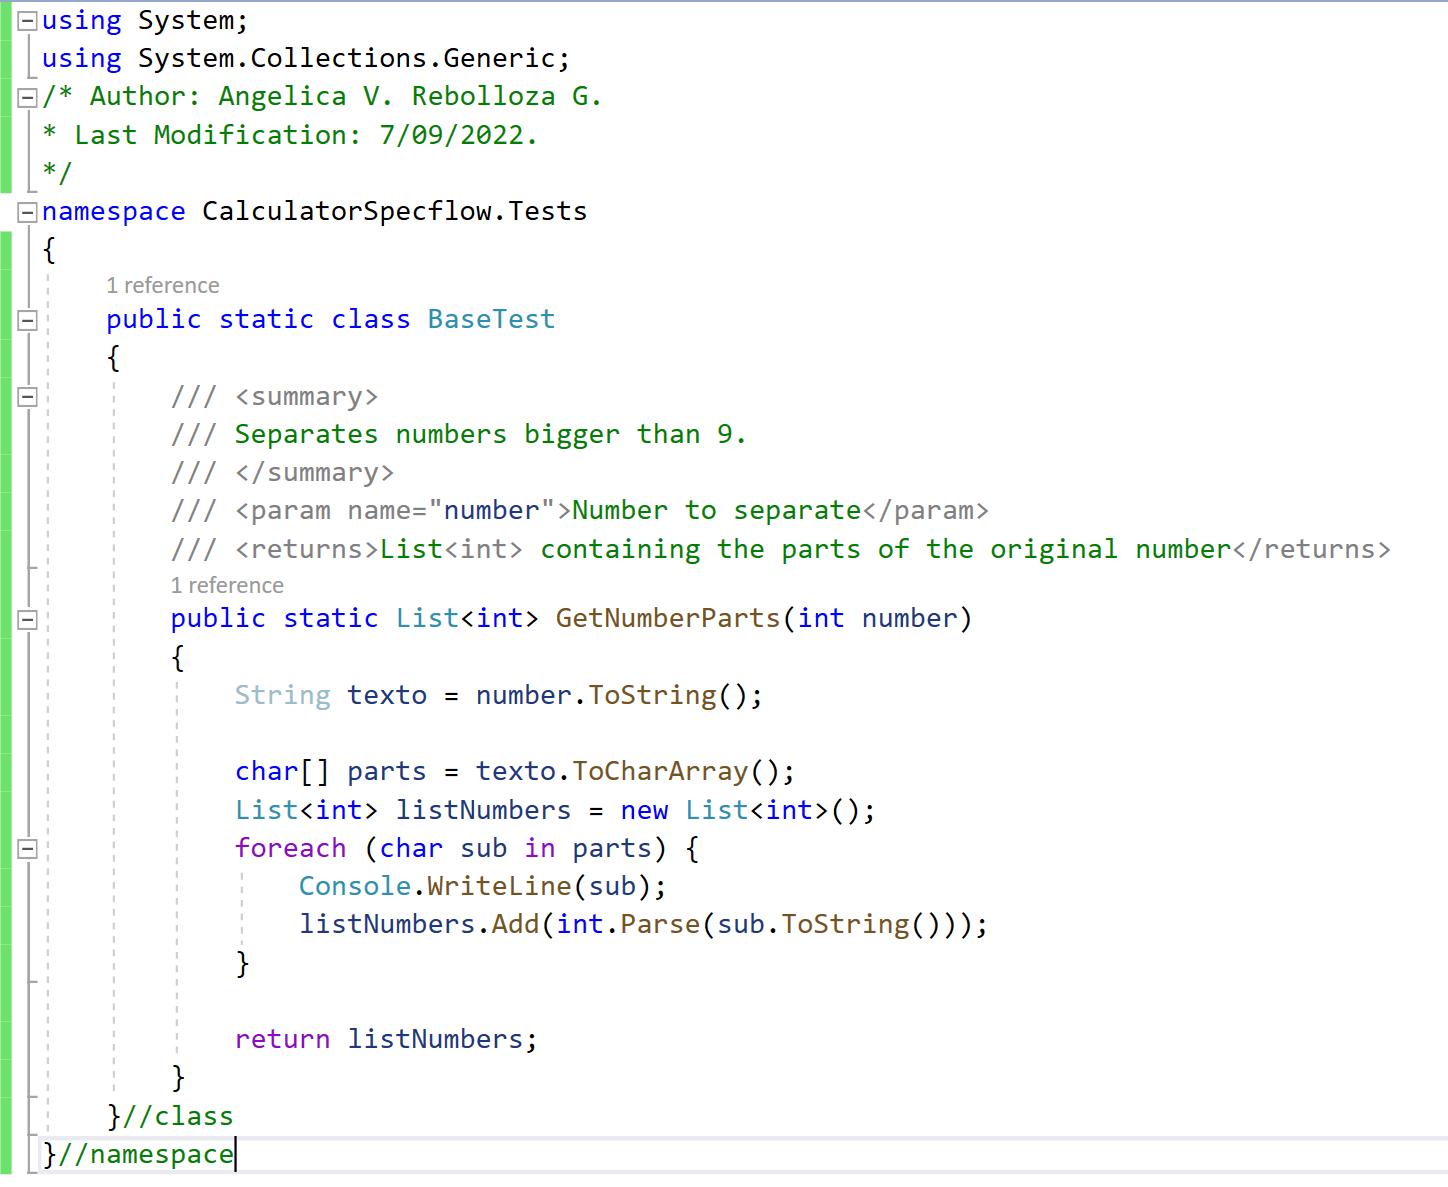
Additionally, to these classes, there is one more class called “BaseTest“, this is a static class that contains extra actions need it, like in this example, contains a special method to separate numbers bigger than 9, to be able to introduce them in the calculator.
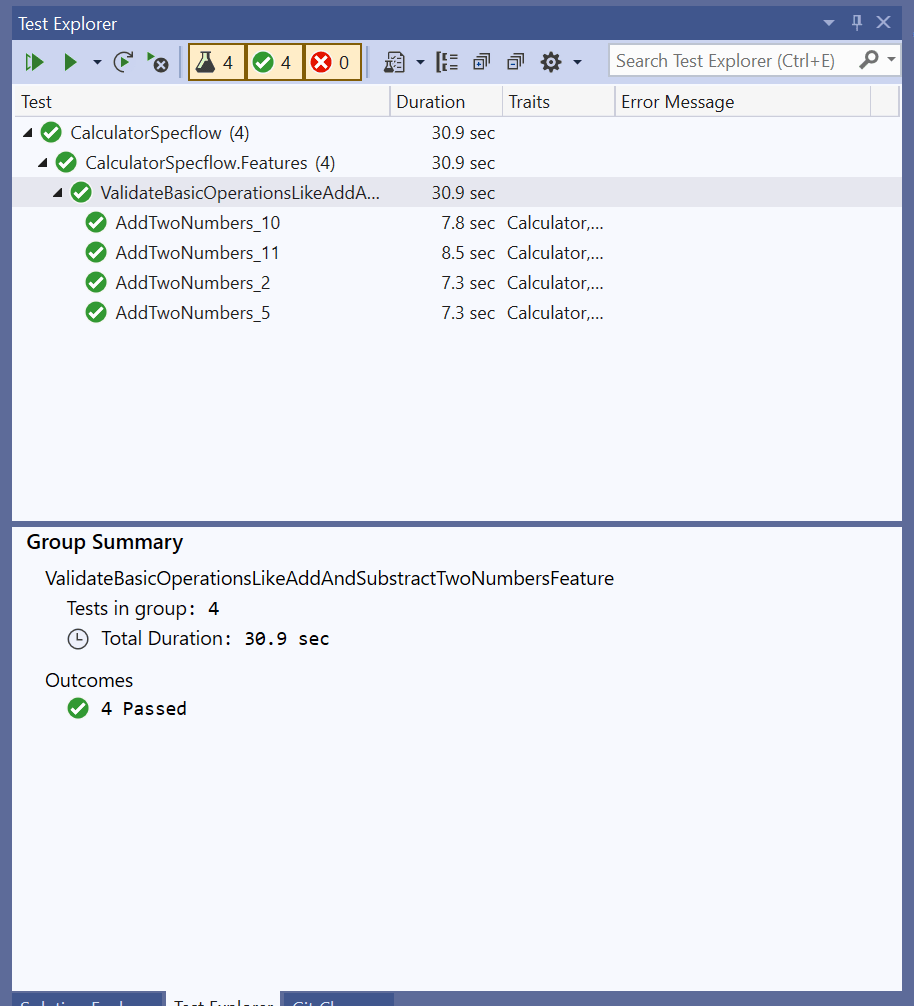
Finally, we can run the test, using “Test Explorer” from Tools in VS.
If you want to download the Project, it is available at Github.
Link of interest:
Automating with Appium – Selenium and TestNG
The Agile Team Approach
The Scrum Team Size
Speed Up Android Testing with TestProject AgentAny help is welcome to help us keeping this effort alive!BTC (Bech32): bc1qx6f8nczr5ram6d57svlnsfmk5mhu6lsr9q7mxwLTC: LdiiMfiJvqrXDw1xPMqDptXGFEkyADZzVVDOGE: DKehWtHnmrf7JTRWpEQ9LtqwqY8HdbdkbUSOL: 3f2RR9w2VwmBqjLm5DmbuUPwWfdYH7GXCbHVWhsq5sky
Angélica Viridiana Rebolloza
Computing Engineer specialized in Automation, working with different tools for Mobile and Web, using languages, tools, and platforms like JAVA, VBScript, JavaScript, C#, Appium, Protractor, UFT (QTP), Selenium, WinAppDriver, Jenkins among others.
Viridiana also has been working using practices like TDD & BDD under Cascade and Agile approaches.
Some certifications include: ISTQB Foundations Certification, SeU Selenium Certified, ITIL Foundations Certification.
No Comment
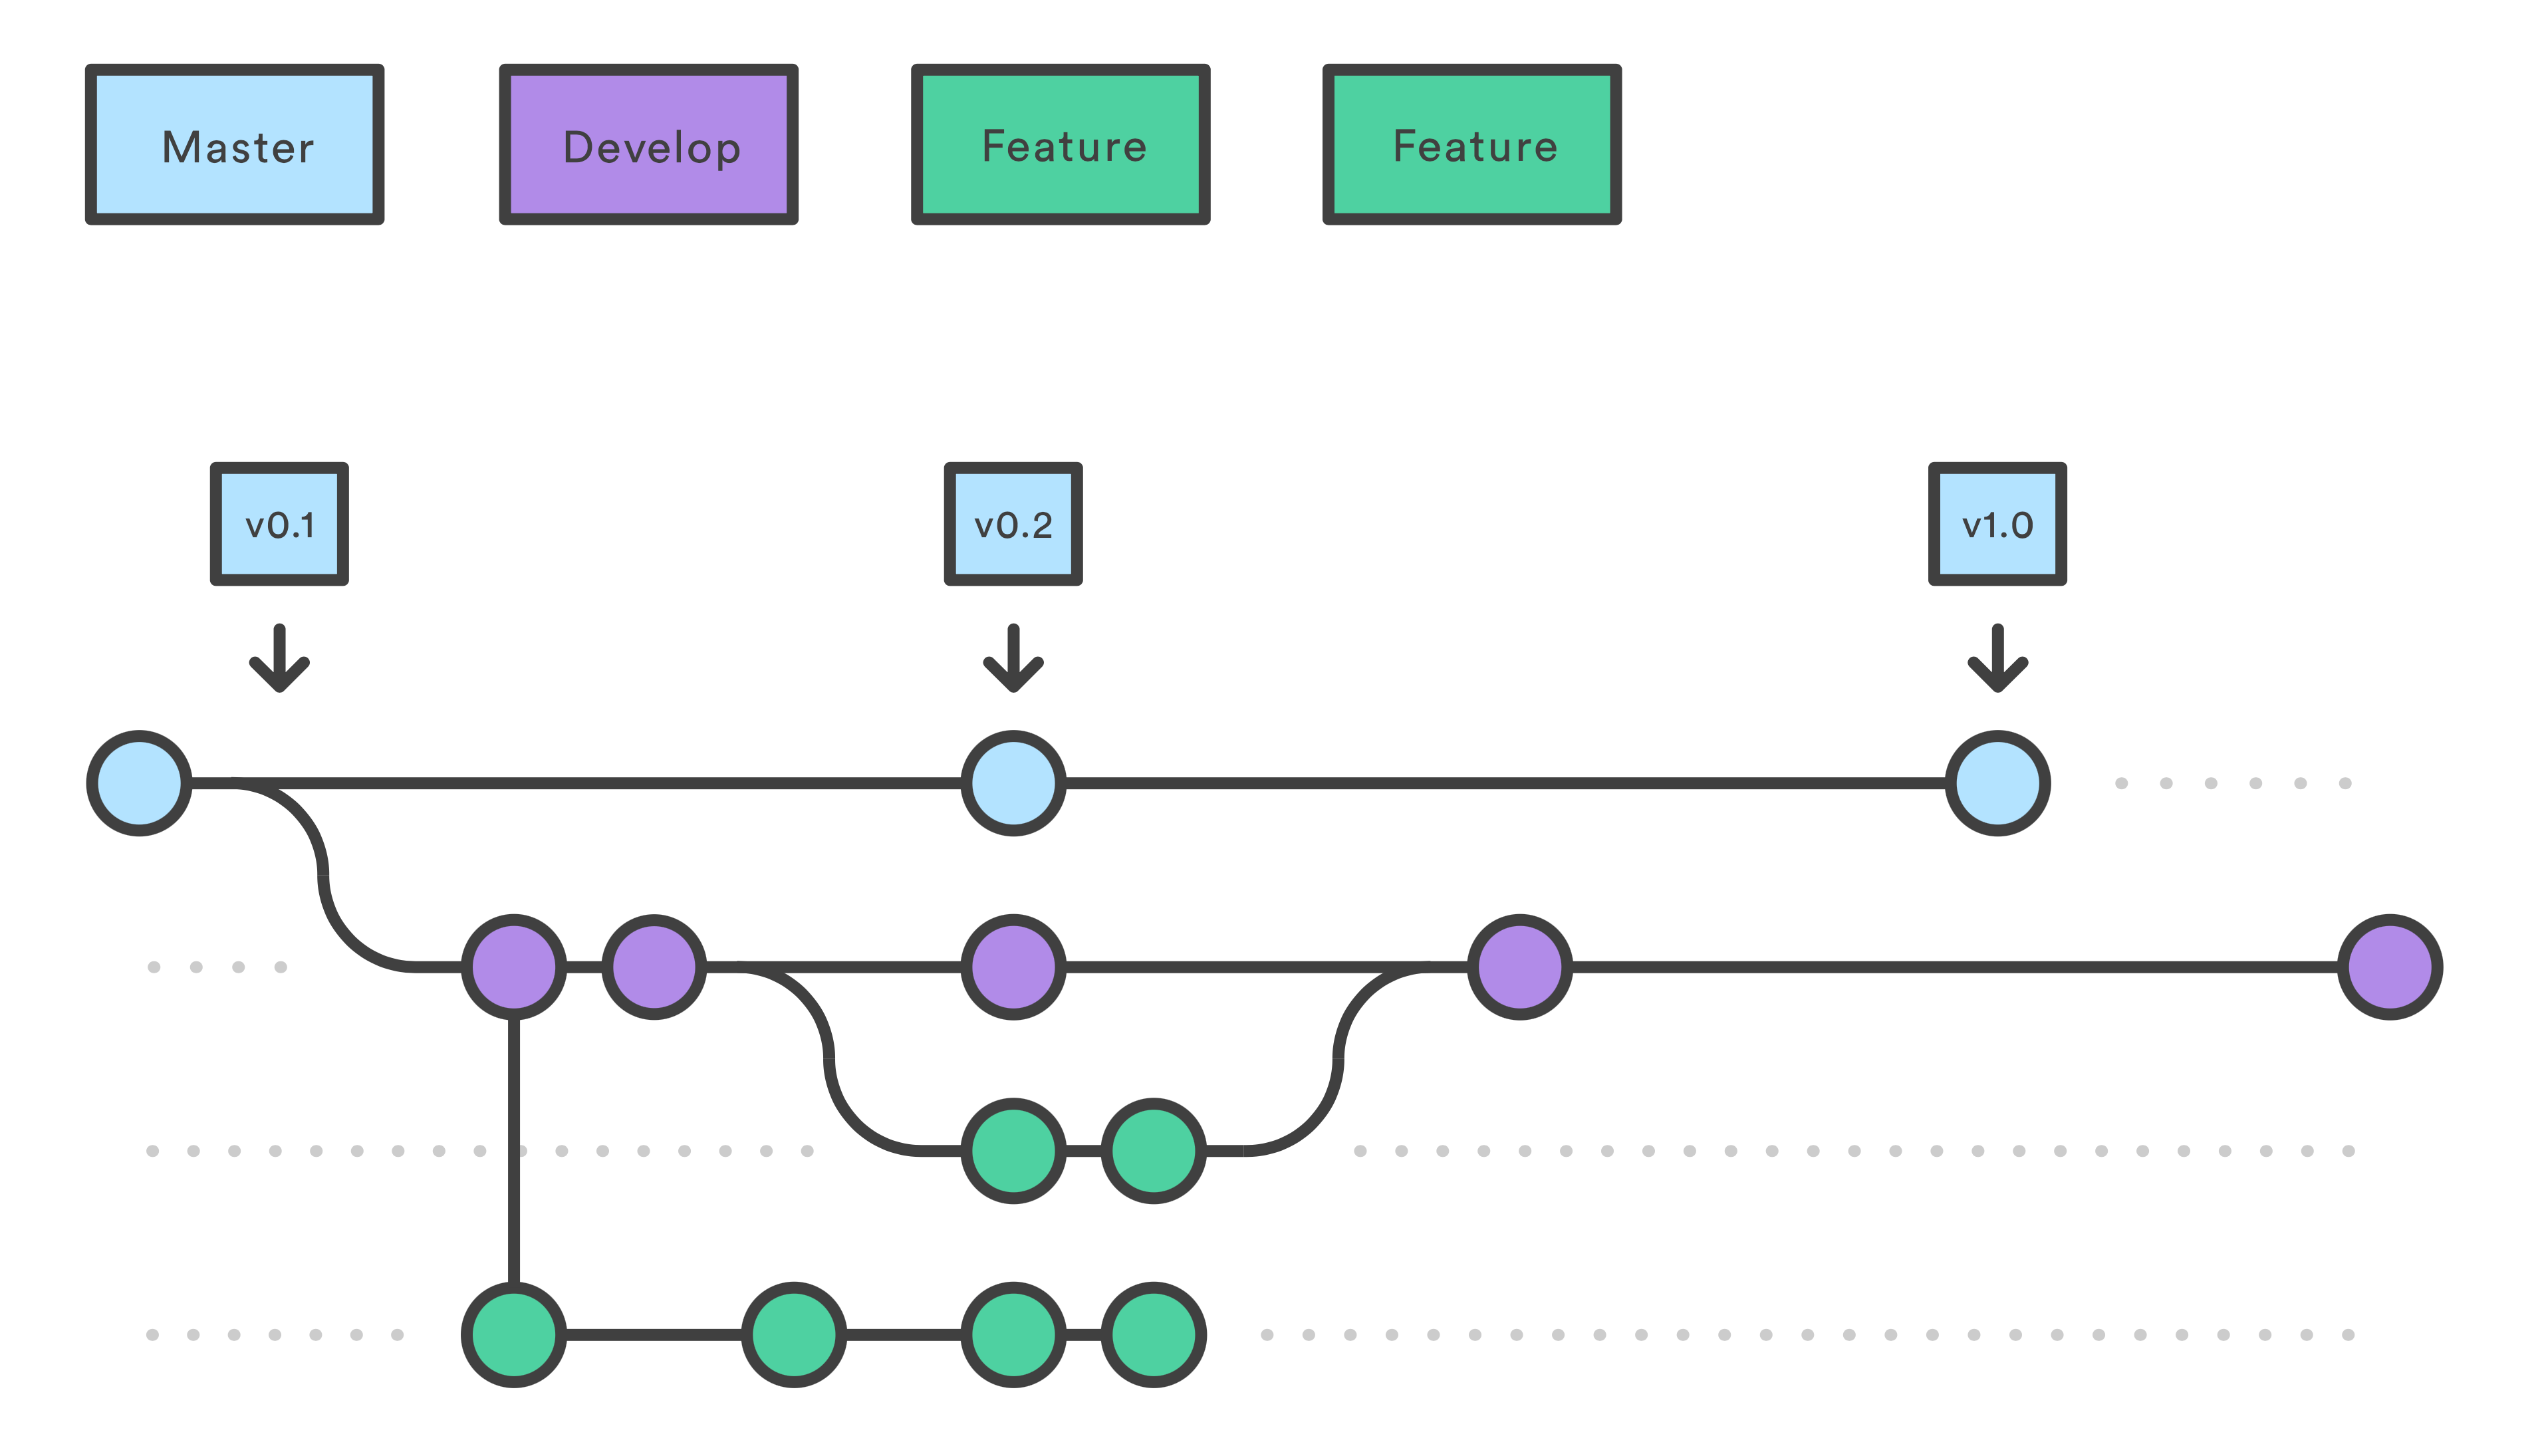
To have better control and management of our code deployments is highly recommended to upload a project to Github using the command line, in other words, have our code uploaded to a Cloud Repository like Github since is the most used cloud repository used out there, but we can also use other options like Bitbucket or an already implemented solution like Azure DevOps that integrates It’s own cloud repository but also has a connection with Github If is needed.
Github is a version control system, this helps us to manage modifications and keep them in a central repository, where a group of developers (contributors) can upload their changes, revert changes, and have to keep each version stored in branches to avoid code conflicts and assure the code integrity and stability.
It’s important to mention that our code repository is going to be stored in “Branches“, “Master Branch” is our main branch where the last stable and verified version of our code has to reside. The rest branches that we create along the way are where the changes like new functionalities, updates are going to be made for later merge them with the Master branch.
In this post, I’m going to teach you how to upload for the first time a workspace project to Github using the command line.
For later management I recommend you to install Github desktop at https://desktop.github.com
Let’s upload our React-Native mobile app called “Calculator“.
Create Repository
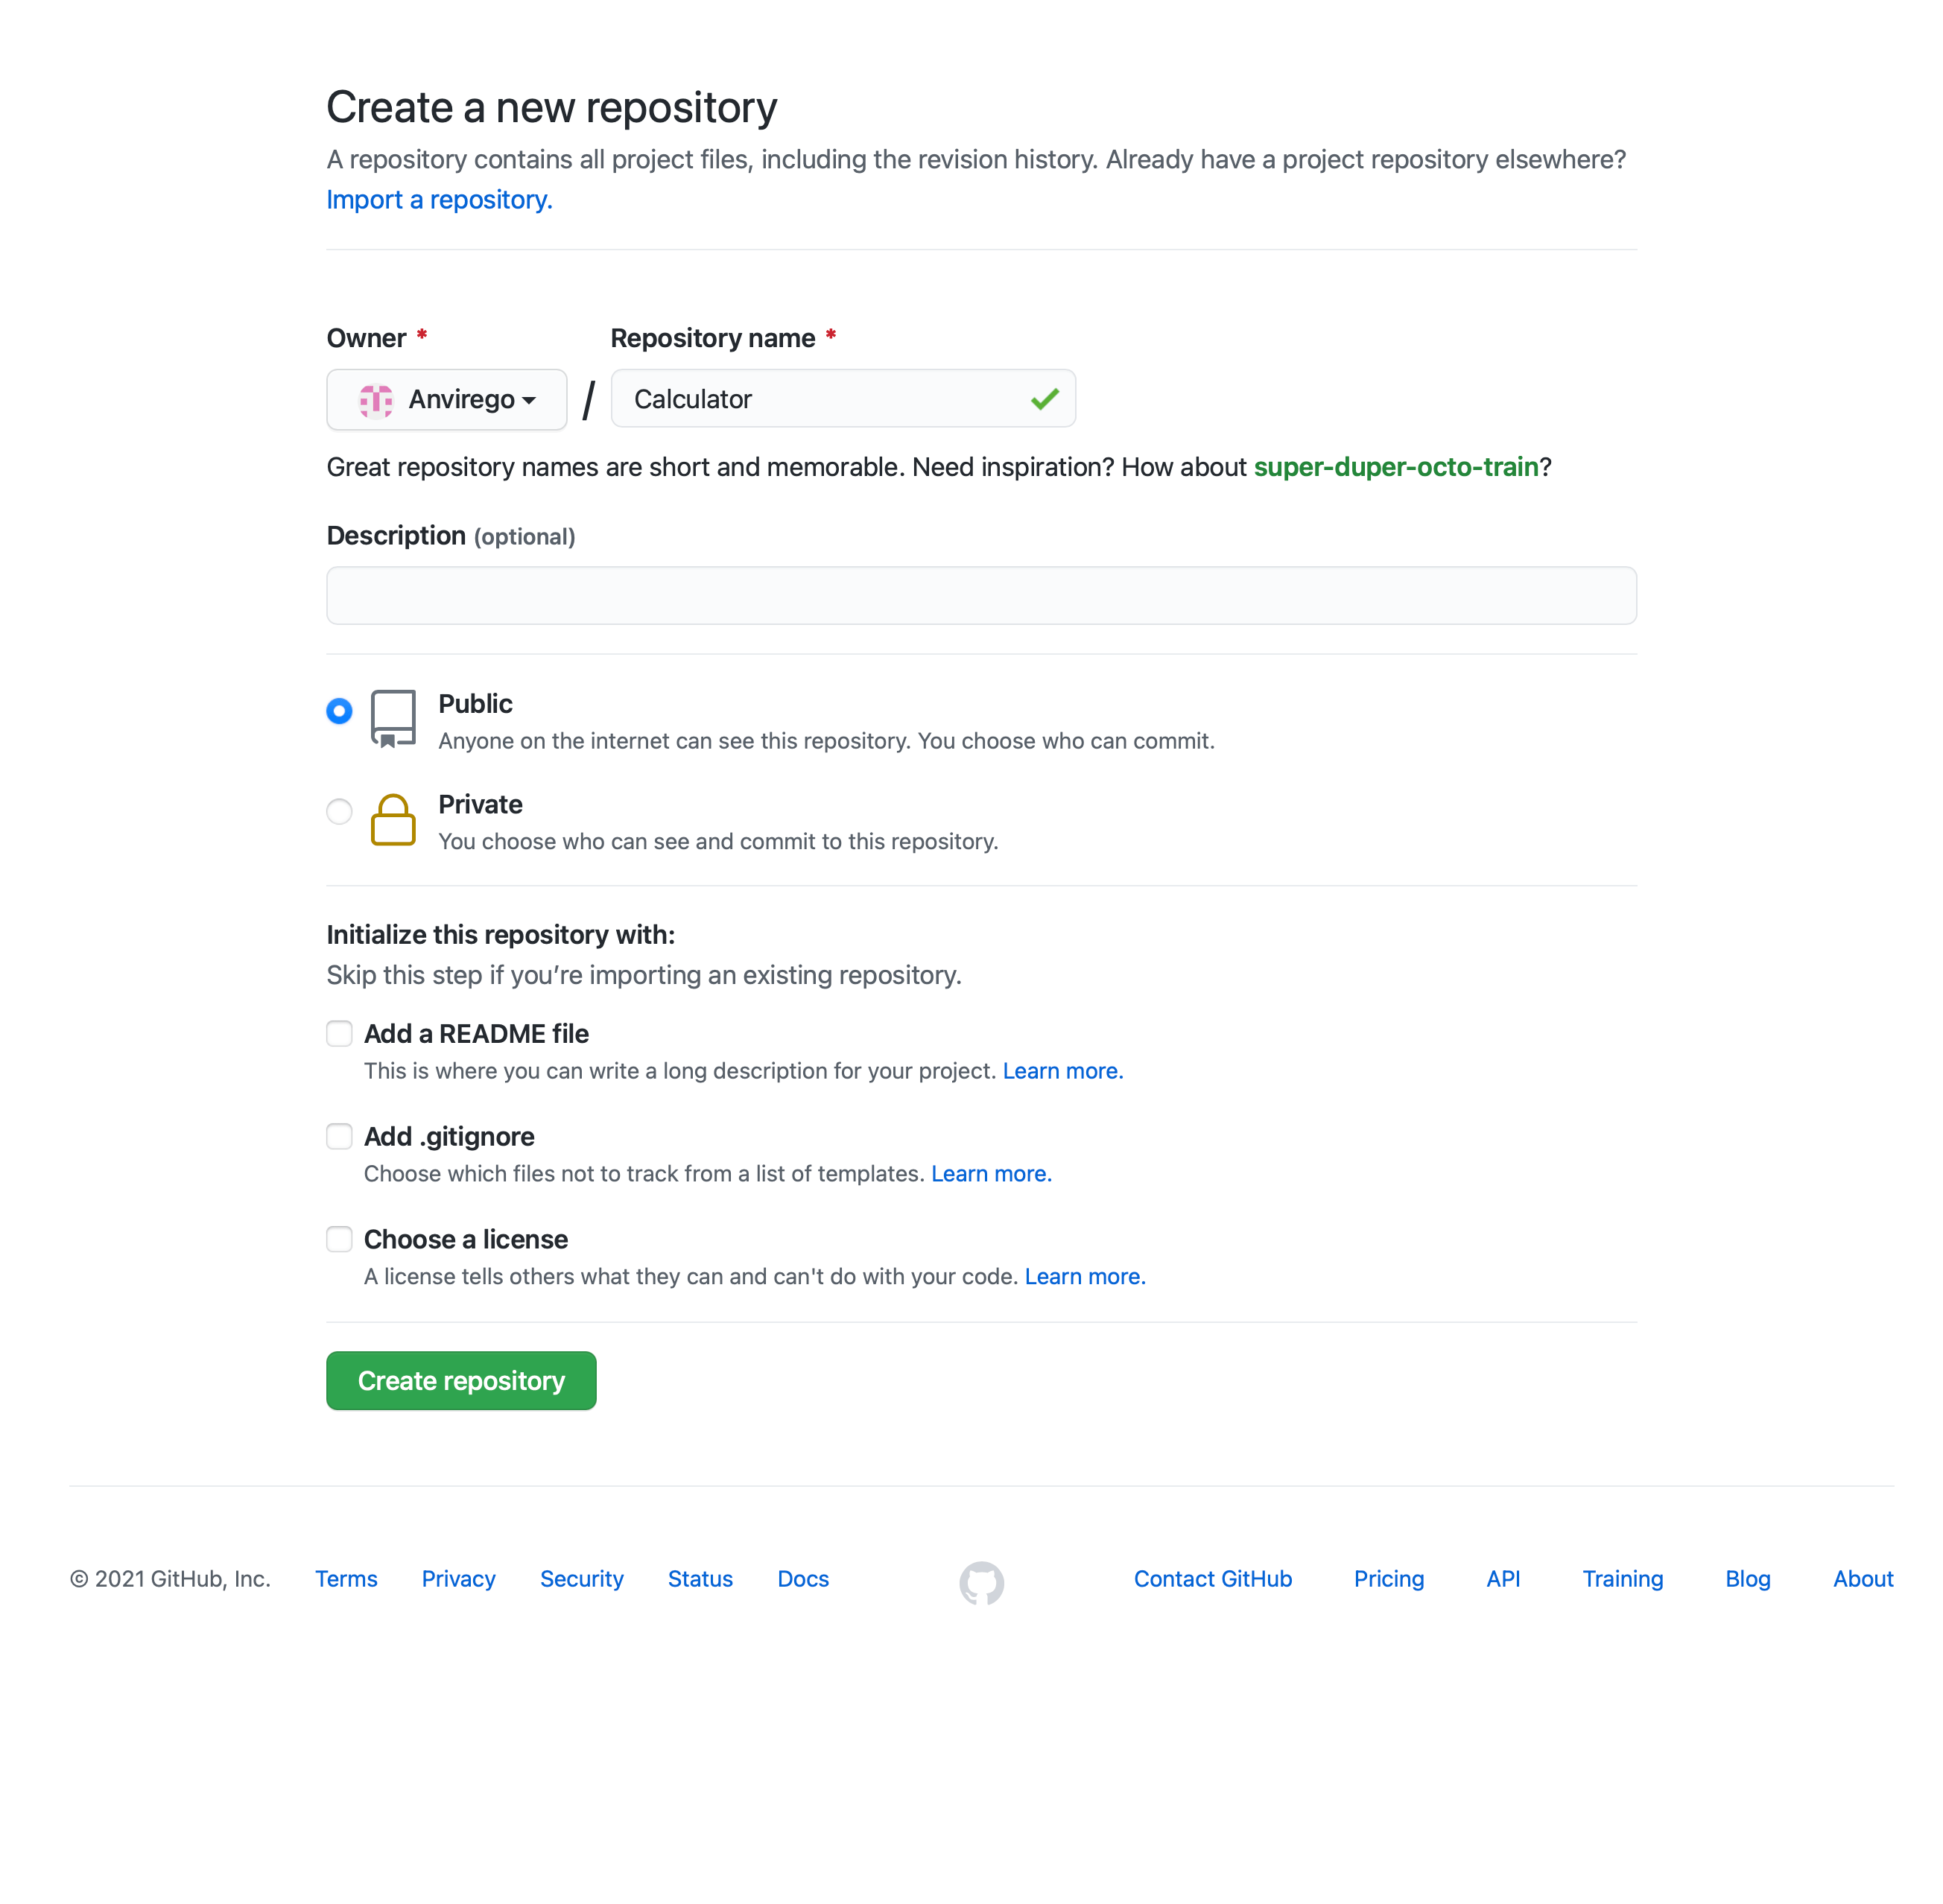
First, we need to create a new Repository, for this go to your main page in Github, and click “New“.
Insert the name of your Repository and choose whether is going to be “Private” or “Public“, for credential management is easier to have as public, if you want it to keep it as “Private” keep in mind that you will need to create an SSH Key to been able to log in with other apps like Jenkins.
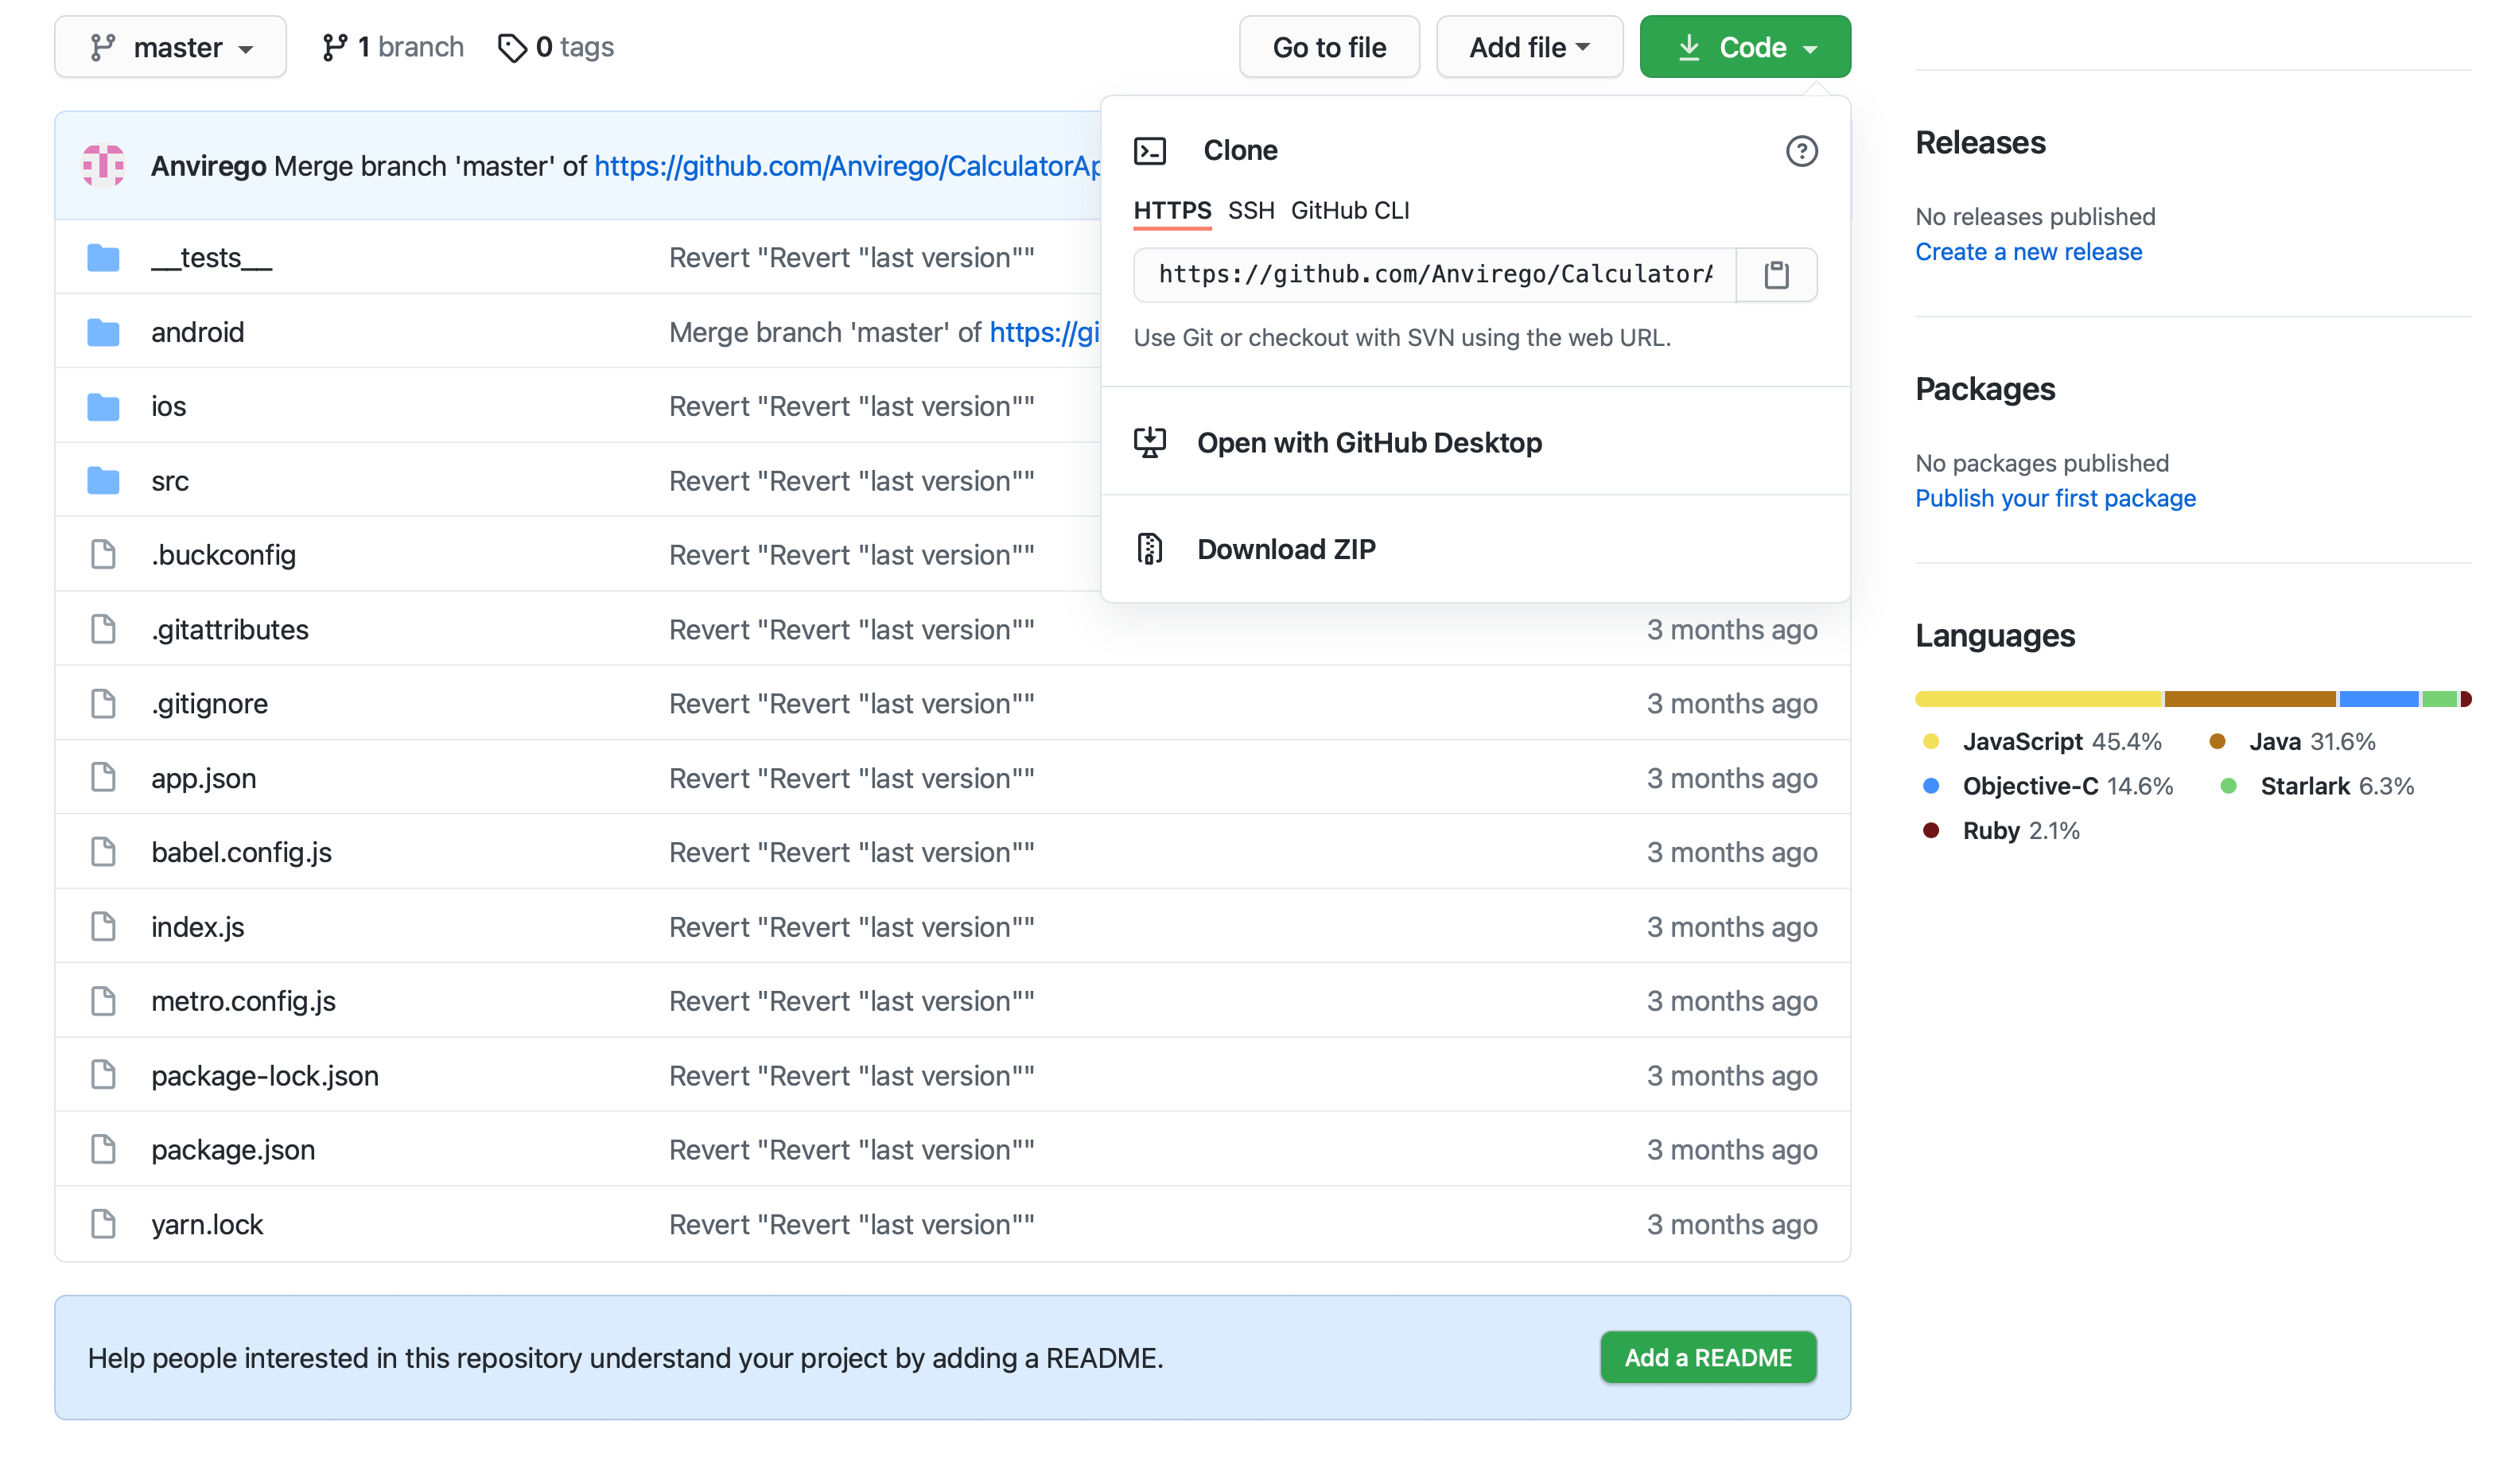
Once the repository is created go to this repo and save the URL of this repo, we’re going to need it later.
Command Line
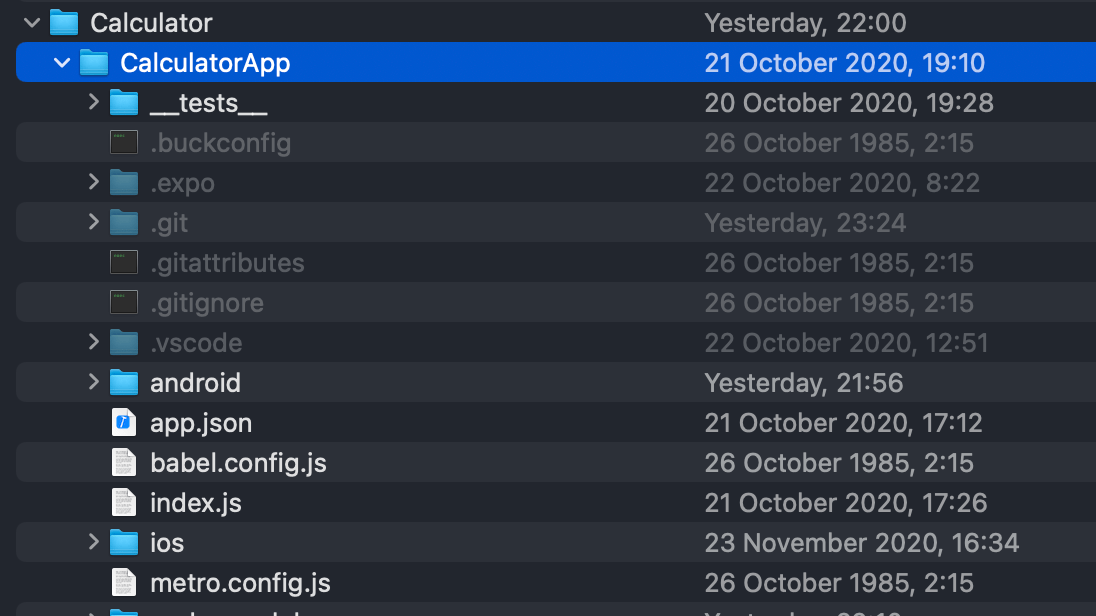
Open cmd and position on the workspace path, like “/Users/angelicaviridiana/eclipse-workspace/Calculator/CalculatorApp“.
Type “git init“.
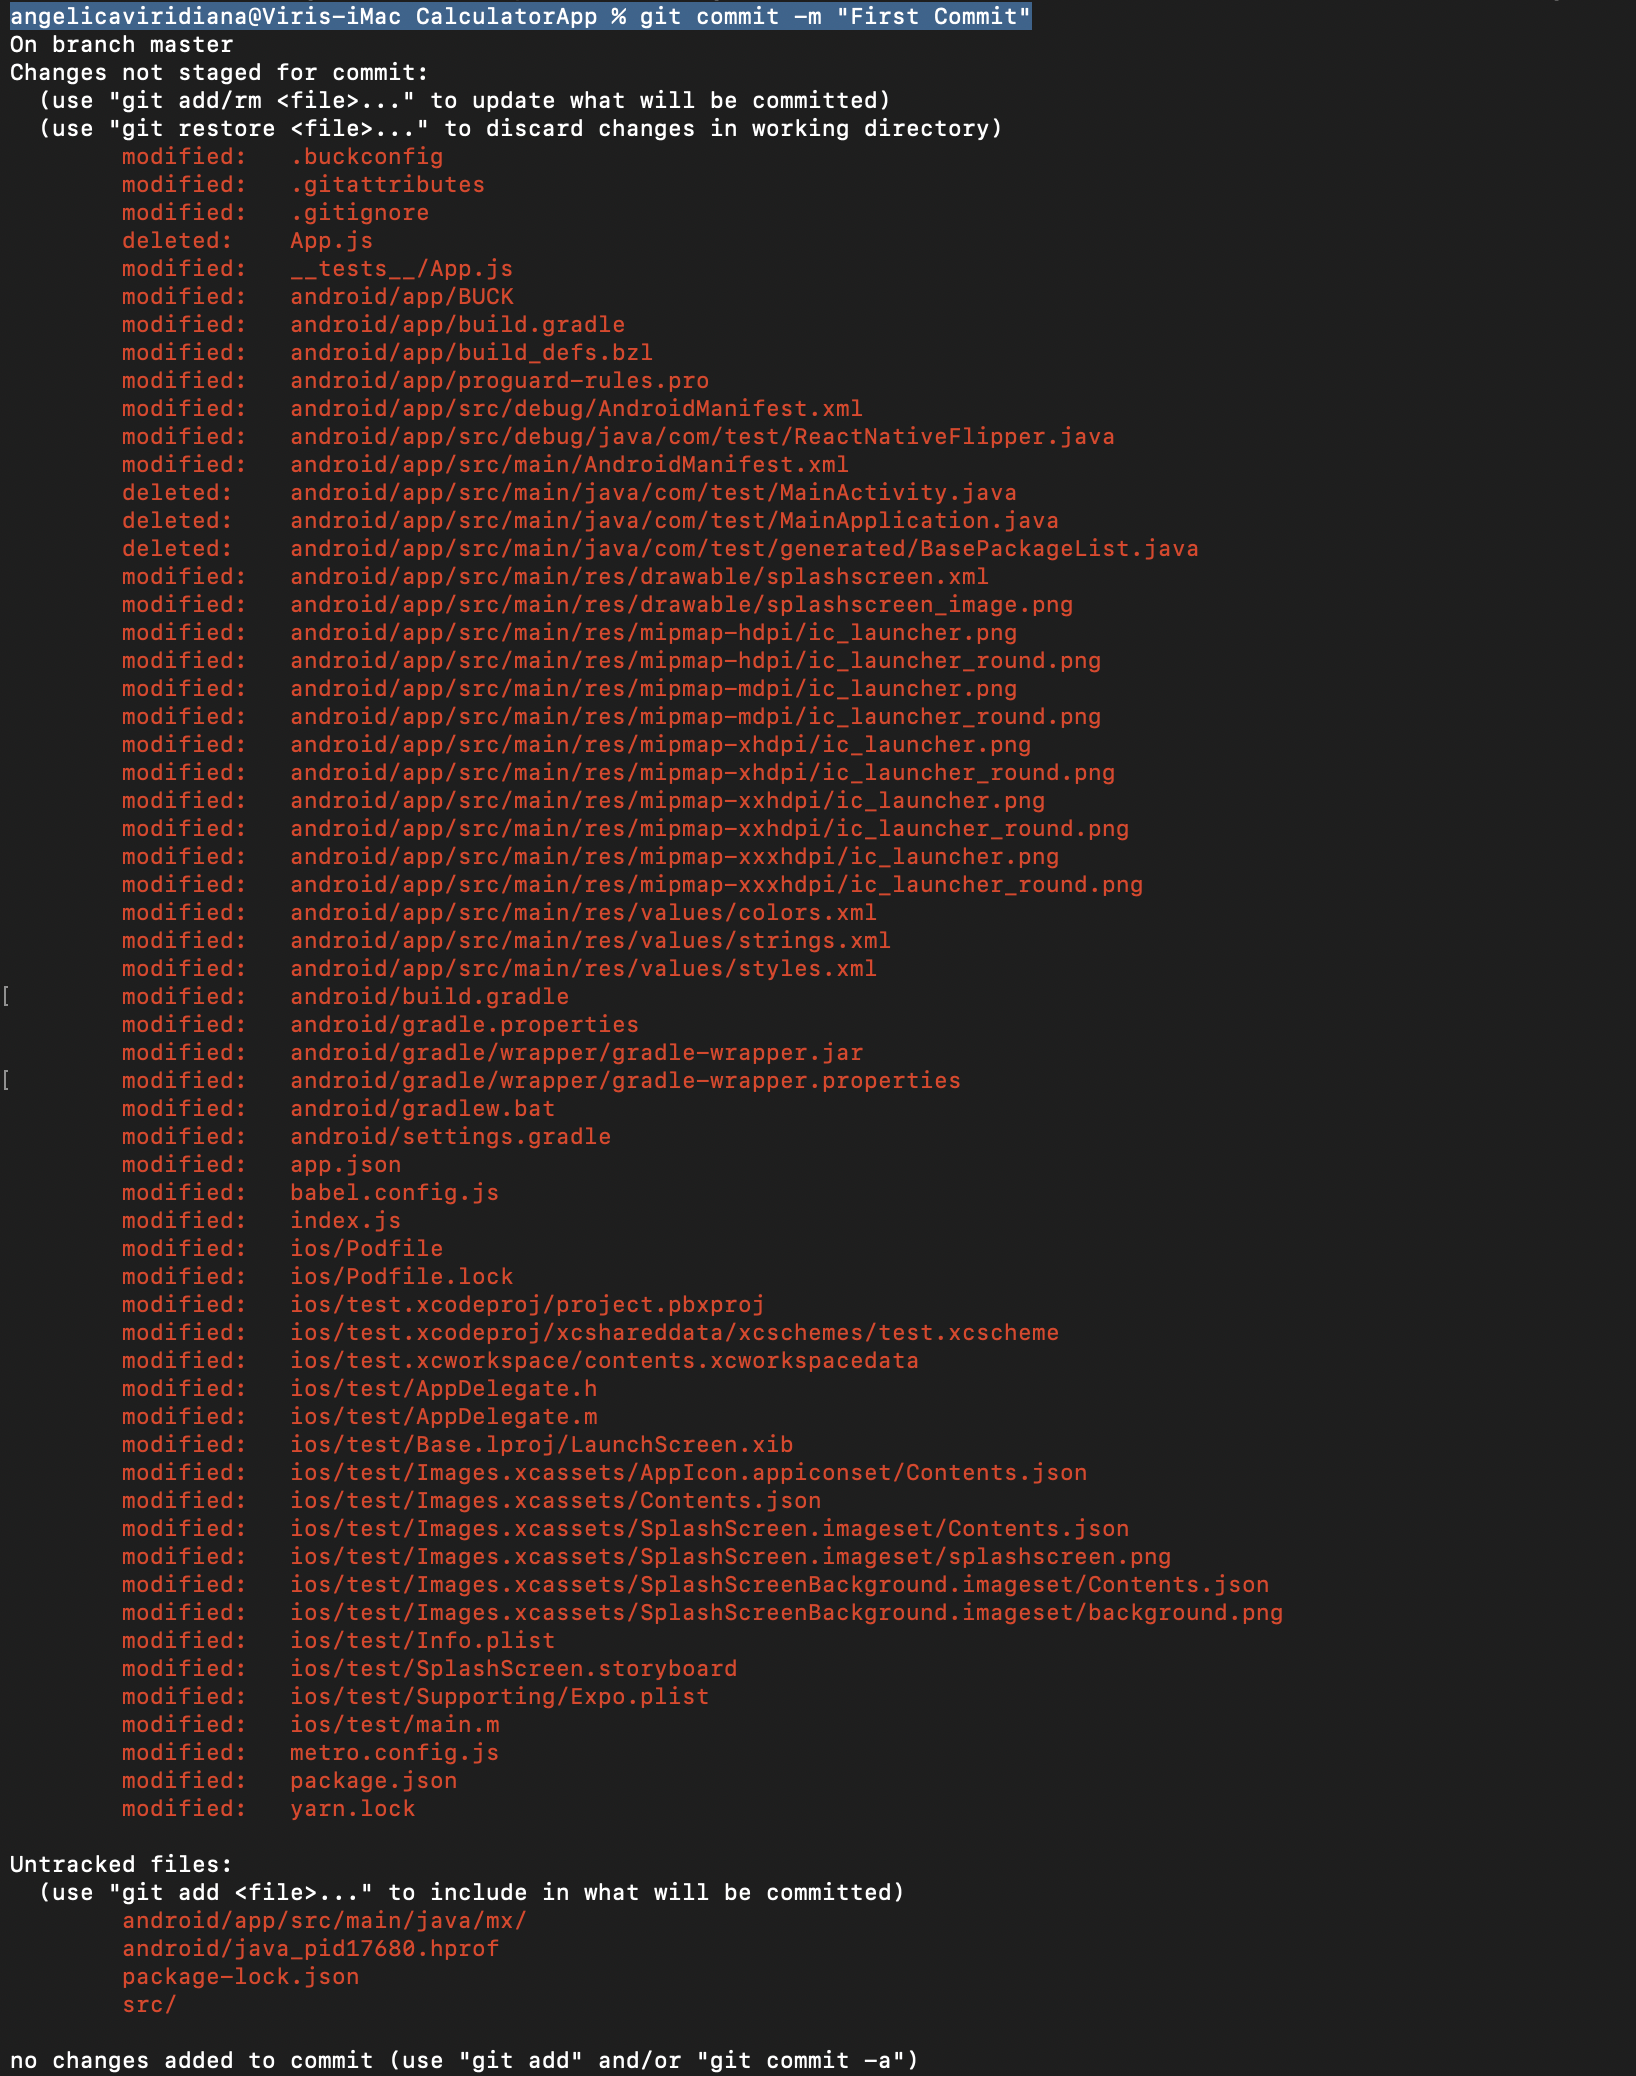
Then “git commit -m “First Commit”“, the text inside “” (First Commit) is the comment of the commit.
You’re going to see all the data inside your project.
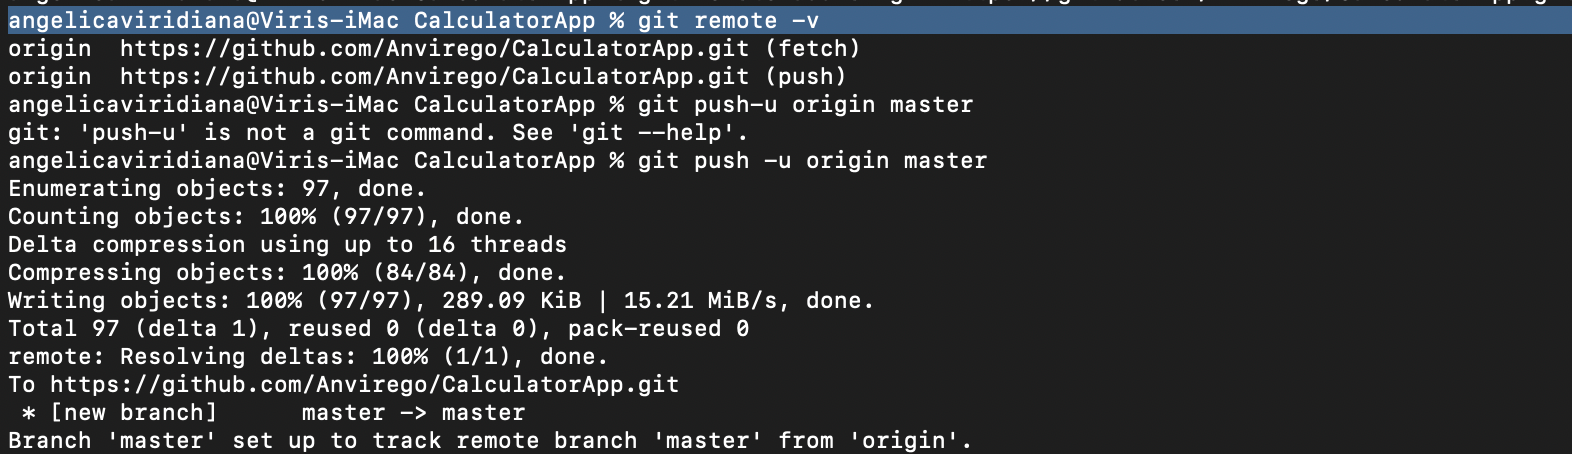
Next “git remote add origin https://github.com/USER/REPOSITORY_NAME.git”, this URL is found in Github, when creating a new repo.
Finally, type “git remote -v“, it’s going to show us to which destination is pointing and the name of this remote repository, in here it’s “origin”.
Finally, if there are no conflicts with our local and remote repository, we can proceed to upload our project using “git push -u origin master“, if everything goes correctly we’re going to see “Writing objects: 100% (84/84), done“.
Corroborate the project has been uploaded, go to your Github Repository.
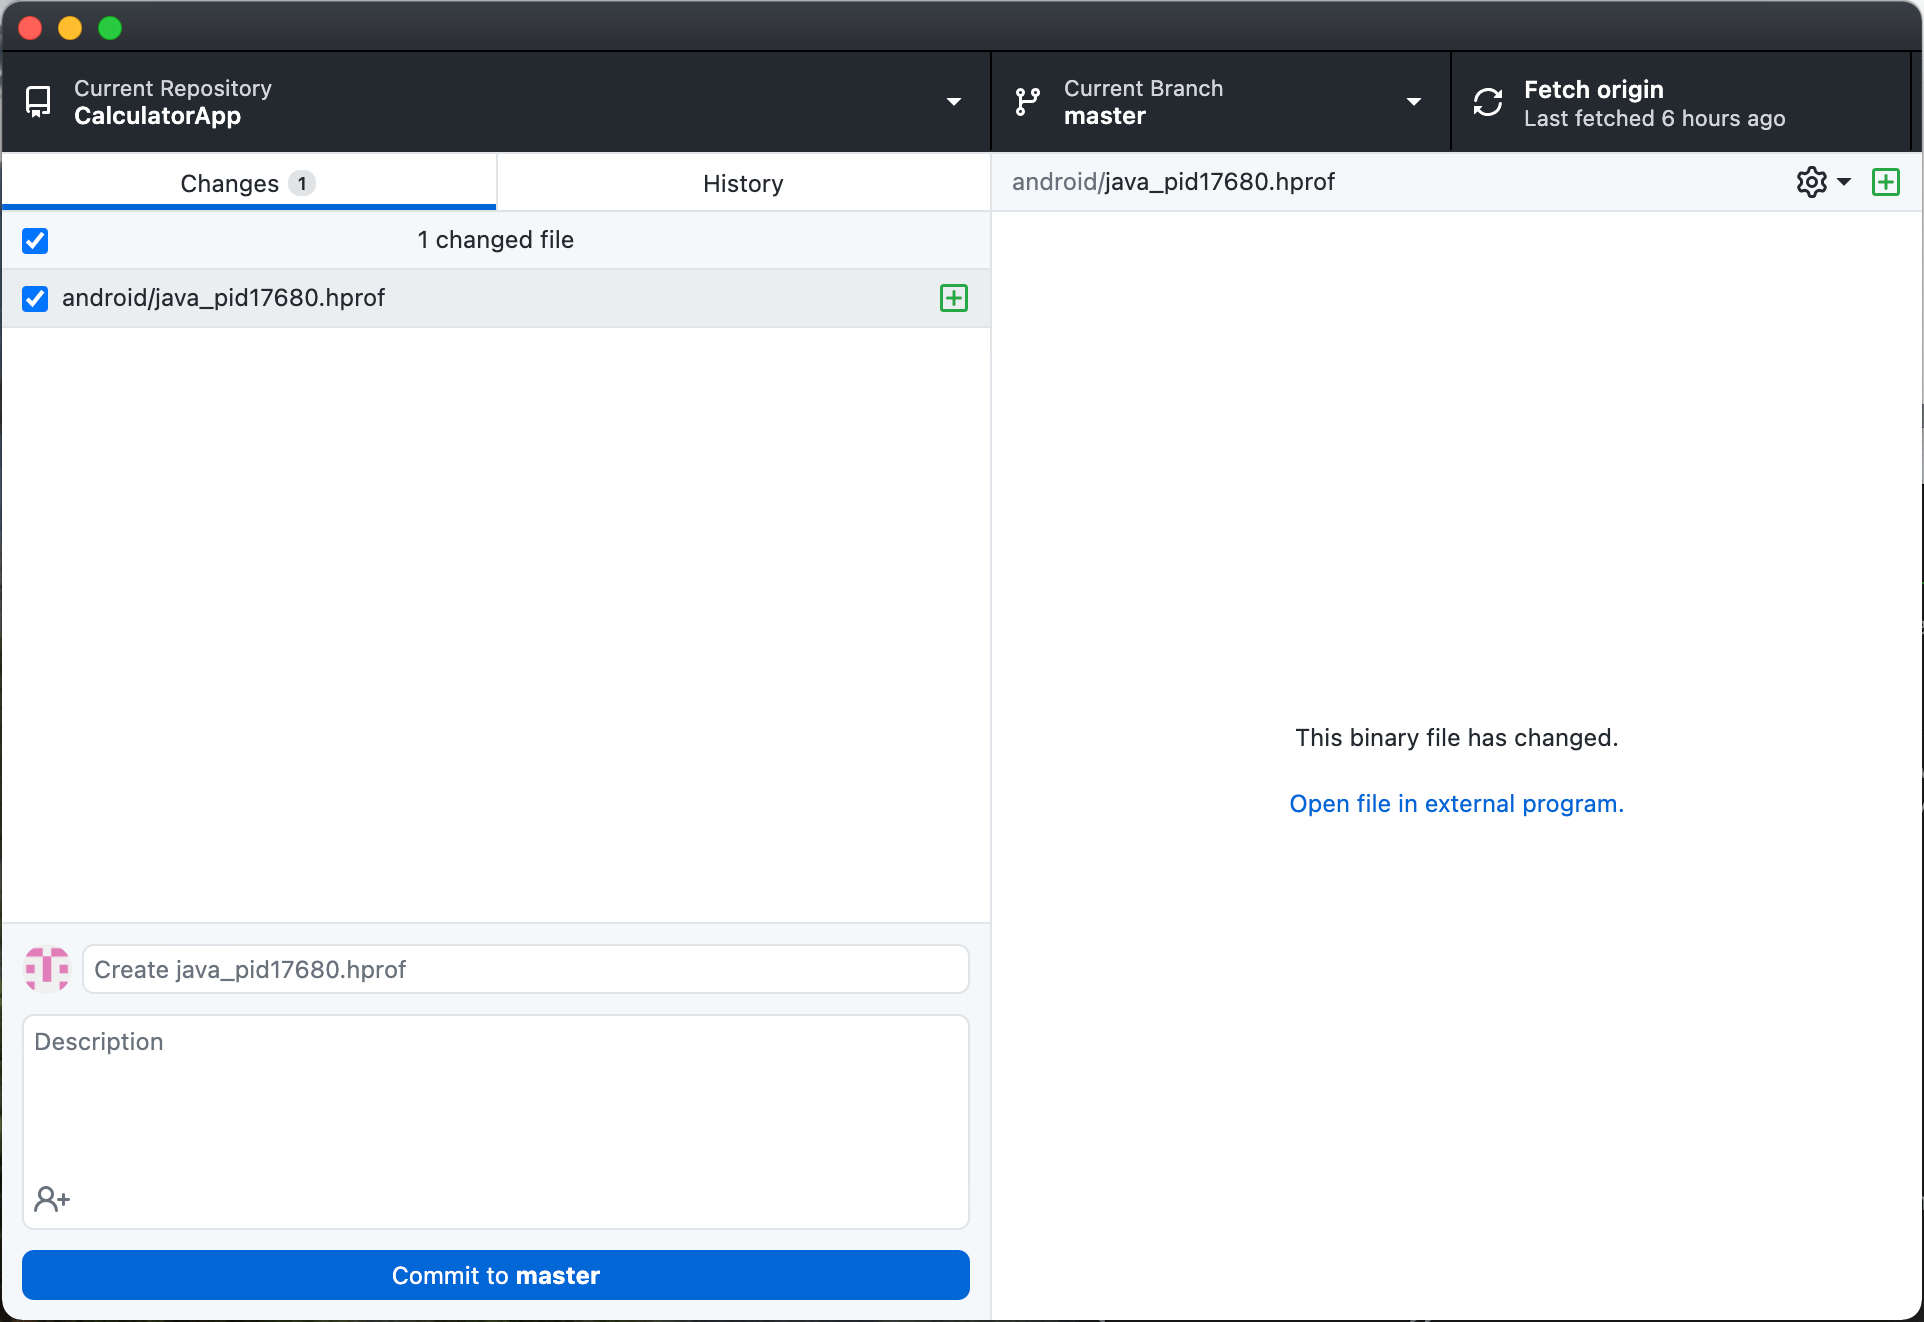
To have easier management with Github, we can use the Github App.
- Current Repository: Name of the Repository we’re managing.
- Current Branch: Branch of the Repository, remember to always create another branch when making changes in the code to later merge it with master. Master branch always has to be the stable version.
- Fetch Origin: Before make changes in our branch we need the last version updated in Github.
- Changes: Displays all the files that have been changed.
- History: History of all the commits made to that repository, we can rollback commits.
- Commit to master: Updates changes with a commit to upload it to Github.
Branches
One of the main functionalities and advantages of having our project to a Remote Repository like Github is the usage of Branches.
Branches help us to work in the same repository and collaborate with others, so let’s say we have our CalculatorApp, but Dev1 it’s working on adding a new feature called “Percentage” and Dev2 it’s working on adding “Trigonometrical Functions”.
To avoid conflicts between these two new functionalities we can create two more branches aside from Master, to push each of these functionalities, like the branch “Percentage” and branch “Trigonometrical”.
Also, this way of working can help us to identify conflicts in our repositories before merging them to our stable version in branch “Master”.
if you want to know more about how Github Branches work you can visit the link here.
Other useful commands:
Command Description git init Initiates a new Remote Repository git add. Adds all content of a Local Repository to be uploaded git rm -r “folderName” Removes specifically a folder, it can also be used with any file that we don’t want to include in the Remote Repository git commit -m “Comment” It’s used to add a commit to our changes git remote -v It’s the name of the Remote and the URL which is pointing git push -u origin master It uploads the Local Repository to the Remote Repository called “origin” in the Branch “Master”.
Links of interest:
Automating with Appium – Selenium and TestNG
Speed up Android Testing with Appium and SDK TestProject Agent
These are some recommended books to learn more:
Any help is welcome to help us keeping this effort alive!BTC (Bech32): bc1qx6f8nczr5ram6d57svlnsfmk5mhu6lsr9q7mxwLTC: LdiiMfiJvqrXDw1xPMqDptXGFEkyADZzVVDOGE: DKehWtHnmrf7JTRWpEQ9LtqwqY8HdbdkbUSOL: 3f2RR9w2VwmBqjLm5DmbuUPwWfdYH7GXCbHVWhsq5skyAngélica Viridiana Rebolloza
Computing Engineer specialized in Automation, working with different tools for Mobile and Web, using languages, tools, and platforms like JAVA, VBScript, JavaScript, C#, Appium, Protractor, UFT (QTP), Selenium, WinAppDriver, Jenkins among others.
Viridiana also has been working using practices like TDD & BDD under Cascade and Agile approaches.
Some certifications include: ISTQB Foundations Certification, SeU Selenium Certified, ITIL Foundations Certification.
No Comment

Nowadays Automation has grown so much, that even working in an environment of just ‘Manual Testing‘, it’s really important to ensure and improve the testing process to include a percentage of ‘Automation‘.
It’s important to mention that there’s impossible to cover 100 % of Automated Test Cases because automation has its limits like the abilities and knowledge about coding in a language programming of the Testers, the most used are Java, Python, and JavaScript, which not all actual Testers have.
Another important key is that not all the types of testing are able to automate like look and feel test.
So to keep it simple, if you want to automate a test you have to take the following points at least to start automating:
1. There are Regression Test Cases that you need to run always before a release.
2. There are flows that are just too large but also repetitive.
3. The scope of the Company is implement Continuous Integration (CI).
There are a lot of automation tools for different platforms like Android, IOS, and Web, but also for different scopes like Selenium, Mocha, Jazmine and Espresso.
Let’s start with Mobile (Android & IOS) using Selenium and TestNG with Java.
Create a Maven Project in Eclipse
For the next example, we’ll be using Eclipse as IDE and Maven of libraries management.
1. Create a Maven Project, it’ll look something like this.

2. In Folder “src/main/java“, create the packages “example.enviroment“, “example.pages” “example.test.base” and “example.pages.base“. This packages will contain our code.

3. Now let’s create the class “Setup” for the package “example.environment“, the class “BasePage” for the package “example.pages.base” and the class “BaseTest” for the package “example.test.base”.

4. It’s necessary to add de dependencies to the “pom.xml” file.

5. In Setup class we create de AppiumDriver that will interact with the device and our test.

To Appium to been able to connect your device is necessary to define the next capabilities: - udid = The ID of the device.
- device_Name = Generic name of the device usually just “My Phone”.
- appPackage = Is the name of the application’s package.
- appActivity = Is the name of the main activity (First Page) that the app loads when the app it’s launch.
- noReset = It’s an extra capability to avoid the information of the app got wiped out each time we run a test.
6. Let’s use ADB to obtain the previous capabilities.

By executing “adb devices” we obtain the UDID of the devices and emulator connected to our computer, in this case, is just one device “7MLNW18B29001109”.
To be able to see the device we must enable de “Developer Mode” and the “USB DEBUGGER”.
For the “appPackage” and “appActivity“, let’s type “adb shell” and then “dumpsys window windows | grep -E ‘mCurrentFocus‘”. It’s important to mention that the app to automate needs to be open on the device when we type the last command.
“com.huawei.android.FMRadio“: is the “appPackage” of the app.
“com.huawei.android.FMRadio.FMRadioMainActivity“: is the “appActivity” of the app.Create our First Test using TestNg
1. In class “BaseTest” we are going to call our driver (Setup class) each time a test is executed that’s why it is going to be called in BaseTest is going to be base for all the tests. With the tag @BeforeMethod, we assure that the Setup class and its method are always called before our tests. Also with the tag @AfterMethod we are going to set the close of the objects open, each time a test finishes. The tag @Parameters is going to help us to send the values from the xml file of TestNG.

2. Now let’s run Appium to inspect the elements of our app.

The host is our computer it can be assigned as 0.0.0.0 or 127.0.0.1 is the local host.
The port can be changed if it’s occupied or we want to run tests in parallel (I recommend separate the ports at least 10 units to avoid conflicts).
Now we have Appium Service running, we can use this console to debbug or use the Eclipse console. 3. Let’s click “Start inspection Session“.

4. Insert the next capabilities, click the button “Start Session“, and then we’ll see the app main activity, in this example the “Radio app“.


5. This main activity it’s going to be the “Principal Page“.

We are going to use “Page object Model” (POM) and “Page Factory” for the implementation of the test.
POM is a framework to organize the elements of an application in a way that it’s easier to understand and to maintain via “Pages”, in each page (Class) it’s defined the elements of only that page, in this example, we are only going to have two pages, the “Principal Page” and the “Radio Channels Page“.6. Let’s inspect and get the locators of the elements of “Principal Page“.

The most common locators are “ID” and “XPath“.
The ID locator is a unique locator that avoids having issues like duplicate elements if it is available de ID locator is much better to use it always.
The XPath locator depends on the DOM of the app source, so it’s not recommended to use it because it can change and also affects the performance because it has to go through all the DOM to find an element.
There are other locators like “name“, “class” and “text“, this locator it’s better to use them as a complement of each other because it’s possible that two or more elements have the same name, class, and text.
In this example:
The previous buttons ID is: “com.huawei.android.FMRadio:id/iv_prev“.
The next button ID is: “
com.huawei.android.FMRadio:id/iv_next“.
The Power button ID is: “com.huawei.android.FMRadio:id/btnPower”. 
The stations button menu ID is: “com.huawei.android.FMRadio:id/action_stations“. 7. Now let’s create our methods in the class “PrincipalPage“, create a package called “example.pages.java” and the class “PrincipalPage“.


The first part of the PrincipalPage consists of the following: - This class extends BasePage that will have the methods used by all the pages.
- In the Class’s Constructor it’s defined the “driver” that we create in Setup.
- PageFactory.initElements: Initialize the elements of the page, this is the main function of Page Factory, at the moment it’s instantiated the class PrincipalPage all the elements of the page are initialized.
- The structure to create these page elements are by the tag @FindBy and the type of locator to use like id, XPath, class, name etcetera; and the value of the locator.
Finally, it only needs the name of the element in our case a WebElement.

The last part is the definition of the methods aka actions of the elements.
In these examples the actions of each element are just clicks, this “Click” method/action is defined by Selenium as other many actions like sendKeys, clear, getText, getLocation, and many others.
The failedMethod and staticWait are not declared on this page because it comes from BasePage.8. Let’s define the actions in BasePage.

In this class is defined the methods “failedMethod” that prints the exceptions encountered on each method of the pages, and the method “staticWait” it converts from miliseconds to seconds, is a static wait to see the execution of the test, without it it’s not possible to see the actions. 9. Let’s create the last package where our Test Suites will be called as package “example.test.java” and class “FirstTest“.

10. The main test script resides in FirstTest.

This is the script of the test, where are just called the methods to make the actions. 11. Finally, let’s create the “PossitiveTests.xml” that TestNG will use to execute the tests and also is where the input parameters are defined.

The parameters are the input data of the test in Setup.
The class name is composed: package_name.class_name.
The methods include name is composed : method_name_of_FirstTest_class12. Lets just run it!

Right click on “PossitiveTests.xml“, select “Run As” and then “TestNG Suite”.
If there’s a problem finding this option be sure to have installed TestNG on the IDE, for more information about the installation of TestNG refers to https://testng.org/doc/download.html.
These are the result displayed in TestNG.
Links of interest:
Speed up Android Testing with TestProject Agent
Upload a File With HTML5
The Agile Team Approach
What Scrum Master Certification to Choose?These are some recommended books to learn more:
Any help is welcome to help us keeping this effort alive! PayPal Account BTC (Bech32): bc1qx6f8nczr5ram6d57svlnsfmk5mhu6lsr9q7mxw BTC: 1DDcWbphm1bKMvWruotNKLSM8ypVaHg5Nv ETH: 0x58D137fb142D946bCD815f0ded0fa3b3fE5AB3BF
Angélica Viridiana Rebolloza
Computing Engineer specialized in Automation, working with different tools for Mobile and Web, using languages, tools, and platforms like JAVA, VBScript, JavaScript, C#, Appium, Protractor, UFT (QTP), Selenium, WinAppDriver, Jenkins among others.
Viridiana also has been working using practices like TDD & BDD under Cascade and Agile approaches.
Some certifications include: ISTQB Foundations Certification, SeU Selenium Certified, ITIL Foundations Certification.
2 Comments Administración / Management / Administración de Proyectos / Project Management / Agile / Destacadas / Featured / Scrum
Much has been said about the Scrum team size or Agile team size, almost every client, boss, and collaborator with whom I have worked asks this question at some point: how many people do we include in the teams? The Scrum Guide sheds very little light on this, suggesting 10 or fewer members per team in its latest update, but giving us no context or reasons for these numbers.
The Scrum Team Size is More Than a Number
The truth is that there is no universally correct number of members to ensure optimal performance in a team, but what we know is that a Scrum team must consider certain factors that should include, beyond numbers:
- Cross-Functional team. Sufficient skills and capabilities to build the product,
- Dedicated team members. Dedicated members to one, and only one, team,
- Consistent membership. Stable and long-term membership within the team[1],
- Diversity of thought. A reasonable wide range of attitudes, beliefs, genders, and thinking patterns[2].
Now, the above points already represent a challenge for some organizations, but at least they enjoy an important consensus, however, they are not the only ones. Once the team is formed, there are other important factors that high-performance teams must address, among others:
- Psychological safety. A safe environment to share ideas and take risks[3].
- Equal communication. The most expressive member should not communicate more than twice as much information as the quietest[4].
- An open mind and willingness to learn[5].
- Shared vision. Everyone knows and agrees on objectives[6].
- Clear roles. Everyone knows their responsibilities and the expectations of their work[7].
- External advice (coaching). In Scrum, this is done by the Scrum Master[8].
And what does all this have to do with the size of the teams? Well, these factors don’t live isolated in a vacuum and just because I say so, so let’s explore the evidence so that together we discover what matters most to your team. After all, there is no universal answer 🙂
Many Numbers Everywhere
When we talk about the size of the teams within various organizations, the topic seems much more controversial and narrow to say the least. In the worst cases, staffing leaders respond by building teams guided by assumptions and even based on the burden caused by unrealistic dates and budgets and inadequate time horizons, thus harming the performance of teams and the organization itself in the medium and long term.
In the early days of Agile, the XP and Scrum texts suggested that the optimal size of members was 7 ± 2, applying George A. Miller’s number, later it was adjusted to 6 ± 3, today the suggested number is 10 or less according to the Scrum Guide.
The original support for the position of seven people, plus or minus two (7±2), comes from a well-known psychology study by research psychologist George A. Miller published in the 1950s, where according to the results of this study, there are limits on the amount of information we can process and retain in our heads.
More recently in 2010, Nelson Cowan claimed that Miller was too ambitious and that the ideal limit was only four and not seven[9].
Also, Ikujiro Nonaka and Hirotaka Takeuchi were formulating the ideal team size after conducting research and creating new products at technology companies such as Fuji-Xerox, Canon, Honda, Epson, Brother, 3M, and Hewlett-Packard[10].
Many others cite historical examples dating back to the Roman army, which used small military units of around 8 people. Others watch bonobos, one of the closest genetic relatives to humans, often splitting into groups of 6-7 to forage for a day. Both conveniently support the number 7±2, but since neither example is about teams doing knowledge work, the relevance of this to agility is limited.
As you can see, the topic has been discussed for some time and can be somewhat confusing, but thanks to this we have some clues, but it is worth having more sources to help us support our decision.
What Happens to Relationships When Teams Grow?
Within a team, each individual will have a connection with another individual, thereby creating a unique relationship; the bigger the team, the more the relationships. The equation that describes this is N(N-1)/2; but what does this mean? and how can it help us? To find out, let’s remember math problems from school and turn it into something we can use in real life.
The above equation tells us how many different relationships will exist within a team of a certain size, where N = the number of people in the team. So, in the first example graph of a team of 5 people, where N=5 we have 10 relationships: 10 different combinations of team members who are related to other members of the same team.
In the second example, where N=7, you have 21 relationships, and where N=9 in the third graph you have 36 relationships. Each pair of people represents a relationship, and that relationship defines how they collaborate. High-performance teams, by their nature, must have strong relationships between each of the team members in order to collaborate effectively.
Knowing this is important for you and your team because it’s true that each new person adds some individual productivity to the team, but it also increases communication overhead in the form of an exponentially growing number of relationships. To grow a team from 5 to 7 people, you need to more than double the number of relationships. To go from 7 to 9, it doesn’t quite double, but the jump is still big.
How expensive is it to maintain these relationships? Anecdotally, after studying the interactions of the members of several of my teams, I can say that in teams of 7 or 8 people, each day more than 90 minutes per person are spent interacting with other team members[11]. This excludes time spent on techniques like pair programming. Part of the interaction is talking about work, but she also spends time socializing. This is good and important because it is the combination of work and socializing that builds resilience and the ability of a team to handle challenges effectively.
A general rule of thumb suggests that people typically have 3½ to 5 hours of productive time at work each day. As a team grows, we lose productivity or, more often, begin to withdraw socially rather than sacrifice productive time to interact with our peers because communication costs for each team member are becoming too high. We need strong relationships to become a high-performing team, but as the size of the group grows, we begin to avoid the interactions that build those relationships.
Therefore, the number of relationships between team members and the time investment they require should be a factor when choosing team size because it will influence productivity.
More People Make Lighter Work…But Only to a Point
What everyone wants to believe is if we go from 1 person to 2 people, or from 2 people to 4 people, we will get double the work done, even top managers of transnational organizations have raised this with me. But even so, we intuitively know that this is not true, but why?
In 1967, Amdahl’s Law was presented for the first time, which for those who are not systems or electronics engineers, tries to estimate how much speed gain can be obtained by executing computational tasks by running them in parallel parts. This means that sometimes there are computer programs that are viable to be worked on by multiple processors at the same time (e.g. parallel processing), but other parts must be taken care of one by one (e.g. serial programming).
The formula derived from Amdahl’s Law may seem intimidating, but it is much simpler than it seems:
If we take the 5 units of work and apply 3 processors to the parts that can be done concurrently (in parallel), it doesn’t take 1 and 2/3 units of time (5 divided by 3) to complete. Instead, 3 units are needed because 2 of the units of work can only be done by one (serial) processor. It’s certainly an improvement over time, but not as much as you’d expect at first glance.
Teamwork works in much the same way. In fact, if we convert everything to a graph we can get an idea of how efficient the increase in team members can be:
Let’s focus for now on the 80% line (the blue one, at the top) of the graph. Let’s be optimistic (and unrealistic) and assume that 80% of the work can be done by working in parallel. This suggests that the more people do it, the faster it will be over, right? Oh but wait. If we go from 1 person to 2 people, we don’t do twice as much work. To get an improvement of 2x the work completed, we actually need 3 people. 7 people only create a 3.2x improvement over 1 person. To do 4 times as much work as 1 person does, we would need 16 people!
What if even less work can be done at the same time (parallel)? What if 50% of the work needs to be done serially (green line on the graph)? Then with 9 people we still have only 1.8x speedup.
What is the solution? There is no easy solution, but there are things you can do to mitigate the effect of Amdahl’s Law:
- Make as much of the work as possible can be done in parallel. This may mean increasing cross skills and collaboration.
- Reduce dependencies between teams, so there are no bottlenecks or delays.
- Increase the speed of the overall work process by improving quality and practices.
Speed doesn’t come from sending more people to work and building bigger teams. It’s about building a high-performing team that is optimally sized for effectiveness, communication, and quality.
Research-Backed Evidence
American Sociological Association
The American Sociological Association published a study by Hackman JR, Vidmar NJ called “Effects of size and task type on group performance and member reactions”[12].
In this study, they had participants complete a series of tasks: a combination of production (writing), discussion, and problem-solving. Participants were placed into different groups of 2 to 7. After completing each task, the volunteers were asked a series of questions, including two shown in this graphic: “was your group too small?” your group was too big? As you can see from the graph, groups around 4-5 in size seemed to have the least negative reaction. The frequently touched number is 4.6. The participants were college students, the tasks were cognitively loaded but not related to technology, development, etc., and the groups were not together long enough for a true “sense of team” to form. Nevertheless, it is an interesting fact.
In those days Hackman wrote the book Leading Teams, his rule of thumb for team size was 6[13].
Social and Developmental Psychology Researcher Jennifer S. Mueller
Research psychologist Jennifer S. Mueller, academic, author, and research collaborator, was quoted in the article “Is Your Team Too Big? Too small? What is the correct number?:”
If companies are dealing with coordination tasks and motivational issues, and you ask, ‘What is your team size and what is optimal?’ that correlates to a team of six. “Above and beyond five, and you begin to see diminishing motivation,” says Mueller. “After the fifth person, you look for cliques. And the number of people who speak at any one time? That’s harder to manage in a group of five or more.”
From the Scrum Creators…nothing less
Based on studies by George A. Miller, and later work, Scrum creators Jeff Sutherland and Ken Schwaber showed the following levels of productivity creating their own research on team size:
Agile Team Productivity NO Agile Team Productivity < 7 members 300 / 400% < 7 members 100% max > 7 members 400% > 7 members < 90% And they added:
A small team from three to four people can be very autonomous when it follows guidelines, has a well-defined focus, and everyone is physically in the same space. His work is often consistent, responsible, aligned and well directed, and communication is fluid. Things are relatively easy when there are only a few people on the team. The problems seem to increase along with the number of team members.
Brook’s Law and Lawrence Putnam
The mythical Frederick Brooks to whom we owe the famous “Brooks’ Law” establishes that “adding manpower to a late software project makes it even later”. This is due to the learning curve, that is, you must train each person new to the product or technology, and you must learn all the related non-technical knowledge, including the business strategies that the product or software addresses [14].
According to important studies by renowned researchers such as Lawrence Putnam:
Miembros Esfuerzo < 9 miembros 25% menos esfuerzo > 9 miembros 25% más esfuerzo With an Agile Team:
Miembros Productividad 1 25% más 5 125% más 9 225% más In summary, if we have an optimal team, we can have productivity from 300 to 400%.
Putnam and Myers Hard Facts
Beyond our personal opinions, those of clients, bosses, and team members, we also have objective statistics. Putnam and Myers examined data from 491 software projects from a large corporation as reported in their article “Familiar Metric Management: Small is Beautiful Once Again“. These were projects with 35,000 – 90,000 lines of source code. They divided the projects into groups called buckets based on the number of people involved in the project: 1.5-3, 3-5, 5-7, 9-11, and 15-20. On average, the smaller groups (3-5, 5-7) took much less time (11.9 and 11.6 months, respectively) than the larger groups (17.1 and 16.29 months) to complete projects of similar size.
When you multiply the number of team members by the number of months, you get a graph that is even more impressive:
A team of 9 to 11 people took 2.5 to 3.5 times as long as teams of 5 to 7 and 3 to 5 to complete projects of a similar size. That suggests that the seven-plus teams in this dataset were just a way to spend money faster due to increased team size but reduced net return.
Evidence of Agile projects
Larry Maccherone, in his work through Rally, Tasktop and AgileCraft exposed in “Impact of Agile Quantified” in late 2014, has helped build large datasets on Agile team practices. His data shows:
Based on Larry’s data, it would appear that 1-3 teams are more productive but have lower quality. 3-5 teams are marginally more productive than 5-9 teams, although they may still be of slightly lower quality – the difference is small. Larry’s notes suggest that he thinks the entire range of 3 to 9 is fine [16]. The reason for the lower quality in the smaller teams is not obvious. Perhaps due to a lack of stability? Lack of diversity of thought and experience? Reduced cross-functionality? We cannot know, but it deserves consideration.
My experience
When clients, managers, etc. ask me how big Scrum teams should be, I don’t have a “correct” answer. But I try to share the above data, my personal opinions, and suggestions based on years of experience. And I won’t lie to you, there are organizations where bad habits are so ingrained that it’s hard to get that information across in a practical way (they don’t listen to it, they don’t take it into account enough, etc.). But I certainly try to make my suggestions based on evidence, simple logic, and common sense.
For example, larger teams spend more time building, more time normalizing, and therefore more time reaching high performance. Why? Because there are more relationships to negotiate. As we saw before, in a team of 5, there are 10 relationships that need to be formed, a team of 7 has 21 relationships, and so on. More relationships take more time to build and establish trust, so that should be taken into account when deciding on team size.
Assuming all else is equal (skills needed to get the job done, diversity of thought, etc.), the existing evidence supports the idea that teams of 4 to 6 work well in most situations. They take less time to train and are just as productive as larger teams. Also, teams of 5-7 can usually combine abilities enough to cover the loss of a team member.
Personally, I would only pick a team of 8 if other pressures, like the breadth of skills required, forced it to happen. I don’t recommend teams with more members, because the overhead costs outweigh the value of the additional person.
With teams of 10 or more, I recommend splitting into 2 teams. My own experience and that of other agile colleagues with scaling experience: Separate teams of 4 and 5 do more than their original large team.
With teams of 9 or more, I recommend splitting into 2 teams. My own experience mirrors that of other agilists using Scrum: separate teams of 4 and 5 do more than their original big team.
Why not 3 or less? Because it would result in very little diversity of thought and it would probably be very difficult to find 3 people with enough skills to get the job done on a complex project. There will also be very little collaboration, which correlates with the reduction in quality shown in Figure #2 (“Impact of Agile Quantified” data). And don’t forget the obvious 2v1 power issues that can make the journey more challenging for one team member.
All the focus has been on the number of people on the team, but the bigger question should be this: does the team have the ability to get to “Done” or “Done” at the end of each Sprint? If not, you’ll want to re-examine and reconfigure to achieve a more effective team size and most likely do a re-analysis to break down work into requirements, user stories, or the like.
[1] “The Impact of Lean and Agile Quantified” – Larry Maccherone showed that dedicated team members doubled productivity and stable teams (no turnover) improved productivity by 60%. https://www.infoq.com/presentations/agile-quantify
[2] Wilkinson, David. Group decision-making. What he said in The Oxford Review, Diciembre 2019
[3] “What Google Learned From Its Quest to Build the Perfect Team”: https://www.nytimes.com/2016/02/28/magazine/what-google-learned-from-its-quest-to-build-the-perfect-team.html
[4] “The New Science of Building Great Teams” – Alex “Sandy” Pentland https://hbr.org/2012/04/the-new-science-of-building-great-teams/ar/pr and also “Evidence for a Collective Intelligence Factor in the Performance of Human Groups“
[5] The Wisdom of Teams: Creating the High-Performance Organization – Jon Katzenbach and Douglas Smith – indicates that potential skills are as important as the skills people currently have in predicting effectiveness.
[6] [7] [8] Wilkinson, David. Group decision-making. What he said in The Oxford Review, Diciembre 2019
[9] “The Magical Mystery Four: How Is Working Memory Capacity Limited, and Why?” – Nelson Cowan – https://www.psychologicalscience.org/journals/cd/19_1_inpress/Cowan_final.pdf?q=the-recall-of-information-from-working-memory
[10] Knowledge management https://en.wikipedia.org/wiki/Knowledge_management
[11] These are informal observations that anyone can get, but one of the most well-known investigations was done by the English magazine Nature Human Behavior in 2017.
[12] Stable reference: https://www.jstor.org/stable/2786271
[13] Familiar Metric Management – Small is Beautiful-Once Again – Lawrence H. Putnam and Ware Myers https://hbswk.hbs.edu/archive/2996.html
[14] The Mythical Man-Month: Essays on Software Engineering – Frederick Brooks https://en.wikipedia.org/wiki/The_Mythical_Man-Month
Related links:
Agile’s Origins and Values
The Agile Team Approach
What Scrum Master Certification to Choose?
Too Big to Scale – Optimal Scrum Team Size GuideSome books to know more:
Emmanuel Herrera
IT professional with several years of experience in management and systems development with different goals within public and private sectors.
Emmanuel worked through development and management layers, transitioning from developer and team development leader to Project Manager, Project Coordinator, and eventually to Scrum Master, Product Owner, and Agile Coach.
Some certifications include: PSM, PSPO, SSM.
No Comment Desarrollo / Development / Destacadas / Featured / Experiencia de Usuario / UX / Gamificación / Gamification / Ideas
Gamification Success Case
Previously, I spoke about the generalities of gamification, I expressed the definition and the objectives that gamification pursues, if you aren’t familiar with the subject before to continue reading, I recommend you that you go and read the previous post.
As part of a project in which I participated recently, I was analyzing how some organizations and their web solutions were using the gamification concept, and one of these solutions which it seems to one of the most interesting and outstanding using this concept is LinkedIn. As many already know, LinkedIn is a social network oriented to professional relationships, and as part of its operation, this social network uses a set of elements that integrate the gamification idea in its design. Now we’ll take a look on some of them, we’ll find out how they work and what is the purpose of the Gamification strategy and LinkedIn.
Profile
To make this network of professionals valuable, as much as for LinkedIn as for its users, the information from each member is required. The more information is provided by the user the greater the benefit which the network gets overall. When a new user signs in, tend to provide only the minimum information, usually doubting about how much information should provide, this apparently due mainly to distrust about sharing personal data, lack of time or laziness from network users.
LinkedIn, using gamification and UX (User Experience) elements, implemented a progress bar that appealed to the “sense of finishing something incomplete” to gently suggest and motivate to achieve a better percentage and thus obtain more information from the user, using a strategy where the percentage increase was easy to obtain at the beginning, but gradually it required more effort to reach 100% which added a touch of fun and challenge that invited to provide more data.
Eventually and very intelligently, LinkedIn realized that a disadvantage about just use a simple progress bar is that other data that arise as a consequence of changes in users’ working life, such as new job positions, new responsibilities, new certifications and academic progress, didn’t obtain relevance.
With the foregoing in mind, the percentage bar scheme was changed to a sphere that fills up as a cup with water, which is known as profile strength. Depending on how much the circle is filled, names are assigned to the “efficiency levels”, thus gauging ALL the data that is provided and also making LinkedIn members more willing to provide and update the information provided. it asks for them with a little invasive method and in addition without giving a foot to notice that the users are being “gameficated”.
Trying to improve even more their interface LinkedIn implemented some kind of mashup between their previous progress bar and the sphere ‘s efficiency levels, and currently is using a new progress bar.
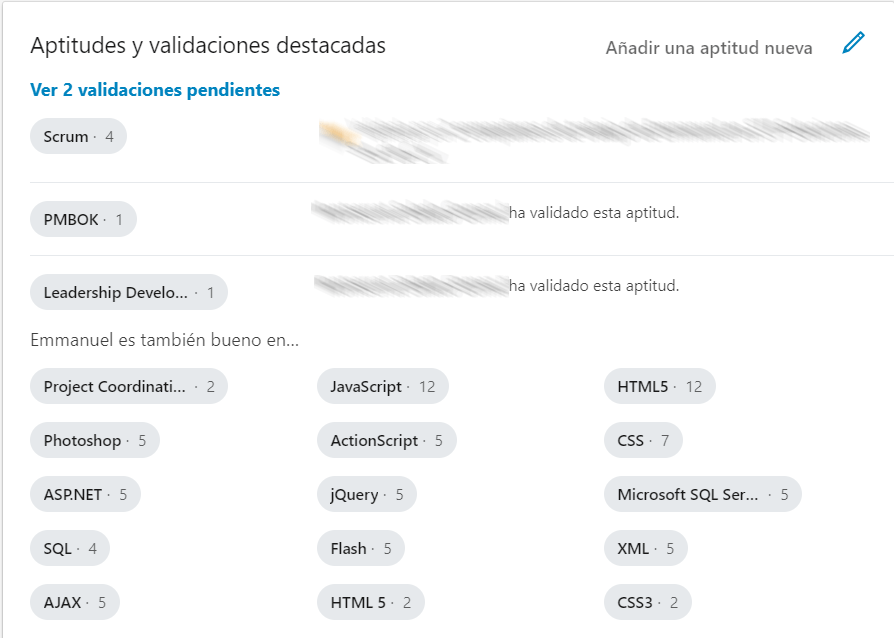
But even with the previous gamification elements, with which the design encourages users to provide information and thus increase the strength of their profiles, what is obtained is a self-description of the user qualities, which should be verifiable by other means. To solve this, the skills and expertise were devised, which, taking advantage of the social network inherent advantages, allow other users to validate the skills and experience, which creates a more accurate view of the user of interest.
Views
No profile makes much sense if it’s not being seen. The social network provides statistics to its members about how many times their profiles have been seen in recent days.
It also shows who have been the last person to see the profile. This not only stimulates the motivator of being the “center of attention”, but also encourages clicking on the profile of those people to potentially connect with them.
Updates
The LinkedIn users not just share personal and professional information, the network’s mechanic encourages them to share their articles, events, job opportunities and other types of related information with its members’ labor life; offering with it, the number of visits, their respective likes and the possibility of following other users or interesting groups, which are gamification techniques already tested by the social network habitual users.
Groups
Belonging to a group, contributing with posts and answers can increase the potential influence of a user as an expert within a community. The number of members is an indicator for the group owner about how successful are the actions derived from organizing a group of people around a certain topic.
Others
During my research about LinkedIn and its gamification strategies, I found mentions of some that I have not been able to corroborate, but I have seen mentioned in different places. Apparently there have been mailings and messages with congratulations to some members for a variety of “achievements”, such as being one of the most viewed profiles according to certain criteria of time and views or being a prominent member with a number of shared articles and views obtained to them, as well as some other similar motivators that pretend to be fun.
Do you know some other gamification techniques used on other sites? do you currently use gamification or do you intend to do it? do you think it’s worth use gamification? share it with us.
Other links that could be interesting for you:
How Gamification Motivates the Masses
Top 10 Groundbreaking Gamification Examples
Some interesting publications:
Emmanuel Herrera
IT professional with several years of experience in management and systems development with different goals within public and private sectors.
Emmanuel worked through development and management layers, transitioning from developer and team development leader to Project Manager, Project Coordinator, and eventually to Scrum Master, Product Owner, and Agile Coach.
Some certifications include: PSM, PSPO, SSM.
No Comment
First of All
If you don’t know the four Agile Value Statements, I invite you to take a look at Agile’s origins and values post before continuing, if you already did or already know these values, now you can focus your attention on how the agile team approach actually is in the field. Together, the Agile Value Statements add up to a highly iterative and incremental process and deliver tested code at the end of each iteration. The next points, in general, include the overall way I which an agile team carries the project:
- Works as one
- Works in short iterations
- Release something every iteration
- Focuses on business priorities
- Inspects and adapts
The Agile team works as one
Unfortunately, is usual to see some business and systems analysts throw processes or requirements to designers and programmers like a ball over the wall and just continuing with their lives, also there are designers and architects who elaborate their appealing designs without the slightest consultation to their programmer coworkers, or talented programmer who finish their assigned part of the system and then shake their hands and disappear; and we can go on with sad stories. A successful agile team must have a “we’re in this together” mindset.
I really like using video games analogies, because are a great way to illustrate what happens in real life. A lot of online games are team games, where each member of the team has a role. In this teams, there are roles such as the healer who heals his teammates, the tank who receives hits becoming in a shield for the rest of team who can attack more efficiently, the DPS who do damage to the enemy and the special class who does some kind of damage. When a player doesn’t perform their role properly, puts the rest of the team at a considerable disadvantage, sometimes this breaks the whole team completely. Everybody must work as one!
Just like happens in this games, the agile teams also have roles, and it’s worth identifying them in a general way:
Product Owner
The main responsibilities of the product owner include making sure that the whole team shares the same vision about the project, establishing priorities in a way that the functionalities that contribute the most value to the business are always in which the team is working on. Take decisions that take the best return on investment of the project is the highest priority.
Customer
The customer is the person who made the decision to finance the project, usually represents a group or division. In these cases, it is common for this role to be combined with the product owner. In other projects, the customer can be a user.
Developer
In the context of agile teams, a developer title is used in a wide way, this is a developer can be a programmer, a graphic designer, a database engineer, user experience experts, architects, etc.
Project manager
We have to take this carefully because an agile project manager focuses more on leadership than traditional management. In some projects and agile frameworks, this figure doesn’t even exist or if it does, the person in charge of this role shares the traditional project management responsibilities with other roles such as product owner. Also can be an advisor on the adoption and understanding of the agile approach. In very small projects can even have a role as a developer, but this practice is not recommended.
The Agile team works in short iterations
Already mentioned this in previous posts, in agile projects, there is not a phase delineation too marked. There are not an exhaustive establishment of requirements at the beginning of the project followed by an analysis, there is not architectural design phase for the entire project. Once the project really starts, all the work (analysis, coding design, testing, etc.) occurs together within an iteration.
The iterations are done within a previously delimited time-space (timeboxed). This means that each iteration is completed is the agreed time without excuses, even if the planned functionalities are not finished. The iterations are often very short. Most agile teams use iterations between one week and four weeks.
The Agile team release something every iteration
Something crucial in each iteration is that within its space of time one or more requirements are transformed into codified, tested and potentially packageable software. In reality, this does not mean that something is delivered to the end users, but it must be possible to do so. The iterations one by one add up the construction of only some functionalities, in this way an incremental development is obtained by going from one iteration to the next.
Because a single iteration usually does not provide enough time to develop all the functionalities that the customer wants, the concept of release was created. A release comprises one or more (almost always more) iterations. Releases can occur in a variety of intervals, but it’s common for releases to last between 2 and 6 months. At the end of a release, this can be followed by another release and this one can be followed by another, and so on until the project is finished.
The Agile team focuses on business priorities
Agile teams demonstrate a commitment to business priorities in two ways. First, they deliver functionalities in the order specified by the product owner, which is expected to prioritize and combine features in a release that optimizes the return on investment for the project organization. To achieve this, a plan is created for the release based on the capabilities of the team and a prioritized list of the new desired functionalities. For the product owner to have greater flexibility in prioritization, the features must be written down minimizing the technical dependencies between them.
Secondly, agile teams focus on completing and delivering functionalities valued by the user instead of completing isolated tasks.
The Agile team inspects and adapts
It is always good to create a plan, but the plan created at the beginning does not guarantee what will happen in the future. In fact, a plan is just a guess at a point in time. If you live persecuted by Murphy’s Law like me 😀, there will be many things that will conspire against the plan. Project staff can come or go, technologies will work better or worse than expected, users will change their minds, competitors can force us to respond differently or faster, and so on. Agile teams see that each change represents both, an opportunity and the need to update the plan to improve and reflect the reality of the current situation.
At the beginning of each new iteration, an agile team incorporates all the new knowledge obtained in the previous iteration and adapts accordingly. If a team learned something that is likely to affect the accuracy or value of the plan, the plan must be updated. That is, perhaps the team discovered that they have overestimated or underestimated their ability to progress (capacity) and that a certain type of work consumes more time than previously thought.
In the same way, the plan can be affected by the knowledge that the product owner has gained from the users. Perhaps because of the feedback obtained from a previous iteration the product owner has learned that users want to see more of some kind of functionality and no longer value so much that they had considered. This type of situation can alter the plan, so you have to adapt it to improve its value.
Sorry about my English I’m not a natural speaker (don’t be grumpy, help me to improve).
This is all for now folks, I hope this can be useful for you.
Related links:
Agile’s origins and values
Roles on Agile Teams: From Small to Large Teams
What Is Agile?These are some recommended books to know more:
Emmanuel Herrera
IT professional with several years of experience in management and systems development with different goals within public and private sectors.
Emmanuel worked through development and management layers, transitioning from developer and team development leader to Project Manager, Project Coordinator, and eventually to Scrum Master, Product Owner, and Agile Coach.
Some certifications include: PSM, PSPO, SSM.