-
What is Desktop Automation?
Desktop Automation focuses on creating automated tests for computer Applications whether these are native Windows Apps or not.
This type of automation focuses on Front End Testing as the interactions and flows cover only the front of the app. It’s similar to Web and Mobile automation as it also uses “drivers” to create a connection that interacts with the App.
The are several tools and frameworks to automate Desktop Apps, but one of the most used and powerful tools to do it is WinAppDriver.
What Inspectors are?
Inspectors are tools that let us see the Document Object Model (DOM) of an app, this DOM is a representation of the structure of an app as an XML Document. By inspecting and seeing the DOM is possible to understand how the elements of the apps like buttons, text, and text boxes are structured, get the properties of these elements as its locators like ID, Name, ClassName, XPaths, and so on, and which of them are contained on specific Panels, Windows and Tabs.
Currently, on the market, we have different inspectors that we can use, the most common for any platform is Appium Inspector and for Windows is Inspect.exe which is contained directly on Windows SDK Kit.
What is WinAppDriver?
Windows Application Driver (WinAppDriver)is a service that supports Selenium UI Test Automation on Windows Applications like Universal Windows Platform (UWP), Windows Forms (WinForms), Windows Presentation Foundation (WPF), and Classic Windows (Win32) apps.
What is BDD?
Behavior Driven Development is an agile software development process that allows the design, creation, and product testing, using the behavior of the product itself and making it easier for technical and non-technical users to understand the product. This approach improves the understanding of Testing for all the Team Members, as instead of showing Testing Scripts full of technical verbose like classes, methods, and variables, we can show the Steps in Natural Language.
The most common tools to implement BDD in Testing are Cucumber and Specflow, the latter is the most used tool in Windows for Visual Studio and C#.
What is Specflow?
Specflow is a test solution to implement BDD in our framework, using Gherkin language and binding of steps definitions for Net-based apps. Currently is really easy to start using Specflow as it can be easily installed using Nuget Manager in any VS project.
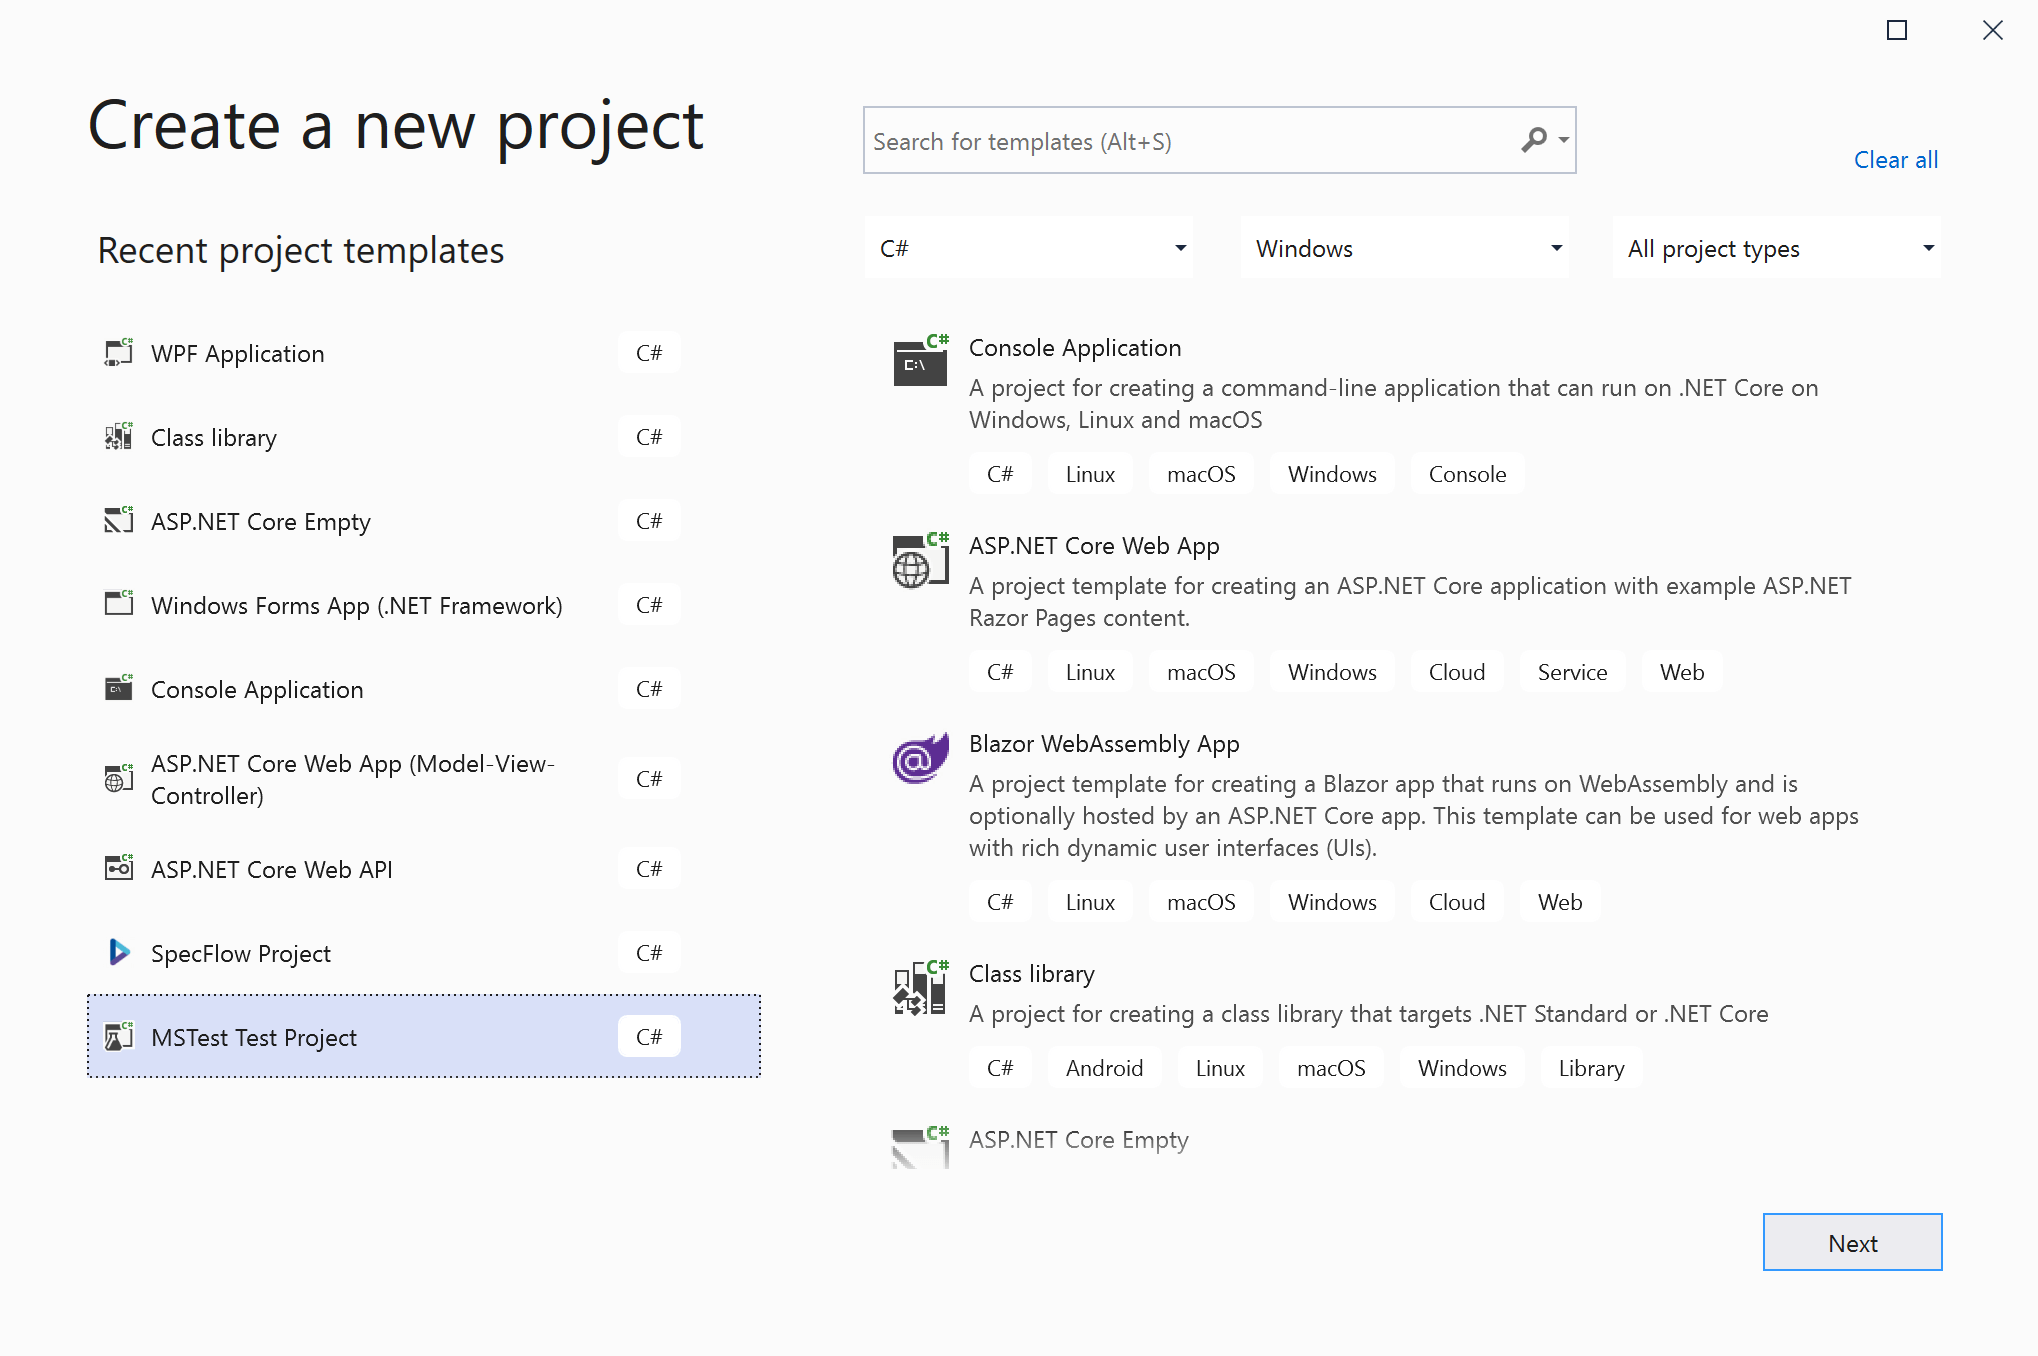
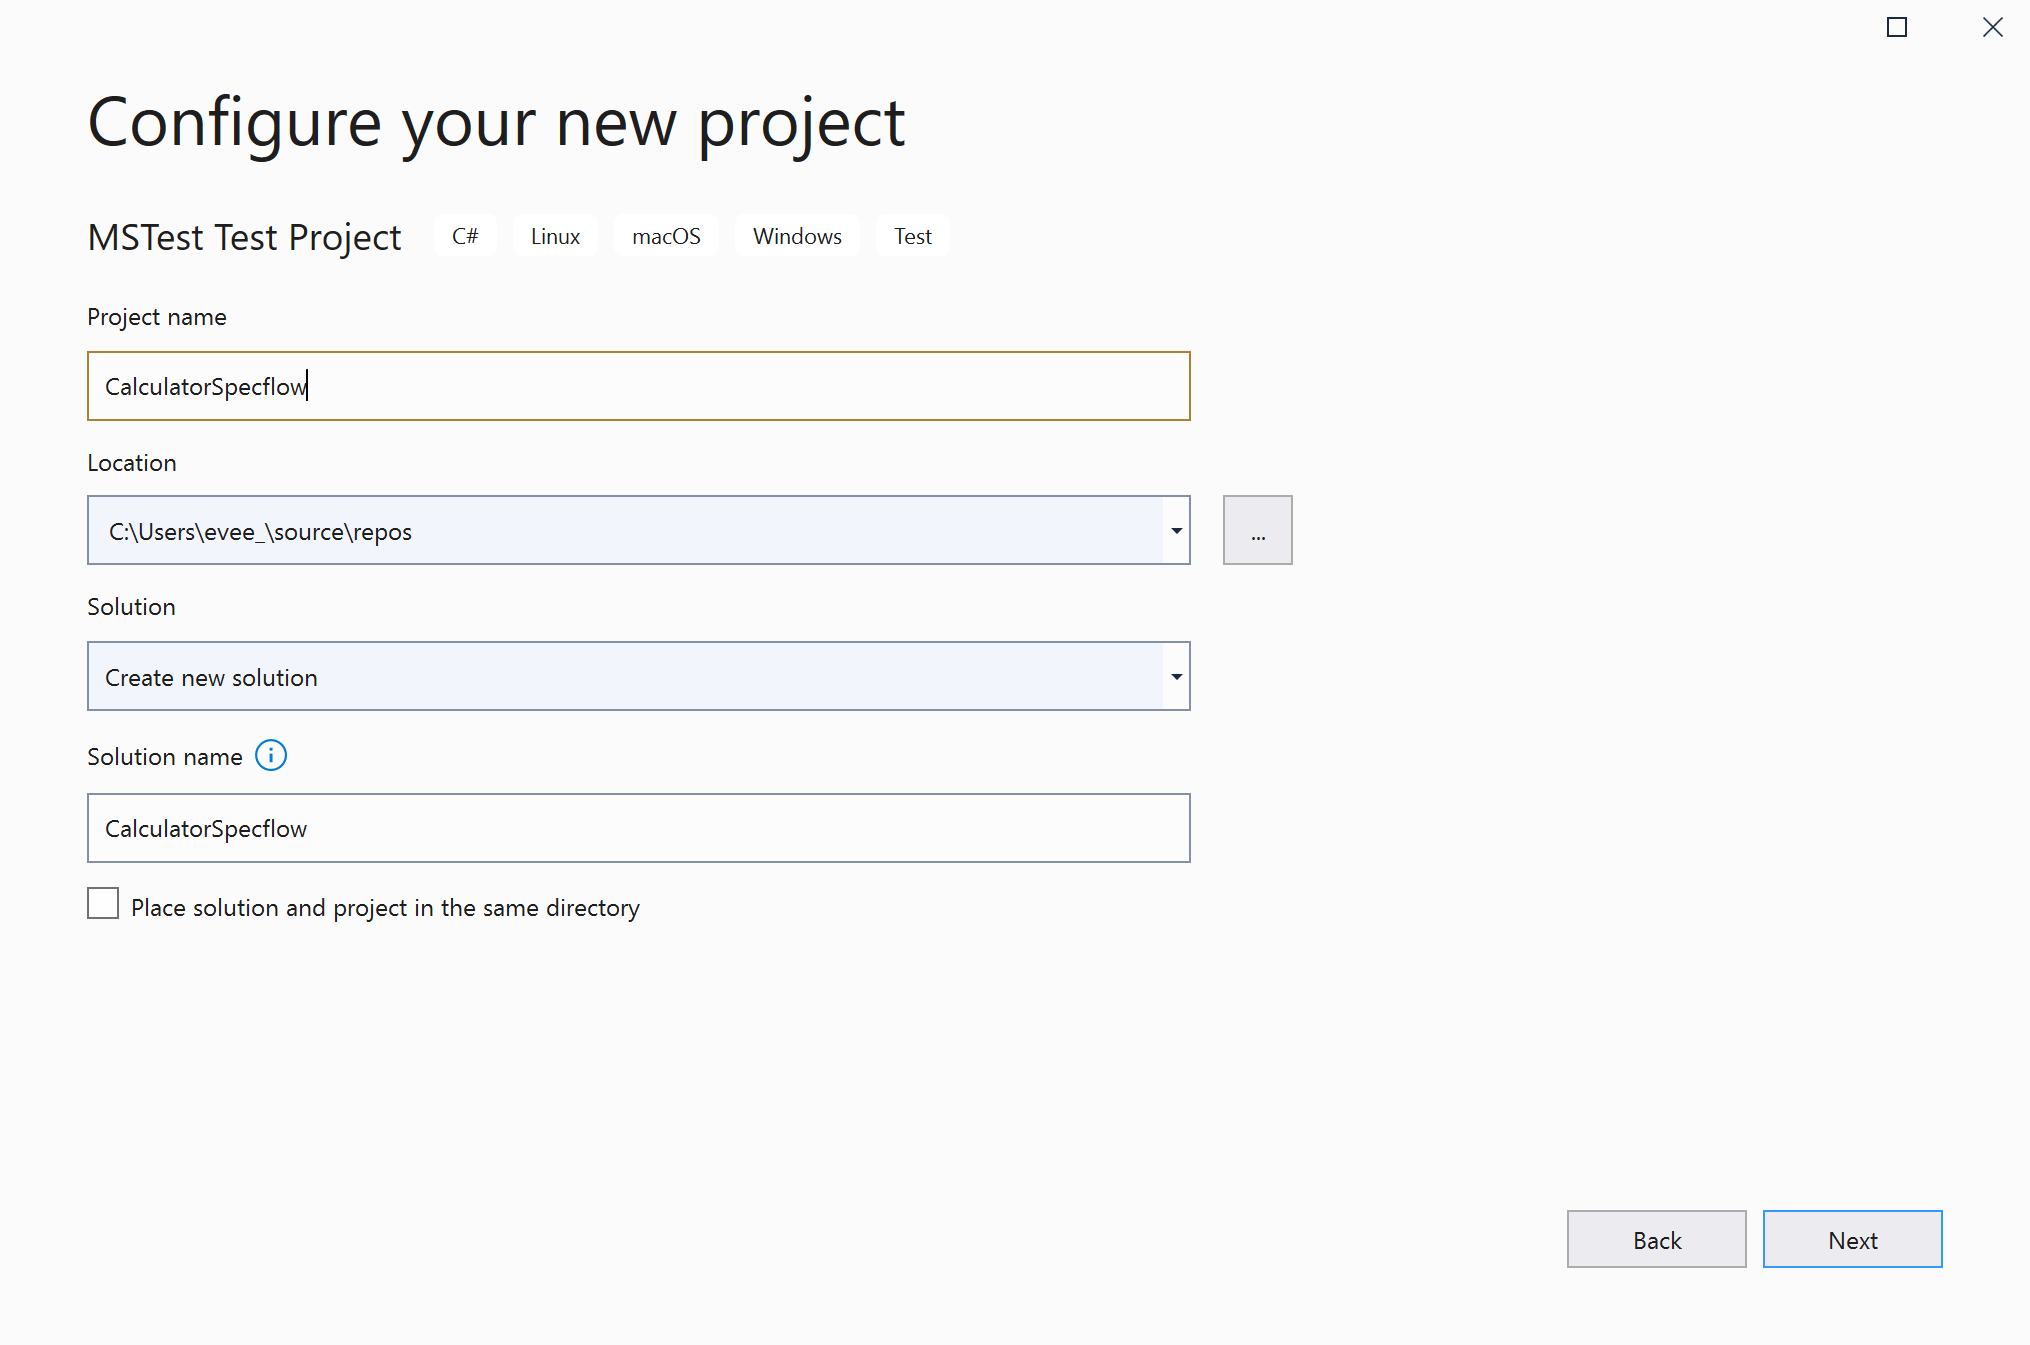
Creating an MSTest Test Project
For this example, we are going to create a VS Project of MSTest Test Project type, is important to notice that we can use any type of project to implement Specflow, even a Specflow-type project.
Enlarge

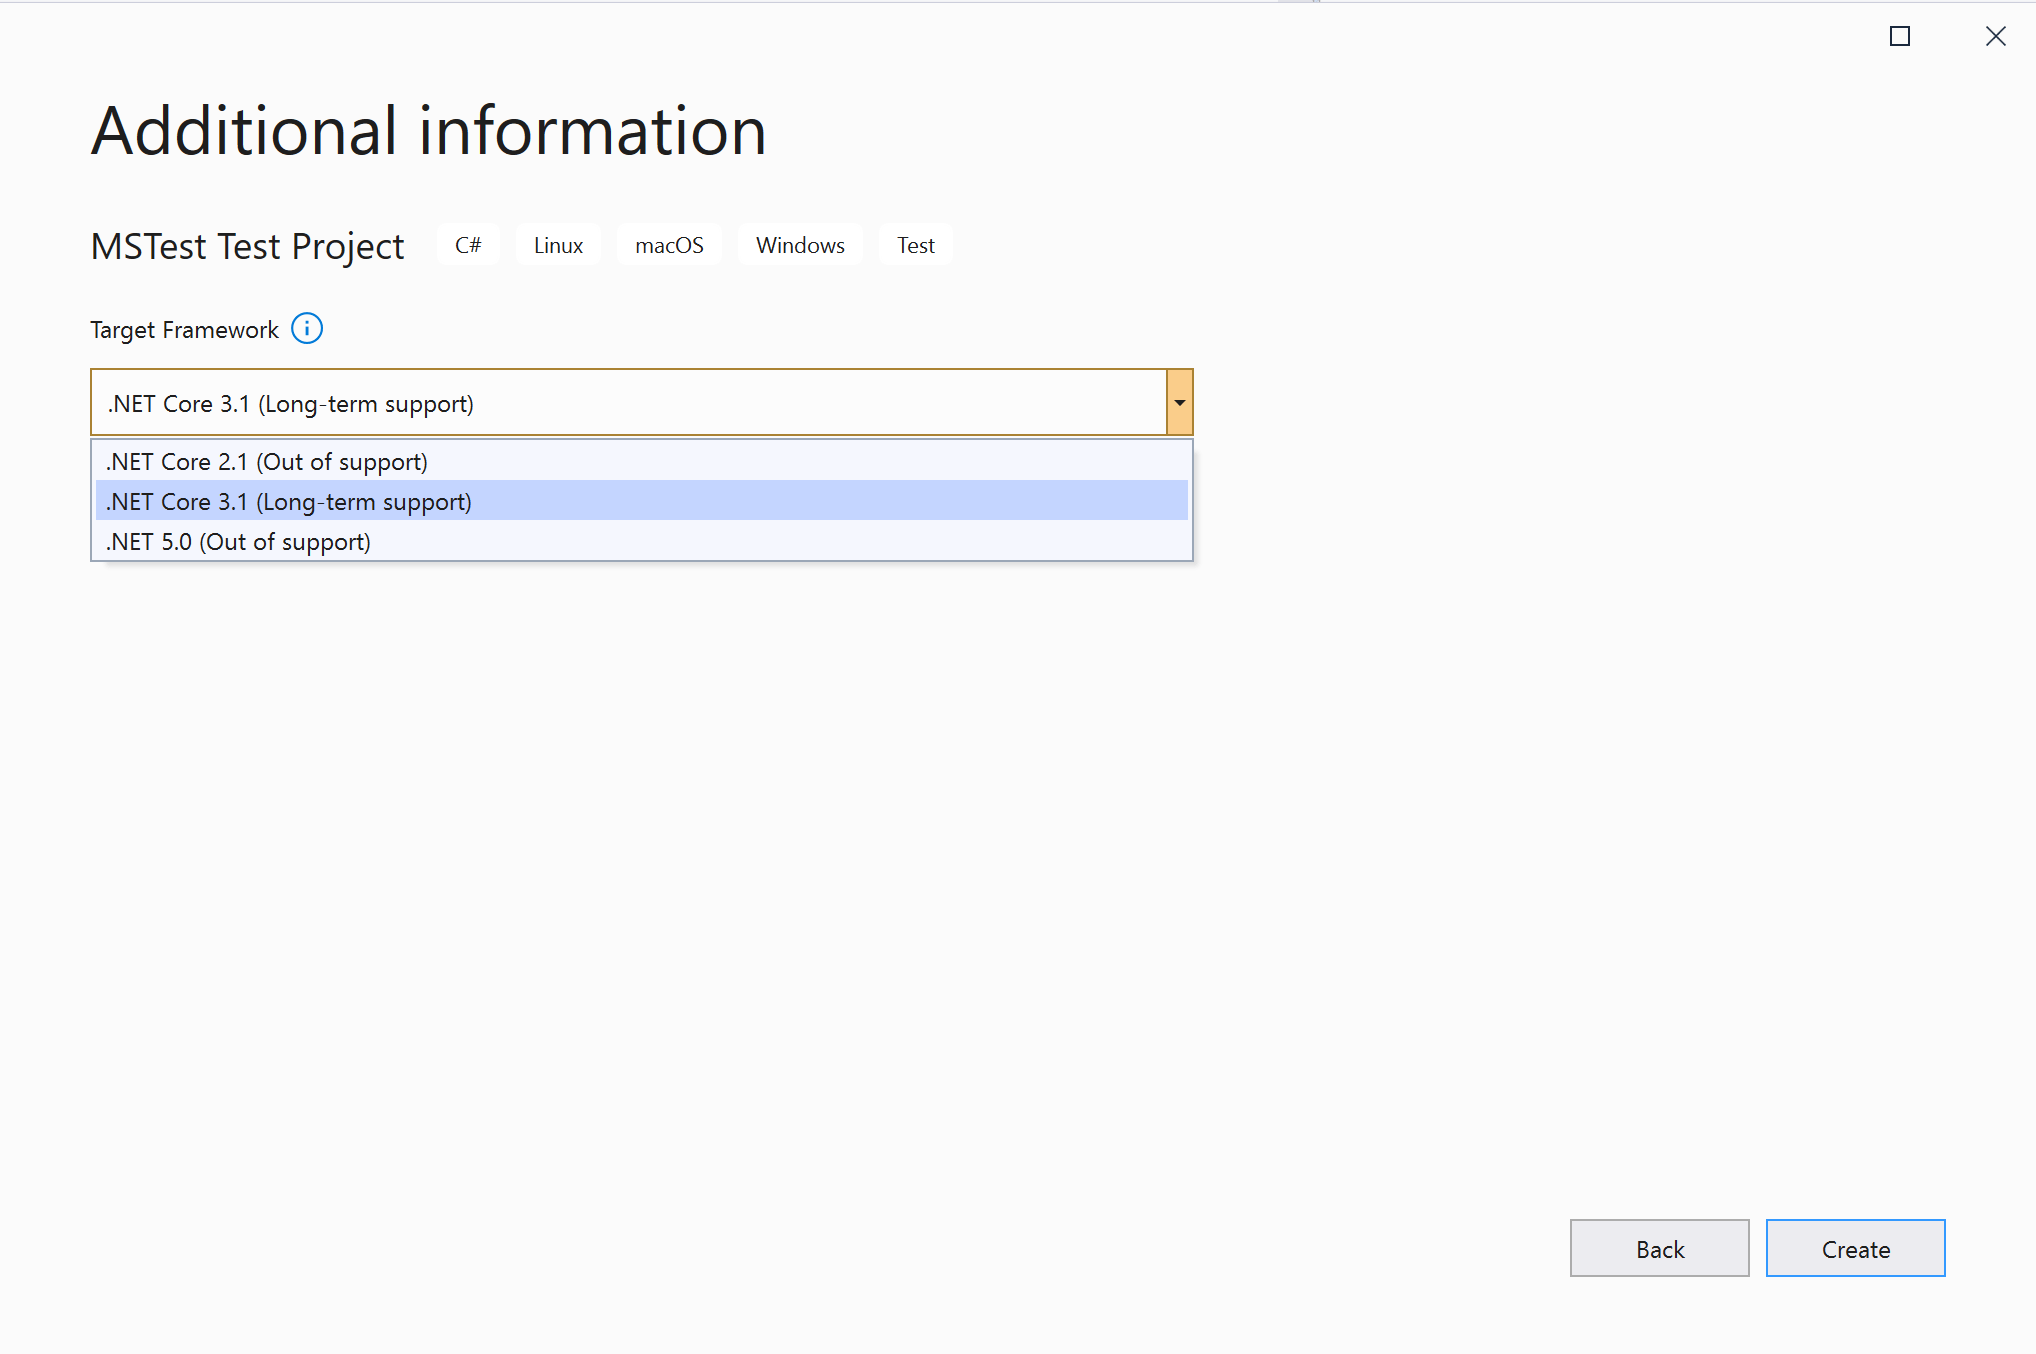
MNP Also is essential to choose the correct Net Core version for our Project, this may vary depending if the automation is going to be forcefully used by the old Net Core version, but keep in mind to always try to choose the latest version of Net Core.
Enlarge

NetCore Enlarge

Configure Project Adding Specflow to VS
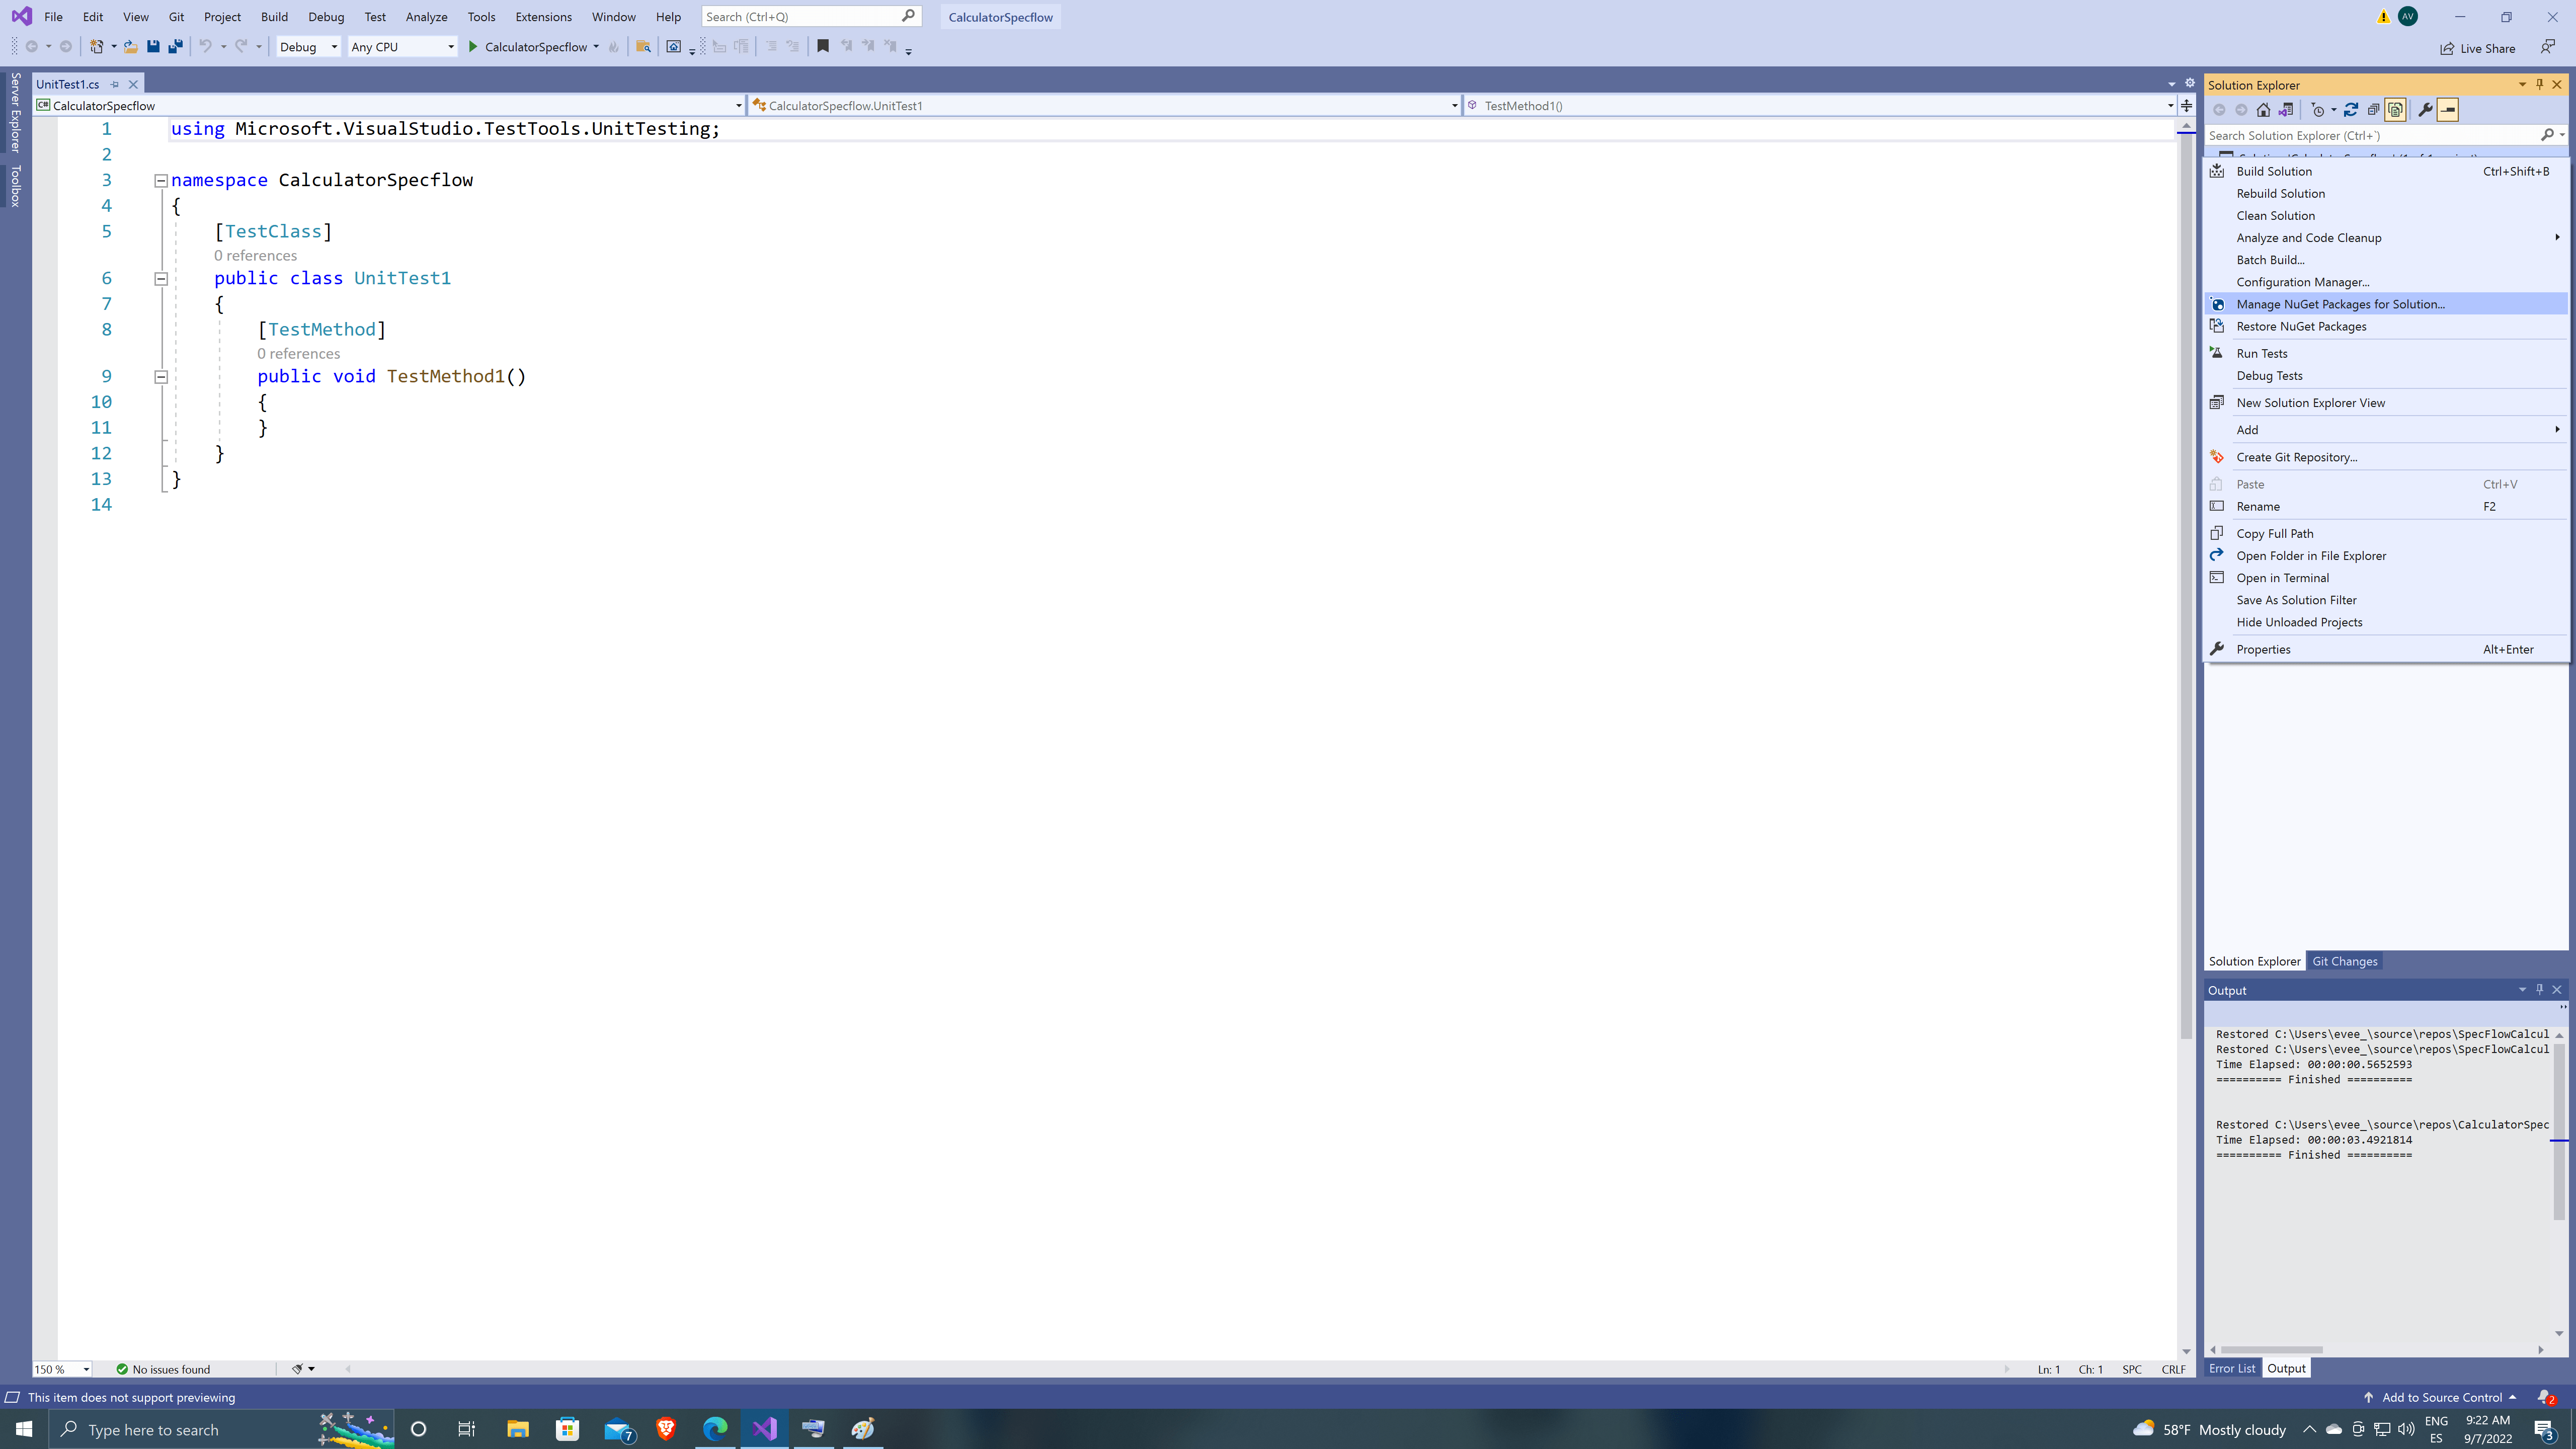
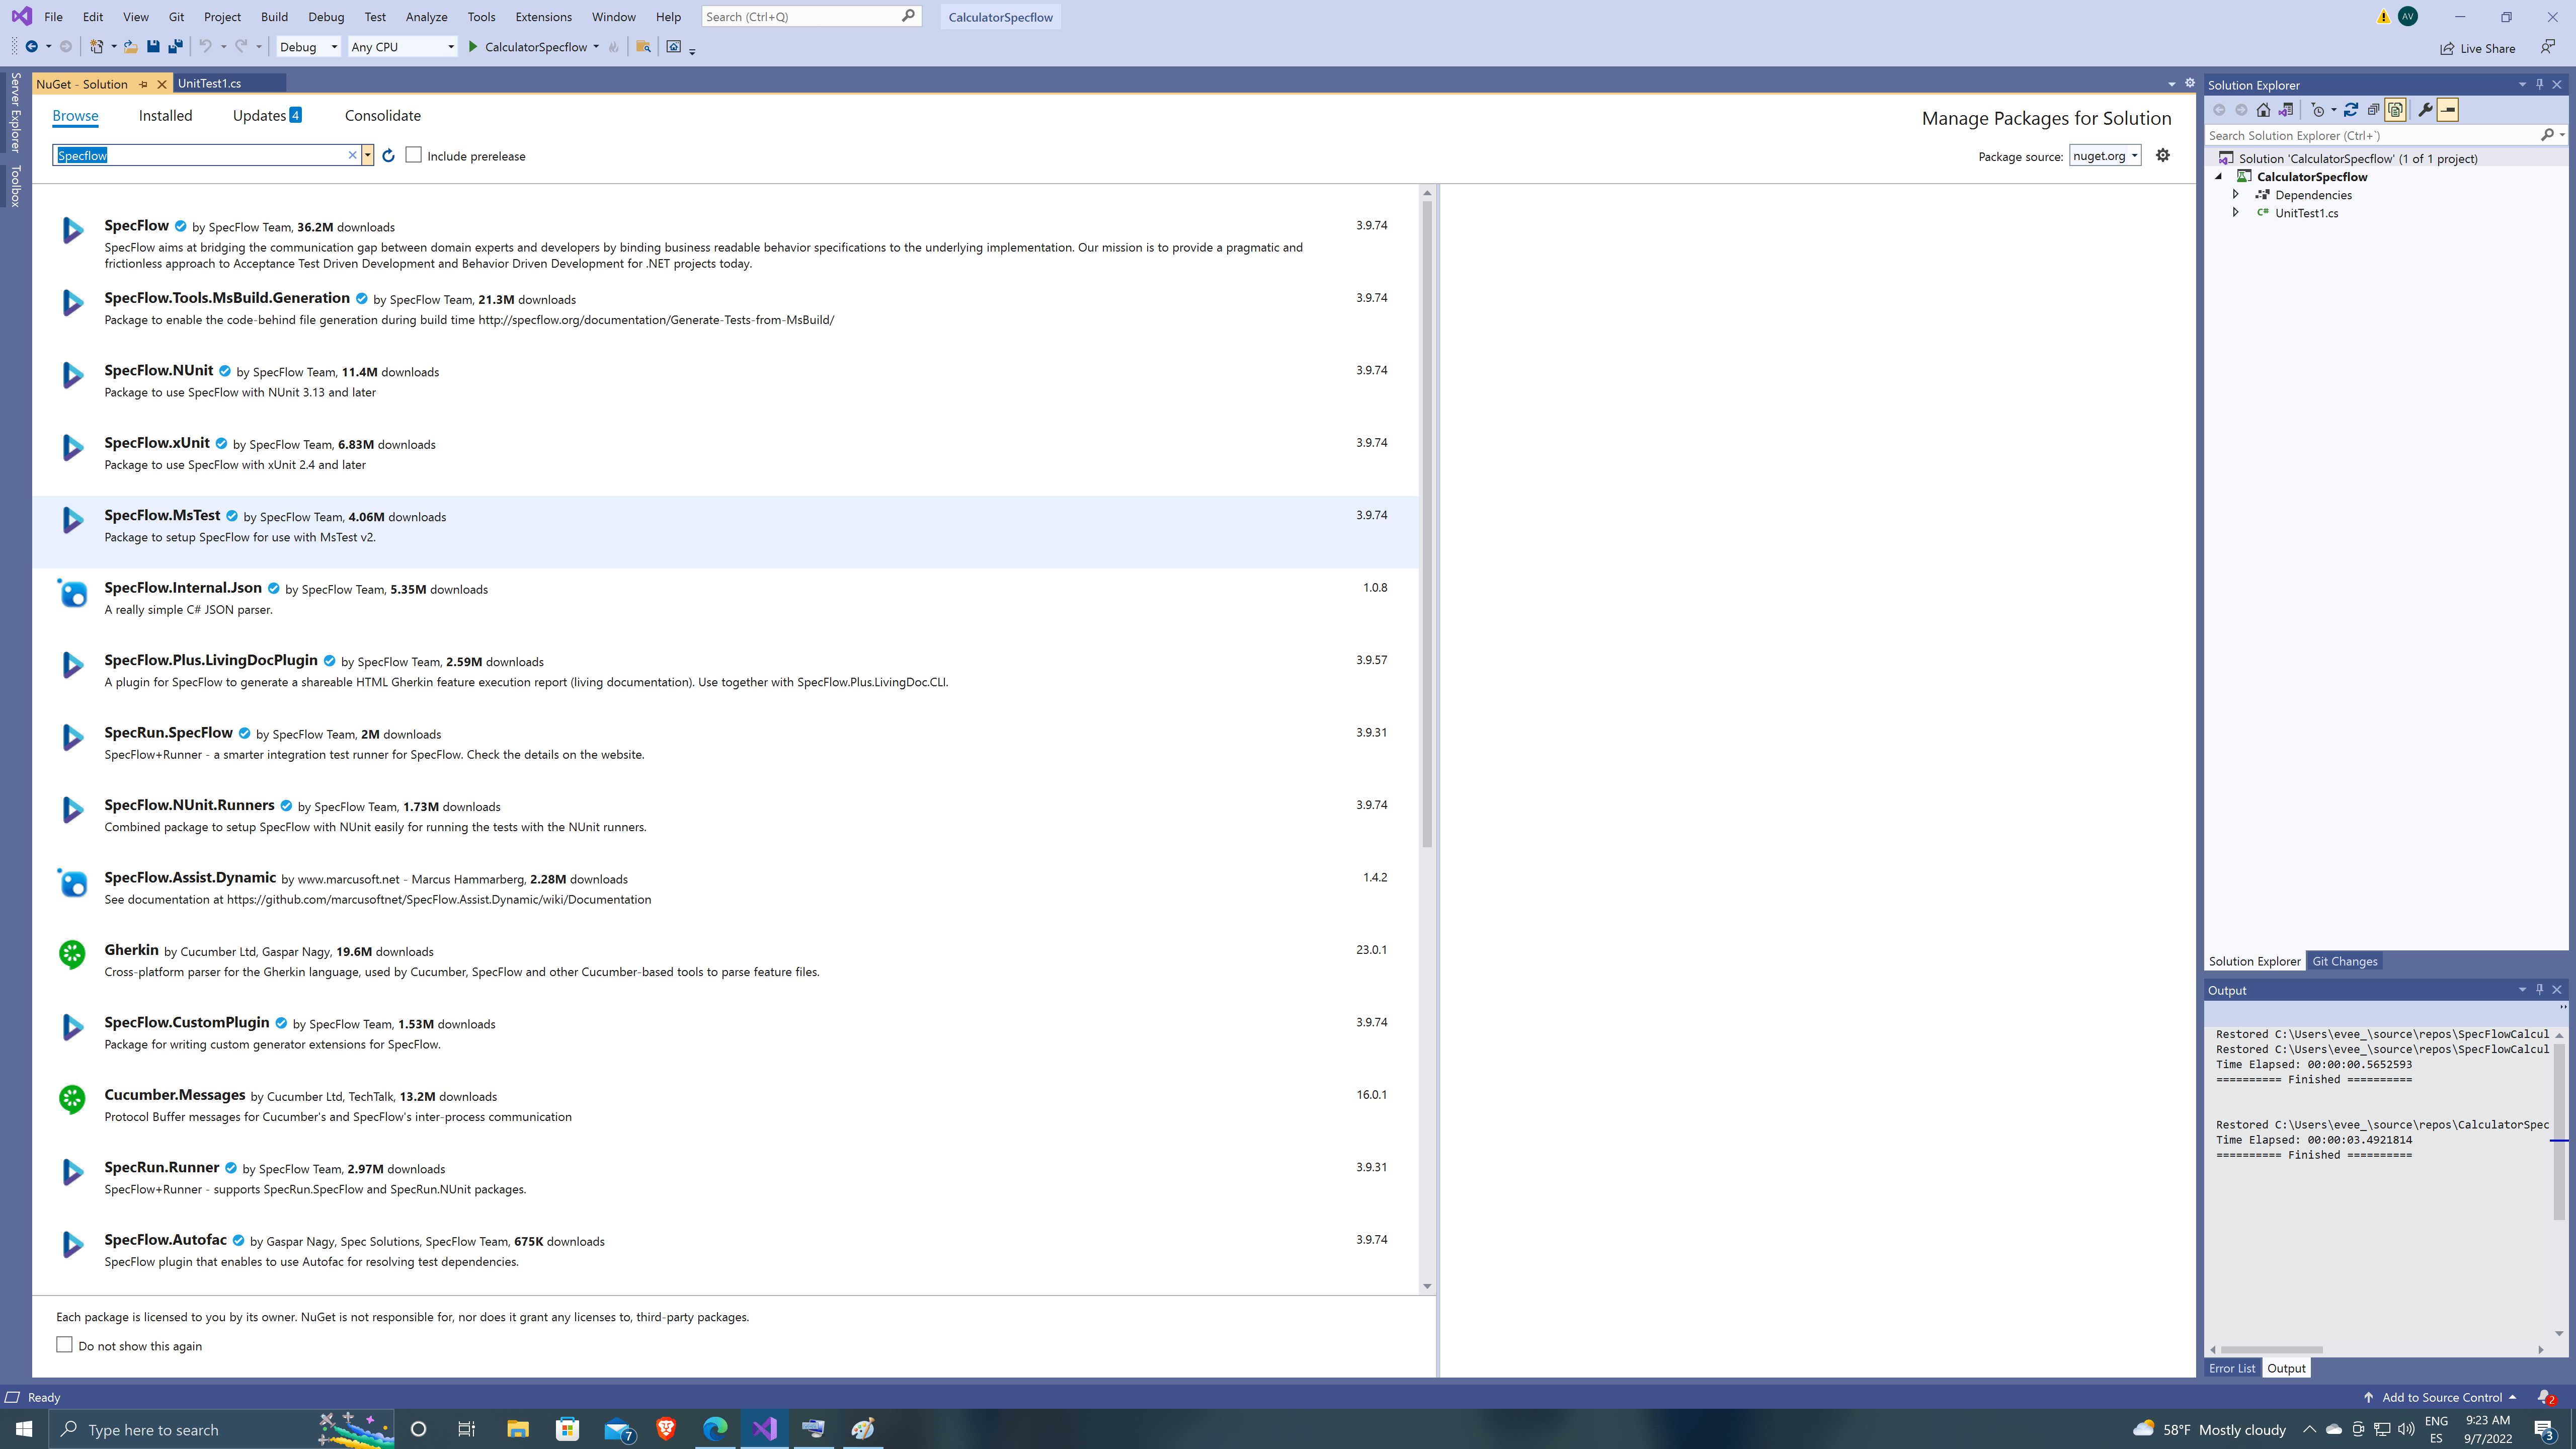
By default VS will create a UnitTest1.cs, we will dispose of this class later, first let’s add Specflow to our project by going to Manage Nuget Packages on our solution.
Specflow has different packages, for this solution we are going to use Specflow.MsTest as is the standard Specflow version to use on MsTest Projects, also we are going to install Specflow.Plus.LivingDocPlugin, to add some HTML results to our tests!
Enlarge

SpecflowMs Installing WinAppDriver and Setting up
Before continuing we need to install WinAppDriver from GitHub – microsoft/WinAppDriver: Windows Application Driver, to be able to open and interact with the Desktop app, we use WinAppDriver, this app will create a session between the app and our tests.
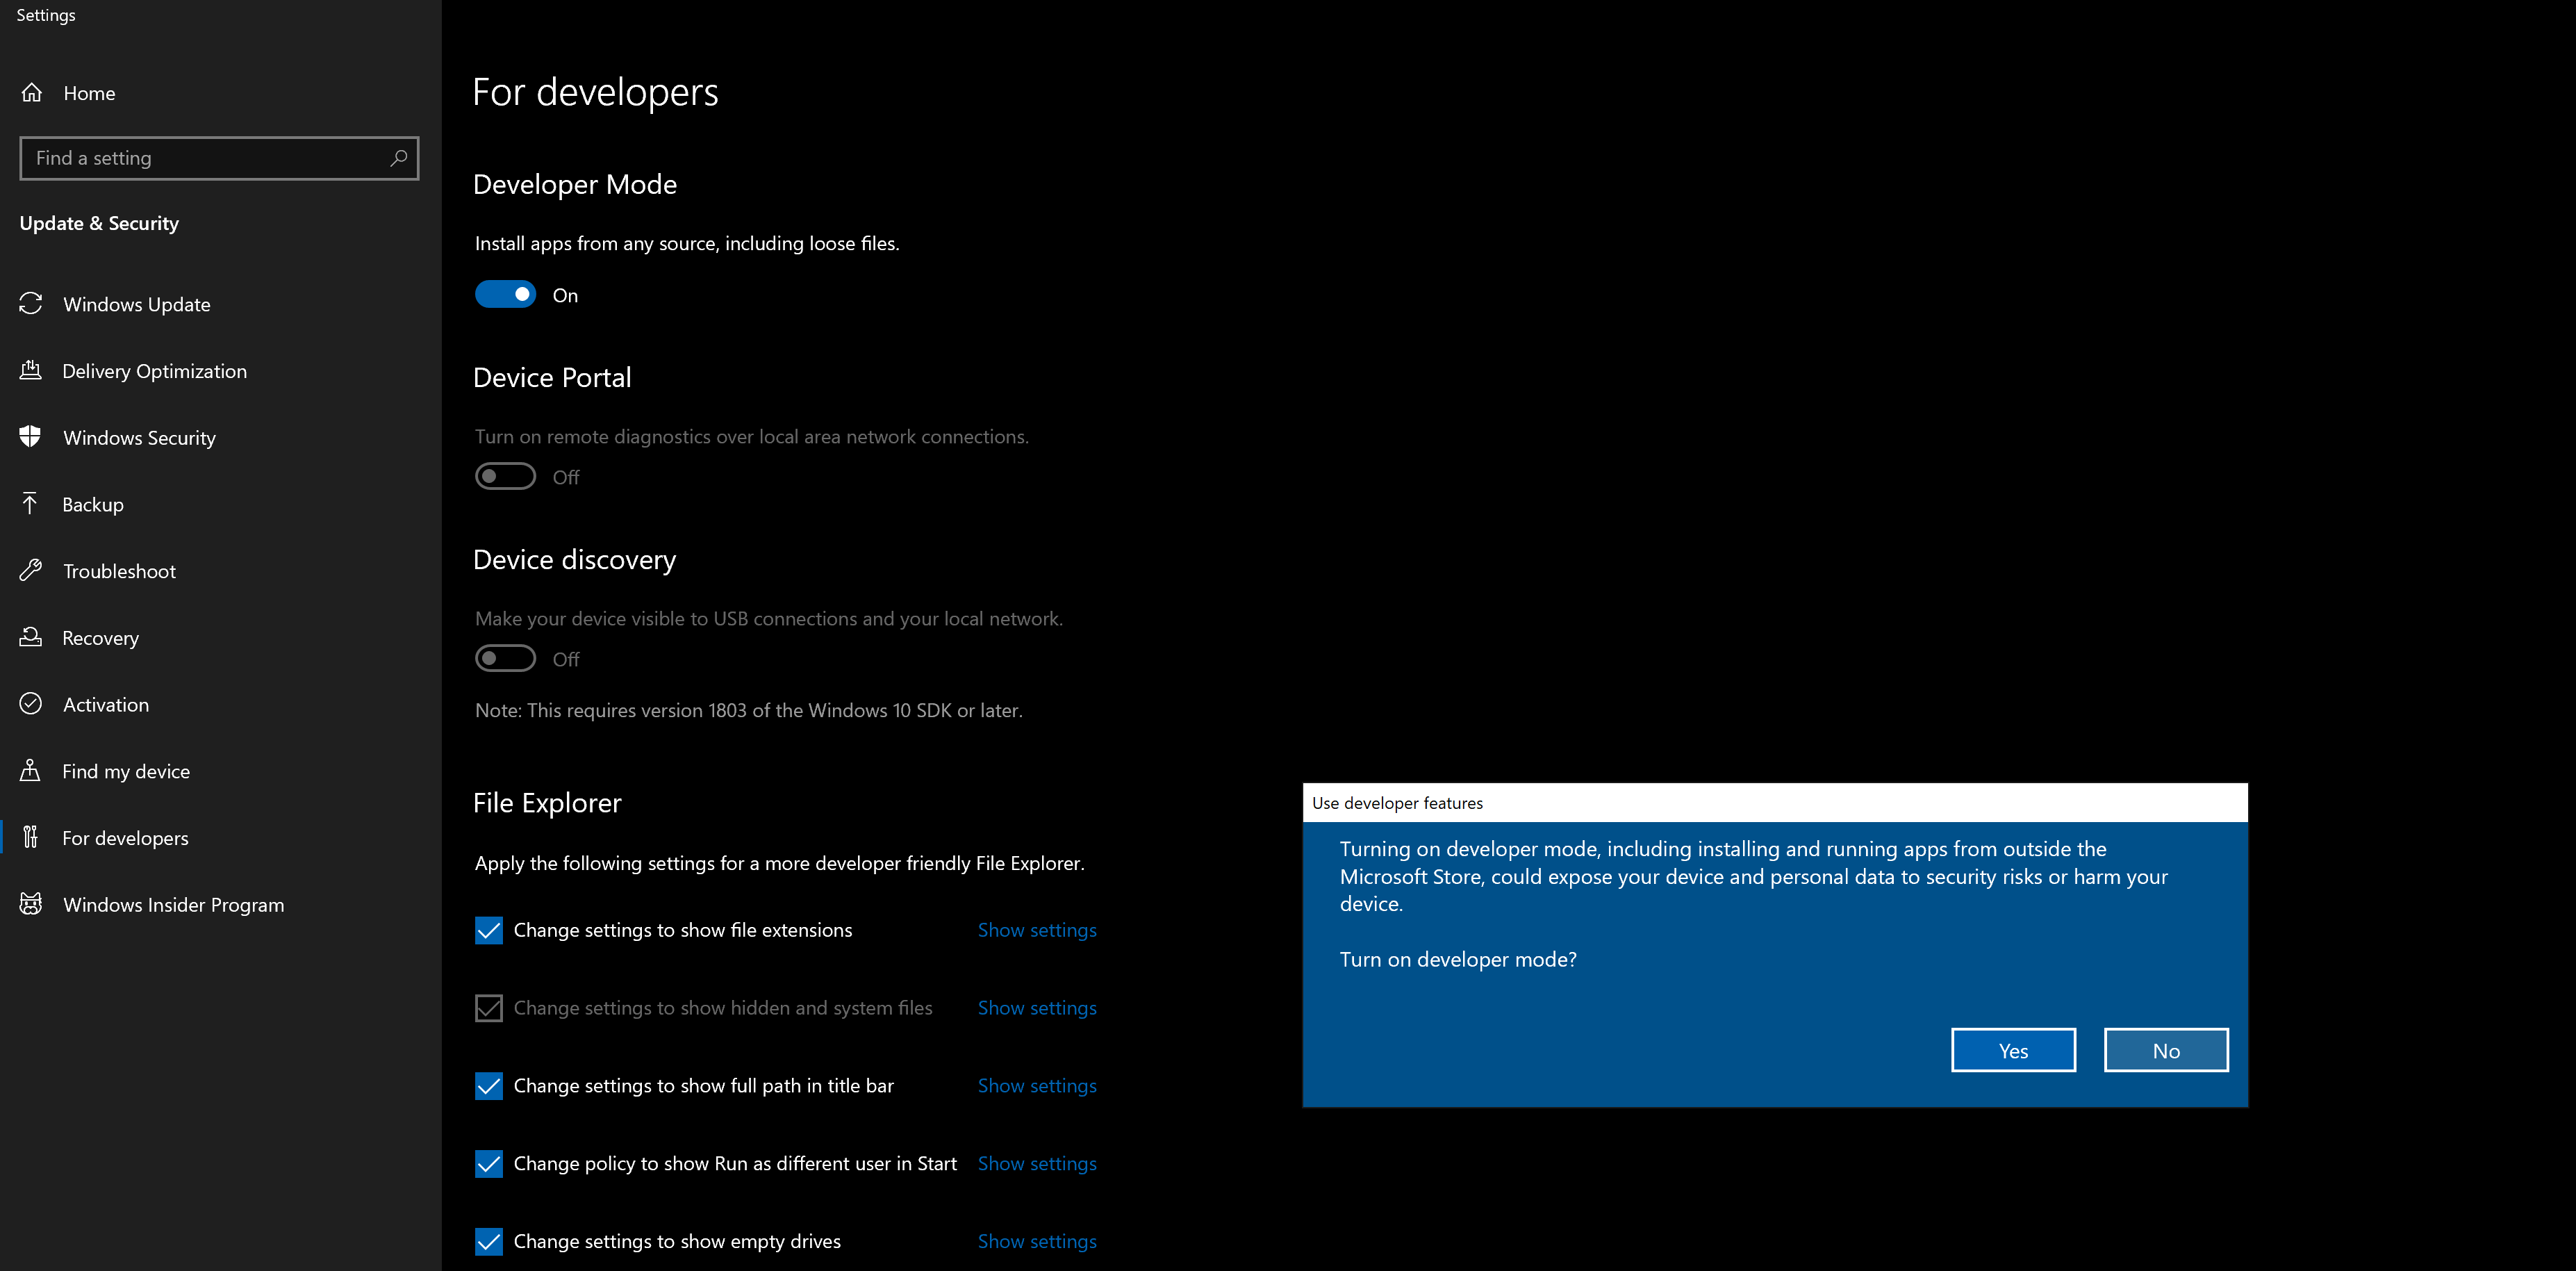
Please be sure to enable Developer Mode in Windows to run WinAppDriver.
Enlarge

developerMoDE Let’s create our first class that will contain the basic Setup to open the app and create the WinAppDriver session.
To be able to use WinAppDriver classes and methods we need to add to our project more Nuget packages, in this case, Appium.WebDriver.
Using AppiumOptions we can add capabilities, like “app”, this one can get whether the path location to the app or its specific ID, for default Windows apps, it’s better to use this ID, by going to PowerShell and typing “get-StartApps” and locating the Calculator app to obtain it.
Additionally of just creating the session, we are going to add two more methods, one to validate if WinAppDriver Process is already running and the other to Start WinAppDriver else, these methods are useful to avoid having to run WinAppDriver manually.
We can avoid opening the cmd with WinAppDriver logs, but I recommend it to validate the commands and interactions received by WinAppDriver.
Automation Framework
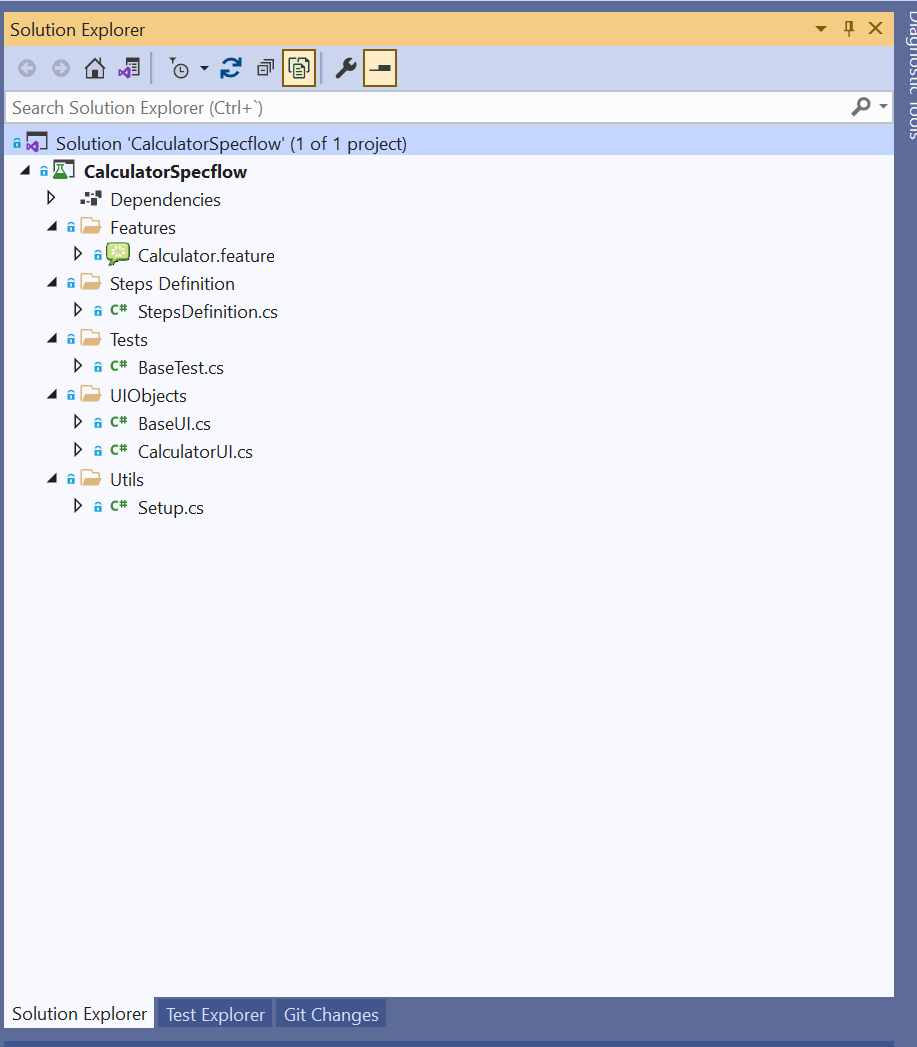
Create the Class “Setup“ under the folder “Utils“.
Let’s create our first feature file, which will contain all the steps need it to make a simple addition of two numbers, this feature file is made using Gherkin, which uses Natural Language. Keep in mind that steps in feature files have to be really simple and easy to understand by every person in the team.
Create the Feature file “Calculator.feature“ under the folder “Features“.
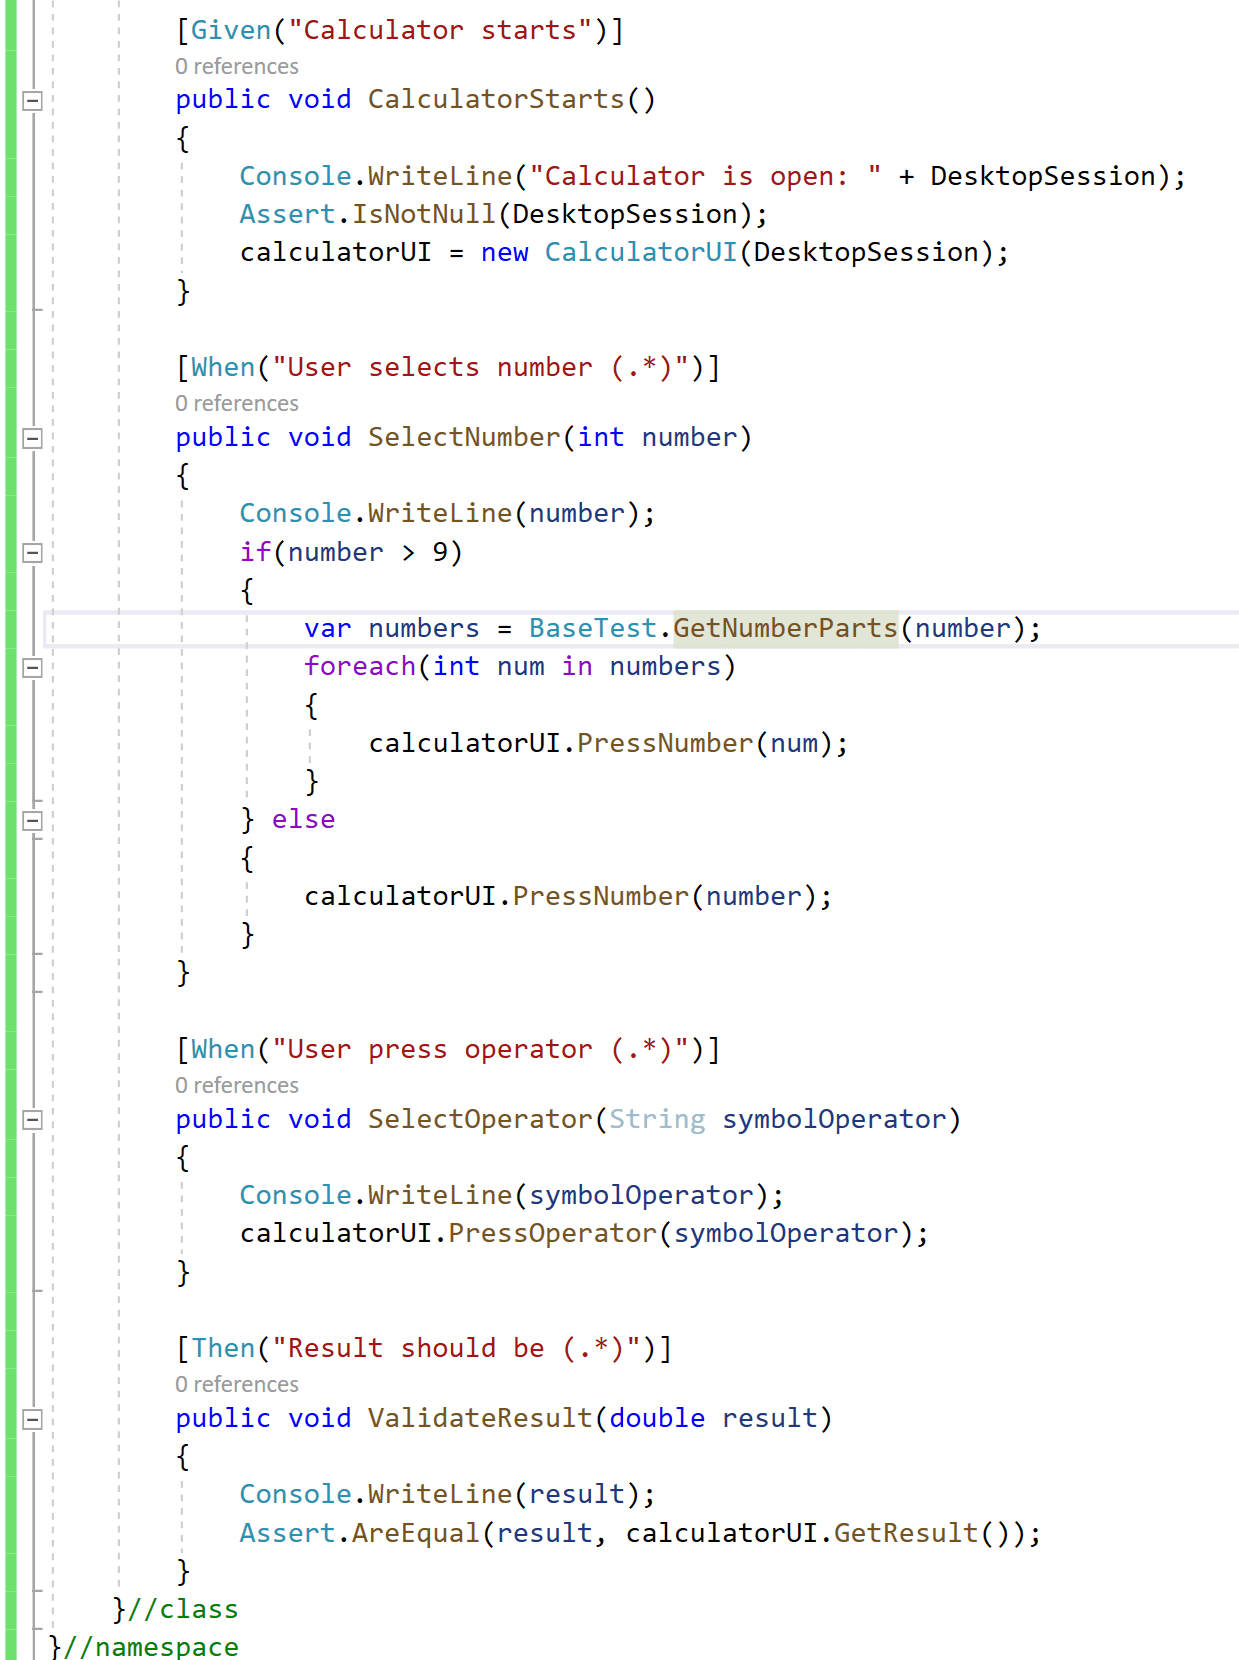
Once we have our Feature file, we have to bind these steps to our code, we are going to create a new class that will contain Methods bound to the steps in the feature.
To get the elements of the calculator, we need to use “inspect.exe” available inside Windows SDK Kit, located at “C:\Program Files (x86)\Windows Kits\10\bin\10.0.22621.0\x86\inspect.exe”.
Open Calculator, and then execute “inspect.exe“, hovering on the element you want to know the locator.
We have different types of locators, but it is always recommended for integrity and speed to use “AutomationID“, as it is unique, if this ID is not defined, we can use “ClassName“, “Name” or get the “XPath” of the element verifying the DOM of the application. It is also possible to use multiple locators.
To have a good handle of WinAppDriver Process, WinAppDriver CMD, and the Calculator App, we need to add two basic methods, one is “BeforeScenario” which contains the creation of WinAppDriver Process, CMD, and the opening of the Calculator.
Next, we have “AfterScenario” which contains the Teardown of all these objects, we can also add other actions that we want always to run when a test finishes, like the creation of evidence, upload of results, and so on.
Create the Class “StepsDefinition“ under the folder “Steps Definition“.
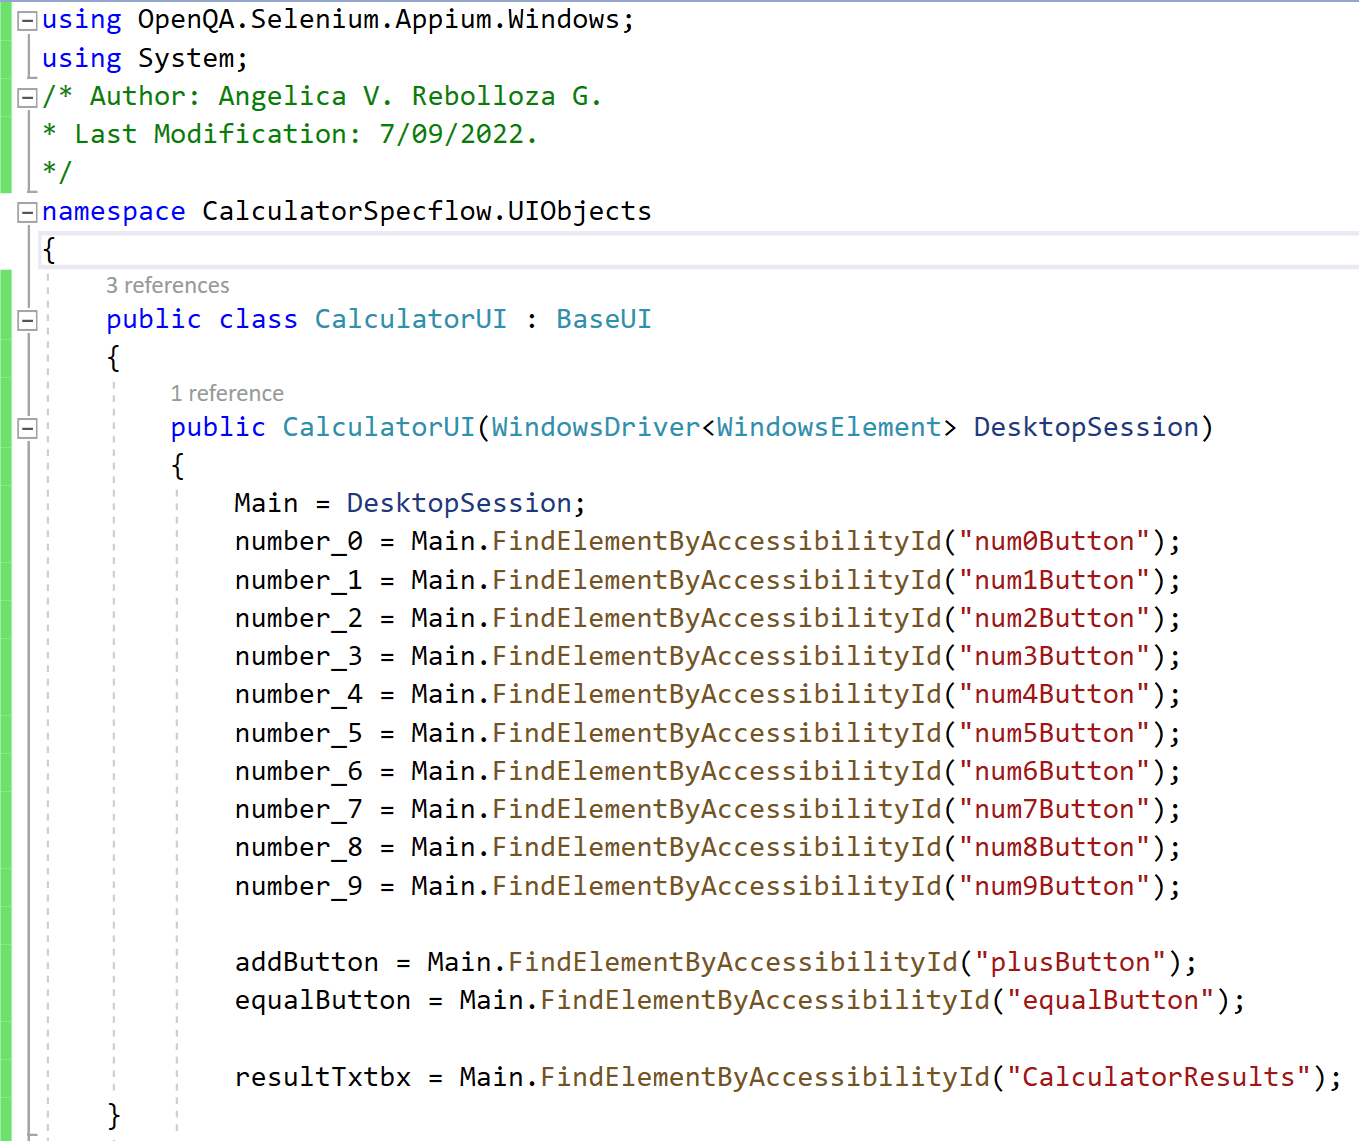
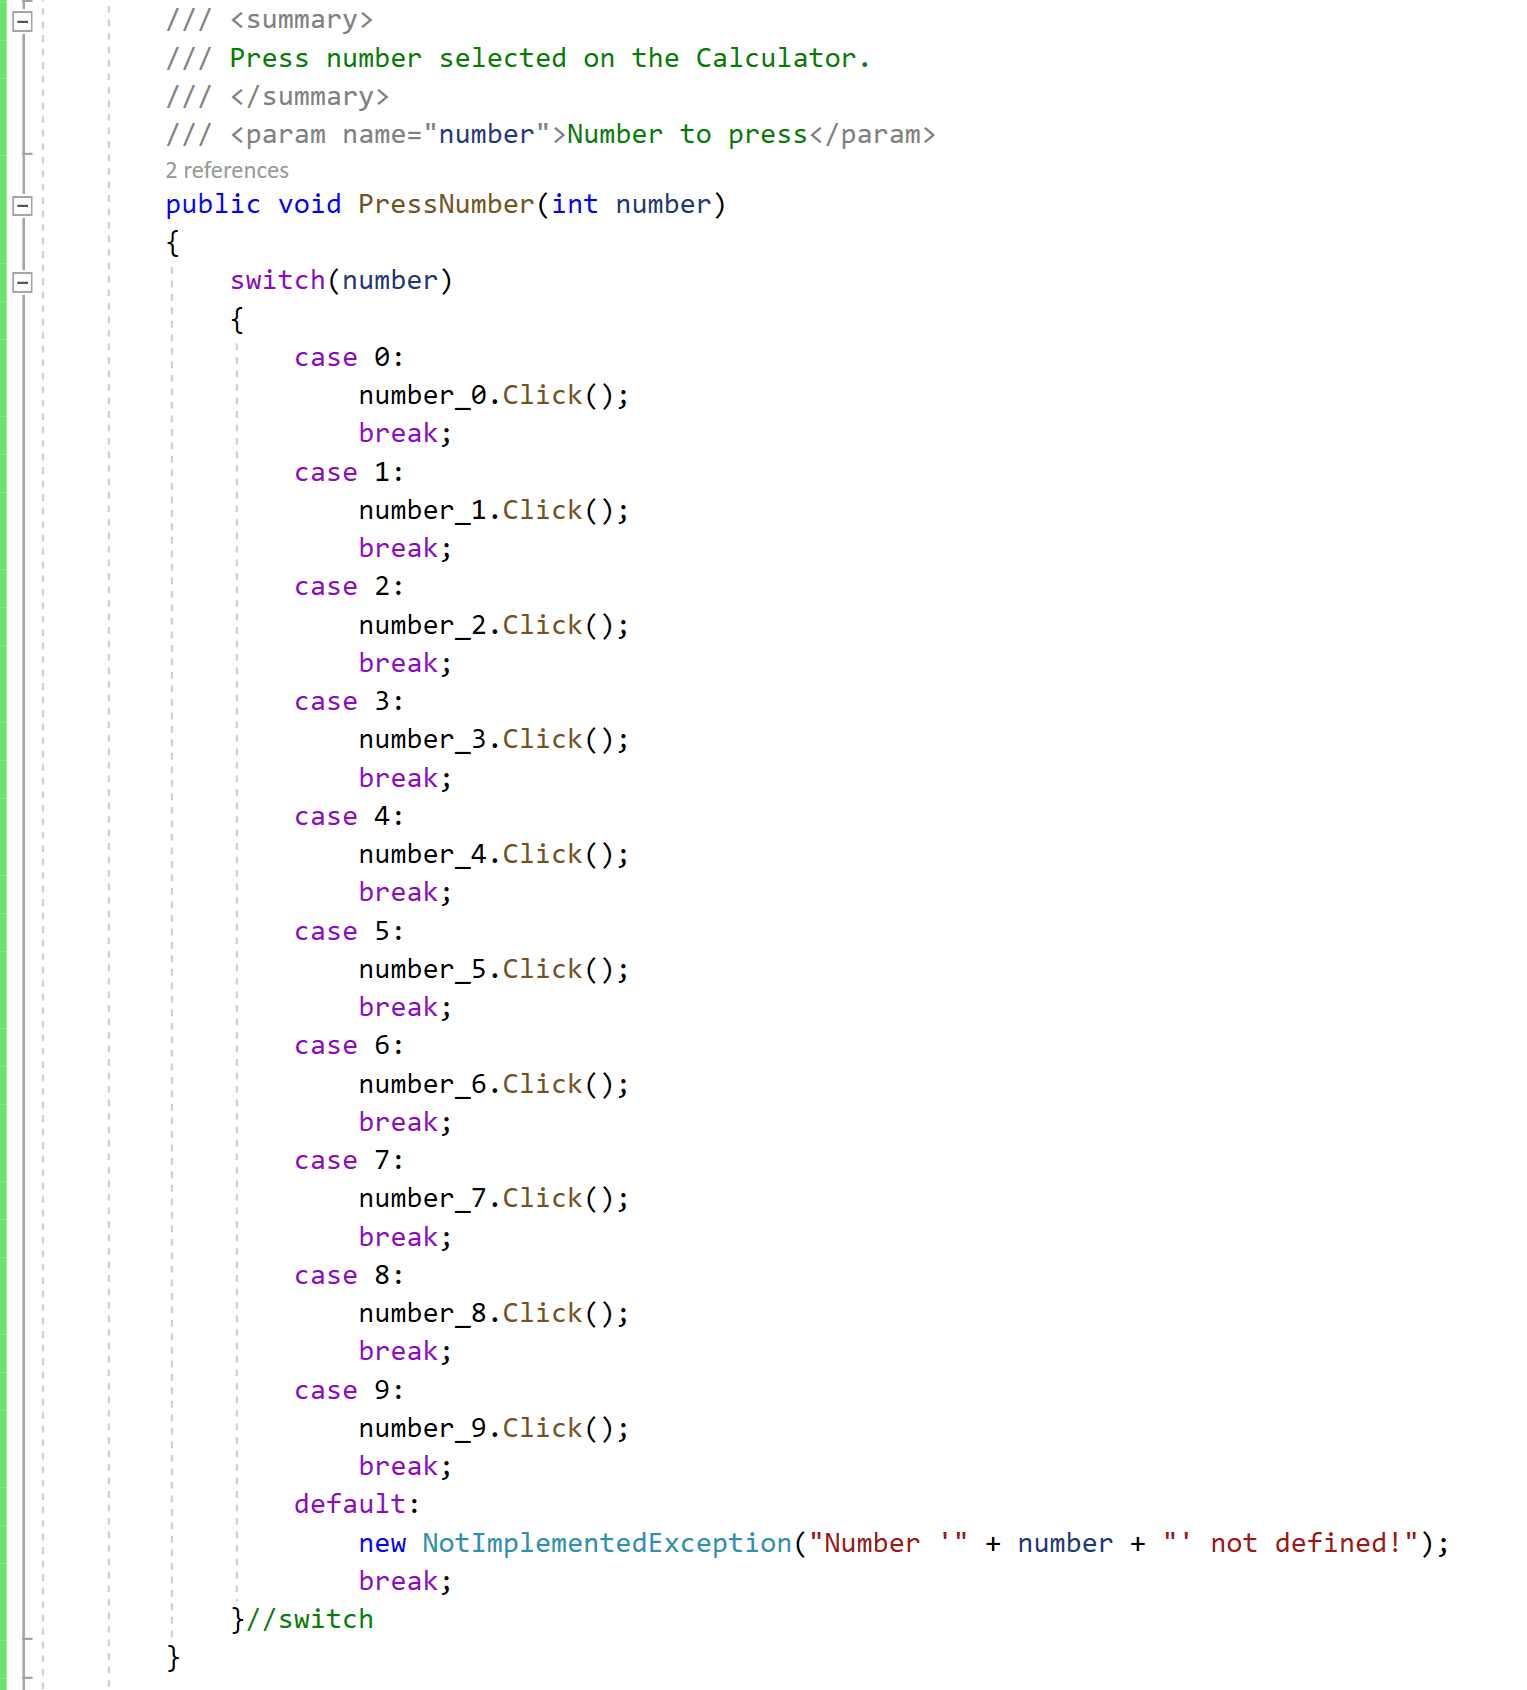
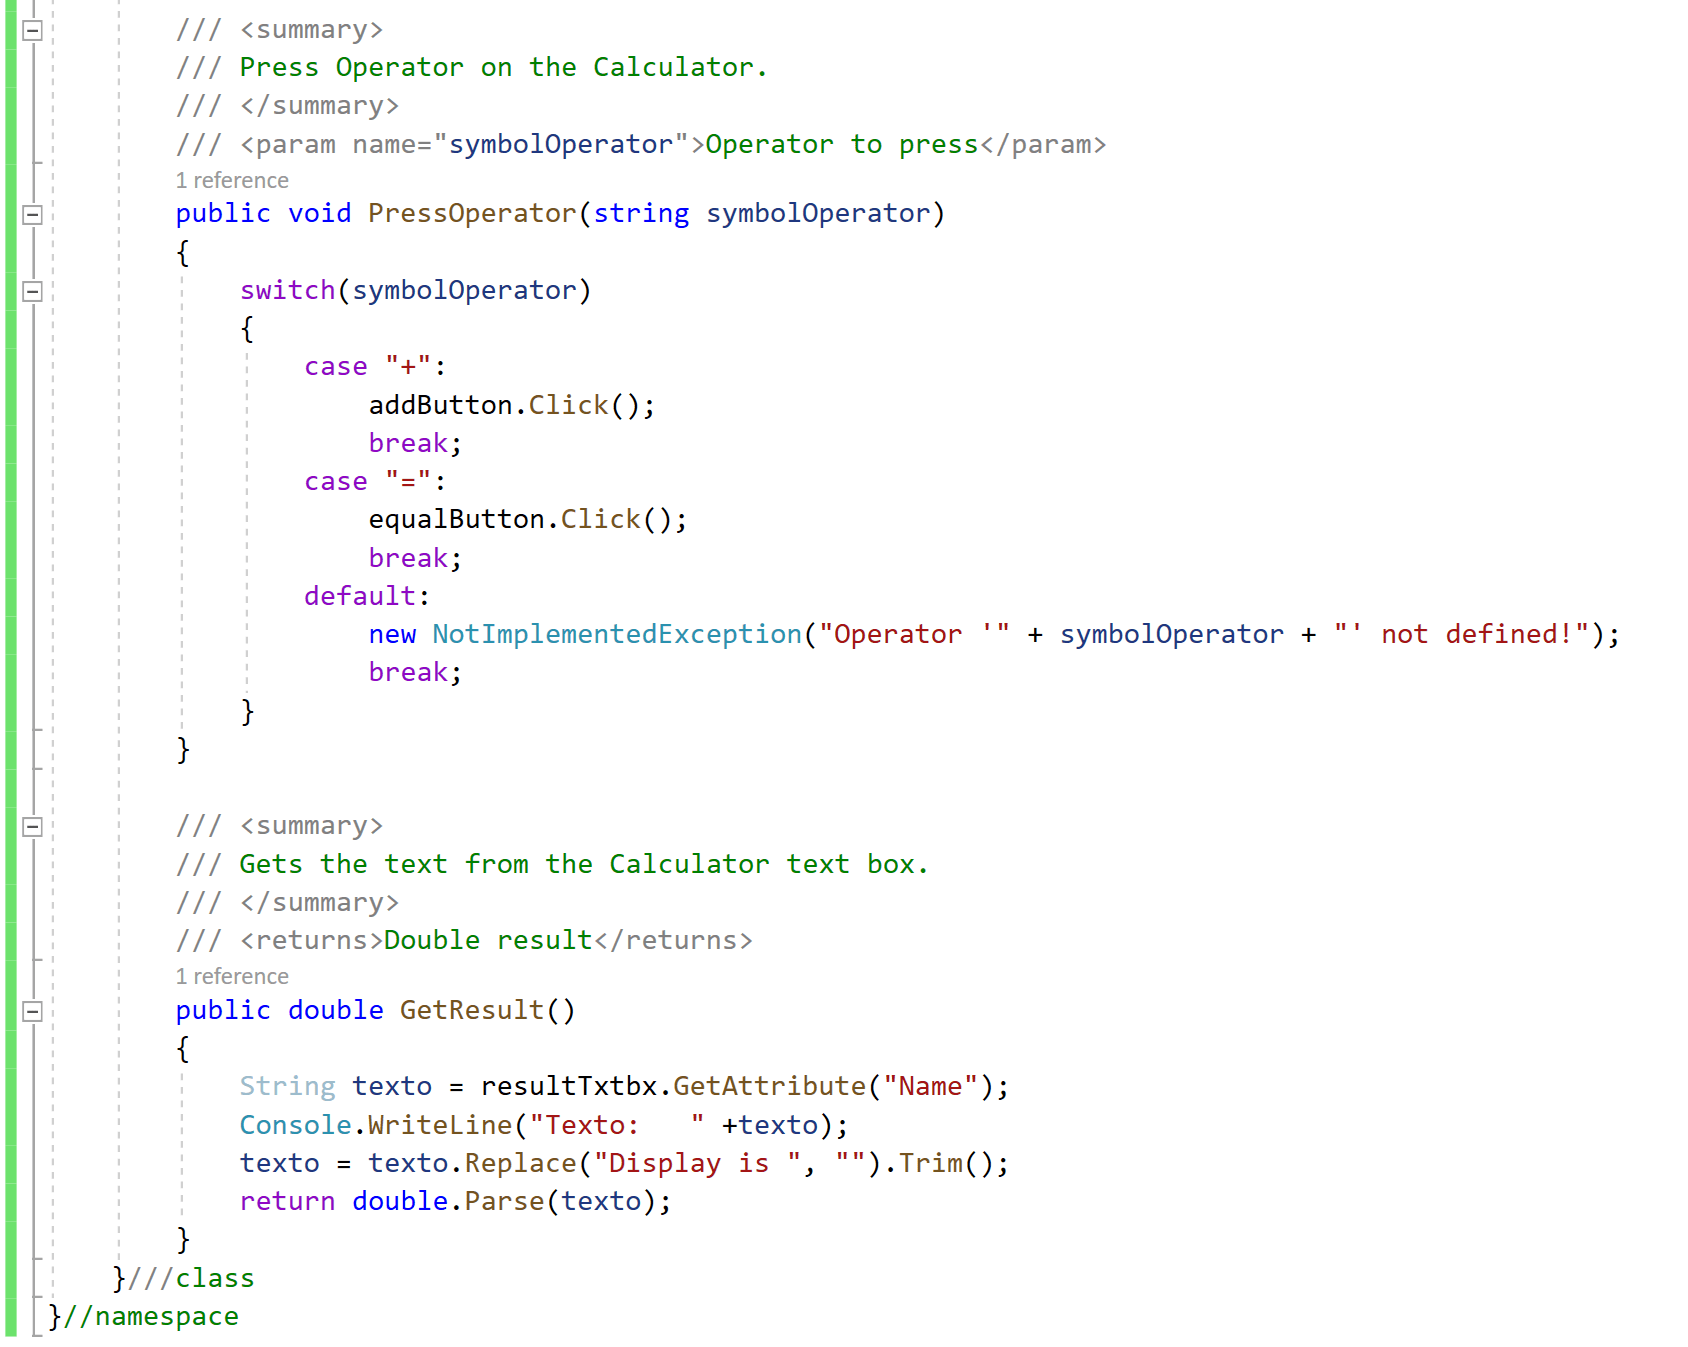
“CalculatorUI“ is a class that will contain all the actions on the UI, like pressing buttons.
Let’s take a look at the “CalculatorUI” class under the folder “UIObjects“.
“CalculatorUI“ extends from “BaseUI“, under the same folder “UIObjects“, which contains the definition of all elements used on the Calculator Main Page, and these are initialized in “CalculatorUI“.
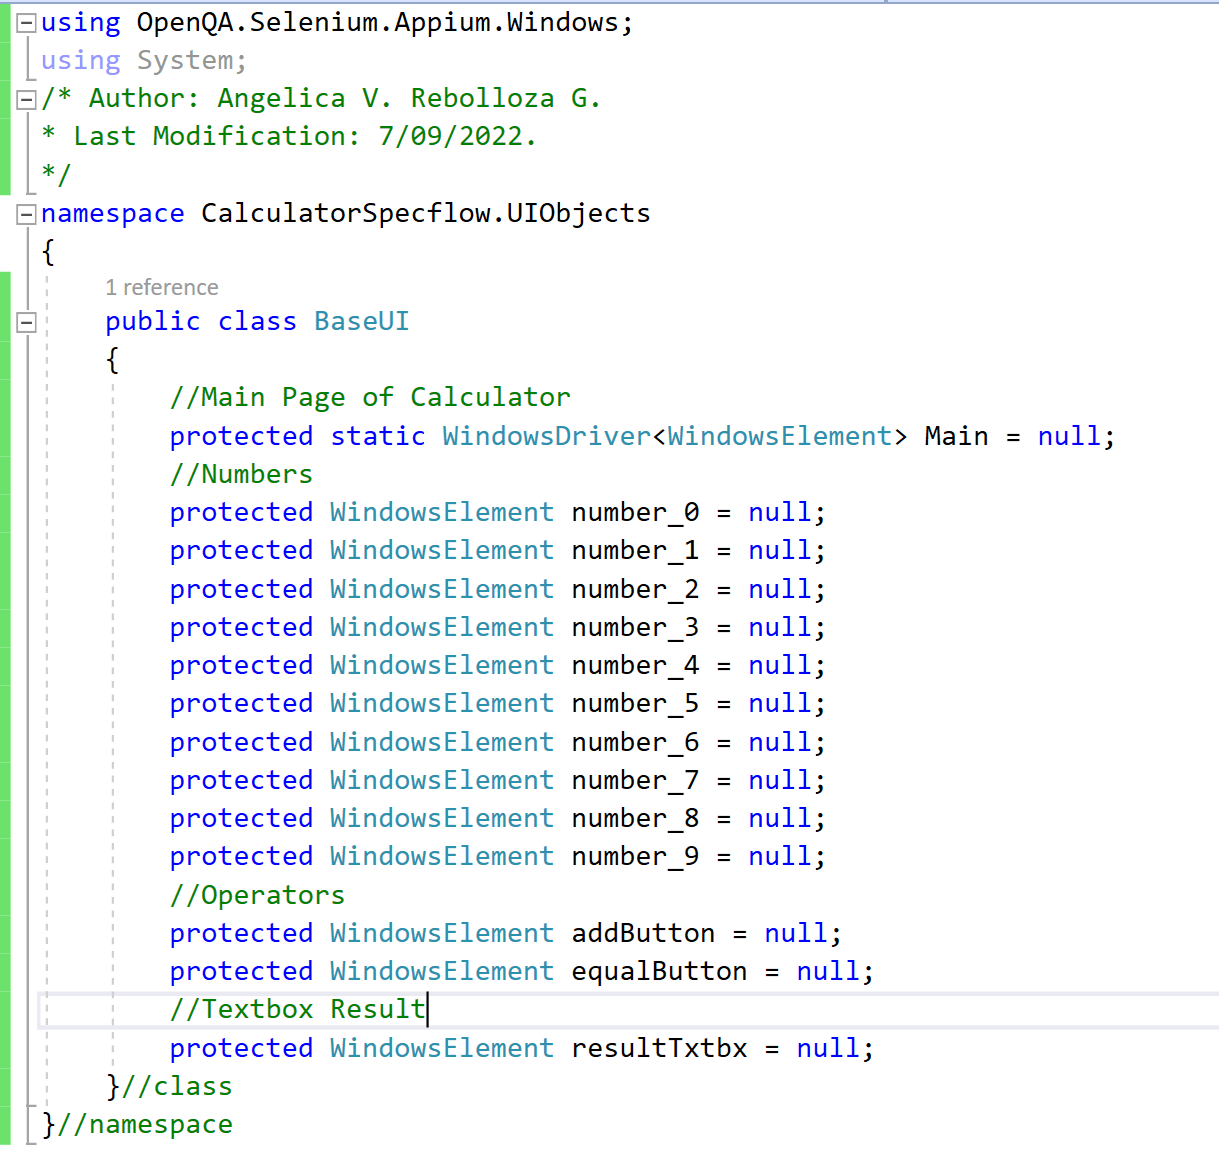
If we review “BaseUI“ it contains the definition of all elements used by “CalculatorUI“.
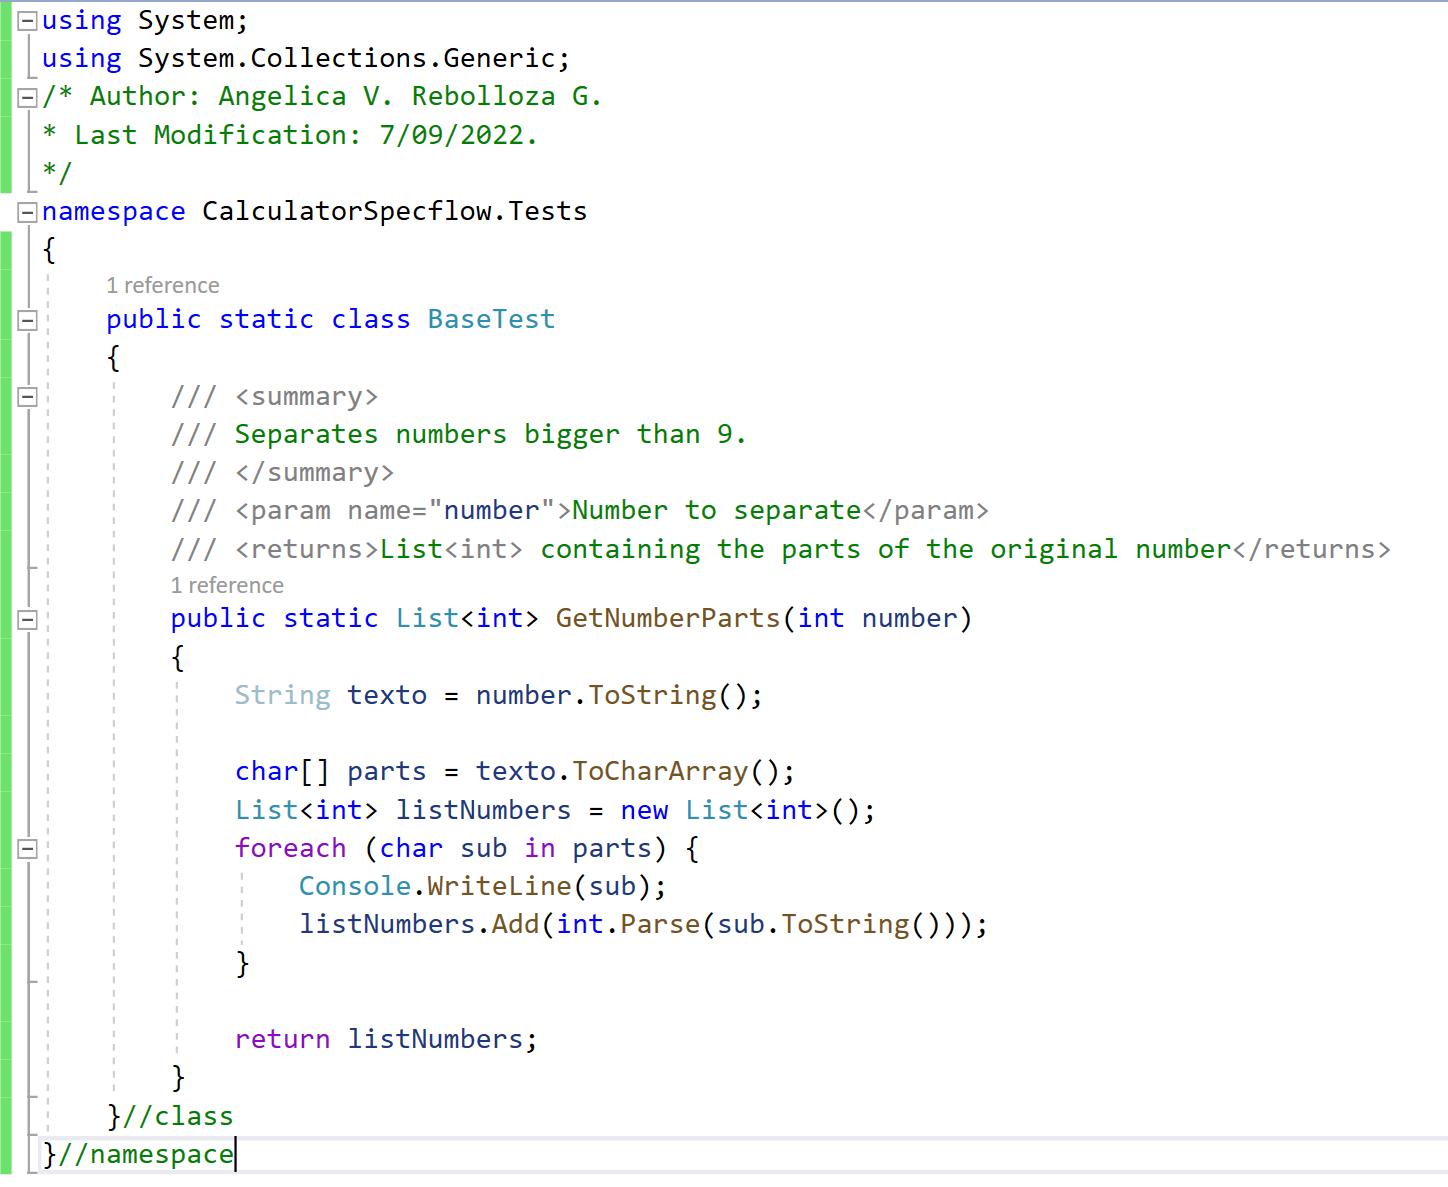
Additionally, to these classes, there is one more class called “BaseTest“, this is a static class that contains extra actions need it, like in this example, contains a special method to separate numbers bigger than 9, to be able to introduce them in the calculator.
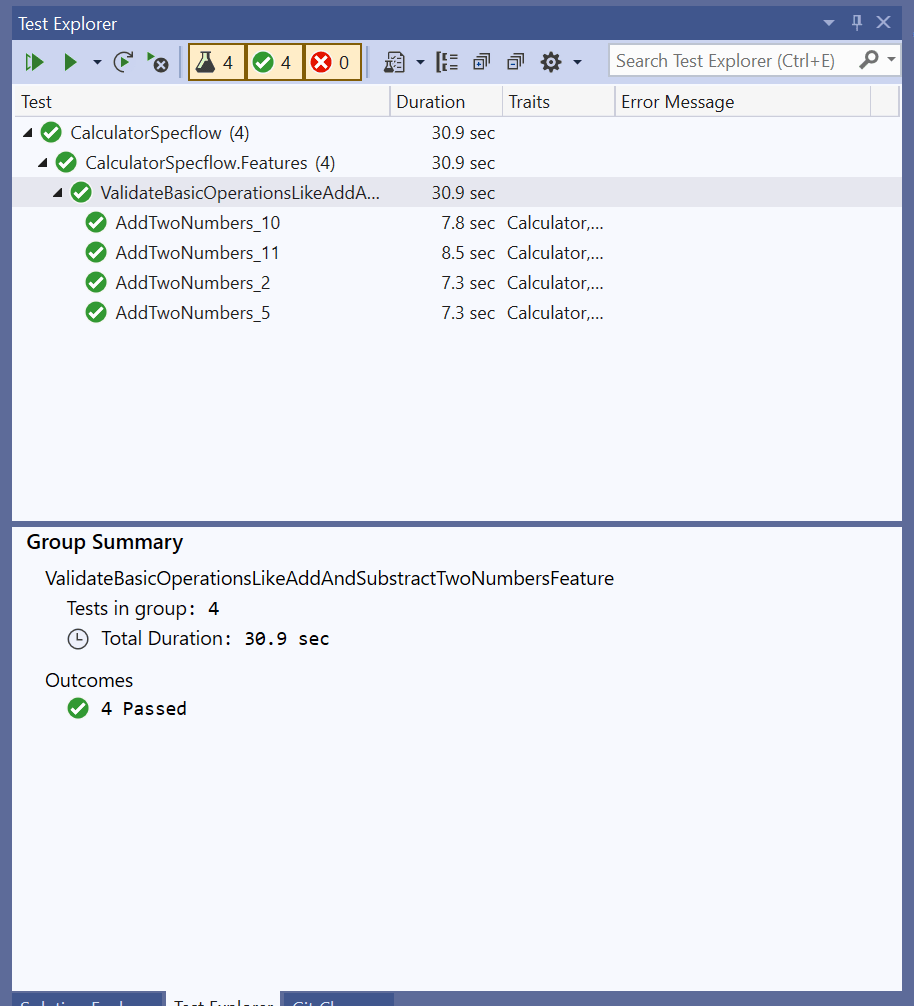
Finally, we can run the test, using “Test Explorer” from Tools in VS.
If you want to download the Project, it is available at Github.
Link of interest:
Automating with Appium – Selenium and TestNG
The Agile Team Approach
The Scrum Team Size
Speed Up Android Testing with TestProject AgentAny help is welcome to help us keeping this effort alive!BTC (Bech32): bc1qx6f8nczr5ram6d57svlnsfmk5mhu6lsr9q7mxwLTC: LdiiMfiJvqrXDw1xPMqDptXGFEkyADZzVVDOGE: DKehWtHnmrf7JTRWpEQ9LtqwqY8HdbdkbUSOL: 3f2RR9w2VwmBqjLm5DmbuUPwWfdYH7GXCbHVWhsq5sky
Angélica Viridiana Rebolloza
Computing Engineer specialized in Automation, working with different tools for Mobile and Web, using languages, tools, and platforms like JAVA, VBScript, JavaScript, C#, Appium, Protractor, UFT (QTP), Selenium, WinAppDriver, Jenkins among others.
Viridiana also has been working using practices like TDD & BDD under Cascade and Agile approaches.
Some certifications include: ISTQB Foundations Certification, SeU Selenium Certified, ITIL Foundations Certification.
No Comment
To have better control and management of our code deployments is highly recommended to upload a project to Github using the command line, in other words, have our code uploaded to a Cloud Repository like Github since is the most used cloud repository used out there, but we can also use other options like Bitbucket or an already implemented solution like Azure DevOps that integrates It’s own cloud repository but also has a connection with Github If is needed.
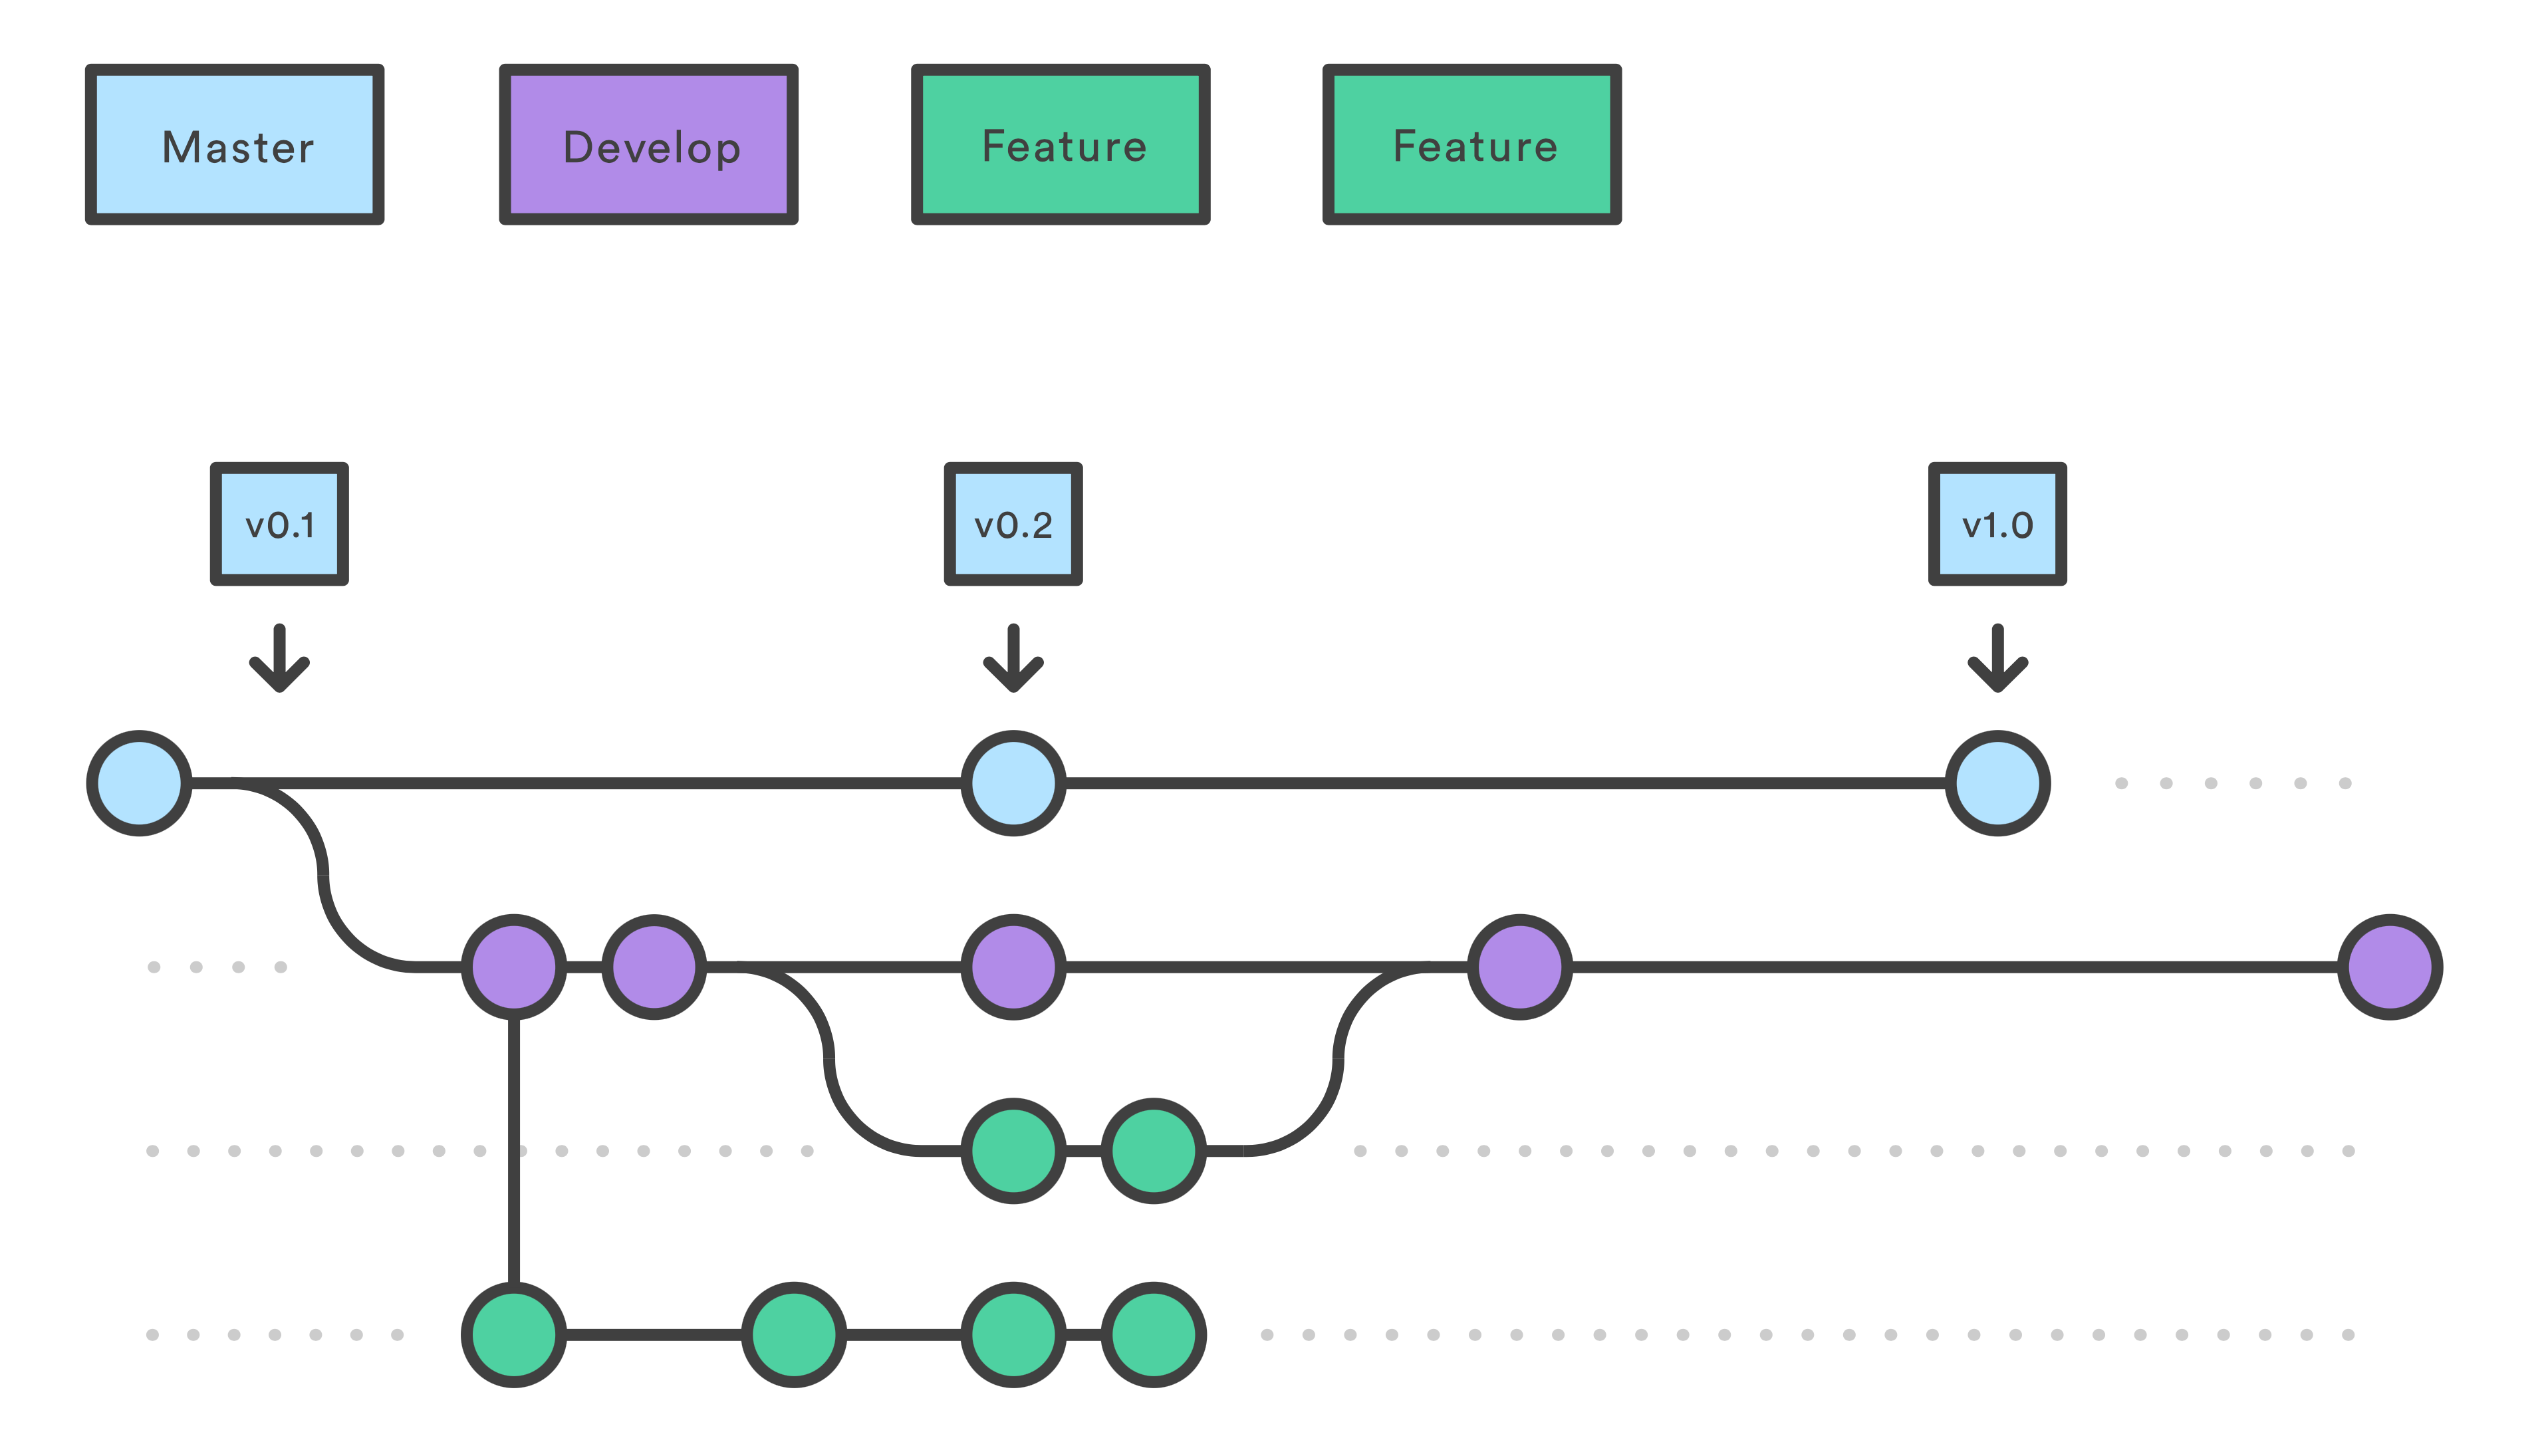
Github is a version control system, this helps us to manage modifications and keep them in a central repository, where a group of developers (contributors) can upload their changes, revert changes, and have to keep each version stored in branches to avoid code conflicts and assure the code integrity and stability.
It’s important to mention that our code repository is going to be stored in “Branches“, “Master Branch” is our main branch where the last stable and verified version of our code has to reside. The rest branches that we create along the way are where the changes like new functionalities, updates are going to be made for later merge them with the Master branch.
In this post, I’m going to teach you how to upload for the first time a workspace project to Github using the command line.
For later management I recommend you to install Github desktop at https://desktop.github.com
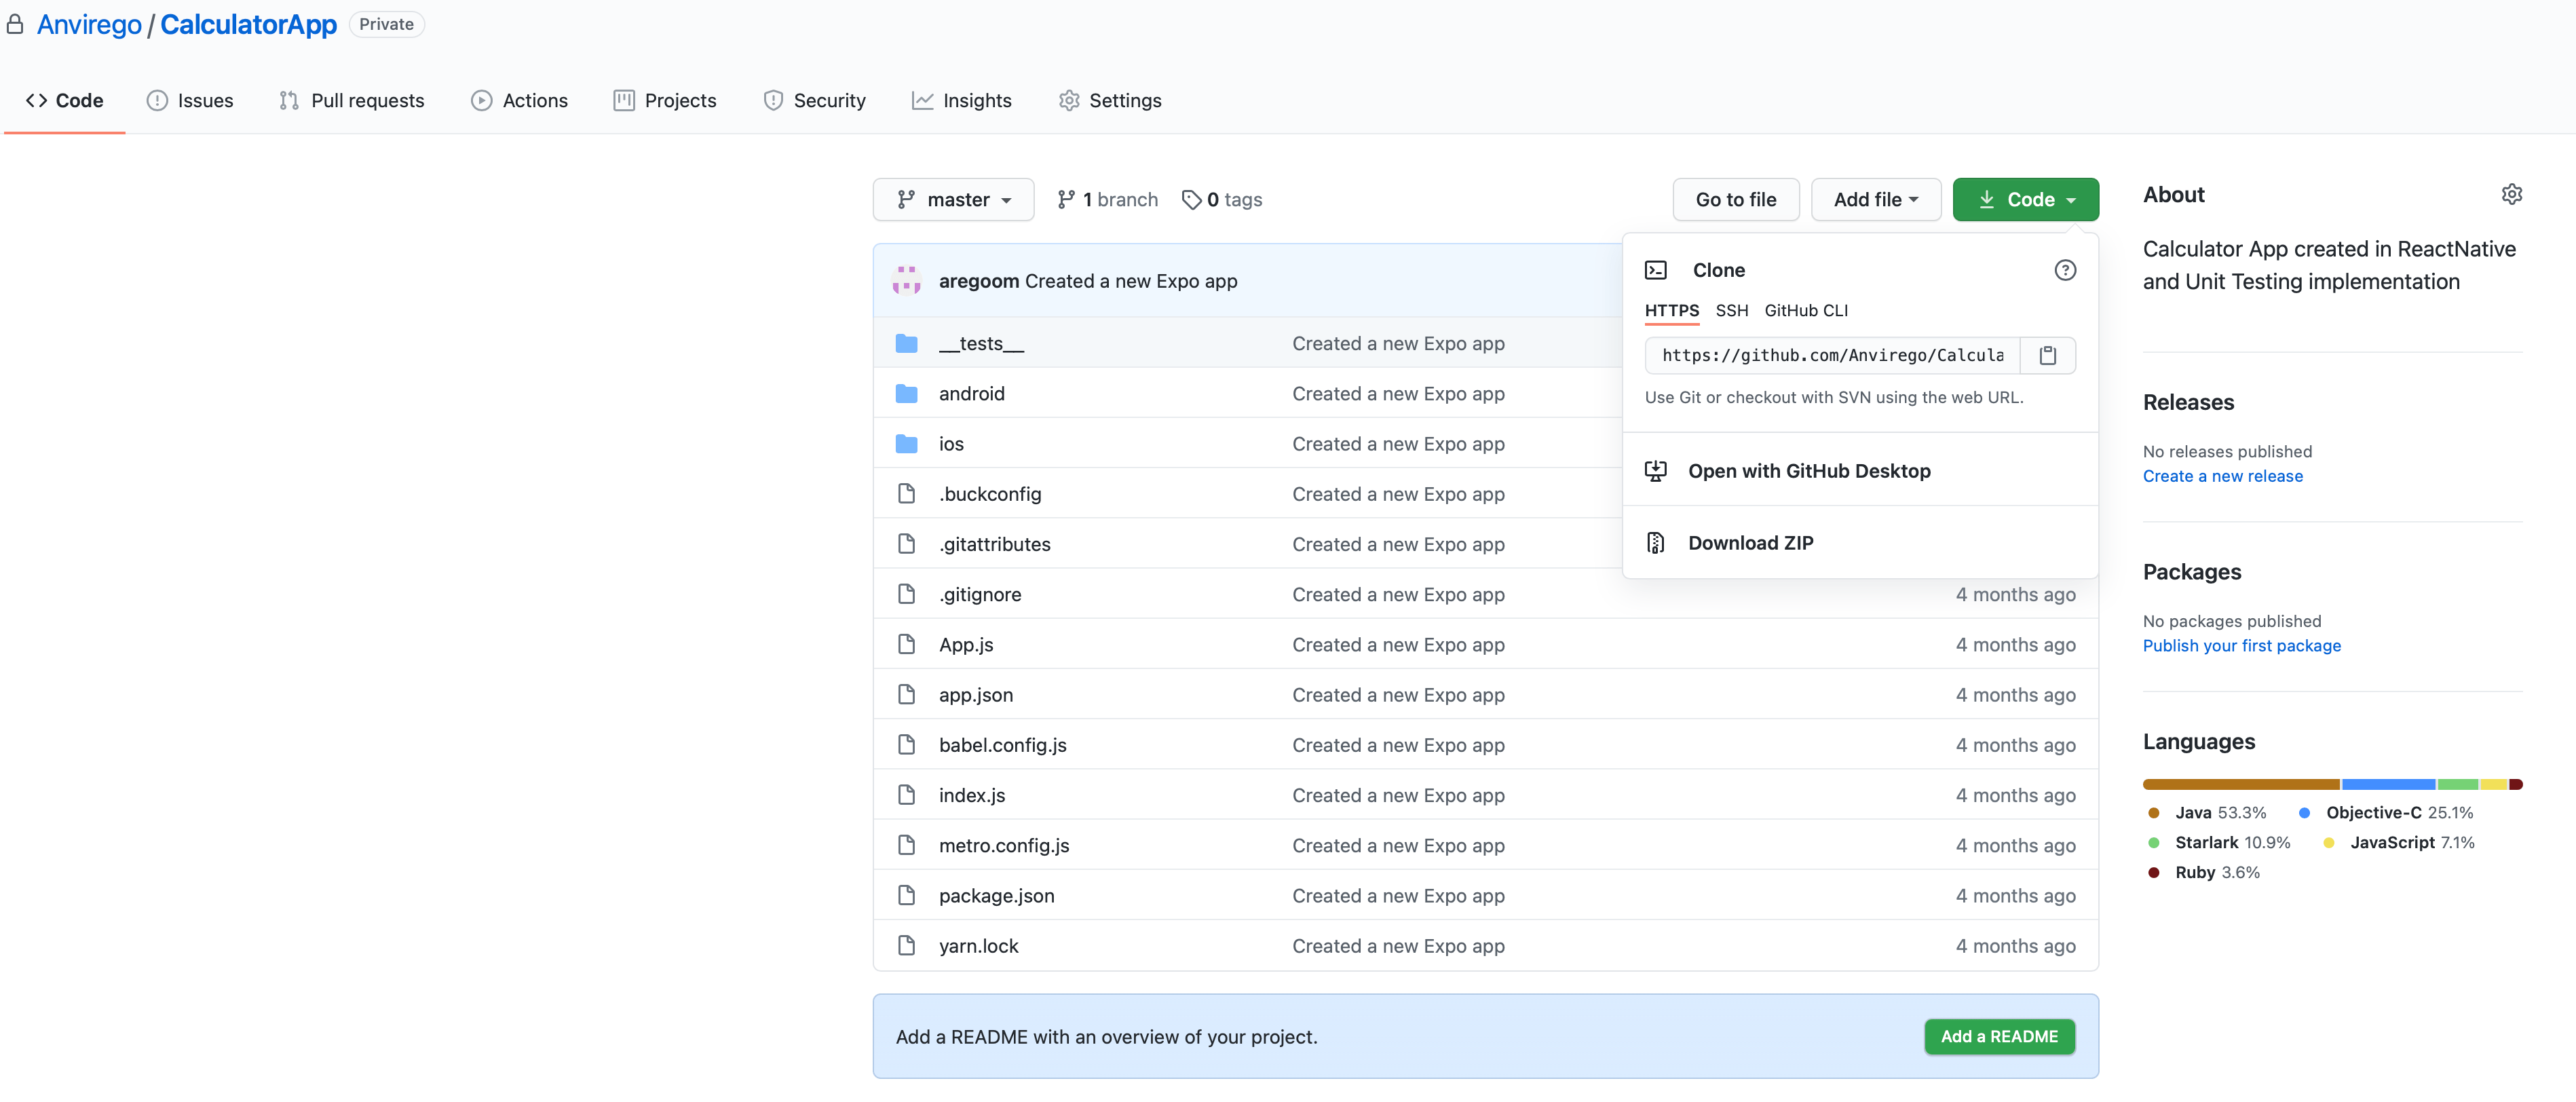
Let’s upload our React-Native mobile app called “Calculator“.
Create Repository
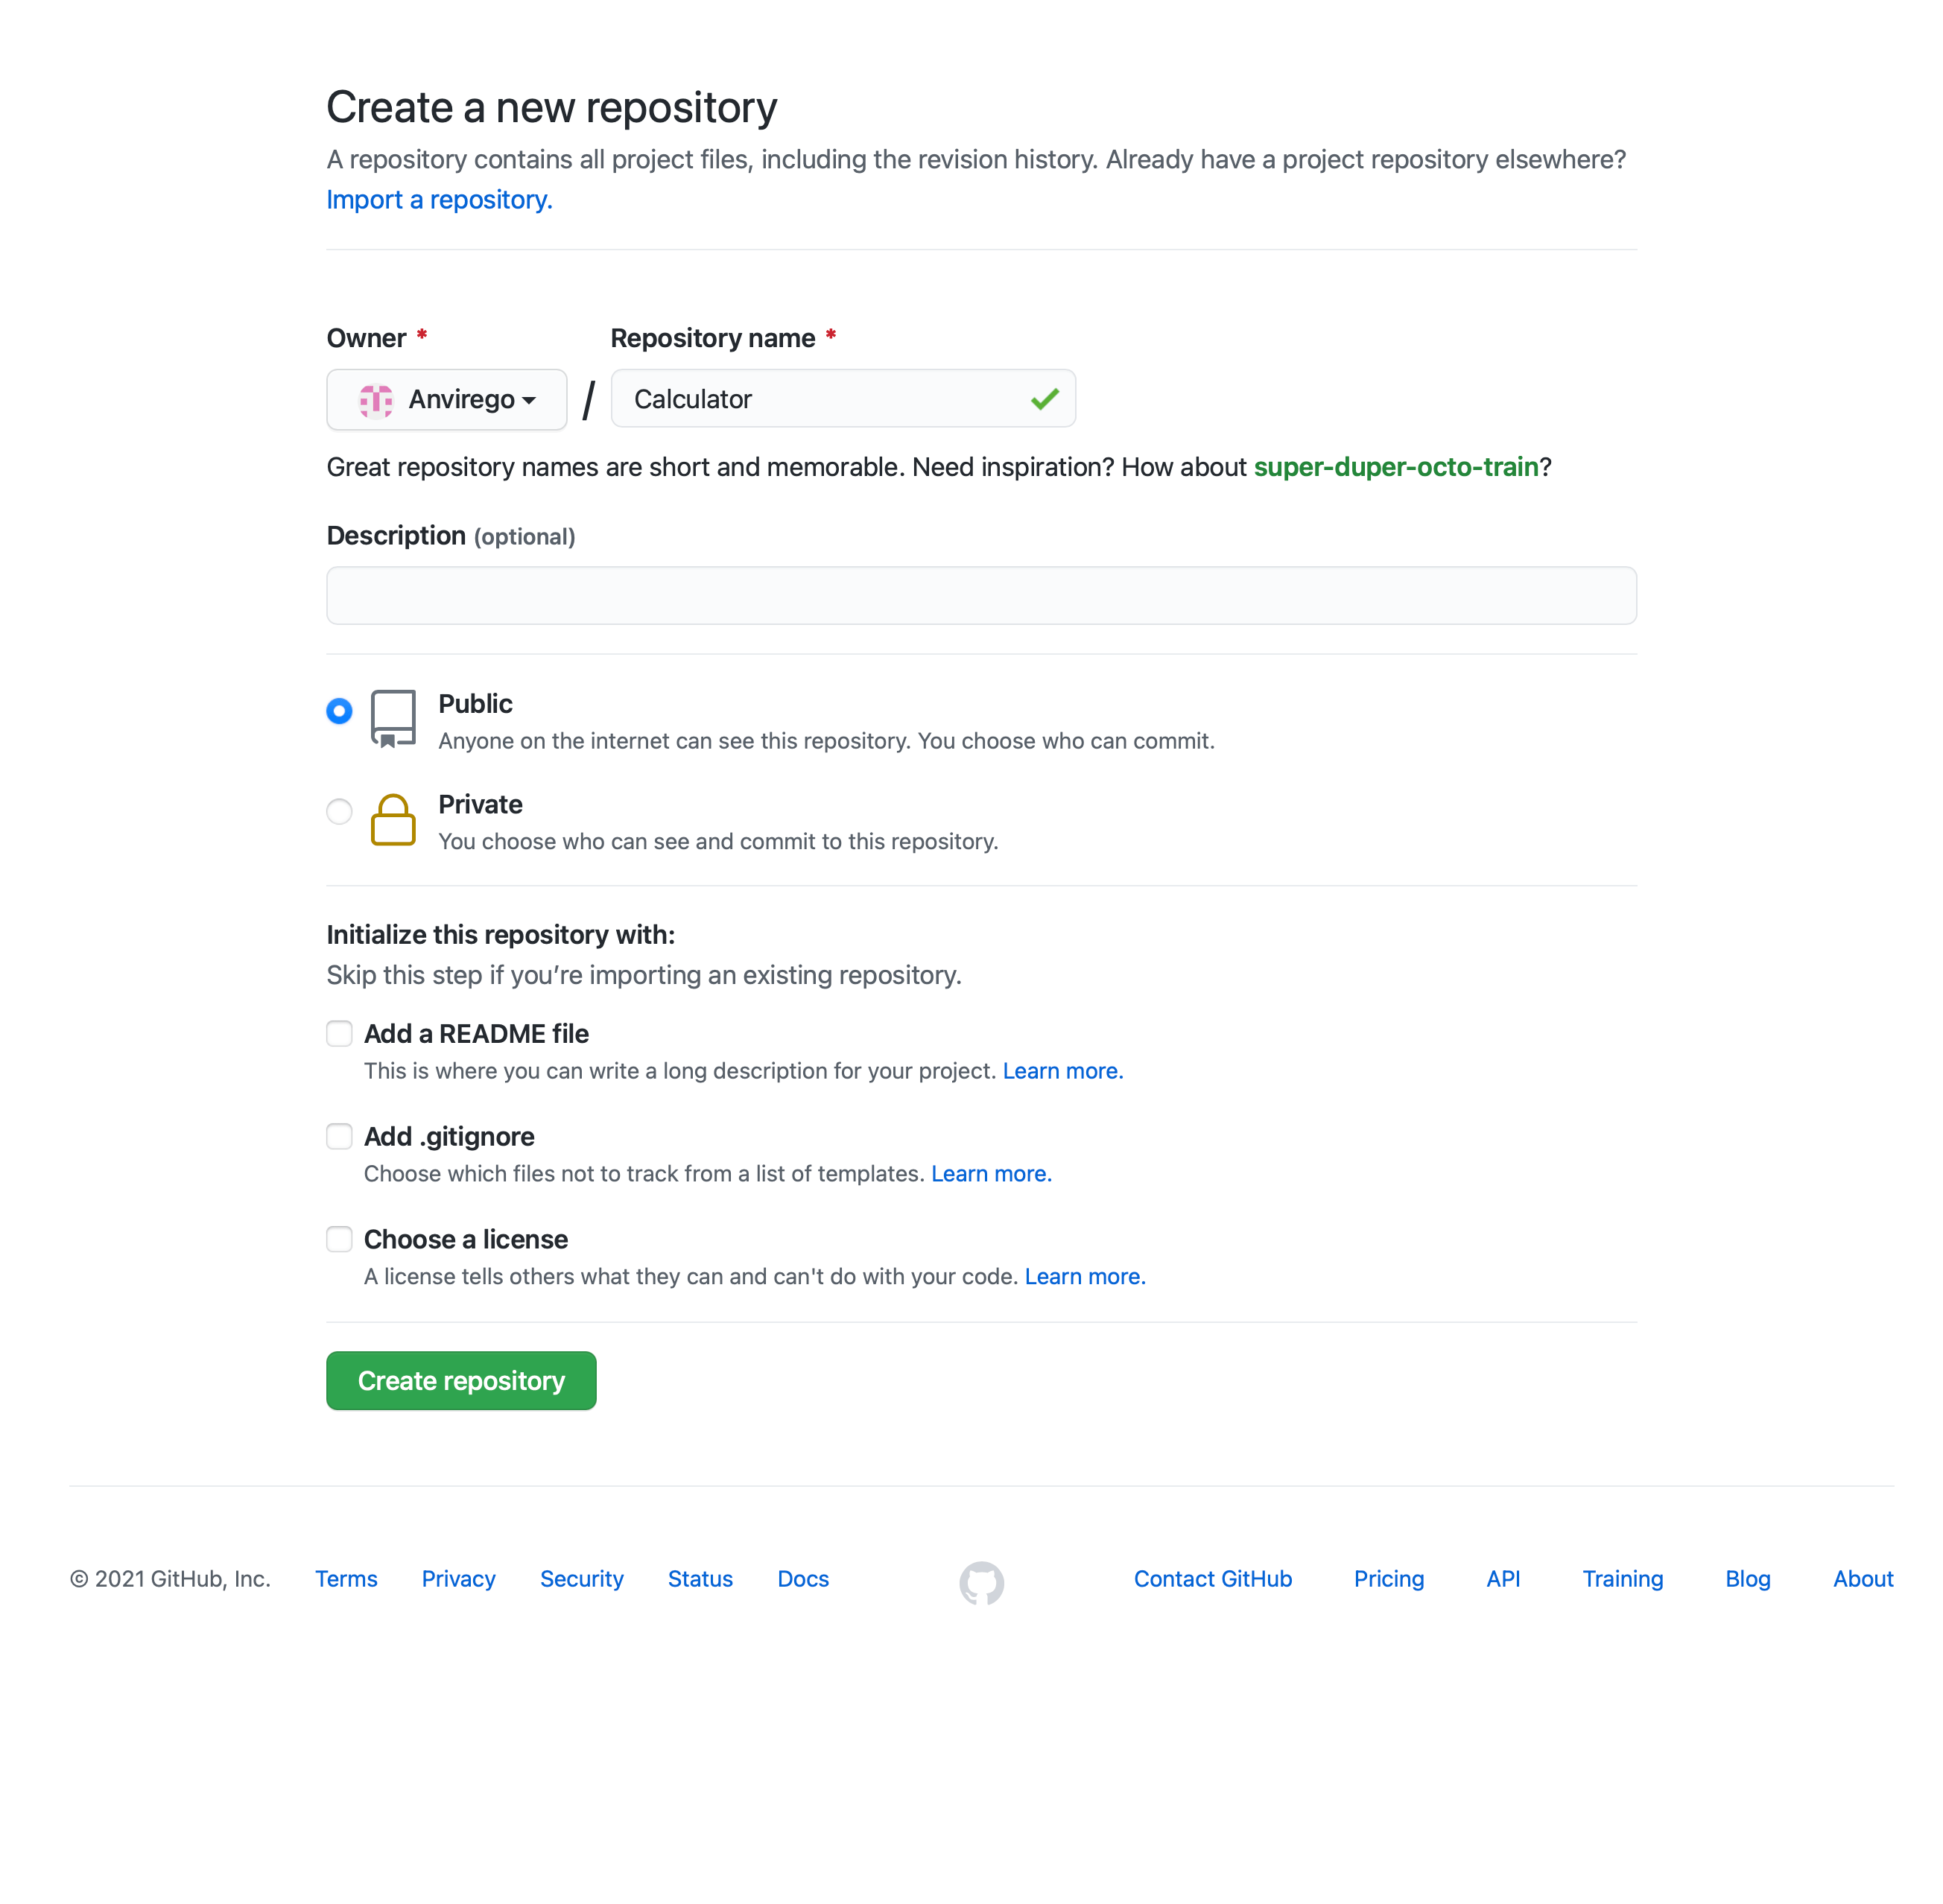
First, we need to create a new Repository, for this go to your main page in Github, and click “New“.
Insert the name of your Repository and choose whether is going to be “Private” or “Public“, for credential management is easier to have as public, if you want it to keep it as “Private” keep in mind that you will need to create an SSH Key to been able to log in with other apps like Jenkins.
Once the repository is created go to this repo and save the URL of this repo, we’re going to need it later.
Command Line
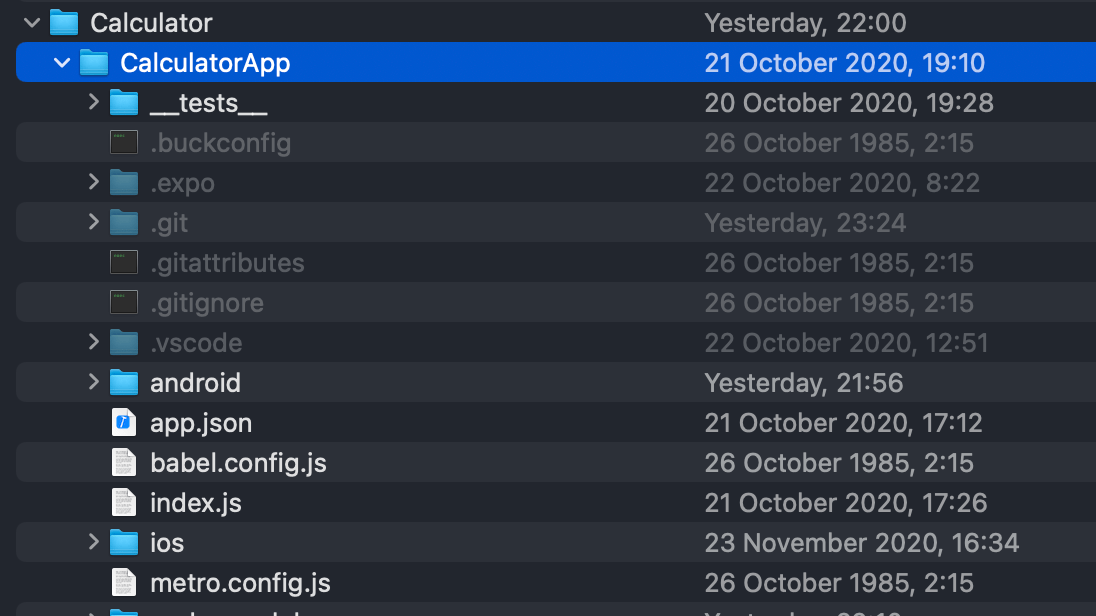
Open cmd and position on the workspace path, like “/Users/angelicaviridiana/eclipse-workspace/Calculator/CalculatorApp“.
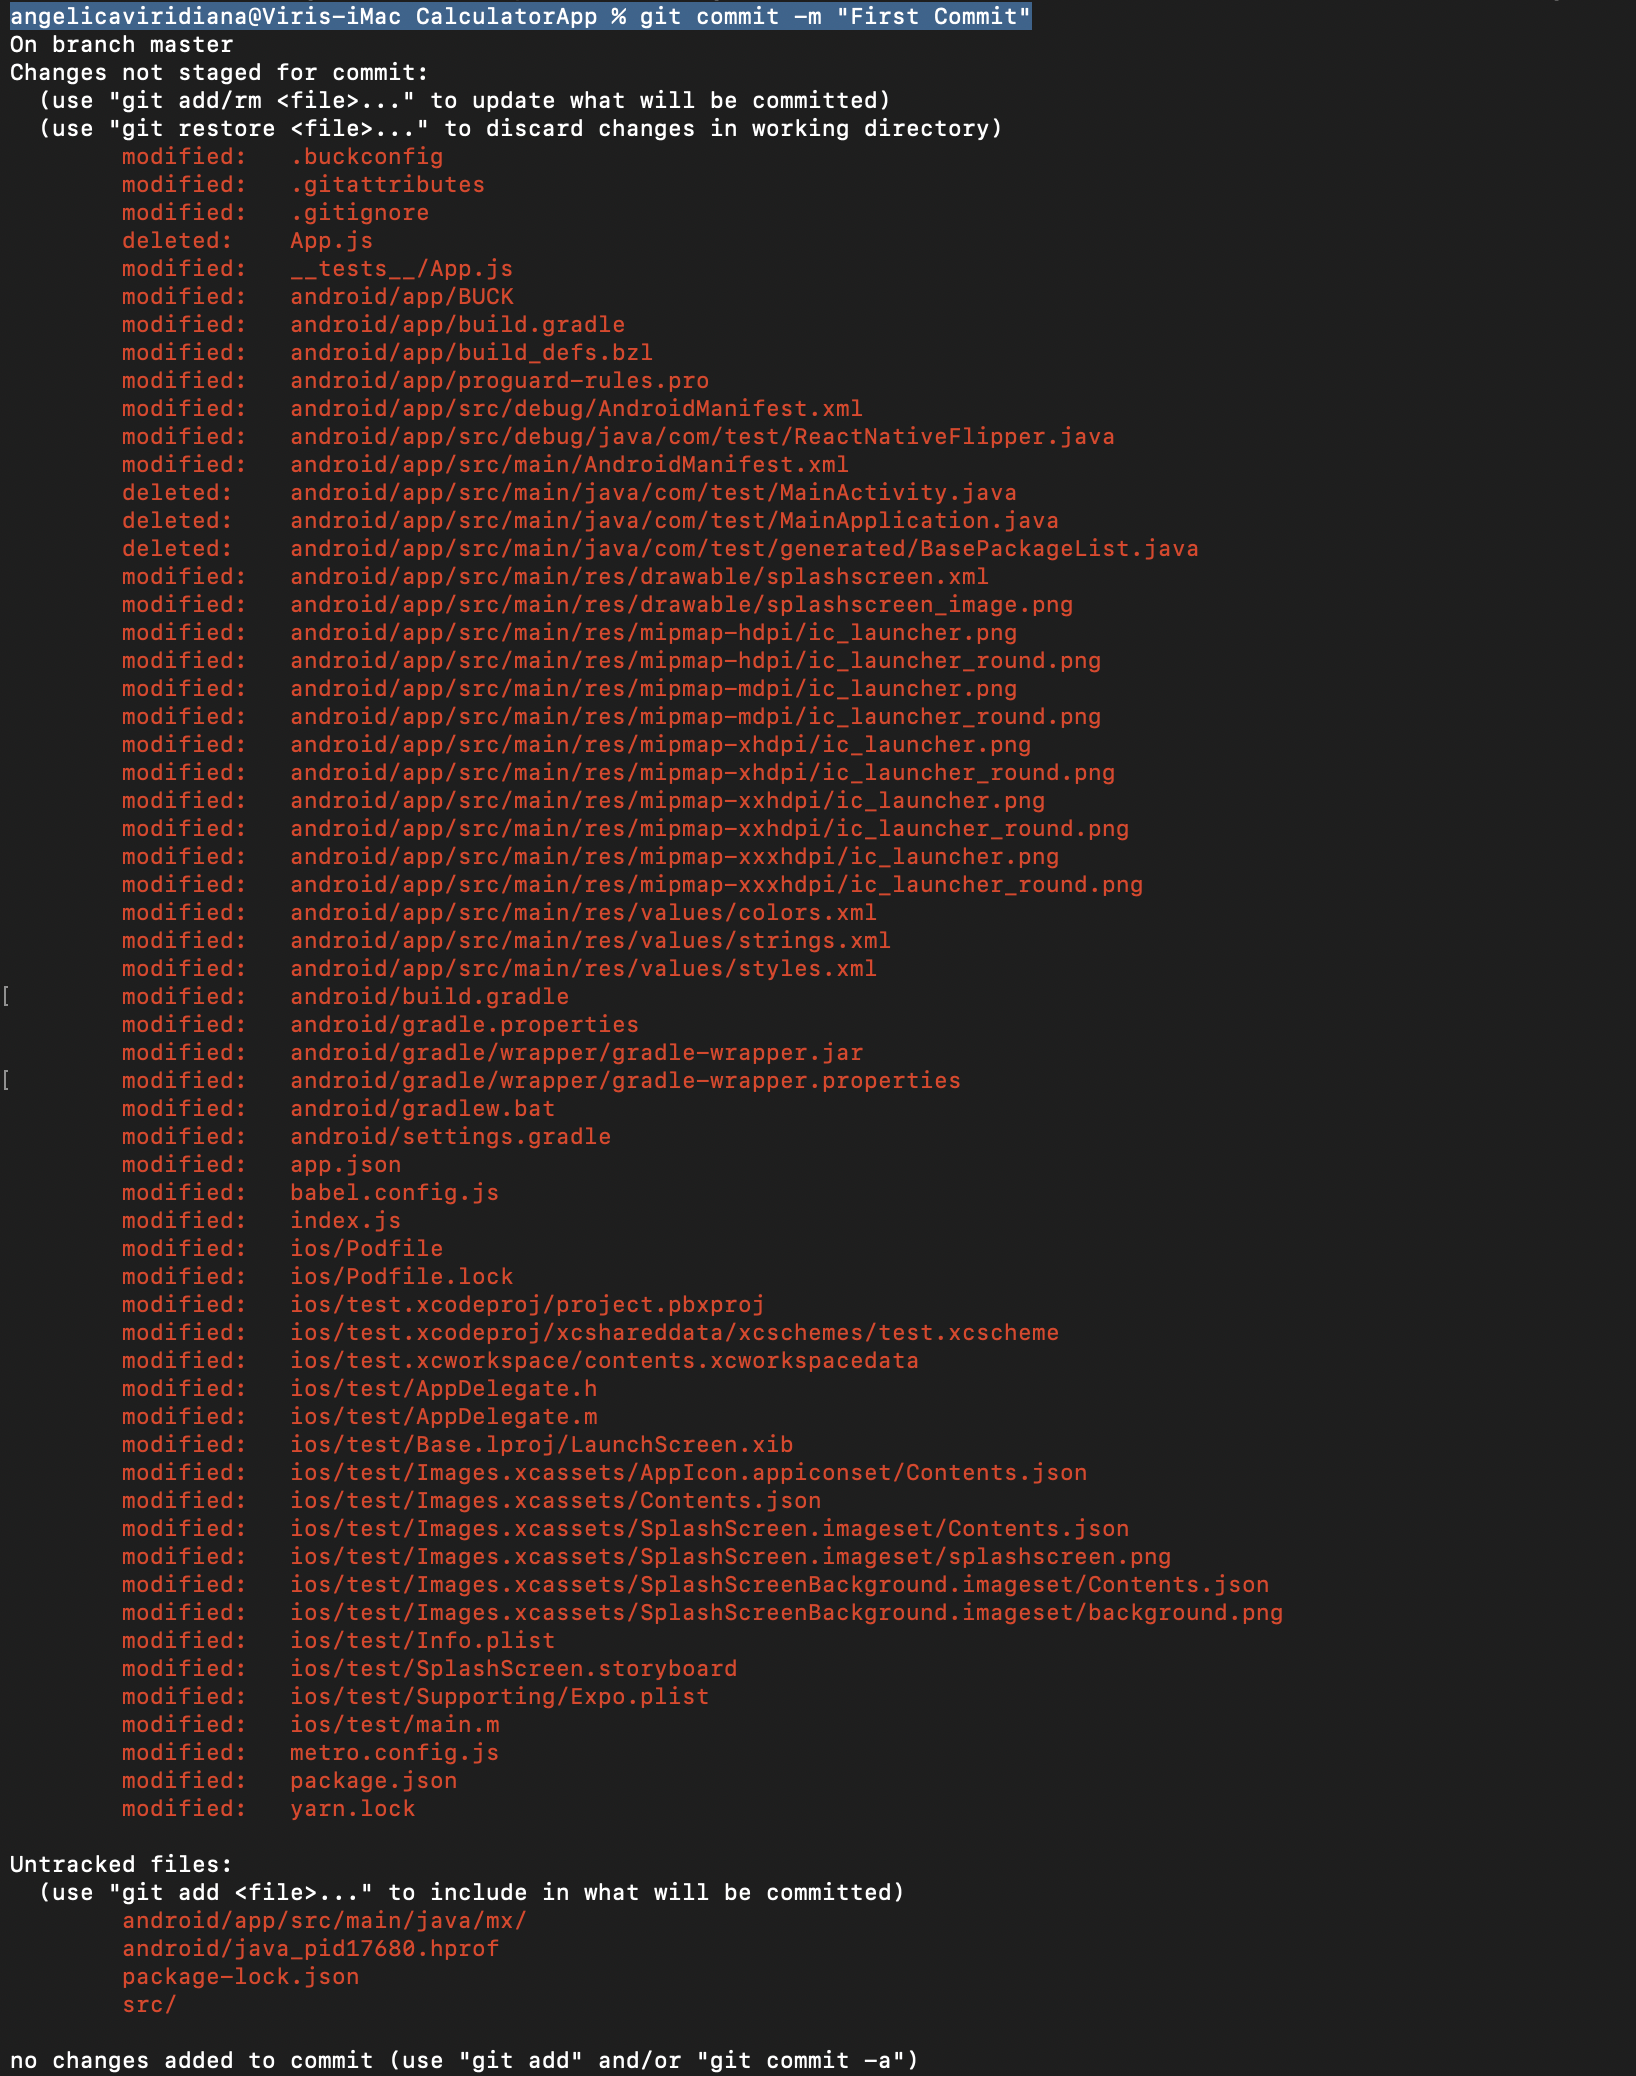
Type “git init“.
Then “git commit -m “First Commit”“, the text inside “” (First Commit) is the comment of the commit.
You’re going to see all the data inside your project.
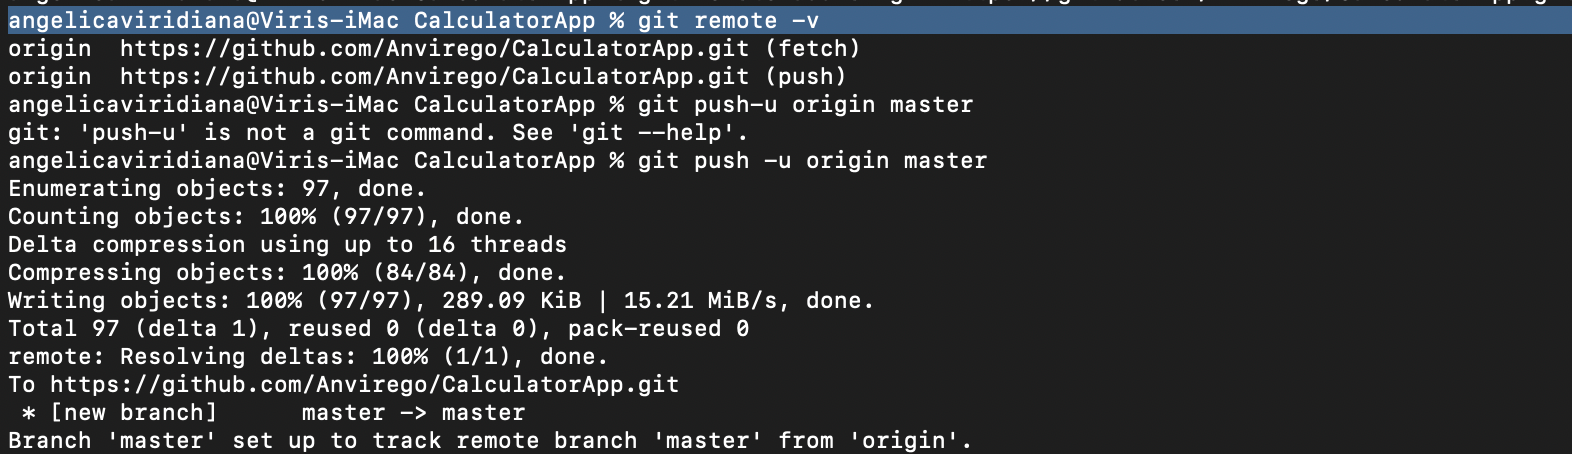
Next “git remote add origin https://github.com/USER/REPOSITORY_NAME.git”, this URL is found in Github, when creating a new repo.
Finally, type “git remote -v“, it’s going to show us to which destination is pointing and the name of this remote repository, in here it’s “origin”.
Finally, if there are no conflicts with our local and remote repository, we can proceed to upload our project using “git push -u origin master“, if everything goes correctly we’re going to see “Writing objects: 100% (84/84), done“.
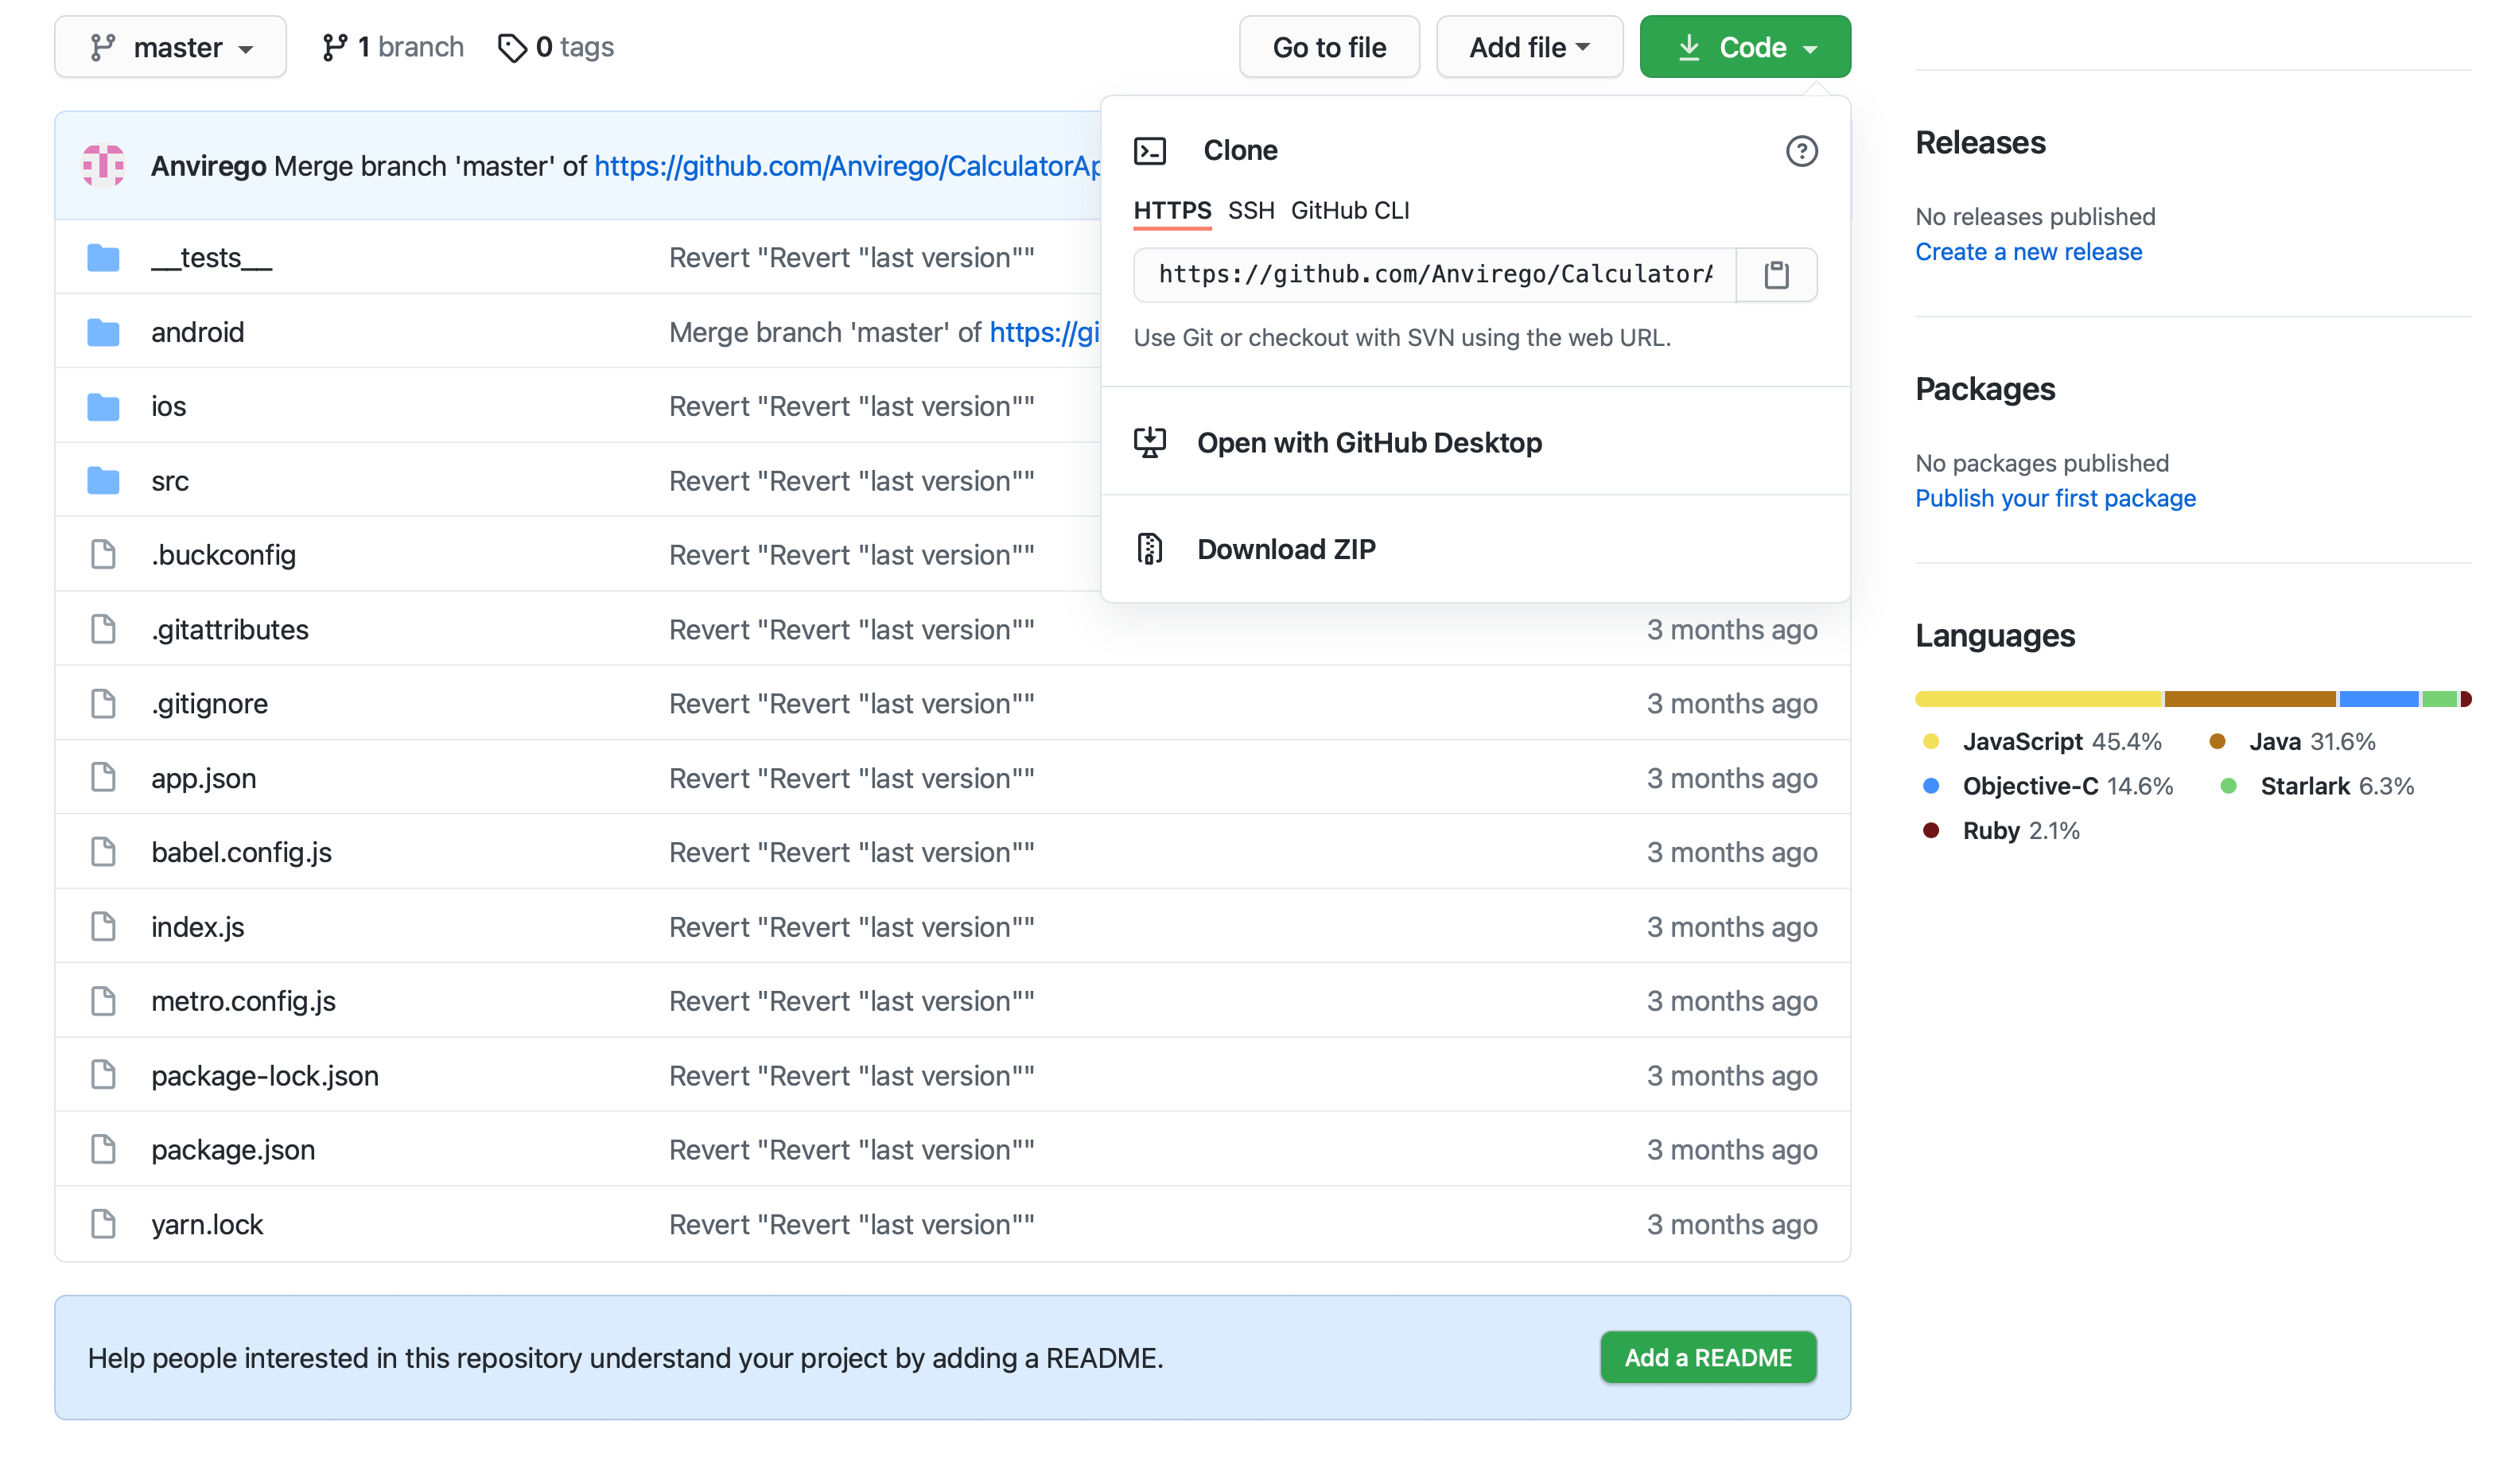
Corroborate the project has been uploaded, go to your Github Repository.
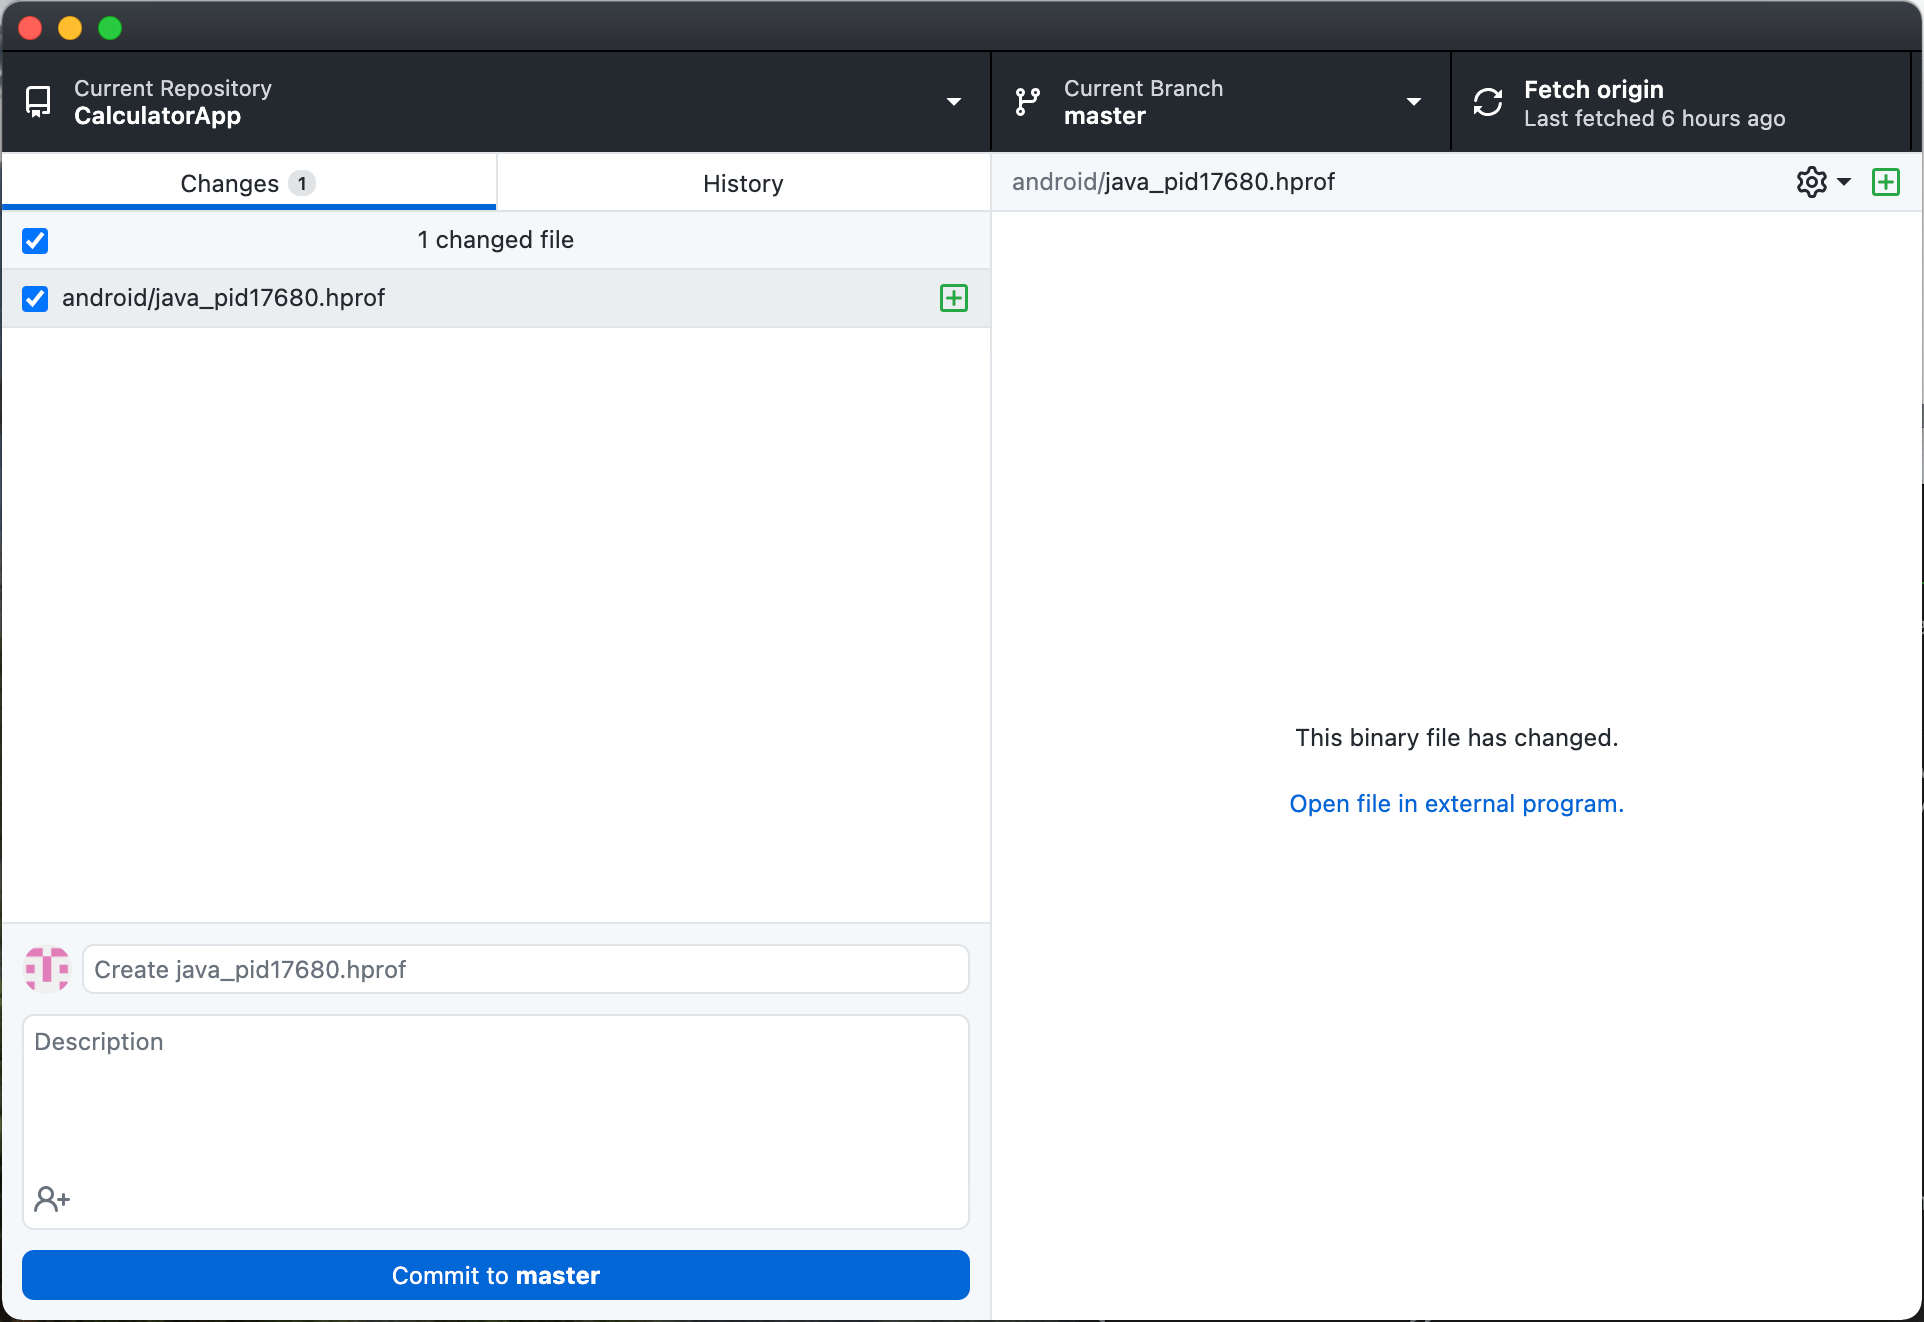
To have easier management with Github, we can use the Github App.
- Current Repository: Name of the Repository we’re managing.
- Current Branch: Branch of the Repository, remember to always create another branch when making changes in the code to later merge it with master. Master branch always has to be the stable version.
- Fetch Origin: Before make changes in our branch we need the last version updated in Github.
- Changes: Displays all the files that have been changed.
- History: History of all the commits made to that repository, we can rollback commits.
- Commit to master: Updates changes with a commit to upload it to Github.
Branches
One of the main functionalities and advantages of having our project to a Remote Repository like Github is the usage of Branches.
Branches help us to work in the same repository and collaborate with others, so let’s say we have our CalculatorApp, but Dev1 it’s working on adding a new feature called “Percentage” and Dev2 it’s working on adding “Trigonometrical Functions”.
To avoid conflicts between these two new functionalities we can create two more branches aside from Master, to push each of these functionalities, like the branch “Percentage” and branch “Trigonometrical”.
Also, this way of working can help us to identify conflicts in our repositories before merging them to our stable version in branch “Master”.
if you want to know more about how Github Branches work you can visit the link here.
Other useful commands:
Command Description git init Initiates a new Remote Repository git add. Adds all content of a Local Repository to be uploaded git rm -r “folderName” Removes specifically a folder, it can also be used with any file that we don’t want to include in the Remote Repository git commit -m “Comment” It’s used to add a commit to our changes git remote -v It’s the name of the Remote and the URL which is pointing git push -u origin master It uploads the Local Repository to the Remote Repository called “origin” in the Branch “Master”.
Links of interest:
Automating with Appium – Selenium and TestNG
Speed up Android Testing with Appium and SDK TestProject Agent
These are some recommended books to learn more:
Any help is welcome to help us keeping this effort alive!BTC (Bech32): bc1qx6f8nczr5ram6d57svlnsfmk5mhu6lsr9q7mxwLTC: LdiiMfiJvqrXDw1xPMqDptXGFEkyADZzVVDOGE: DKehWtHnmrf7JTRWpEQ9LtqwqY8HdbdkbUSOL: 3f2RR9w2VwmBqjLm5DmbuUPwWfdYH7GXCbHVWhsq5skyAngélica Viridiana Rebolloza
Computing Engineer specialized in Automation, working with different tools for Mobile and Web, using languages, tools, and platforms like JAVA, VBScript, JavaScript, C#, Appium, Protractor, UFT (QTP), Selenium, WinAppDriver, Jenkins among others.
Viridiana also has been working using practices like TDD & BDD under Cascade and Agile approaches.
Some certifications include: ISTQB Foundations Certification, SeU Selenium Certified, ITIL Foundations Certification.
No Comment

Jenkins and CI/CD it’s a great idea! let’s see why…
Jenkins and CI/CD, but what is Jenkins?
Jenkins is an open-source server that can automate all sorts of tasks whether in local or cloud (Docker) machines. It’s widely used to create Continuous Integration and Continuous Delivery flows (CI/CD).
What is CI/CD?
CONTINUOUS INTEGRATION (CI)
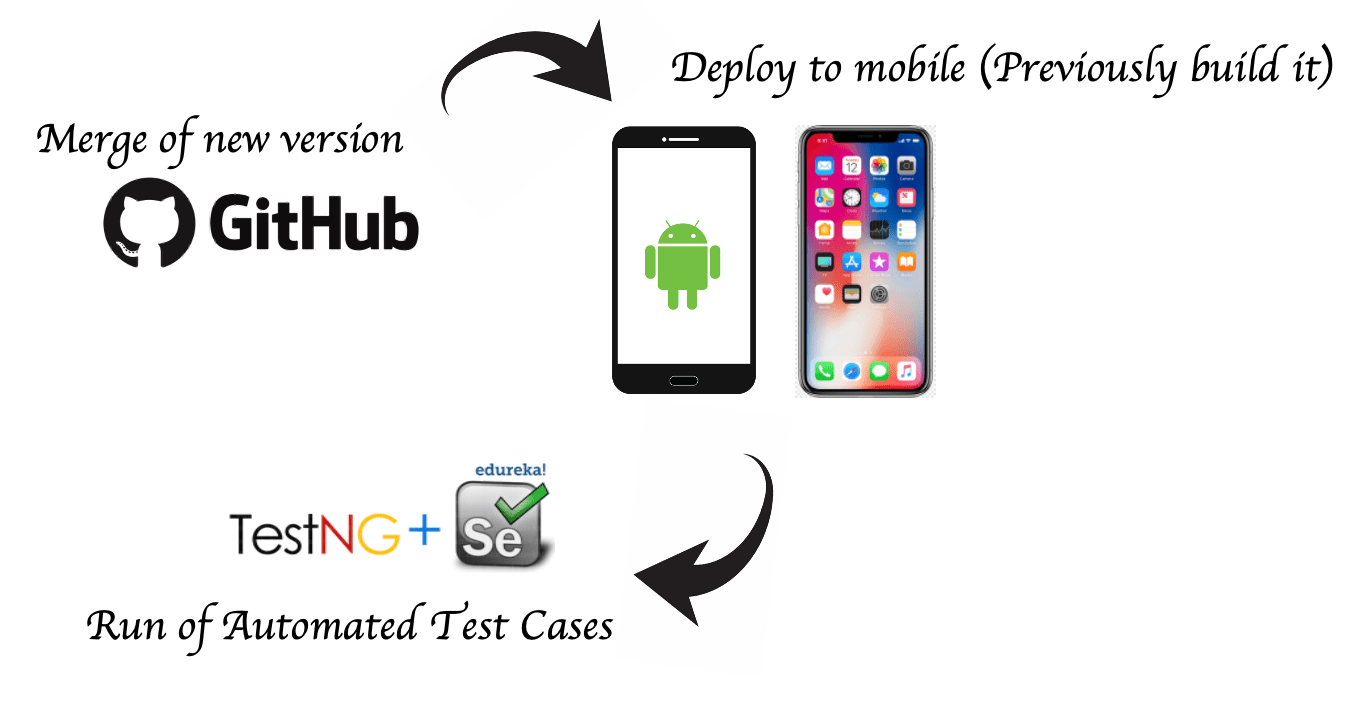
Continuous integration is the first step to Devops’s world (I’ll touch that matter later), basically is the process from when a Developer merges into a master branch new changes to the Run of the Automated Tests. To be totally automated, this process needs that the app’s building tasks, in the case of mobile apps, the deployment (locally or in a personal server) goes to a physical or emulator/simulator device.
CONTINUOUS DELIVERY (CD)
Continuous delivery takes one more step, that is deploy this new version of the app but to a “Testing Environment” such as Staging or UAT environments.
There’s another term, CONTINUOUS DEPLOYMENT, this is usually confused with Continuous Delivery, but it’s slightly different because it’s also deployment of the app but to “Production Environment” where clients can have access to the new app. All these processes need to be automated to be able to call it Continuous Deployment.
What is Devops?
Jenkins and CI/CD is good, but we also need understand somethings about Devops.
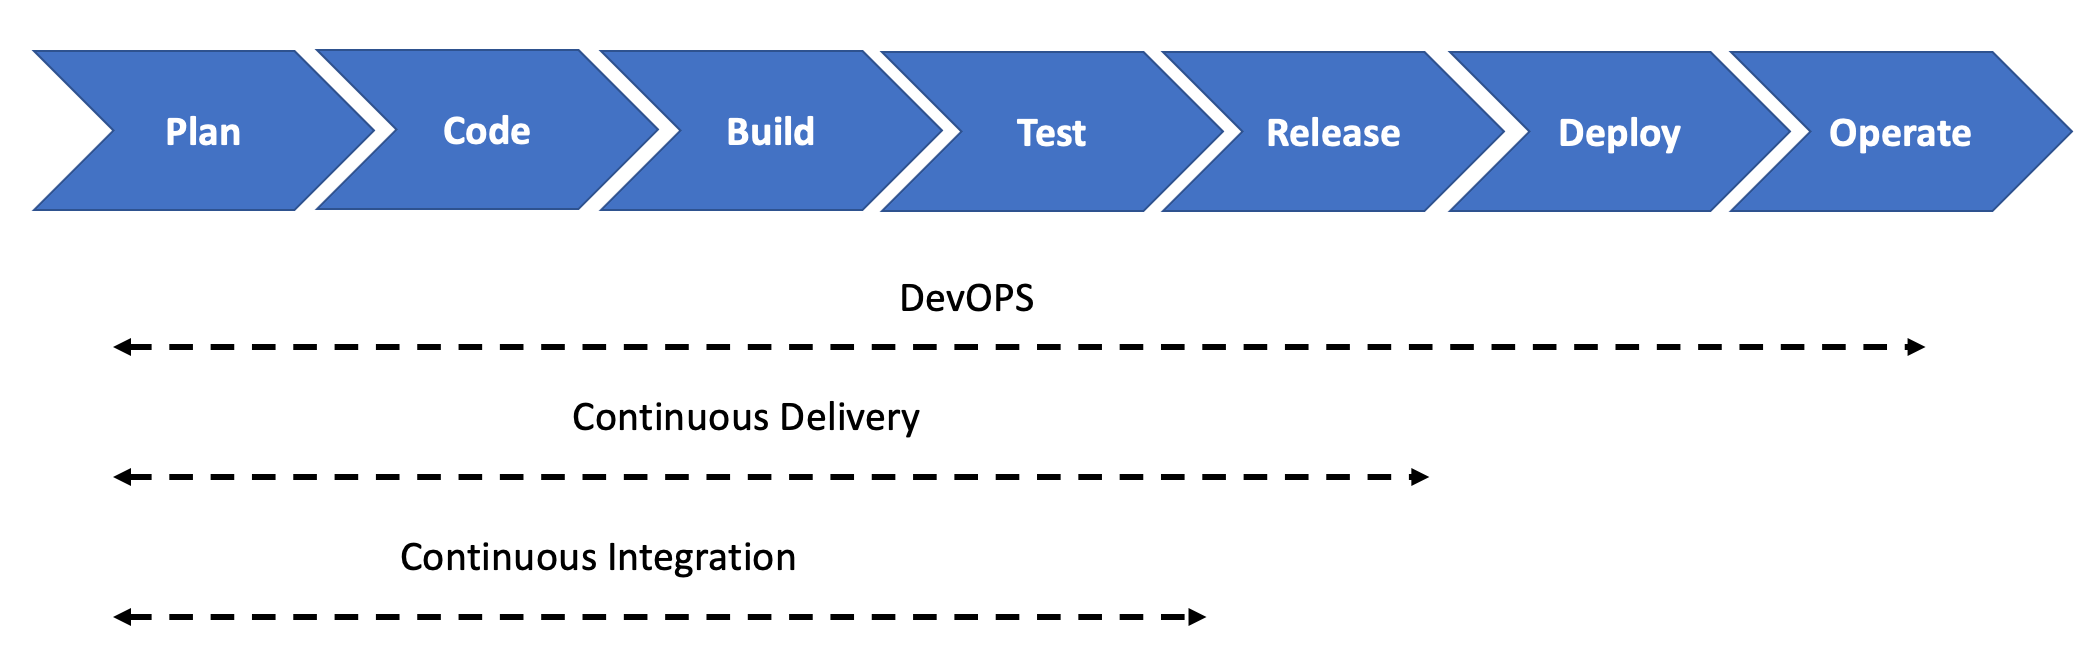
In short terms, DevOps it’s the management of all this process including the DEV side, just like technical implementation to the IT tools to create, maintain and apply it.
Enlarge

DevOps To create a Continuous Integration (CI) environment we need to install Jenkins. Take a look at the next steps:
Step 1.
Download Jenkins from the official page, easy 🙂
Step 2.
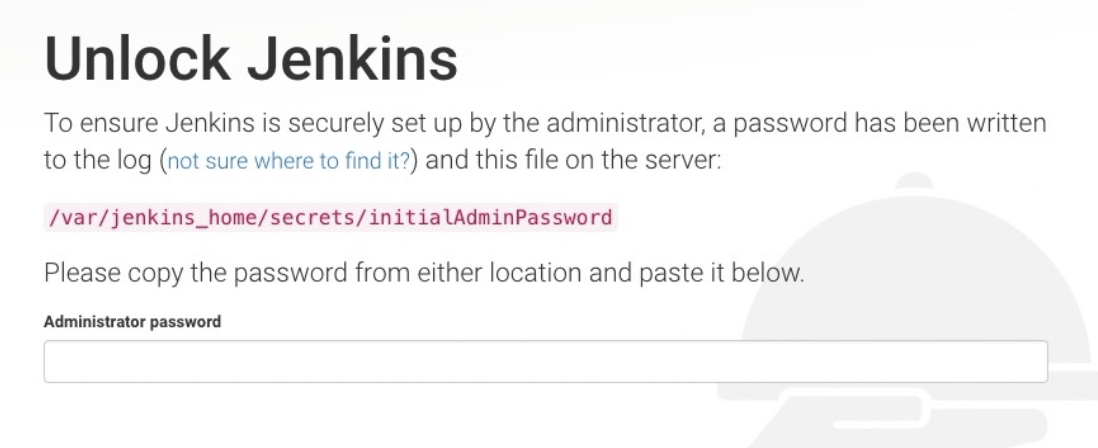
Once installed go to “http//localhost:8080/”, the first time a message like this will appear, so search the key in your computer under “/Users/username/.jenkins/secrets/initialAdminPassword”.
Enlarge

Unlock Jenkins Step 3
Once the password has been entered, Jenkins will ask you to create another admin password and then you’ll see the main page of Jenkins.
Enlarge

Welcome To Jenkins Step 4
Now, let’s go to the Code Repository, in this case, I’ll use Github, the process can change in some configurations with other repositories but not too much.
Step 5
The App should be already uploaded to a Github Repository, if you don’t know how to do this, you can check it out how in https://internet80.com/blog/upload-project-to-github/
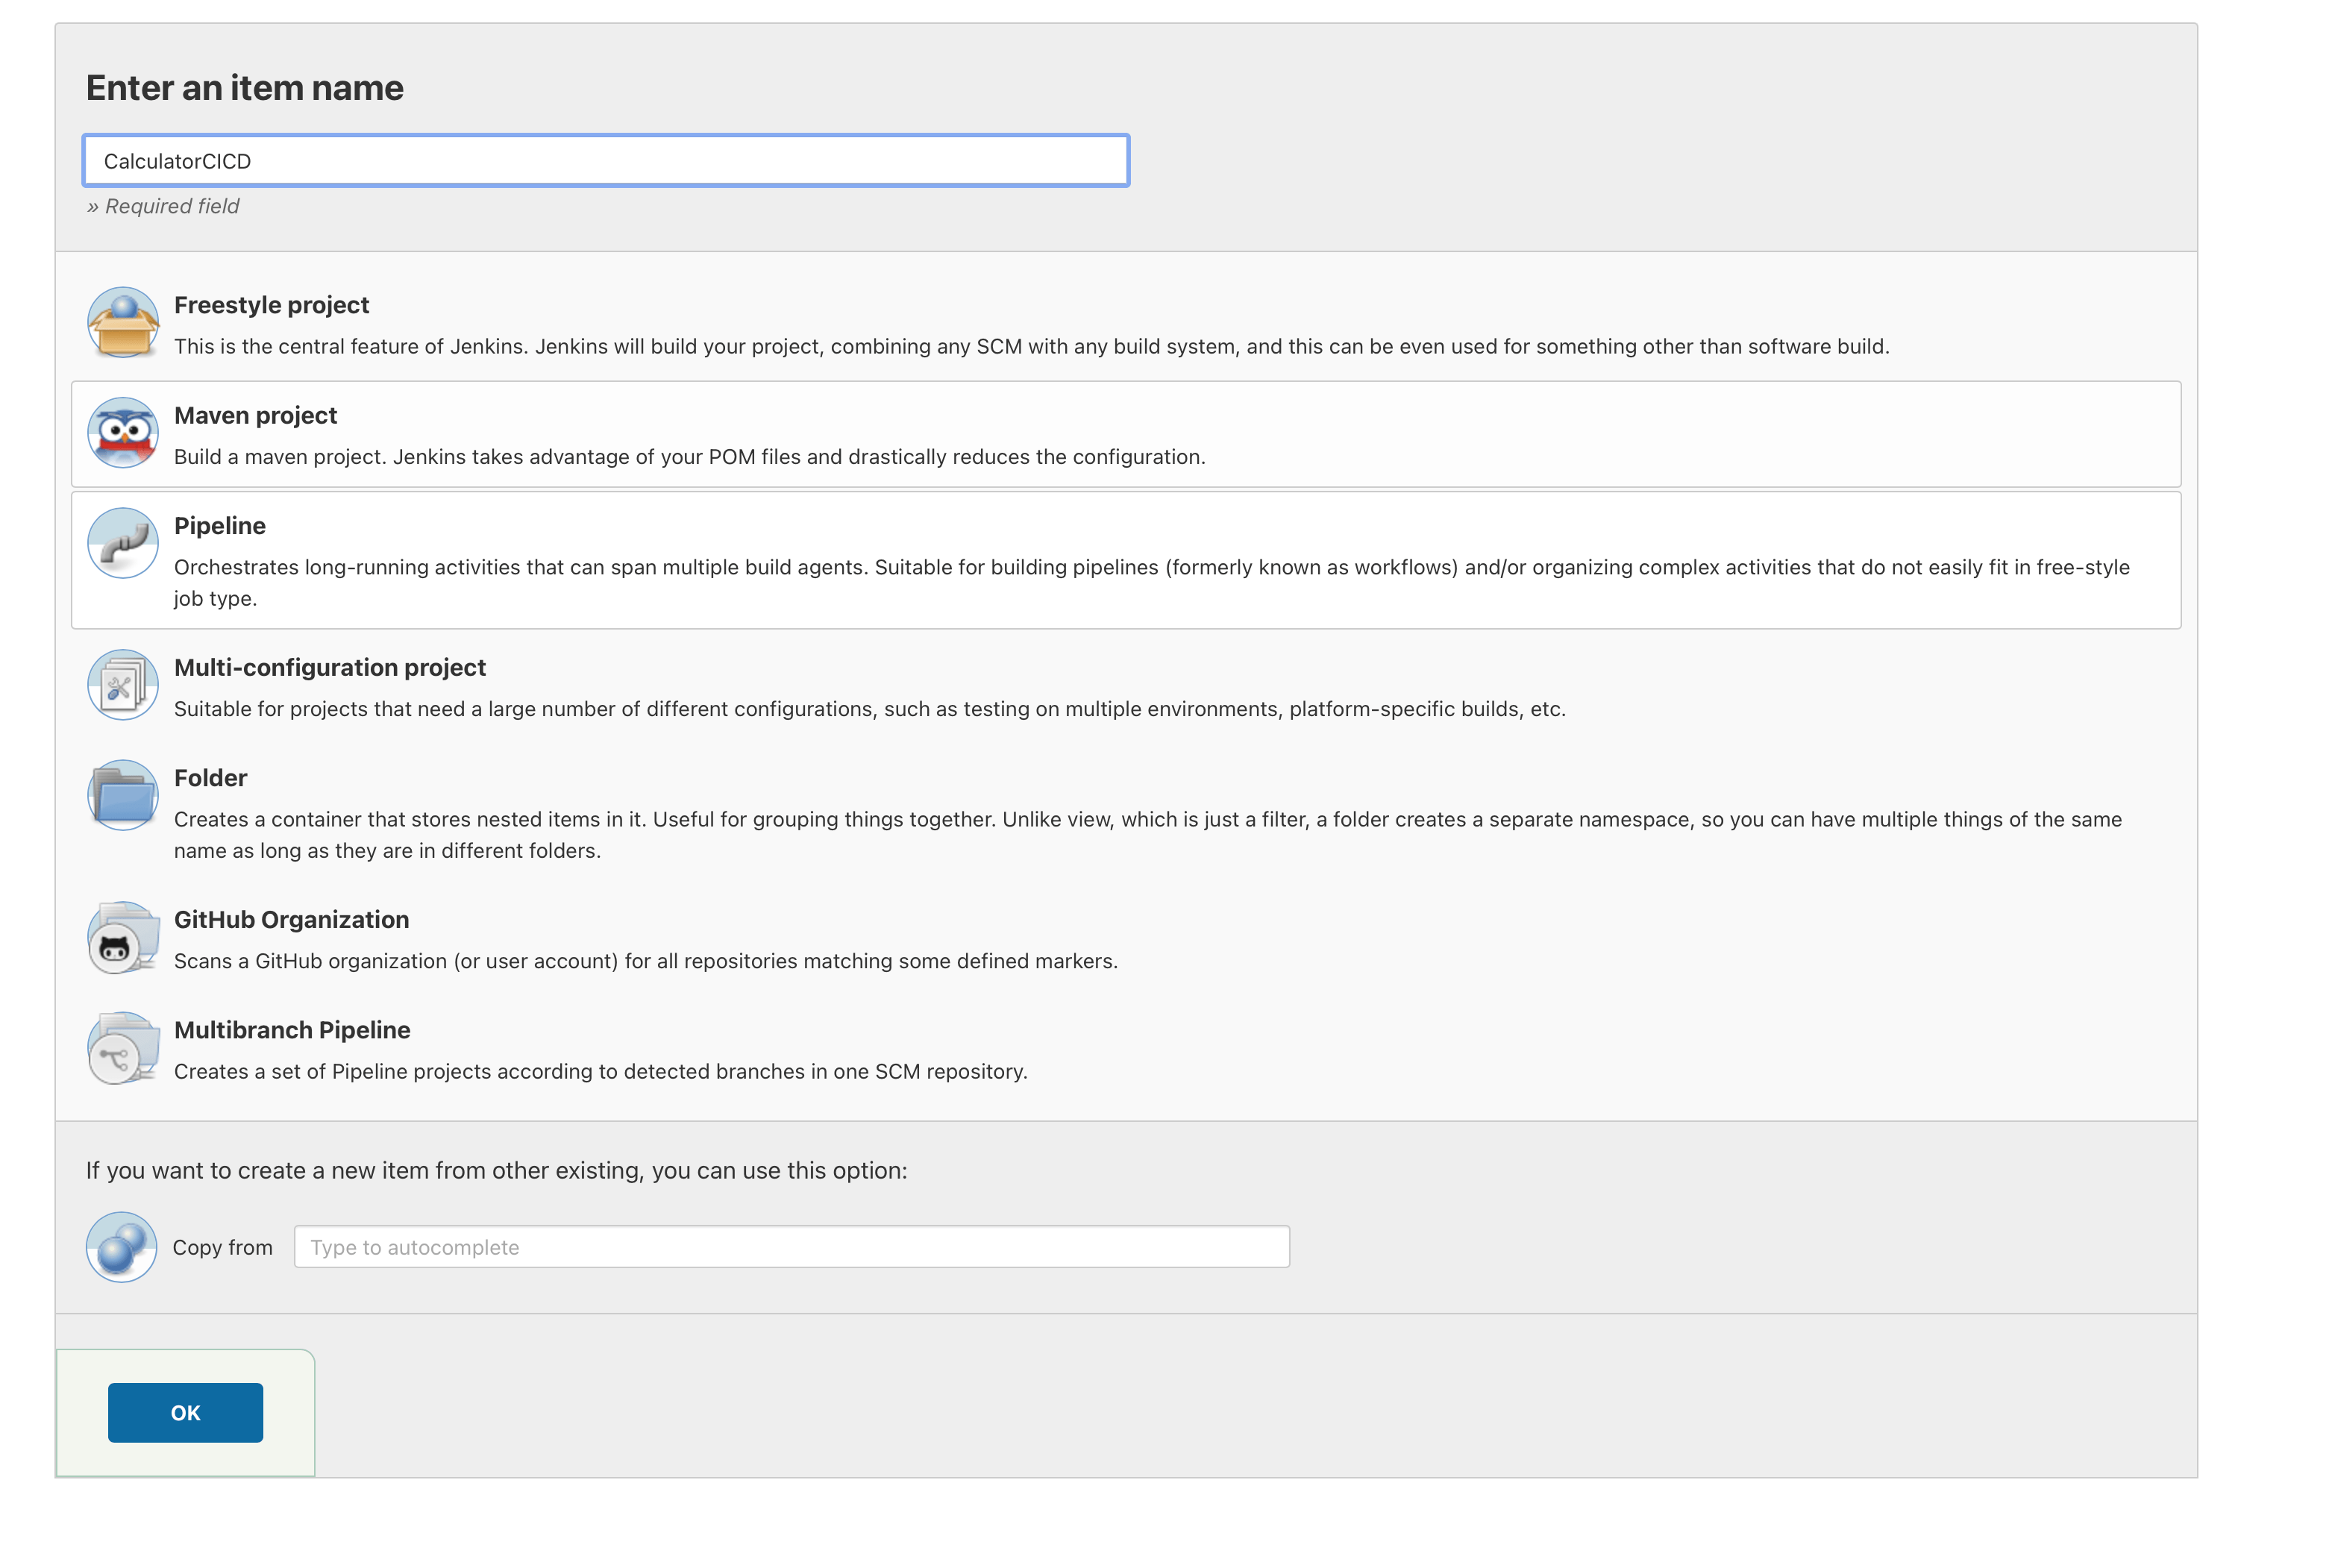
Create in Jenkins a “New Item” as “Pipeline”, in this case, it’s called “CalculatorCICD“.
Enlarge

CalculatorCICD Enlarge

CalculatorCICD 2 Step 6
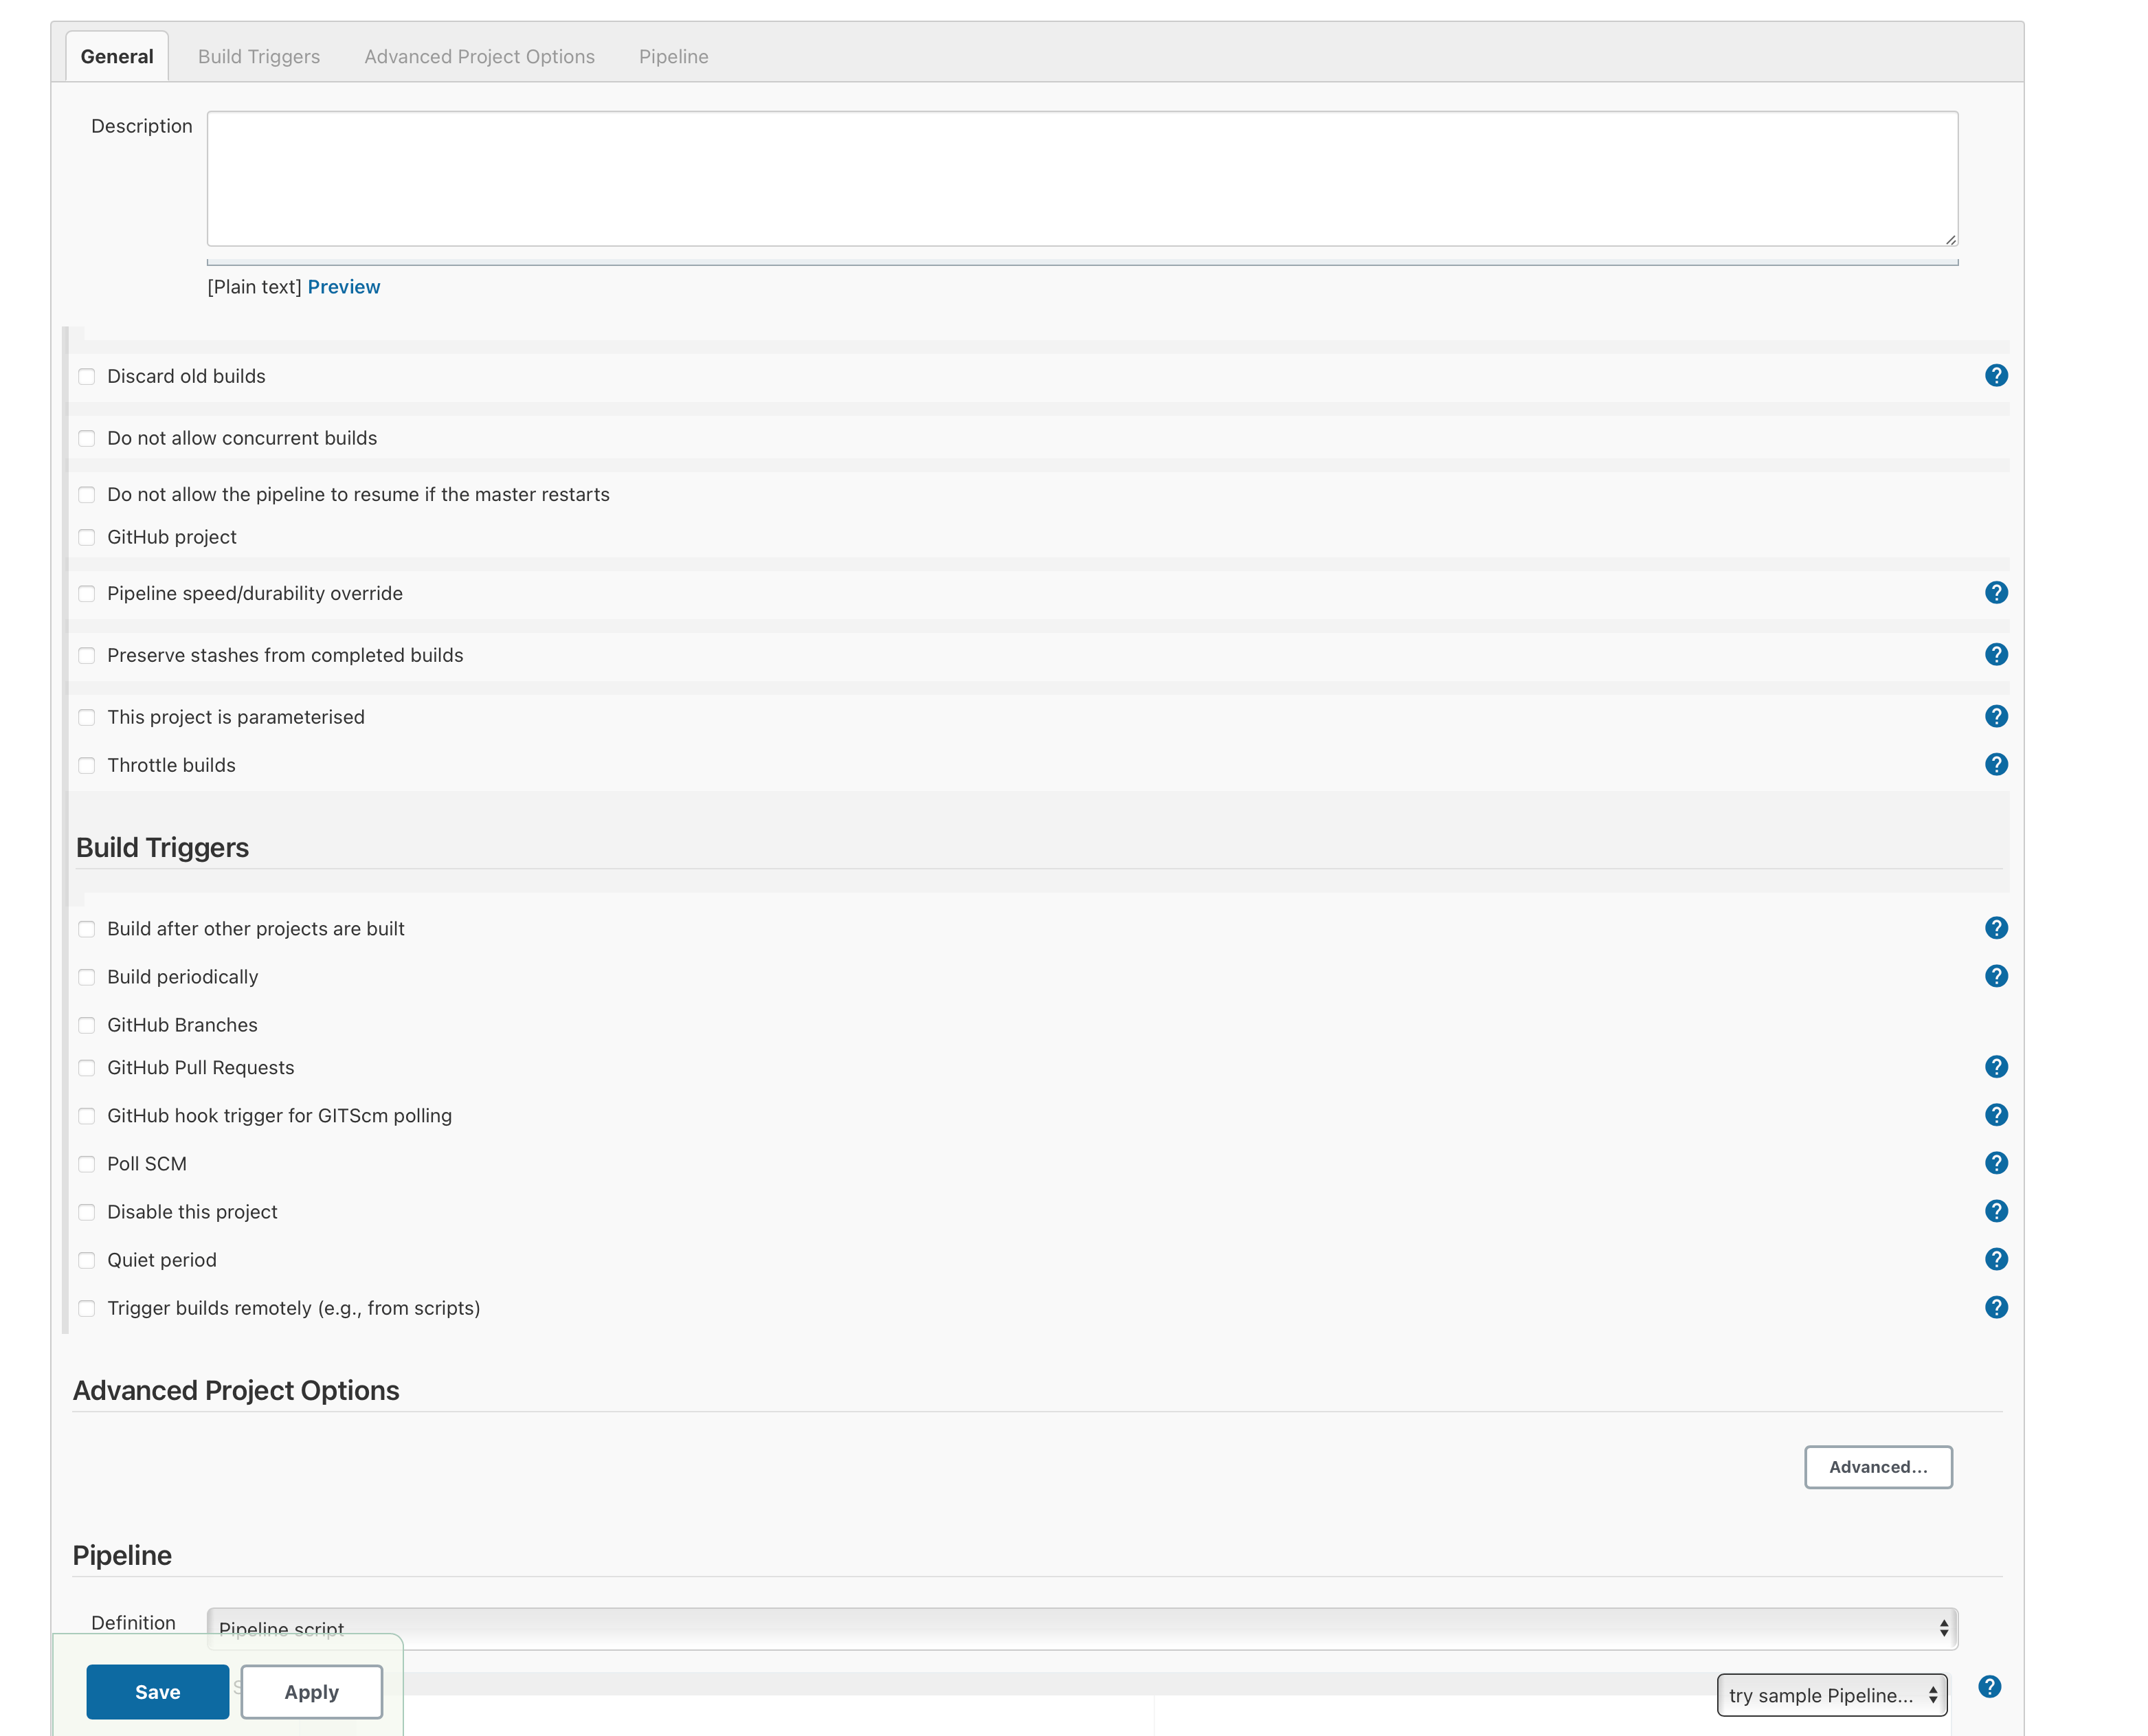
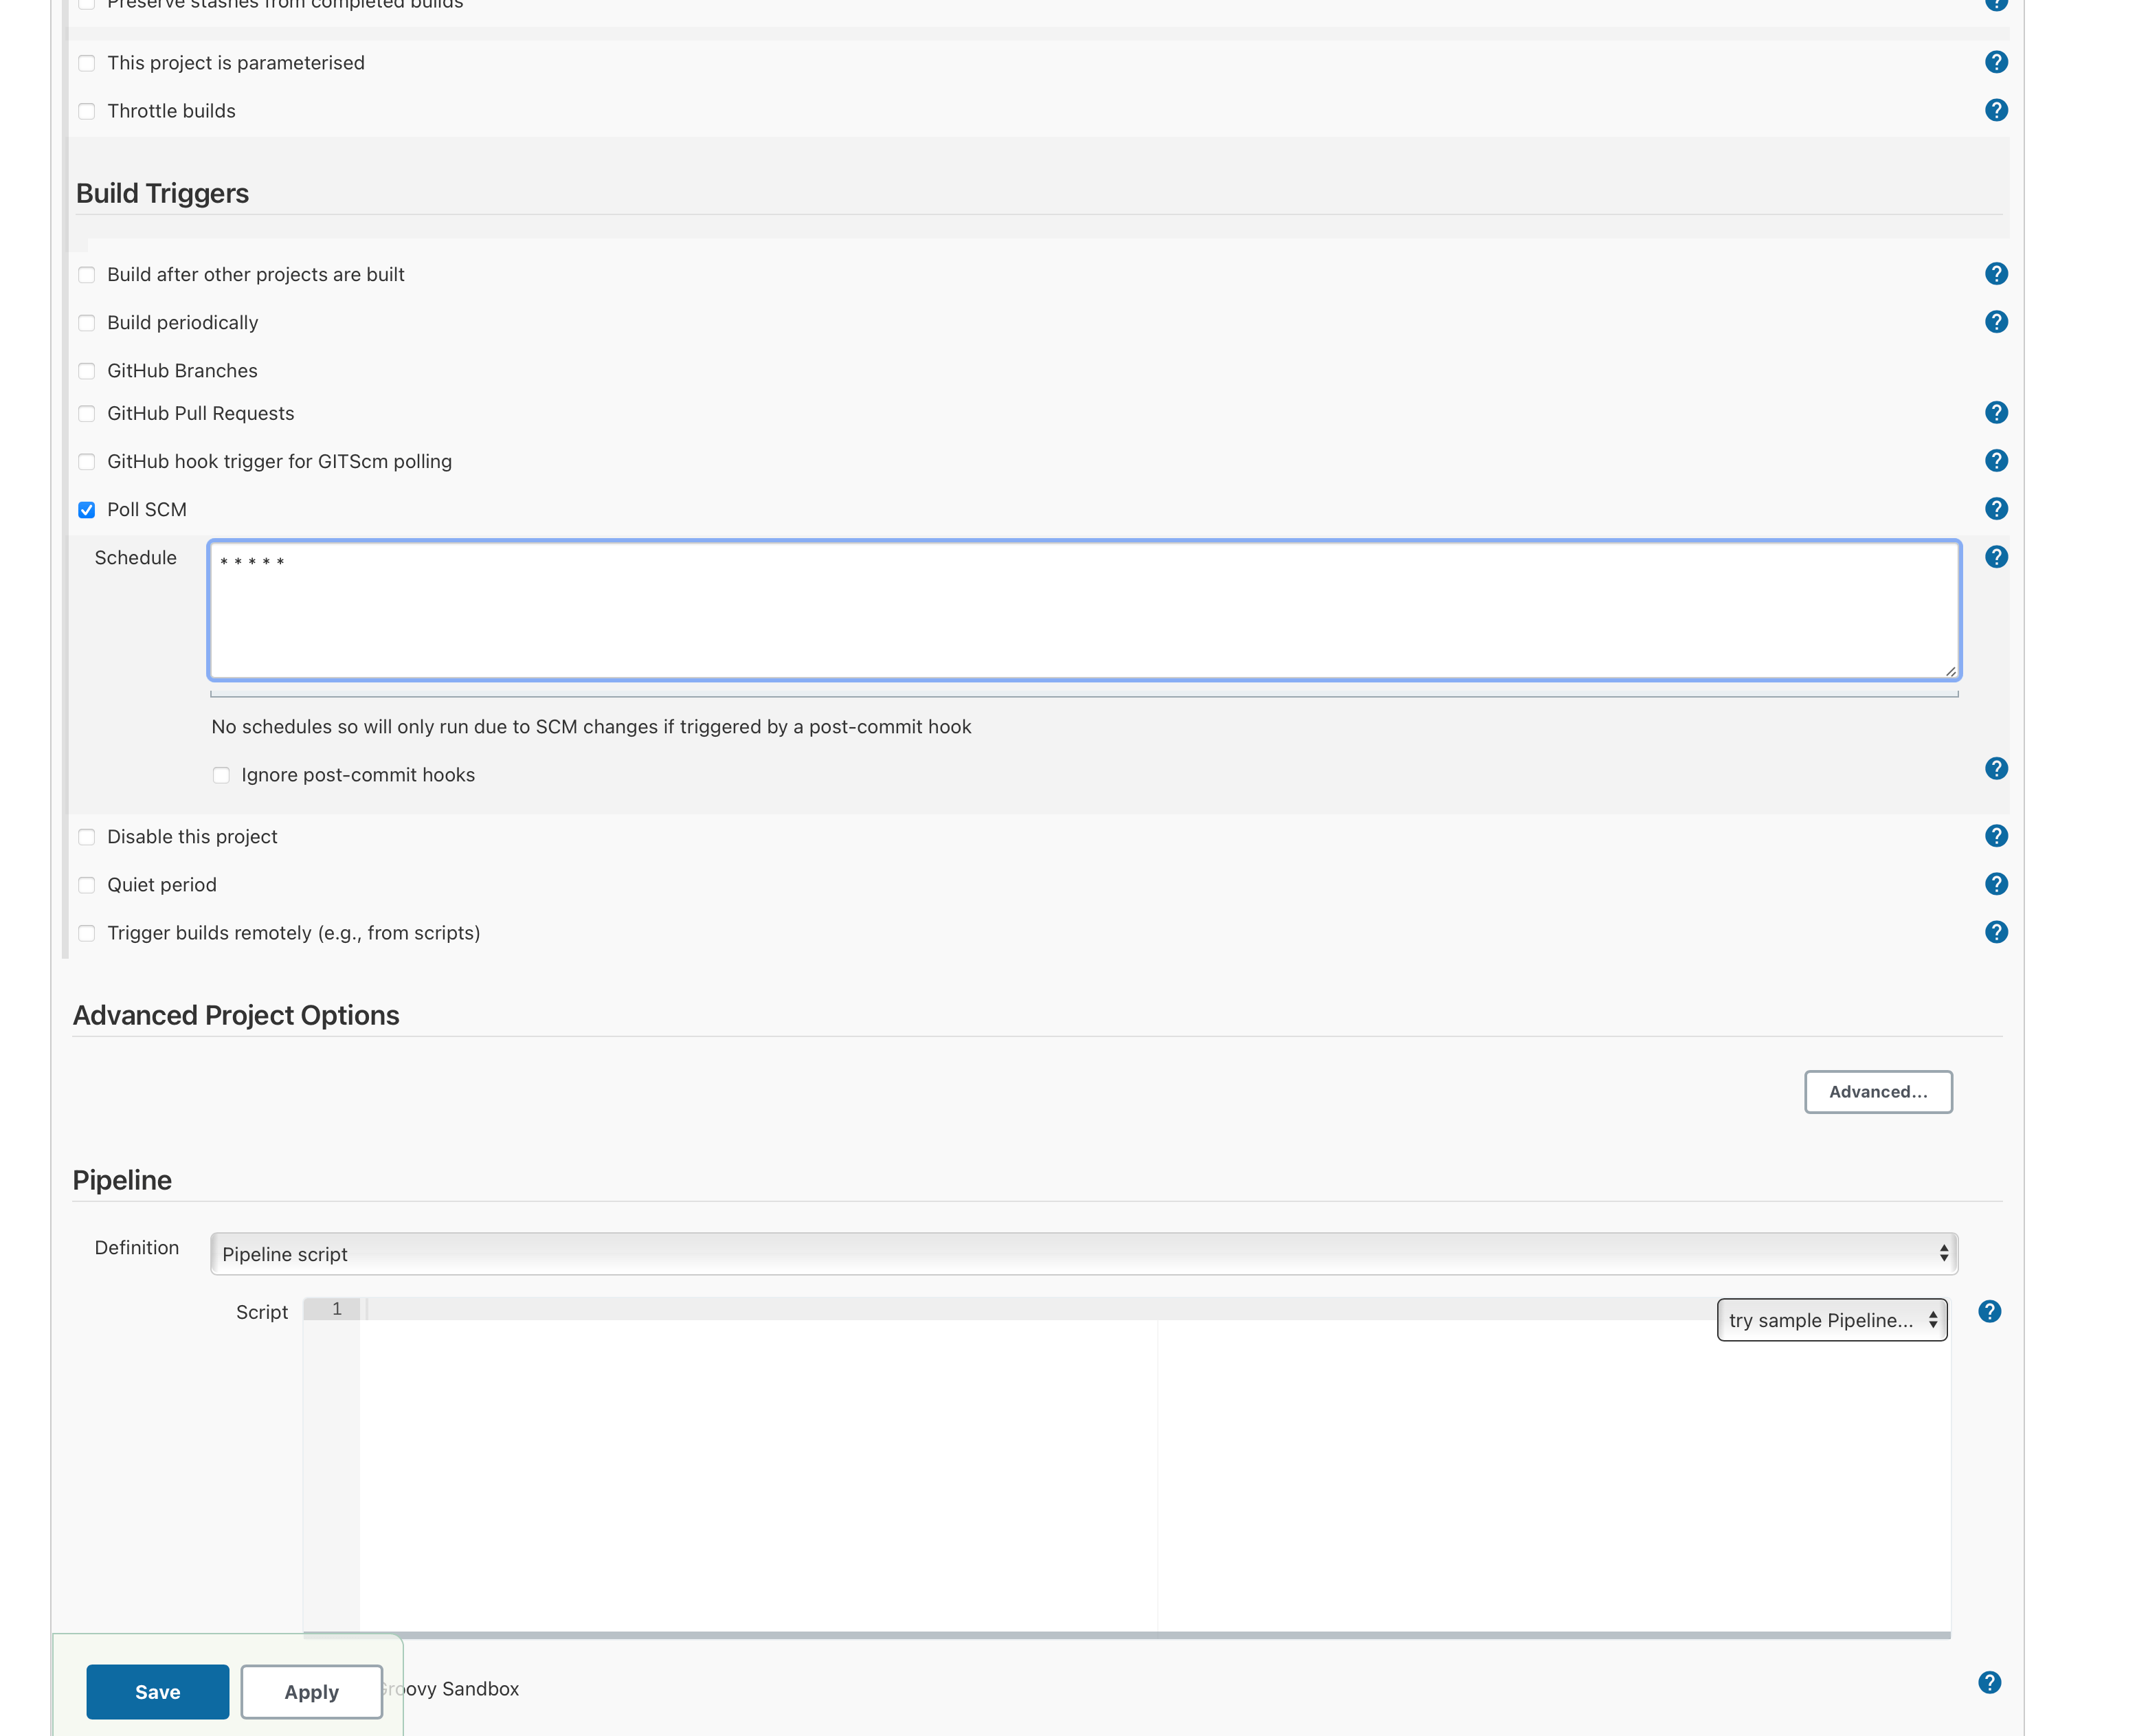
To tell Jenkins to run the pipeline every time there’s a new commit in the repo where the CalculatorApp’s code resides, add in the section “Build Triggers” -> “Poll SCM”, add “* * * * *”.
Enlarge

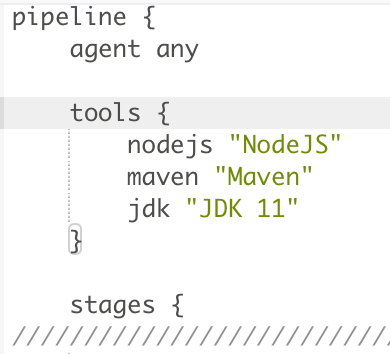
CalculatorCICD 2 Step 7
Now let’s create our first pipeline, to do this, we need to set the flow we’re going to follow. It’s important to mention that Pipelines in Jenkins have a main structure divided by “stages” each stage does a part of the CI/CD process. In this example we’re going to have 4 main stages “Checkout”, “Build”, “Deploy” and “Testing”.
- We need the “Checkout – Github” section to connect to Github Repo to download the code in our Jenkins workspace.
- The “Build Process”, is where once we have the last version of the code copied in our Jenkins workspace, we need to build the app.
- The “Deploy to Emulator”, in here we’re going to deploy the app to an emulator in Android (If you prefer you can deploy it to a physical device too).
- Finally, the last stage is to run our Automated Test Cases, the “Testing” stage.
Step 7.1
Checkout – Github
- Get the URL of the Repo in Github. “https://github.com/Anvirego/CalculatorApp.git”
Enlarge

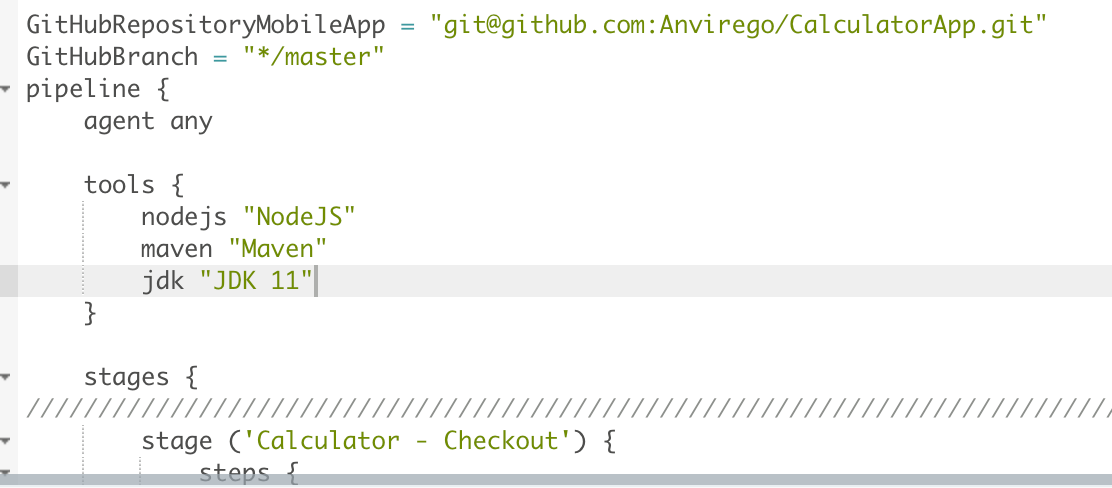
pipe jenking code 01 - To parametric our pipeline we’re going to define “GitHubRepositoryMobileApp” to pass the URL of the Github repo and “GithubBranch”.
Enlarge

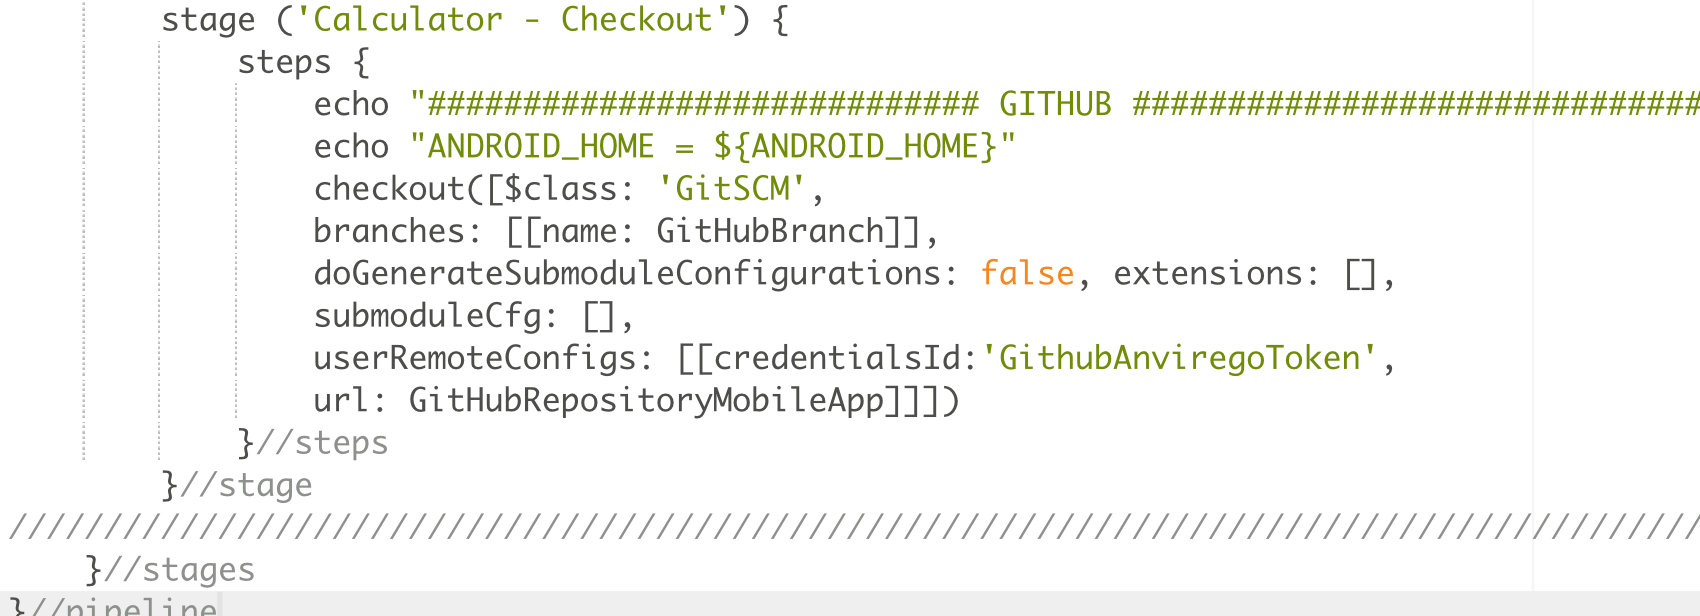
pipe jenking code 02 - Let define the logic under stage (‘Calculator – Checkout’). To authenticate with Jenkins and Github we’re using a “Personal Token” so the repo has to be Public, if you want to have access to a Private repo, you will need to create an SSH Credential in Github. For further information you can go to this link https://docs.github.com/en/authentication/connecting-to-github-with-ssh.
Enlarge

pipe jenking code 03 Step 7.2
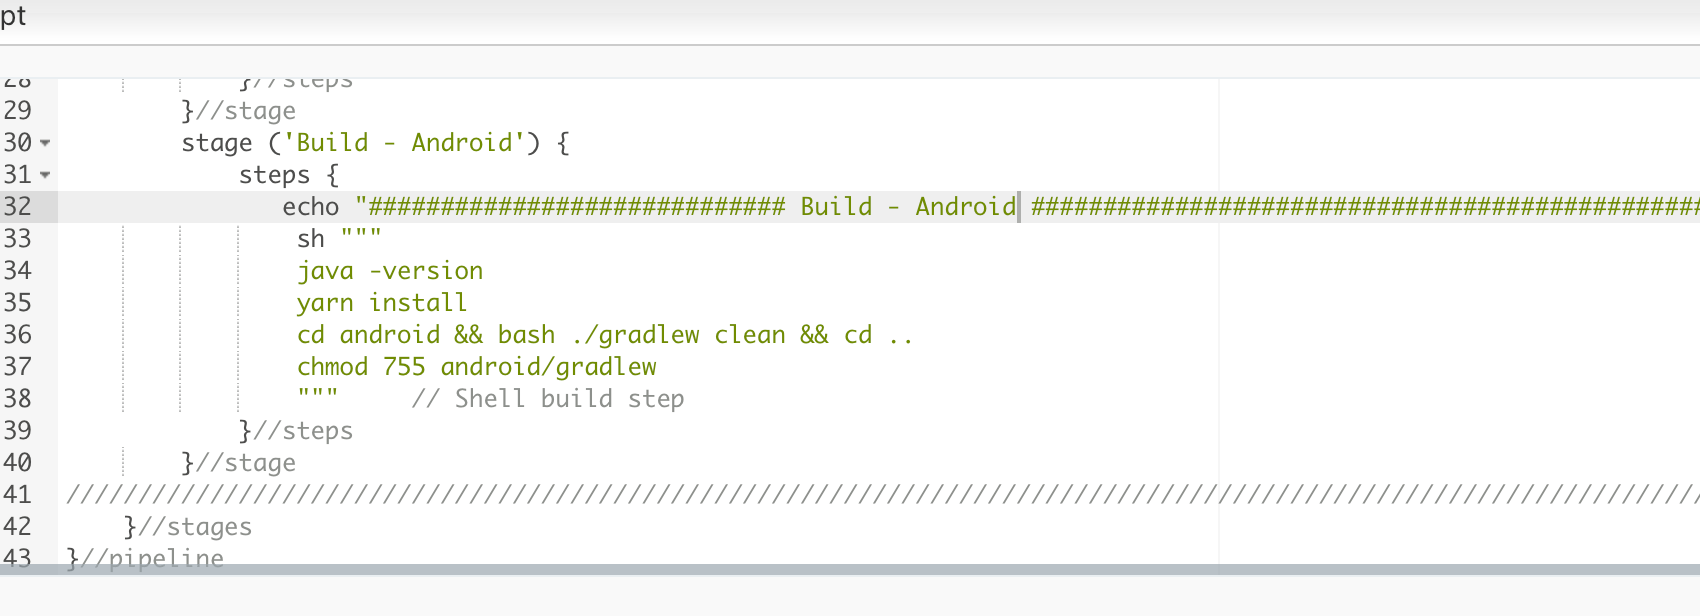
Build – Android
- In the next stage, we need to build the app, for that, we have to follow the steps used to build the app from command.
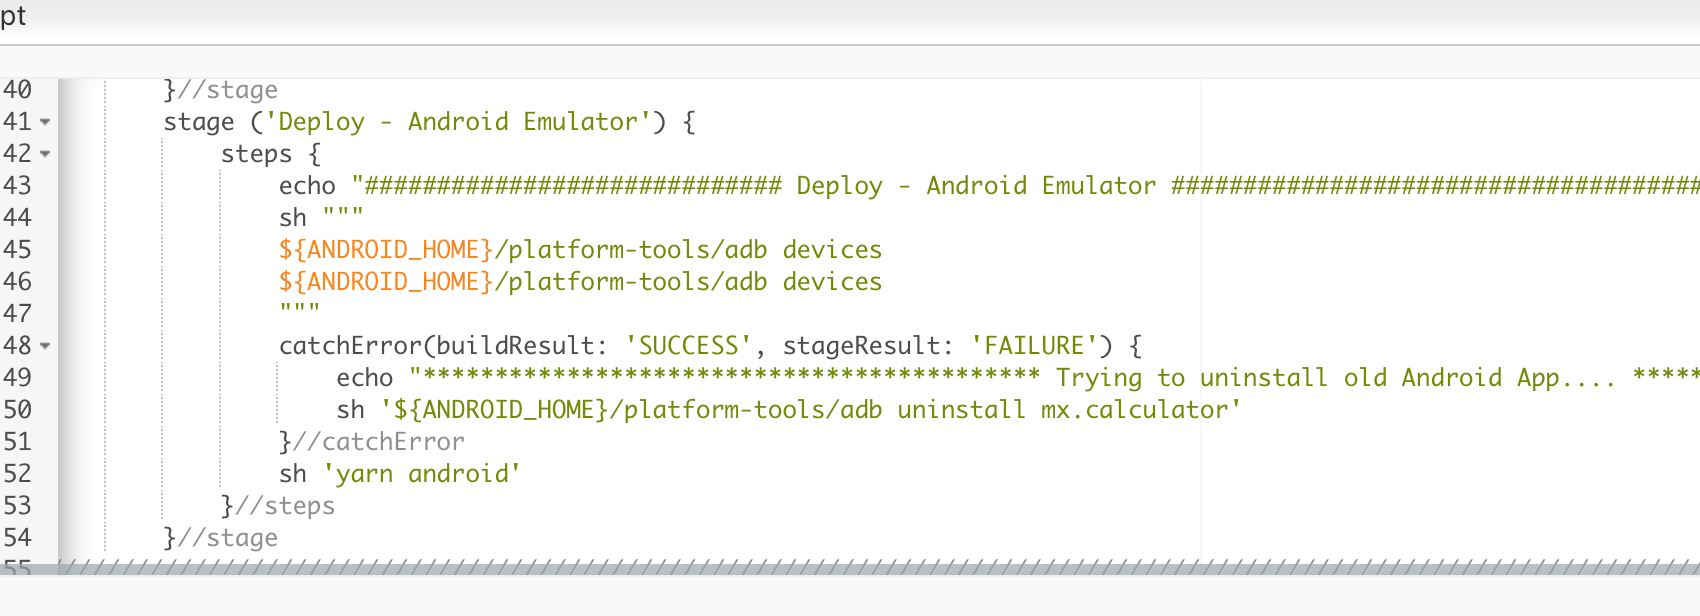
7.2 Deploy – Android Emulator
- In this step, we’re going to finish building the app and deploy it to our Emulator. Inside the cathError{} tries to uninstall the app if it’s already installed (Previous version of the app) and then installs the new version.
Enlarge

Android Emulator Step 7.3
Run Automated Test Cases
- Finally, we’re going to connect to our Test Repository (Local) to run the test cases. This step is going to change depending on how the Automation Framework is made. This automated framework runs using TestNG and Maven.
Enlarge

Run Automated Test To know how to create an Automation Framework using TestNG please go to the post Automating with Appium – Selenium and TestNG
Step 8
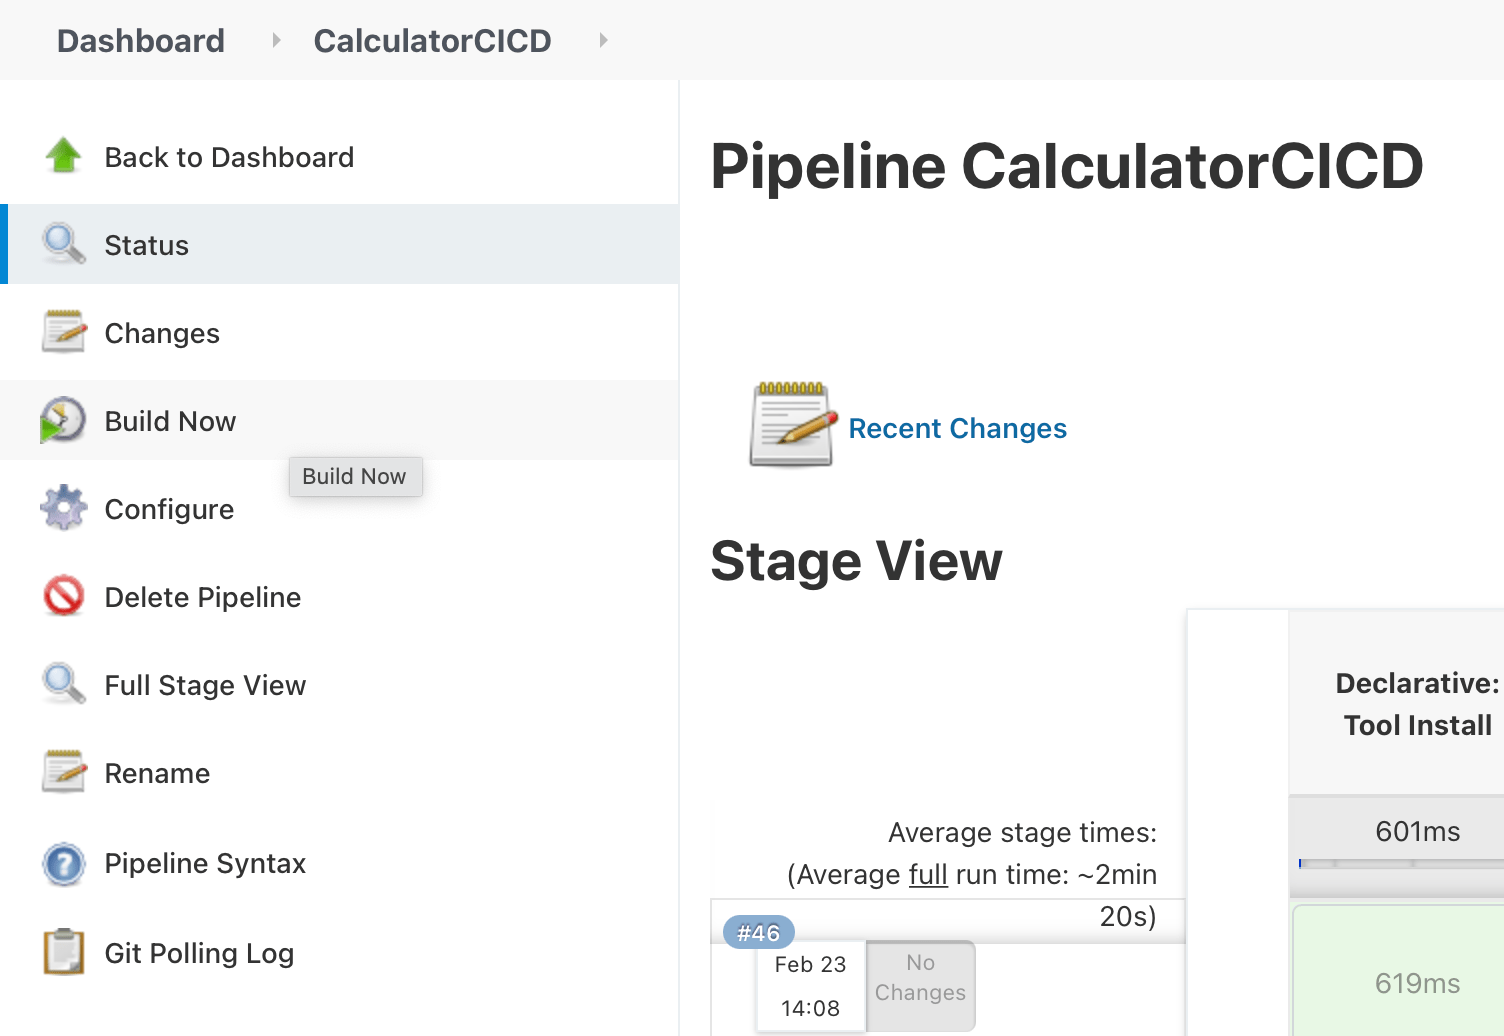
Let’s run our CI/CD Pipeline in Jenkins.
Enlarge

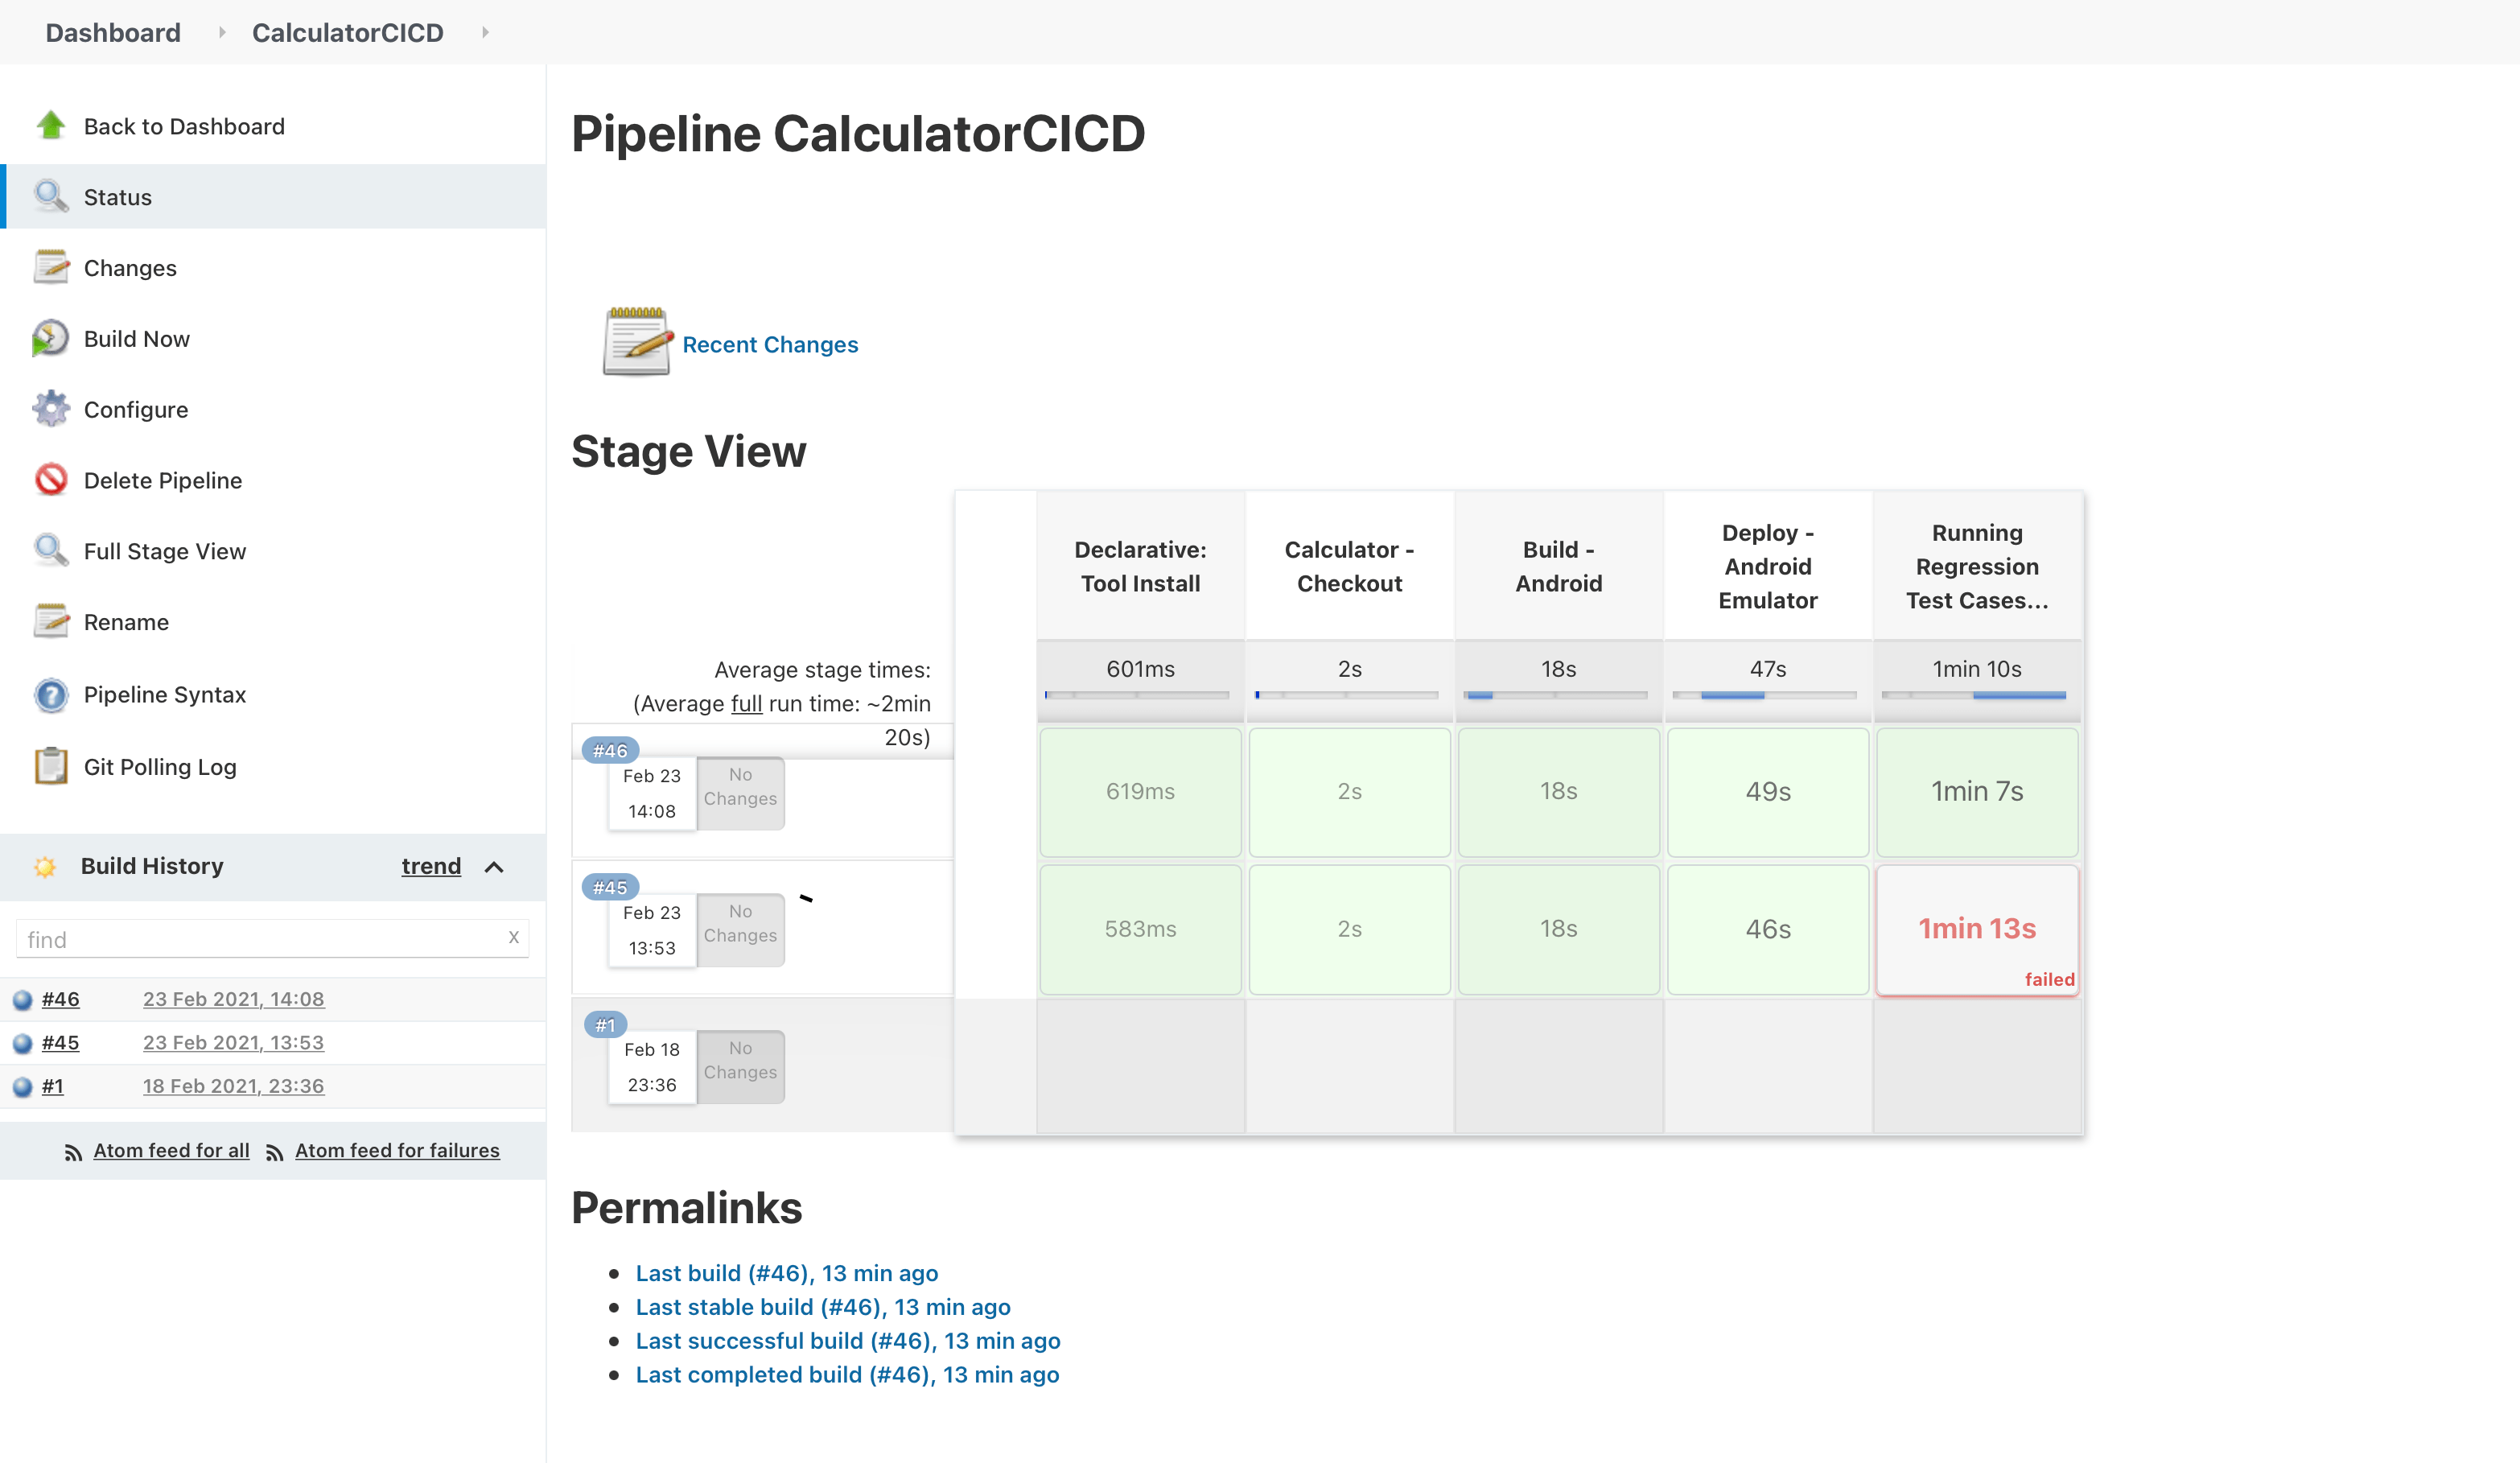
Run Pipeline Jenkins We’re going to see our pipeline results under our project’s dashboard, and the build number.
Enlarge

Run Pipeline Jenkins 02 As you can see create a local pipeline to implement a CI/CD env it’s really easy, from here you can customise your Jenkins pipeline using different plugins according to your needs.
Link of interest:
Automating with Appium – Selenium and TestNG
The Agile Team Approach
What Scrum Master Certification to Choose?
Speed Up Android Testing with TestProject AgentBooks to learn more about:
Any help is welcome to help us keeping this effort alive!
BTC (Bech32): bc1qx6f8nczr5ram6d57svlnsfmk5mhu6lsr9q7mxwBTC: 1DDcWbphm1bKMvWruotNKLSM8ypVaHg5NvETH: DKehWtHnmrf7JTRWpEQ9LtqwqY8HdbdkbUDOGE: 0x58D137fb142D946bCD815f0ded0fa3b3fE5AB3BFAngélica Viridiana Rebolloza
Computing Engineer specialized in Automation, working with different tools for Mobile and Web, using languages, tools, and platforms like JAVA, VBScript, JavaScript, C#, Appium, Protractor, UFT (QTP), Selenium, WinAppDriver, Jenkins among others.
Viridiana also has been working using practices like TDD & BDD under Cascade and Agile approaches.
Some certifications include: ISTQB Foundations Certification, SeU Selenium Certified, ITIL Foundations Certification.
No Comment

Nowadays Mobile Testing is so important to ensure Quality, but one of the most common problems is the speed of an automated test. There’s no point in automating a set of test cases if the execution time of a single Automated Test is more than one or more Manual Tests.
This problem is really common when automating Android Test Cases using Appium and UIAutomator or UIAutomator2, one solution is to use “Espresso Driver” but requires:
- App has to be an Android Native.
- It’s important to have the source code of the App.
But most of the time, Companies doesn’t always provide the source code (Commonly if the App was made by a third-party) or the App’s development is with a No-Native Android App using external frameworks as React-Native.
In these scenarios, there’s also another big problem, not all developers use unique and fast locators while developing an App, whether for Android or IOS like the usage of IDs. Most of the time we have to deal with XPaths, that is not only not recommended, due to the change of the DOM’s structure but also are extremely slow when are processed by Appium’s most common drivers like UIAutomator and UIAutomator2.

Here is where TestProject comes to help, even though I don’t recommend using the UI Interface of TestProject for big Projects because of the lack of maintainability and scalability. Using the UI of TestProject has a lot of dependency on the tool itself because it’s more focused on the “No Coding” Framework. Later on, if there’s a feature or functionality that TestProject doesn’t provide, we’re going to start coding, which it’s going to be more difficult to adapt the code generated by TestProject and adapt it to our necessities.
Anyhow, TestProject comes with an SDK for Java and Python, which easily (there’s almost none of the documentation) to integrate with our code to avoid using Appium and UIAutomator.
- We need to register in TestProject Web Page at https://testproject.io/ and Download the TestProject Agent.

TestProject Agent is available for Windows, Mac OS X and Linux (It’s also available in DockerHub). 2. To be able to run the Agent, we need to get our “Developer Token”, to get it, go to “https://app.testproject.io/#/integrations/sdk”, save this token for later.

3. In a Maven Project, let’s add these new dependencies, “io.testproject”, “org.slf4j” and “org.seleniumhq.selenium”. It’s also important to use the last version of Appium, there’re some libraries problems if the last version of Appium is not used.

This are all the dependencies used in this project. 4. In the class we create our old driver, in this case, it’s “Setup”, let’s remove Appium import and replace it with “io.testproject.sdk.drivers.android.AndroidDriver.

**Modify the Driver.

5. It’s important to add an environment variable called “TP_DEV_TOKEN” with the obtained token in Step 2, under Environment Variables > New System Variable.

6. Let run the TestProject Agent, by clicking on TestAgent.exe.


7. Now let’s run our test and see the performance improvement!. (Don’t forget to change the type of the new Driver in all classes.

In this basic example, there’s no much improvement on the performance and speed of the test, but for complex Apps and Test, the increseace of speed can go up to 50 %. For further information on how to use TestProject consult: “https://testproject.io“.
Links of interest:
Automating with Appium – Selenium and TestNG
The Agile Team Approach
What Scrum Master Certification to Choose?These are some recommended books to learn more:
Any help is welcome to help us keeping this effort alive! PayPal Account BTC (Bech32): bc1qx6f8nczr5ram6d57svlnsfmk5mhu6lsr9q7mxw BTC: 1DDcWbphm1bKMvWruotNKLSM8ypVaHg5Nv ETH: 0x58D137fb142D946bCD815f0ded0fa3b3fE5AB3BF
Angélica Viridiana Rebolloza
Computing Engineer specialized in Automation, working with different tools for Mobile and Web, using languages, tools, and platforms like JAVA, VBScript, JavaScript, C#, Appium, Protractor, UFT (QTP), Selenium, WinAppDriver, Jenkins among others.
Viridiana also has been working using practices like TDD & BDD under Cascade and Agile approaches.
Some certifications include: ISTQB Foundations Certification, SeU Selenium Certified, ITIL Foundations Certification.
No Comment

Nowadays Automation has grown so much, that even working in an environment of just ‘Manual Testing‘, it’s really important to ensure and improve the testing process to include a percentage of ‘Automation‘.
It’s important to mention that there’s impossible to cover 100 % of Automated Test Cases because automation has its limits like the abilities and knowledge about coding in a language programming of the Testers, the most used are Java, Python, and JavaScript, which not all actual Testers have.
Another important key is that not all the types of testing are able to automate like look and feel test.
So to keep it simple, if you want to automate a test you have to take the following points at least to start automating:
1. There are Regression Test Cases that you need to run always before a release.
2. There are flows that are just too large but also repetitive.
3. The scope of the Company is implement Continuous Integration (CI).
There are a lot of automation tools for different platforms like Android, IOS, and Web, but also for different scopes like Selenium, Mocha, Jazmine and Espresso.
Let’s start with Mobile (Android & IOS) using Selenium and TestNG with Java.
Create a Maven Project in Eclipse
For the next example, we’ll be using Eclipse as IDE and Maven of libraries management.
1. Create a Maven Project, it’ll look something like this.

2. In Folder “src/main/java“, create the packages “example.enviroment“, “example.pages” “example.test.base” and “example.pages.base“. This packages will contain our code.

3. Now let’s create the class “Setup” for the package “example.environment“, the class “BasePage” for the package “example.pages.base” and the class “BaseTest” for the package “example.test.base”.

4. It’s necessary to add de dependencies to the “pom.xml” file.

5. In Setup class we create de AppiumDriver that will interact with the device and our test.

To Appium to been able to connect your device is necessary to define the next capabilities: - udid = The ID of the device.
- device_Name = Generic name of the device usually just “My Phone”.
- appPackage = Is the name of the application’s package.
- appActivity = Is the name of the main activity (First Page) that the app loads when the app it’s launch.
- noReset = It’s an extra capability to avoid the information of the app got wiped out each time we run a test.
6. Let’s use ADB to obtain the previous capabilities.

By executing “adb devices” we obtain the UDID of the devices and emulator connected to our computer, in this case, is just one device “7MLNW18B29001109”.
To be able to see the device we must enable de “Developer Mode” and the “USB DEBUGGER”.
For the “appPackage” and “appActivity“, let’s type “adb shell” and then “dumpsys window windows | grep -E ‘mCurrentFocus‘”. It’s important to mention that the app to automate needs to be open on the device when we type the last command.
“com.huawei.android.FMRadio“: is the “appPackage” of the app.
“com.huawei.android.FMRadio.FMRadioMainActivity“: is the “appActivity” of the app.Create our First Test using TestNg
1. In class “BaseTest” we are going to call our driver (Setup class) each time a test is executed that’s why it is going to be called in BaseTest is going to be base for all the tests. With the tag @BeforeMethod, we assure that the Setup class and its method are always called before our tests. Also with the tag @AfterMethod we are going to set the close of the objects open, each time a test finishes. The tag @Parameters is going to help us to send the values from the xml file of TestNG.

2. Now let’s run Appium to inspect the elements of our app.

The host is our computer it can be assigned as 0.0.0.0 or 127.0.0.1 is the local host.
The port can be changed if it’s occupied or we want to run tests in parallel (I recommend separate the ports at least 10 units to avoid conflicts).
Now we have Appium Service running, we can use this console to debbug or use the Eclipse console. 3. Let’s click “Start inspection Session“.

4. Insert the next capabilities, click the button “Start Session“, and then we’ll see the app main activity, in this example the “Radio app“.


5. This main activity it’s going to be the “Principal Page“.

We are going to use “Page object Model” (POM) and “Page Factory” for the implementation of the test.
POM is a framework to organize the elements of an application in a way that it’s easier to understand and to maintain via “Pages”, in each page (Class) it’s defined the elements of only that page, in this example, we are only going to have two pages, the “Principal Page” and the “Radio Channels Page“.6. Let’s inspect and get the locators of the elements of “Principal Page“.

The most common locators are “ID” and “XPath“.
The ID locator is a unique locator that avoids having issues like duplicate elements if it is available de ID locator is much better to use it always.
The XPath locator depends on the DOM of the app source, so it’s not recommended to use it because it can change and also affects the performance because it has to go through all the DOM to find an element.
There are other locators like “name“, “class” and “text“, this locator it’s better to use them as a complement of each other because it’s possible that two or more elements have the same name, class, and text.
In this example:
The previous buttons ID is: “com.huawei.android.FMRadio:id/iv_prev“.
The next button ID is: “
com.huawei.android.FMRadio:id/iv_next“.
The Power button ID is: “com.huawei.android.FMRadio:id/btnPower”. 
The stations button menu ID is: “com.huawei.android.FMRadio:id/action_stations“. 7. Now let’s create our methods in the class “PrincipalPage“, create a package called “example.pages.java” and the class “PrincipalPage“.


The first part of the PrincipalPage consists of the following: - This class extends BasePage that will have the methods used by all the pages.
- In the Class’s Constructor it’s defined the “driver” that we create in Setup.
- PageFactory.initElements: Initialize the elements of the page, this is the main function of Page Factory, at the moment it’s instantiated the class PrincipalPage all the elements of the page are initialized.
- The structure to create these page elements are by the tag @FindBy and the type of locator to use like id, XPath, class, name etcetera; and the value of the locator.
Finally, it only needs the name of the element in our case a WebElement.

The last part is the definition of the methods aka actions of the elements.
In these examples the actions of each element are just clicks, this “Click” method/action is defined by Selenium as other many actions like sendKeys, clear, getText, getLocation, and many others.
The failedMethod and staticWait are not declared on this page because it comes from BasePage.8. Let’s define the actions in BasePage.

In this class is defined the methods “failedMethod” that prints the exceptions encountered on each method of the pages, and the method “staticWait” it converts from miliseconds to seconds, is a static wait to see the execution of the test, without it it’s not possible to see the actions. 9. Let’s create the last package where our Test Suites will be called as package “example.test.java” and class “FirstTest“.

10. The main test script resides in FirstTest.

This is the script of the test, where are just called the methods to make the actions. 11. Finally, let’s create the “PossitiveTests.xml” that TestNG will use to execute the tests and also is where the input parameters are defined.

The parameters are the input data of the test in Setup.
The class name is composed: package_name.class_name.
The methods include name is composed : method_name_of_FirstTest_class12. Lets just run it!

Right click on “PossitiveTests.xml“, select “Run As” and then “TestNG Suite”.
If there’s a problem finding this option be sure to have installed TestNG on the IDE, for more information about the installation of TestNG refers to https://testng.org/doc/download.html.
These are the result displayed in TestNG.
Links of interest:
Speed up Android Testing with TestProject Agent
Upload a File With HTML5
The Agile Team Approach
What Scrum Master Certification to Choose?These are some recommended books to learn more:
Any help is welcome to help us keeping this effort alive! PayPal Account BTC (Bech32): bc1qx6f8nczr5ram6d57svlnsfmk5mhu6lsr9q7mxw BTC: 1DDcWbphm1bKMvWruotNKLSM8ypVaHg5Nv ETH: 0x58D137fb142D946bCD815f0ded0fa3b3fE5AB3BF
Angélica Viridiana Rebolloza
Computing Engineer specialized in Automation, working with different tools for Mobile and Web, using languages, tools, and platforms like JAVA, VBScript, JavaScript, C#, Appium, Protractor, UFT (QTP), Selenium, WinAppDriver, Jenkins among others.
Viridiana also has been working using practices like TDD & BDD under Cascade and Agile approaches.
Some certifications include: ISTQB Foundations Certification, SeU Selenium Certified, ITIL Foundations Certification.
2 Comments Desarrollo / Development / Destacadas / Featured / Experiencia de Usuario / UX / Gamificación / Gamification / Ideas
Gamification Success Case
Previously, I spoke about the generalities of gamification, I expressed the definition and the objectives that gamification pursues, if you aren’t familiar with the subject before to continue reading, I recommend you that you go and read the previous post.
As part of a project in which I participated recently, I was analyzing how some organizations and their web solutions were using the gamification concept, and one of these solutions which it seems to one of the most interesting and outstanding using this concept is LinkedIn. As many already know, LinkedIn is a social network oriented to professional relationships, and as part of its operation, this social network uses a set of elements that integrate the gamification idea in its design. Now we’ll take a look on some of them, we’ll find out how they work and what is the purpose of the Gamification strategy and LinkedIn.
Profile
To make this network of professionals valuable, as much as for LinkedIn as for its users, the information from each member is required. The more information is provided by the user the greater the benefit which the network gets overall. When a new user signs in, tend to provide only the minimum information, usually doubting about how much information should provide, this apparently due mainly to distrust about sharing personal data, lack of time or laziness from network users.
LinkedIn, using gamification and UX (User Experience) elements, implemented a progress bar that appealed to the “sense of finishing something incomplete” to gently suggest and motivate to achieve a better percentage and thus obtain more information from the user, using a strategy where the percentage increase was easy to obtain at the beginning, but gradually it required more effort to reach 100% which added a touch of fun and challenge that invited to provide more data.
Eventually and very intelligently, LinkedIn realized that a disadvantage about just use a simple progress bar is that other data that arise as a consequence of changes in users’ working life, such as new job positions, new responsibilities, new certifications and academic progress, didn’t obtain relevance.
With the foregoing in mind, the percentage bar scheme was changed to a sphere that fills up as a cup with water, which is known as profile strength. Depending on how much the circle is filled, names are assigned to the “efficiency levels”, thus gauging ALL the data that is provided and also making LinkedIn members more willing to provide and update the information provided. it asks for them with a little invasive method and in addition without giving a foot to notice that the users are being “gameficated”.
Trying to improve even more their interface LinkedIn implemented some kind of mashup between their previous progress bar and the sphere ‘s efficiency levels, and currently is using a new progress bar.
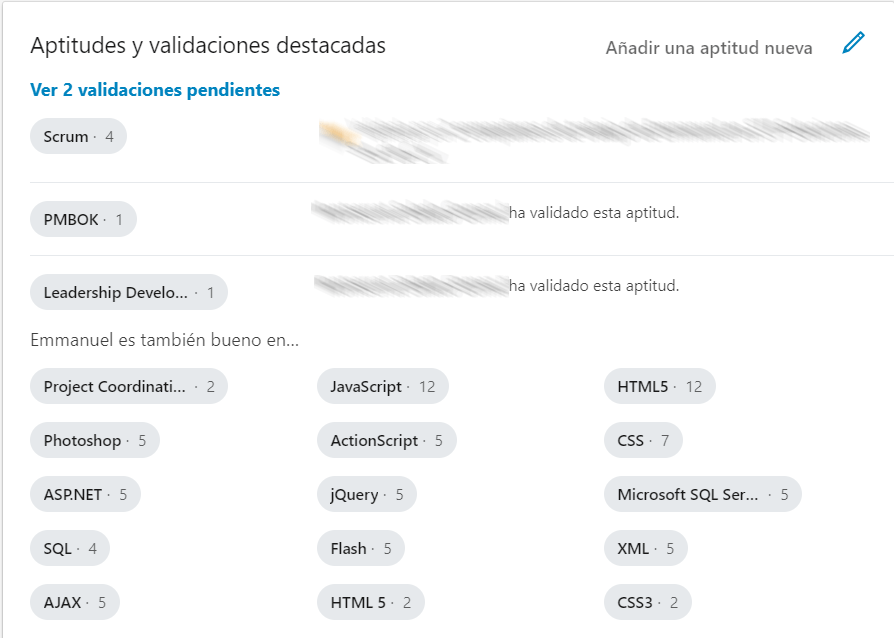
But even with the previous gamification elements, with which the design encourages users to provide information and thus increase the strength of their profiles, what is obtained is a self-description of the user qualities, which should be verifiable by other means. To solve this, the skills and expertise were devised, which, taking advantage of the social network inherent advantages, allow other users to validate the skills and experience, which creates a more accurate view of the user of interest.
Views
No profile makes much sense if it’s not being seen. The social network provides statistics to its members about how many times their profiles have been seen in recent days.
It also shows who have been the last person to see the profile. This not only stimulates the motivator of being the “center of attention”, but also encourages clicking on the profile of those people to potentially connect with them.
Updates
The LinkedIn users not just share personal and professional information, the network’s mechanic encourages them to share their articles, events, job opportunities and other types of related information with its members’ labor life; offering with it, the number of visits, their respective likes and the possibility of following other users or interesting groups, which are gamification techniques already tested by the social network habitual users.
Groups
Belonging to a group, contributing with posts and answers can increase the potential influence of a user as an expert within a community. The number of members is an indicator for the group owner about how successful are the actions derived from organizing a group of people around a certain topic.
Others
During my research about LinkedIn and its gamification strategies, I found mentions of some that I have not been able to corroborate, but I have seen mentioned in different places. Apparently there have been mailings and messages with congratulations to some members for a variety of “achievements”, such as being one of the most viewed profiles according to certain criteria of time and views or being a prominent member with a number of shared articles and views obtained to them, as well as some other similar motivators that pretend to be fun.
Do you know some other gamification techniques used on other sites? do you currently use gamification or do you intend to do it? do you think it’s worth use gamification? share it with us.
Other links that could be interesting for you:
How Gamification Motivates the Masses
Top 10 Groundbreaking Gamification Examples
Some interesting publications:
Emmanuel Herrera
IT professional with several years of experience in management and systems development with different goals within public and private sectors.
Emmanuel worked through development and management layers, transitioning from developer and team development leader to Project Manager, Project Coordinator, and eventually to Scrum Master, Product Owner, and Agile Coach.
Some certifications include: PSM, PSPO, SSM.
No Comment Desarrollo / Development / Destacadas / Featured / Diseño Web / Experiencia de Usuario / UX / Gamificación / Gamification / Ideas / Programación / Programming
Playing while working, studying, exercising or using the web
Those of us who have been or are gamers know that the idea or concept of gamification has been hovering around forever (at least, about 3 decades). Remember old phrases like, learn by playing! lose weight while having fun! etc. Now, although the concept is old, the term was coined thanks to a computer programmer named Nick Pelling in 2002, but in reality, the concept has begun to attract attention only in recent years.
Lately, I have met many people who use dazzling terms such as “game mechanics”, “game dynamics” or aims to establish as something complex and laborious the implementation of the concept, confusing the basic idea of gamification with complex marketing campaigns and big data. Certainly, you can create a sophisticated gamification implementation, but based on my experience involved in multimedia development teams since 1998, I can say that a lot about implementing gamification is just common sense.
Without being or pretending to be an expert in gamification, below I share some ideas, terms, and approaches that I’ve learned over time:
What is gamification?
There are lots of sites where you can get nice definitions about what gamification is, but to save the trip to Wikipedia, this is its definition:
Gamification is the application of game-design elements and game principles in non-game contexts. Gamification commonly employs game design elements to improve user engagement, organizational productivity, flow, learning, crowdsourcing, employee recruitment and evaluation, ease of use, usefulness of systems, physical exercise, traffic violations, voter apathy, and more. A collection of research on gamification shows that a majority of studies on gamification find it has positive effects on individuals. However, individual and contextual differences exist. Gamification can also improve an individual’s ability to comprehend digital content and understand a certain area of study such as music.
Did you understand that? Basically, it means, turns a task into something more interesting by adopting the logic of a game. The simplest way would be giving some sort of reward for doing some activity. The prize can be as obvious as a trophy or as vague and subjective as simply seeking to offer fun while doing a specific task. But of course, there’s much more that can be done, especially when human behavior is considered.
But to meet the cliché, this is my personal definition:
Gamification is the application of the metaphor of gaming to common or compulsory tasks to influence behavior, giving more motivation and increasing involvement, preference or loyalty.
Are video games useful?
For some years I was a World of Warcraft player, a very popular video game with millions of users, which I think is a great example of how these games can be related to the real world. Within World of Warcraft, one of the objectives is to make money. This money can be obtained in several ways, but most of it is completing quests (missions). As a result of solving the missions you get gold, which the player uses to obtain different things like buying clothes, weapons, materials, improvements, information for new missions, etc. (Does this sound familiar?), this is the basics of any business and an important part of life. Day by day World of Warcraft players spend their time making goods, offering services and fulfilling missions. In the real world, we do the same, we earn money to obtain some achievement; We spend that money on buying new things or we invest in something that allows us to earn more money or do something more efficiently or comfortably.
Enlarge

Blizzard Entertainment
A valid question would be why these players are so willing to spend so much time doing what they could do in real life? The answer is easy: because it’s fun.
Adopting the idea
At this point It’s important to clarify that not everything is about video games, we will not see in the immediate future someone willing to play the latest game of Microsoft Project or Word (although, you never know 😉). What we are trying to do is take ideas from games and insert them into some routine task, so these tasks don’t have to be boring to death.
With all the above in mind I have to be honest, despite the relatively recent popularity of the idea of gamification, not everyone knows what it is, not everyone is interested, it seems that to get hear and understand the term is required of some curiosity, wanting to know what is in vogue about developing, UX, etc., or just having a little bit of geekness. All this makes selling the idea to or in an organization is not as easy as it might seem (at least not here in the third world).
Recently I participated in a project where customer asked my team, to propose “innovative” ideas (another oversold term) to improve the technological proposal of an organization, as part of this I eventually proposed the idea of incorporating some initial and modest strategy of gamification, giving some overall but concrete examples including just enough detail, not exactly as something “innovative” but as something that only intended to “update” the technological solution implemented at the time. Surprisingly, although the organization which I was working with, develops technological solutions, 90% of those involved did not know what the hell I was talking about (shame on you Infotec); I had to explain the idea to business analysts, deputy directors, directors, contractors and developers without much success (nobody is a prophet in his own land, but I like to think I threw some light on lost souls).
I have to add that the word gamification is weird English and the translations into Spanish sound even worse, so the word doesn’t help too much to sell the concept, as a result of this experience I came up to the conclusion that in order to adopt the idea more easily, we must use words such as Productivity, Behavior Changes, Motivation and Preference (or engagement if you prefer the marketing jargon).
Points, Medals, Trophies, Position Tables
As responsible for a project some time ago, I needed to make a quality assurance in a series of contents for courses, with a lot of information to review and very little time, I told the members of my team, that the two people who found more errors would earn a big coffee every day for the next week. Suddenly a game was on.
Fortunately, we do not always need to resort to real physical awards in all cases. The management of information that users provide their organization, website or mobile application can be used to award prizes in different ways, the most common are:
- Points
- Medals
- Trophies
- Levels
- Position Tables
- Challenges
- Achievements
En un sitio o sistema web, por ejemplo, el concepto es utilizado ampliamente para que sus usuarios hagan más dentro del sitio o estén más tiempo expuestos a determinada información. Algún sitio donde se hacen trámites, puede hacer del llenado de sus formularios algo más ameno dando alguna especie de puntaje o jerarquía relacionada con un progreso por cada paso completado. Un sitio de ventas puede dar trofeos o medallas por las reseñas que un usuario coloca acerca de algún producto.
These examples are certainly very simple since only seek to motivate more users to carry out a task, and of course, they leave much more to exploit the concept, but they’re a good starting point to explore the benefits of gamification.
Not everything is about money
A strange and limited argument that I came across when I proposed gamification, is that accordingly with someone’s assumption, gamification was about giving economic incentives in the form of cash, coupons or discounts, which of course is not necessarily true, and falling into that assumption usually creates concern and even rejection from the sponsors of any project or production chain. Money is a good motivator for a user (it always is), but there is a word that you will find very often in blogs and books about gamification and also I already mentioned, this is engagement, this means that money will always motivate you doing some task but won’t necessarily “hook” you to it nor will make the activity enjoyable.
What else?
If you start to delve deeper into gamification issues, you will eventually realize that there is much more than just depending on incentives and certainly much more than relying on money. You will be using human behavior and the famous reptilian brain, that is, use in your favor something that is within human nature itself, play. Using gamification you will be appealing to feelings of pride and need for recognition, with which you could achieve even more than offering money in exchange.
In conclusion
I’ll share with you a couple of videos about some educational projects where I was involved and I used gamification (they’re old but still valid to understand the concept) and some bibliographies that I found useful and interesting:
Books:
- Why we do what we do: understanding self-motivation
- For the Win: How Game Thinking Can Revolutionize Your Business
- A Theory of Fun for Game Design
Videos:
Risk Prevention
Mexico’s Economic Development
English Learning Card Game
Thanks to @Mordred77M for the English translation, he’s not a natural English speaker and he´s still learning so don’t be grumpy and help him to improve :)
Related links:
Mint (Empresa con aplicaciones fintech que utiliza gamification para las finanzas personales)
Emmanuel Herrera
IT professional with several years of experience in management and systems development with different goals within public and private sectors.
Emmanuel worked through development and management layers, transitioning from developer and team development leader to Project Manager, Project Coordinator, and eventually to Scrum Master, Product Owner, and Agile Coach.
Some certifications include: PSM, PSPO, SSM.
No Comment

Revelación
Hacer la estimación y la planeación del desarrollo de un producto puede ser una tarea desalentadora que se hace más complicada por nuestra ignorancia o mala interpretación acerca de los proyectos, como concepto y en proyectos específicos. Hace tiempo leí (enlaces al final) que un proyecto no debía ser visto sólo como una secuencia de pasos, sino que también debía ser visto como un flujo rápido que genera nuevas capacidades y nuevo conocimiento. Las nuevas capacidades se entregan como parte del nuevo producto y el nuevo conocimiento se utiliza para hacer un mejor producto (Cohn 2006). Esto es la base para el enfoque de la Planificación Agile sobre la planeación.
Al comenzar a leer sobre administración de proyectos, trabajaba como desarrollador, y esa frase (del párrafo anterior) fué una de mis primeras revelaciones serias acerca de porque trabajaba tan duro codificando para funcionalidades que al final no se utilizaban o bien en proyectos que no lograban sus objetivos plenamente. Parte de las fallas de esos proyectos fueron desde luego, a veces no planear en lo absoluto, pero también tratar de planear todo desde el principio.

Plan En un proyecto Agile utilizamos las nuevas capacidades y el nuevo conocimiento obtenido como guía para el trabajo mismo que se está realizando. El conocimiento obtenido puede ser acerca del producto o del mismo proyecto en general, lo importante es que este nuevo conocimiento nos da mejor idea de cómo debería ser el producto en el cual trabajamos o bien se convierte en mejor entendimiento sobre una tecnología, sobre el equipo, sobre los riesgos, etc.
Cuando pretendemos planear todo desde el principio (ni hablar cuando no planeamos) estamos fallando en integrar nuevo conocimiento al plan, y por lo tanto eso nos lleva a caer en suposiciones erróneas, como creer que estamos incluyendo TODO lo necesario en nuestro plan (lo que en el mundo del software rara vez sucede).
Mis amigos desarrolladores son mayormente gordos y feos (pero aún así los quiero 😃) y no les gusta correr (ejercitarse, hacer cardio, etc.) , pero a mí sí, por lo que utilizaré la siguiente analogía: Una aproximación tradicional a un proyecto puede ser como una carrera de 10km donde usted sabe exactamente dónde está la meta y trata de alcanzarla tan rápido como sea posible. Un proyecto Agile es como cuando usted se toma el tiempo y ve que tan lejos puede llegar en 60 minutos. Un equipo Agile sabe cuándo termina, pero no exactamente que entregará al final. Por lo tanto, planear se convierte en proceso en donde crean y revisan objetivos periódicamente que eventualmente llevan a una meta de más largo término.
Niveles de planificación Agile
Cuando estamos preparando los objetivos de un plan es importante reconocer que no podemos ver más allá de cierto horizonte y que la exactitud de nuestro horizonte será cada vez menor entre más lejos queramos ver. En mis cursos menciono los primeros capítulos de una serie de TV llamada Vikings en donde plantean someramente el uso regular de un compás solar, un piedra solar y cuervos para poder corregir el rumbo periódicamente y mantener un curso correcto; de esta misma manera nosotros debemos revisar el estado de nuestro proyecto y ajustar nuestro plan de acuerdo a ello. Desde este punto ya estamos hablando de la elaboración de una planeación estratégica con el enfoque Agile.
Como ya expresé, el riesgo de un plan se incrementa de acuerdo a que tan lejos en el futuro queramos planear, por ello cada cierto tiempo debemos levantar nuestra vista para ver el nuevo horizonte y ajustar el plan. Los equipos Agile hacen esto planeando en por lo menos 3 distintos horizontes (podrían ser más dependiendo de la aproximación de su organización, pero en esta entrada solo explicare estos). Los 3 horizontes son el Release (Liberación), Iteración y Diaria (actual). Puede tomar como referencia el siguiente diagrama (este no es un estándar, puede encontrar diferentes diagramas similares, pero los 3 horizontes principales no cambian):

Niveles de la Planificación Agile Planificación del Release (Liberación).
Aquí determinamos respuestas a preguntas que se relacionan con el alcance, el calendario y los recursos del proyecto. Este plan debe ser actualizado a lo largo del proyecto, usualmente al inicio de cada iteración para reflejar las expectativas actuales que serán incluidas en el Release.
Planificación de la Iteración.
Esta se lleva a cabo al inicio de cada iteración y basada en el trabajo que se hizo en la iteración anterior (si no es la primera desde luego). El cliente o sus representantes (el Product Owner) deben identificar los elementos de mayor prioridad en los cuales el equipo concentrará sus esfuerzos en la nueva iteración. Esto porque estamos en un horizonte más cercano que el del Release. En este horizonte se establecen las tareas requeridas para obtener una parte funcional y probada de nuestro producto.
Planificación Diaria.
Puede sonar muy excesivo (y quizá lo es) llamar planificación a este horizonte, esto no son más que reuniones diarias e informales (que usualmente se hacen de pie ya que solo deben durar unos minutos) en donde se sincronizan los esfuerzos diarios individualmente. Esto es, que cada miembro del equipo comparte que ha hecho el día anterior, que piensa hacer hoy y comunica los obstáculos que afronta.
Con estos tres horizontes (Release, Iteración y Diaria) los equipos ágiles se concentran sólo en lo que es visible e importante en el plan que han creado. De esta manera han adoptado el enfoque de la planificación Agile.
Condiciones de Satisfacción.
En una futura entrada dedicaré más detalle a esto (lo merece) pero no quiero dejar de mencionar el tema en esta misma entrada, por lo menos de manera breve. Todo proyecto debe comenzar con una meta, quizá de esta se deriven varios objetivos relacionados con fechas, presupuesto, recursos humanos, etc., pero típicamente solo habrá una meta. No dé por hecho que usted debe crear el mejor auto del mundo, la mejor puerta del mundo, el mejor ERP del mundo; los objetivos sólo deben alinearse con las condiciones de satisfacción del Producto Owner (la voz del cliente); esto es, los criterios que serán utilizados para evaluar y determinar el éxito del proyecto.
Lo pondré de otra forma, hace mucho tiempo, cuando estaba en la secundaria era común que a la clase entera nos asignaran escribir un artículo sobre un libro, y de inmediato aparecía la pregunta obligada al profesor, la cual era qué tan largo debía ser artículo. El respondía algo así como “cinco páginas”, entonces conociamos su primera Condición de Satisfacción. Hubo, por supuesto, una serie de condiciones adicionales de satisfacción no escritas, como que el documento estubiera bien escrito, que fuera mi propio trabajo (no plagios), sin faltas de ortografía, etc.
Al comienzo de la planificación Agile del Release o lanzamiento, el equipo y el propietario del producto exploran en colaboración las condiciones de satisfacción del propietario del producto. Estos incluyen los elementos habituales (alcance, calendario, presupuesto y calidad), aunque los equipos ágiles suelen prefieren tratar la calidad como no negociable. El equipo y el propietario del producto buscan formas de cumplir con todas las condiciones de satisfacción. El propietario del producto puede, por ejemplo, estar igualmente satisfecho con un Release en cinco meses que incluya un conjunto de historias de usuarios, que con un sólo lanzamiento de un mes que incluya historias de usuarios adicionales.
A veces, sin embargo, no se pueden cumplir todas las condiciones de satisfacción del propietario del producto. El equipo puede construir el mejor procesador de textos del mundo, pero no pueden construirlo para el próximo mes. Cuando no se puede encontrar una solución factible, las condiciones de satisfacción deben cambiar. Debido a esto, la planificación del lanzamiento y la exploración de las condiciones de satisfacción del propietario del producto son altamente iterativas
Conclusión
Los proyectos deben considerarse como una generación rápida y confiable de un flujo de nuevas capacidades útiles y nuevos conocimientos, en lugar de solo la ejecución de una serie de pasos. Los proyectos generan dos tipos de conocimiento nuevo: conocimiento sobre el producto o servicio y conocimiento sobre el proyecto. Este conocimiento debe ser validado para evitar trabajo infructuoso (waste).
La siguiente imagen muestra como la planifiación Agile existe dentro de una dinámica que busca adaptar conocimiento de manera pronta y altamente iterativa (como ya se mencionó). Hemos basado esta ilustración en la propuesta del buen @sdelbecque quien toma en cuenta la filosofía de Lean, con la cual la agilidad es altamente compatible:

Lean Agile Enlaces relacionados:
El Origen Y Los Valores De Agile
Planeación, Cono de Incertidumbre y Estimaciones en IT
Estos son alguno libros recomendables para saber más:
Emmanuel Herrera
IT professional with several years of experience in management and systems development with different goals within public and private sectors.
Emmanuel worked through development and management layers, transitioning from developer and team development leader to Project Manager, Project Coordinator, and eventually to Scrum Master, Product Owner, and Agile Coach.
Some certifications include: PSM, PSPO, SSM.
No Comment

The XMLHttpRequest object
The XMLHttpRequest object has been updated several times since was defined as the WHATWG’s HTML effort using Microsoft technology; then we had the original XMLHttpRequest Level 1 specification as part of W3C, we also had the XMLHttpRequest Level 2 updated specification, and now we have the last version of this object known as XMLHttpRequest Living Specification. We can summarize its advantages in the following points:
- Allows upload and download files as stream bytes, large binaries (BLOBs) or data forms
- It has event handlers for progress, errors, abortion, start, and end of operations
- Cross-domain capabilities (CORS)
- New type for JSON responses
- Is a fundamental part of the HTML5 File API specification
It’s important to emphasize that before HTML5 and the latest versions of XMLHttpRequest object it was required to resort to server-side technology in order to able to perform an uploading file operation, that is, it wasn’t possible to upload a file natively from the client side. Technologies as AJAX and Flash did their own effort but with serious limitations, so XMLHttpRequest comes to cover this old problem in a big way. There are other additional features that come with XMLHttpRequest, if you want to know more you can resort to the official specification.
Starting
The first thing we’ll do is to define the user interface for this small implementation starting with the HTML tags, the code is very simple and only includes some form elements, and some div tags that are only used to give a better presentation using CSS3. I won’t analyze in this post anything related to the used cascade style sheets since is not something really necessary for the operation of this example.
<!DOCTYPE html>
<html>
    <head>
        <title>Upload File</title>
        <meta charset="iso-8859-1" />
    </head>
    <body>
    <div id="wrap">
       <div class="field">
           <ul class="options">
              <li><input type="file" id="myfile" name="myfile" class="rm-input" onchange="selectedFile();"/></li>
              <li><div id="fileSize"></div></li>
              <li><div id="fileType"></div></li>
              <li><input type="button" value="Subir Archivo" onClick="uploadFile()" class="rm-button" /></li>
           </ul>
       </div>
       <progress id="progressBar" value="0" max="100" class="rm-progress"></progress>
       <div id="percentageCalc"></div>
    </div>
    </body>
</html>
The previous code explains itself, but let’s summarize what is in there:- A file-type input which will be used to select the file to be uploaded
- A div which will be used to print the size of the selected file
- A div which will be used to print the MIME type of the selected file
- A button which will fire the uploading process for the selected file
- A progress bar to indicate the uploading process progress of the selected file
- Finally, a div where the progress will be shown in a percentage format
The selectedFile() function
Each time you select a file using the file element, you also trigger the onchange event which calls the selectedFile() function. In this function very interesting things happen, to start, a reference to a file array instantiated by the HTML5 object FileList is done, the objects that we get as members of FileList are File objects. In this case, we’ll get the size and type properties from the gotten File object.Using the information provided by the size property, the size of the selected file is calculated and shown in megabytes or kilobytes within the function. With the type property, the MIME type of the selected files is gotten and showed in the corresponding div.function selectedFile() { var archivoSeleccionado = document.getElementById("myfile"); var file = archivoSeleccionado.files[0]; if (file) { var fileSize = 0; if (file.size > 1048576) fileSize = (Math.round(file.size * 100 / 1048576) / 100).toString() + ' MB'; else fileSize = (Math.round(file.size * 100 / 1024) / 100).toString() + ' Kb'; var divfileSize = document.getElementById('fileSize'); var divfileType = document.getElementById('fileType'); divfileSize.innerHTML = 'Tamaño: ' + fileSize; divfileType.innerHTML = 'Tipo: ' + file.type; } }The uploadFile() function
Esta es la función que hace un mayor uso de las nuevas posibilidades de XMLHttpRequest , y es la que se encargará de disparar el proceso principal del lado cliente.
function uploadFile(){
 //var url = "/ReadMoveWebServices/WSUploadFile.asmx/UploadFile";
 var url = "/ReadMoveWebSite/UploadMinimal.aspx";
 var archivoSeleccionado = document.getElementById("myfile");
 var file = archivoSeleccionado.files[0];
 var fd = new FormData();
 fd.append("archivo", file);
 var xmlHTTP = new XMLHttpRequest();
 //xmlHTTP.upload.addEventListener("loadstart", loadStartFunction, false);
 xmlHTTP.upload.addEventListener("progress", progressFunction, false);
 xmlHTTP.addEventListener("load", transferCompleteFunction, false);
 xmlHTTP.addEventListener("error", uploadFailed, false);
 xmlHTTP.addEventListener("abort", uploadCanceled, false);
 xmlHTTP.open("POST", url, true);
 //xmlHTTP.setRequestHeader('book_id','10');
 xmlHTTP.send(fd);
}
At the beginning, we have the variable url that we’ll use to indicate where is the page o web service which is going to receive the request from this page to do the proper process on server side. Immediately like in the selectedFile() function, a reference to the gotten File object member is also done.In the fourth line, there is something new and very useful, that is the FormData object, this object allows to instantiate a web form via JavaScript, that is, is like you put an HTML form using tags, or you can refer to an already existing one assigning it to a FormData object. No doubt this is really helpful since means now you can create a web form y alter the sending values dynamically. To append values to, either instantiated or referenced web form with FormData, use the append(file, object) method, this way in the fifth line our File object is added with the file name.This is the code of the function that covers what was just stated://var url = "/ReadMoveWebServices/WSUploadFile.asmx/UploadFile"; var url = "/ReadMoveWebSite/UploadMinimal.aspx"; var archivoSeleccionado = document.getElementById("myfile"); var file = archivoSeleccionado.files[0]; var fd = new FormData(); fd.append("archivo", file);Event handlers
Continuing with the rest of the function, we can observe that the XMLHttpRequest object is finally instantiated and is assigned to the xmlHTTP variable, and then we proceed to the next novelty, I mean the possibility of creating new events which are part of XMLHttpRequest thanks to the upload object. The added events for this particular case are:- loadstart. Is triggered when the uploading file process initiates.
- progress. Is triggered each time there is an advance in the file uploading process.
- load. Is triggered when the transfer is complete successfully.
- error. Is triggered when the transfer fails
- abort. Is triggered when the user/developer interrupts the process.
These aren’t the only available events, check the official specification for more information.The event handlers are declared in the following code:var xmlHTTP= new XMLHttpRequest(); //xmlHTTP.upload.addEventListener("loadstart", loadStartFunction, false); xmlHTTP.upload.addEventListener("progress", progressFunction, false); xmlHTTP.addEventListener("load", transferCompleteFunction, false); xmlHTTP.addEventListener("error", uploadFailed, false); xmlHTTP.addEventListener("abort", uploadCanceled, false);The triggered events functions are the following:
function progressFunction(evt){
    var progressBar = document.getElementById("progressBar");
    var percentageDiv = document.getElementById("percentageCalc");
    if (evt.lengthComputable) {
        progressBar.max = evt.total;
        progressBar.value = evt.loaded;
        percentageDiv.innerHTML = Math.round(evt.loaded / evt.total * 100) + "%";
    }
}

function loadStartFunction(evt){
    alert('Comenzando a subir el archivo');
}

function transferCompleteFunction(evt){
    alert('Transferencia completa');
    var progressBar = document.getElementById("progressBar");
    var percentageDiv = document.getElementById("percentageCalc");
    progressBar.value = 100;
    percentageDiv.innerHTML = "100%";
}

function uploadFailed(evt) {
    alert("Hubo un error al subir el archivo.");
}

function uploadCanceled(evt) {
    alert("La operación se canceló o la conexión fue interrunpida.");
}
ProgressFunction() updates the progress bar and percentage which indicate in a graphical and numerical way the process progress, the rest of the functions only display the proper message for each case.
Commented code
If you have observed the code you probably noticed some commented lines, this is because this is just the base code to create something a little bit more complex, but I decided to leave those lines because maybe can be useful for someone:
//var url = "/ReadMoveWebServices/WSUploadFile.asmx/UploadFile";
The previous line of code is a call to a .Net HTTP service instead of a page. Here is where you should call your own server-side implementation.
//xmlHTTP.upload.addEventListener("loadstart", loadStartFunction, false);This line calls a function that shows a message when the process starts. I commented this line after I executed the code several times because was annoying.
The completo code
This is how the complete implementation of the code looks:
<!DOCTYPE html>
<html>
    <head>
        <title>Upload File</title>
        <meta charset="iso-8859-1" />
                                    <link rel="stylesheet" type="text/css" href="estilosUploadFile.css" />
        <script type="text/javascript">

              function selectedFile() {
                var archivoSeleccionado = document.getElementById("myfile");
                var file = archivoSeleccionado.files[0];
                if (file) {
                    var fileSize = 0;
                    if (file.size > 1048576)
                        fileSize = (Math.round(file.size * 100 / 1048576) / 100).toString() + ' MB';
                    else
                        fileSize = (Math.round(file.size * 100 / 1024) / 100).toString() + ' Kb';

                    var divfileSize = document.getElementById('fileSize');
                    var divfileType = document.getElementById('fileType');
                    divfileSize.innerHTML = 'Tamaño: ' + fileSize;
                    divfileType.innerHTML = 'Tipo: ' + file.type;

                }
              }

            function uploadFile(){
                //var url = "http://localhost/ReadMoveWebServices/WSUploadFile.asmx?op=UploadFile";
                var url = "/ReadMoveWebServices/WSUploadFile.asmx/UploadFile";
                var archivoSeleccionado = document.getElementById("myfile");
                var file = archivoSeleccionado.files[0];
                var fd = new FormData();
                fd.append("archivo", file);
                var xmlHTTP= new XMLHttpRequest();
                //xmlHTTP.upload.addEventListener("loadstart", loadStartFunction, false);
                xmlHTTP.upload.addEventListener("progress", progressFunction, false);
                xmlHTTP.addEventListener("load", transferCompleteFunction, false);
                xmlHTTP.addEventListener("error", uploadFailed, false);
                xmlHTTP.addEventListener("abort", uploadCanceled, false);
                xmlHTTP.open("POST", url, true);
                //xmlHTTP.setRequestHeader('book_id','10');
                xmlHTTP.send(fd);
            }

            function progressFunction(evt){
                var progressBar = document.getElementById("progressBar");
                var percentageDiv = document.getElementById("percentageCalc");
                if (evt.lengthComputable) {
                    progressBar.max = evt.total;
                    progressBar.value = evt.loaded;
                    percentageDiv.innerHTML = Math.round(evt.loaded / evt.total * 100) + "%";
                }
            }

            function loadStartFunction(evt){
                alert('Comenzando a subir el archivo');
            }
            function transferCompleteFunction(evt){
                alert('Transferencia completa');
                var progressBar = document.getElementById("progressBar");
                var percentageDiv = document.getElementById("percentageCalc");
                progressBar.value = 100;
                percentageDiv.innerHTML = "100%";
            }

            function uploadFailed(evt) {
                alert("Hubo un error al subir el archivo.");
            }

            function uploadCanceled(evt) {
                alert("La operación se canceló o la conexión fue interrunpida.");
            }

        </script>
    </head>
    <body>
        <div id="wrap">
            <div class="field">
                <ul class="options">
                    <li>
                        <input type="file" id="myfile" name="myfile" class="rm-input" onchange="selectedFile();"/>
                    </li>
                    <li>
                        <div id="fileSize"></div></li>
                    <li>
                        <div id="fileType"></div></li>
                    <li>
                        <input type="button" value="Subir Archivo" onClick="uploadFile()" class="rm-button" /></li>
                </ul>
            </div>
            <progress id="progressBar" value="0" max="100" class="rm-progress"></progress>
            <div id="percentageCalc"></div>
        </div>
    </body>
</html>
I’m not describing the CSS3 code because is irrelevant in terms of functionality, but I share an image that shows how it looks the implementation in the browser and the link to the CSS3 estilosUploadFile.zip.

I’m also sharing the original HTTP service that I used to test this example -the server-side code, backend file or any name that you prefer 😃- but this won’t be very useful for you unless you use the exact same stack that I was using at the moment- in other words, if you are the kind of person who just wants to copy and paste….hehehe well….maybe you’re not ready for this yet. Here is the file WSUploadFile.zip
Sorry about my English I’m not a natural speaker (don’t be grumpy, help me to improve).
This is all for now folks, I hope this can be useful for you.
Here some books that can help you in your HTML5 journey:
Emmanuel Herrera
IT professional with several years of experience in management and systems development with different goals within public and private sectors.
Emmanuel worked through development and management layers, transitioning from developer and team development leader to Project Manager, Project Coordinator, and eventually to Scrum Master, Product Owner, and Agile Coach.
Some certifications include: PSM, PSPO, SSM.
4 Comments
Desarrollo / Development / Diseño Web / Experiencia de Usuario / UX / Gamificación / Gamification / IdeasCaso de éxito con Gamification o Gamificación
Anteriormente, hablé sobre las generalidades de la gamification (ludificación, juguetización, jueguización o el término feo que prefiera), en ello expresé la definición y los objetivos que persigue, si usted NO esta familiarizado con el tema le recomiendo que lea la entrada anterior antes de continuar leyendo.
Como parte de un proyecto en que el participé recientemente, estuve analizando el uso que daban algunas organizaciones y sus sitios web al concepto de gamification, y uno de los sitios que me pareció más interesante y sobresaliente en el uso del concepto, fue LinkedIn. Como muchos ya saben, LinkedIn es una red social orientada a las relaciones profesionales, y como parte de su funcionamiento, esta red social utiliza una serie de elementos que integran la idea de gamification en su diseño. Ahora echaremos un vistazo a algunos de ellos y descubriremos cómo funcionan y cuál es el propósito de la estrategia de Gamification y LinkedIn.
Perfil
Para hacer valiosa esta red de profesionales, tanto para LinkedIn como para sus usuarios, la información de cada miembro es requerida. Entre más información sea proporcionada por el usuario mayor beneficio obtiene la red en general. Cuando un nuevo usuario se registra, tiende a proporcionar solo la información mínima, normalmente dudando acerca de cuanta información proporcionar, esto aparentemente es debido sobre todo a la desconfianza de compartir datos personales, la falta de tiempo o la pereza por parte de los usuarios de la red.
LinkedIn, echando mano de elementos de gamification y UX (User Experience), implementó una barra de progreso que apelaba al “sentido de terminar algo incompleto” para gentilmente sugerir y motivar a lograr un mejor porcentaje y así obtener más información del usuario, utilizando una estrategia en donde el aumento de porcentaje era fácil de obtener al principio, pero gradualmente se requería de mayor esfuerzo para llegar al 100% lo cual añadía un toque de diversión y reto que invitaba a proporcionar más datos.
Eventualmente y de manera muy inteligente, LinkedIn se dió cuenta de que una de las desventajas de usar una simple barra de progreso, es que otros datos que surgen como consecuencia de los cambios en la vida laboral de los usuarios, como son nuevos puestos, nuevos cargos, nuevos certificados o avances en el nivel académico, no cobraban relevancia.
Con lo anterior en mente se cambió el esquema de barra de porcentaje por una esfera que se llena cual copa con agua, la cual se conoce como eficiencia del perfil (profile strength). Dependiendo de que tanto se llena el círculo se asignan nombres a los “niveles de eficiencia”, logrando con ello ponderar TODOS los datos que se proporcionan y así mismo hacer que los miembros de LinkedIn se sientan más dispuestos a proporcionar y actualizar la información que se les solicita con un método poco invasivo y además sin dar pie a percatarse de que los usuarios están siendo “gameficados“.
Intentando mejorar aún más su interfaz, LinkedIn implementó una especie de mezcla entre su barra de progreso anterior y los niveles de eficiencia de la esfera, y actualmente está utilizando una nueva barra de progreso.
Pero incluso con los anteriores elementos de gamification, con los cuales el diseño estimula a los usuarios para que proporcionen información y así aumentar la fortaleza de sus perfiles, lo que se obtiene es una autodescripción de las cualidades del usuario, lo cual debería de poder ser verificable por otros medios. Para solucionar esto, se idearon las aptitudes y validaciones (skills and expertise), las cuales, aprovechando las ventajas inherentes de una red social, permiten a otros usuarios validar las habilidades y la experiencia, lo cual crea una visión más precisa del miembro en cuestión.
Vistas
Ningún perfil tiene mucho sentido si no está siendo visto. La red proporciona estadísticas a sus miembros acerca de cuantas veces ha sido visto su perfil en los últimos días.
También muestra quienes han sido las últimas personas en ver el perfil. Esto no solo estimula el motivador de ser el “centro de atención”, si no que además alienta a hacer clic en el perfil de esas personas para potencialmente conectar con ellas.
Actualizaciones
Los usuarios de LinkedIn no solo comparten información personal y profesional, la mecánica de la red los alienta a compartir artículos, eventos, oportunidades de trabajo y otros tipos de información relacionada con la vida laboral de sus miembros; ofreciendo con ello, el número de vistas, sus respectivos likes y la posibilidad de seguir a los usuarios o grupos de interés, lo cual son técnicas de gamification por demás experimentadas por los usuarios habituales de redes sociales.
Grupos
Pertenecer a un grupo, aportar publicaciones y respuestas puede incrementar la potencial influencia del usuario como experto dentro de una comunidad. El número de miembros es un indicador para el “dueño” del grupo acerca de que tan exitosas son las acciones derivadas de organizar a un grupo de personas alrededor de cierto tema.
Otros
Durante mi investigación de LinkedIn y sus estrategias de gamification, encontré menciones de algunas que no he podido corroborar de primera mano, pero he visto mencionadas en diferentes lugares. Aparentemente han habido envíos de correos y mensajes con felicitaciones a algunos miembros por una variedad de “logros”, como son el ser uno de los perfiles más vistos según determinados criterios de tiempo y vistas o por ser miembro destacado con cierto número de artículos compartidos y vistas obtenidas a los mismos, así como algunos otros motivadores por el estilo que pretenden ser divertidos.
¿Conoce algunas otras técnicas de gamification utilizadas en otros sitios?, ¿utiliza gamification o piensa hacerlo?, ¿cree que vale la pena el uso de gamification? compártalo con nosotros.
Otros enlaces que pueden ser de su interés:
Emmanuel Herrera
IT professional with several years of experience in management and systems development with different goals within public and private sectors.
Emmanuel worked through development and management layers, transitioning from developer and team development leader to Project Manager, Project Coordinator, and eventually to Scrum Master, Product Owner, and Agile Coach.
Some certifications include: PSM, PSPO, SSM.
No Comment
Desarrollo / Development / Diseño Web / Experiencia de Usuario / UX / Gamificación / Gamification / Ideas / Programación / ProgrammingJugando mientras trabaja, estudia, ejercita o usa la web
Aquellos que hemos sido o somos gamers (personas que gusta de los juegos y/o video juegos) sabemos que la idea o concepto de gamificaction (en sus aún más feas traducciones al español: gamificación, ludificación, juguetización o jueguización) ha andado rondando por siempre (unas 3 décadas). Recordemos frases viejísimas como: !aprende jugando!, ¡adelgace mientras se divierte!; si alguien es de México y de mis años recordará aquellos clásicos comerciales con la frase: ¡Con juguetes Mi Alegría…aprendemos…y jugamos! (sí, el tono de canción en su mente es inevitable si sabe de que hablo). Ahora, si bien el concepto es viejo, el término se acuñó gracias a un programador llamado Nick Pelling en 2002, pero en la realidad el concepto ha comenzado a atraer la atención tan solo en años recientes.
Últimamente me he encontrado con mucha gente que utiliza términos deslumbrantes como mecánica de juego, dinámica de juego o pretende establecer como algo complejo y laborioso la implementación del concepto, confundiendo la idea básica de gamification o gamificación con complejas campañas tecnológicas de marketing y big data. Lo anterior puede ser verdad y se pueden crear sofisticadas implementaciones de gamification, pero basado en mi experiencia involucrado en equipos desarrollo multimedia desde 1998, puedo decir que mucho sobre aplicar gamification es solo sentido común.
Sin ser o pretender ser un experto en gamification, a continuación le comparto algunas ideas, términos y aproximaciones que he aprendido con el tiempo:
¿Qué es gamification?
Hay montones de sitios donde puede obtener buenas definiciones sobre lo que es gamification (ludificación, juguetización o jueguización), pero para ahorrar el viaje a Wikipedia le traduzco lo que dice la misma en su sitio en inglés:
Gamification es la aplicación de elementos del diseño y principios para juegos en un contexto que no es de juego. Gamification comúnmente emplea los elementos que se utilizan en el diseño de juegos en los denominados non-game contexts en un intento de mejorar la participación de los usuarios, productividad de organización, aprendizaje, contratación y evaluación de empleados, facilidad de uso y la utilidad de sistemas, ejercicio físico, violaciónes de tráfico, apatía de votantes, entre otros. Una revisión de investigación sobre gamification muestra que la mayoría de los estudios sobre gamification encuentran efectos positivos en su implementación. Sin embargo, existen diferencias individuales y contextuales.
¿Entendió eso? Básicamente significa, hacer una tarea más interesante adoptando la lógica de un juego. La manera más simple sería otorgando alguna especie de premio por hacer alguna tarea. El premio puede ser tan obvio como un trofeo o tan vago y subjetivo como simplemente buscar ofrecer diversión mientras se hace una tarea definida. Pero desde luego hay mucho más que se puede hacer, especialmente cuando el comportamiento humano es considerado.
Pero para cumplir con el cliché, aquí mi definición personal:
Gamification es aplicar la metáfora del juego a tareas comunes u obligatorias para influenciar el comportamiento, dar mayor motivación e incrementar el involucramiento, la preferencia o la lealtad.
¿Los videojuegos sirven de algo?
Durante algunos años fui jugador de World of Warcraft, un video juego muy popular con millones de usuarios, el cual me parece que es un gran ejemplo de cómo estos juegos se pueden relacionar con el mundo real. Dentro de World of Warcraft uno de los objetivos es hacer dinero. Este dinero se puede obtener de varias maneras, pero la mayor parte es haciendo quests (misiones). Como resultado de resolver las misiones se obtiene dinero, el cual el jugador utiliza para obtener diferentes cosas como comprar ropa, armas, materiales, mejoras, información para nuevas misiones, etc. (¿le suena esto familiar?), esto es lo básico de cualquier negocio y parte importante de la vida. Día con día los jugadores de World of Warcraft se la pasan fabricando bienes, ofreciendo servicios y cumpliendo misiones. En el mundo real hacemos lo mismo, ganamos dinero por obtener determinado logro; gastamos ese dinero en comprar nuevas cosas o lo invertimos en algo que nos permita ganar más dinero o hacer algo de manera más eficiente o cómoda.
Enlarge
Blizzard Entertainment
Una pregunta válida sería ¿por qué estos jugadores están tan dispuestos a pasar tanto tiempo haciendo lo que bien podrían hacer en la vida real? La respuesta es fácil: porque es divertido.
Adoptando la idea
Es importante aclarar en este punto que no todo es acerca de video juegos, no veremos en futuro inmediato a alguien deseoso de jugar el último juego de Microsoft Project o de Word (aunque nunca se sabe 😉 ). Lo que estamos intentando hacer es tomar ideas de los juegos e insertarlos en alguna tarea de rutina, para que dicha tarea no tenga que ser aburrida hasta la muerte.
Con todo lo anterior en mente tengo que ser honesto, a pesar de la relativamente reciente popularidad de la idea de gamification, no todo el mundo sabe lo que es, no todos están interesados, pareciera que para llegar a escuchar y a comprender el término se requiere de algo de curiosidad, ganas de saber lo que está en boga o simplemente tener un poco de geekness. Todo esto hace que vender la idea en una organización no sea tan fácil como pudiera parecer (por lo menos no acá en el tercer mundo). Recientemente participé en un proyecto donde le solicitaron al equipo del cual formaba parte, proponer ideas “innovadoras” (otro término sobrevendido) para mejorar la propuesta tecnológica de una organización, como parte de esto eventualmente propuse la idea de incorporar alguna estrategia inicial y modesta de gamification dando algunos ejemplos con detalle general pero concreto, no como algo precisamente “innovador” si no como algo que únicamente pretendía poner “al día” la propuesta tecnológica implementada al momento. Sorprendentemente aunque la organización con la que trabajaba desarrolla tecnología, el 90% de los involucrados no sabía de que diablos hablaba (shame on you Infotec); tuve que explicar la idea a analistas, subdirectores, directores, consultores y desarrolladores sin demasiado éxito (nadie es profeta en su propia tierra, aunque me gusta pensar que di luz a algún alma perdida).
Tengo que agregar que la palabra gamification se escucha rara en inglés y las traducciones al español suenan aun peor, imagine decir en la reuniones todo el tiempo ludificación, juguetización o jueguización, estas palabras no ayudan mucho a la venta del concepto, como fruto de la experiencia llegué a la conclusión de que para adoptar la idea más fácilmente, hay que usar palabras como Productividad, Cambios de Comportamiento, Motivación y Preferencia (o engagement si prefiere el termino de marketing).
Puntos, Medallas, Trofeos, Tablas de Posición
Como responsable de un proyecto hace tiempo, requería hacer un aseguramiento de calidad en una serie de contenidos para cursos, con mucha información por revisar y muy poco tiempo, le dije a los miembros de mi equipo, que las 2 personas que encontraran más errores se ganaban un café grande diario durante toda la semana siguiente. Repentinamente tenía un juego en marcha.
Afortunadamente, no siempre necesitamos recurrir a premios físicos reales en todos los casos. El manejo de información que los usuarios le proporcionan a su organización, sitio web o aplicación móvil puede ser utilizado para otorgar premios en diferente forma, las más comunes son:
- Puntos
- Medallas
- Trofeos
- Niveles
- Tablas de Posición
- Retos
- Logros
En un sitio o sistema web, por ejemplo, el concepto es utilizado ampliamente para que sus usuarios hagan más dentro del sitio o estén más tiempo expuestos a determinada información. Algún sitio donde se hacen trámites, puede hacer del llenado de sus formularios algo más ameno dando alguna especie de puntaje o jerarquía relacionada con un progreso por cada paso completado. Un sitio de ventas puede dar trofeos o medallas por las reseñas que un usuario coloca acerca de algún producto.
Estos ejemplos son ciertamente algo muy simple ya que solo buscan motivar más a los usuarios a llevar a cabo una tarea, y desde luego que dejan mucho más para explotar el concepto, pero son un buen punto de inicio para explorar los beneficios de gamification.
No todo es dinero
Un argumento extraño y limitado que me topé al proponer gamification, es que bajo la suposición de alguien, gamification se trataba de dar incentivos económicos en forma de efectivo, cupones o descuentos, lo cual no necesariamente es cierto, y caer en ese supuesto usualmente crea preocupación y hasta rechazo por parte de los patrocinadores de cualquier proyecto o cadena de producción (¿qué pasa con tus directores Infotec? :D). El dinero es un buen motivador para un usuario (siempre lo es), pero hay una palabra en inglés que encontrará mucho en los blogs y libros sobre gamification y que ya mencioné, esta es engagement, esto quiere decir que el dinero siempre lo motivará a hacer alguna tarea pero no necesariamente hará que se “enganche” o que disfrute con la misma.
¿Qué más?
Si usted comienza a profundizar más en los temas de gamification, eventualmente se dará cuenta que hay mucho más que solo depender de incentivos y ciertamente mucho más que depender del dinero. Usted estará utilizando el comportamiento humano y el famoso cerebro reptiliano, es decir, usará a su favor algo que está dentro de la naturaleza humana, jugar. Usando gamification usted estará apelando a sentimientos de orgullo y necesidad de reconocimiento, con lo cual podría lograr incluso más que ofreciendo dinero.
Para concluir
Le dejo videos de algunos proyectos educativos donde apliqué gamification (algo viejos pero vigentes para entender el concepto) y algunas bibliografías que encontré útiles e interesantes:
Libros:
- Why we do what we do: understanding self-motivation
- For the Win: How Game Thinking Can Revolutionize Your Business
- A Theory of Fun for Game Design
Videos:
Interactivo Prevención de Riesgos
Interactivo Desarrollo Económico de México
Juego de cartas para ayudar a aprender inglés HTML5
Enlaces relacionados:
Mint (Empresa con aplicaciones fintech que utiliza gamification para las finanzas personales)
Emmanuel Herrera
IT professional with several years of experience in management and systems development with different goals within public and private sectors.
Emmanuel worked through development and management layers, transitioning from developer and team development leader to Project Manager, Project Coordinator, and eventually to Scrum Master, Product Owner, and Agile Coach.
Some certifications include: PSM, PSPO, SSM.
3 Comments

Historia
Hace ya 3 años inicié una serie de entradas en este blog, en donde comparaba las tecnologías Flash y la entonces emergente HTML5, en aquel entonces atestigüé acalorados debates en diferentes foros y medios sobre las bondades y retos que estas dos tecnologías tenían enfrente, sin embargo hoy en día parece que tenemos claro para donde van las cosas, y aunque Flash se niega a morir y aun se puede encontrar a uno que otro nostálgico pero aguerrido defensor de esta tecnología (yo mismo fui entusiasta de Flash durante sus años de gloria), en este primer cuarto del 2015 se han colocado algunos de los clavos más firmes en el ataúd de Flash. Las malas noticias para Flash provenientes en esta ocasión de YouTube, Mozilla y de las mismas fallas de rendimiento y seguridad del plug-in Flash Player.
Si es que alguien no lo sabe, Flash se propago ámpliamente hace más de década y media permitiendo a los desarrolladores web y multimedia crear gráficos, animación, video y otras interacciones con el usuario que eran difíciles o imposibles para el navegador. Para que las creaciones en Flash pudieran ser visualizadas en los navegadores, tanto entones como ahora, se requiere de un plug-in llamado Flash Player, y es aquí donde comienzan los problemas para Flash (¿barbas a remojar para el plug-in de Java?).
Con el poder de los navegadores incrementándose, la evolución de las capacidades de HTML5, la búsqueda del ahorro de recursos y las nuevas propuestas que se suman en el camino, tenemos que los plug-in van de salida. El primer gran golpe para Flash fue el que dio el todavía vivo Steve Jobs desterrando a Flash del ecosistema del iPhone por ahí del 2010. Pero ahora tenemos tres nuevos golpes, aunque uno de ellos es engañoso y paradójicamente quizá le ofrezca un último asidero a Flash, veamos:
Problemas de seguridad del Flash Player.
Comenzando el año 2015 el Flash Player tuvo muchos problemas de seguridad, y la verdad sea dicha es el plug-in favorito de los black hat hackers lo que ha llevado incluso a sugerir a algunos expertos el que no se instale el plug-in a menos que sea totalmente necesario, el problema es que en poco mas de dos semanas Adobe tuvo que hacer tres parches de emergencia para peligrosos bugs, lo cual ha sido en realidad un problema constante durante la vida de Flash. Esto llevó a Adobe a tener que trabajar rápidamente con sus socios distribuidores iniciando el año, dígase Google y Microsoft, para corregir el problema tanto en Chrome como en Internet Explorer de primera mano, pero al final los usuarios tenia que hacer varias actualizaciones del plug-in dependiendo de los navegadores que utilizasen; el problema fue tan grave que incluso Mozilla Firefox desactivo definitivamente el plug-in hasta que hubiera una solución final.
YouTube abandona el uso de Flash por default en sus videos.
YouTube, el mayor proveedor de videos en Flash de la historia, anunció que dejaría de servir videos utilizando el plug-in para todos los usuarios que consumen su contenido en un navegador moderno, haciendo por default el uso de HTML5 y su tag . Richard Leider en el blog de la gerencia de ingeniería de YouTube hace una interesante referencia a las razones por las cuales no habían podido hacer de HTML5 su plataforma favorita de entrega de video hasta el momento y de como las cosas han ido evolucionando para HTML5 hasta el punto de poder cerrar brechas técnicas. Esto sin duda marcará la tendencia para otros sitios de video.
Mozilla y su proyecto Shumway
En febrero Mozilla y sus programadores activaron Shumway para la reproducción de videos Flash en la plataforma Amazon SIN el uso del Flash Player. El proyecto Shumway ha estado en desarrollo desde hace algunos años y lo que intenta, en pocas palabras, es poder reproducir contenido SWF y FLV sin utilizar el Flash Player, si esto se lograra de forma completamente eficaz y eficiente significaría (desde mi punto de vista) la muerte absoluta e inmediata del Flash Player, sin embargo, el proyecto Shumway no está terminado y aun requiere mucho trabajo, pero lo que ha logrado es bastante prometedor.
Aquí es donde entra la paradoja y la esperanza para Flash, si bien algo como Shumway al final representaría la muerte inmediata del Flash Player, también significaría darle nueva vida al Flash Professional, la herramienta de creación de Adobe y probablemente a algunas otras que también crean contenido SWF y FLV. La herramienta de diseño y animación Flash Professional per se, sigue siendo bastante buena, trata de ir adaptándose a los nuevos estándares web mientras se mantiene relativamente más accesible que otras herramientas de animación y hoy por hoy aun no existe una herramienta tan buena como el Flash Professional dirigida a el HTML5 puro, el mismo Adobe lo intenta con su Adobe Edge Animate desde hace tiempo pero creo que aun no lo logran.
Enlaces a las posts previos:
Emmanuel Herrera
IT professional with several years of experience in management and systems development with different goals within public and private sectors.
Emmanuel worked through development and management layers, transitioning from developer and team development leader to Project Manager, Project Coordinator, and eventually to Scrum Master, Product Owner, and Agile Coach.
Some certifications include: PSM, PSPO, SSM.
2 Comments
En las entradas anteriores sobre la experiencias de usario (Parte 1 y Parte 2) hablé de lo interesante y ventajoso que puede ser el diseño de experiencia de usuario, pero aun siendo así, la verdad es que esta disciplina tampoco puede hacerlo todo ni es la medicina para todas los casos.
El diseño UX no viene en unitalla para todos.
El diseño de experiencia de usuario no funcionará en todos los casos para toda la gente debido a nuestra condición humana en la que todos somos diferentes. Lo que funciona para una persona probablemente funciona de manera totalmente opuesta para otra, de modo que lo que el diseño UX puede hacer es únicamente procurar alguna experiencia específica para promover cierto comportamiento, pero NO puede fabricar, imponer o predecir con total exactitud una experiencia en si misma.
El diseño de experiencia de usuario NO puede replicar de manera literal la experiencia de un sitio web o aplicación en otro sitio web o aplicación, las experiencias de un usuario siempre serán diferentes entre servicios y productos, es por eso que cuando se diseña algo, ese diseño es adaptado para buscar ciertos objetivos, valores o procesos de producción pero siempre en función de una iniciativa en particular.
No existen métricas para evaluar al UX
Desafortunadamente no hay ningún indicador que pueda señalar directamente el rendimiento o la calidad del diseño de la experiencia de usuario, esto solo lo podremos saber con la suma de múltiples factores como las clásicas estadísticas de vistas a páginas, porcentajes comparativos, tasas de conversiones de usuario, reportes ventas, colocación y otras evidencias enecdóticas, pero no existe ningún código o algoritmo que evalúe la experiencia de usuario, por lo que es importante que los diseñadores UX y los responsables de proyectos y cadenas de producción trabajen juntos con todos los indicadores al alcance bien documentados para comparar el antes y el después y así justificar la inversión en UX.UX no es usabilidad ni diseño gráfico.
Todavía encuentro blogs, videos, comentarios, etc., donde se habla de usabilidad como sinónimo de experiencia de usuario, y si bien es cierto que la usabilidad juega un papel importante, NO son lo mismo. La usabilidad se refiere a la eficiencia con la que una interface se relaciona con las acciones de un usuario, mientras que UX se refiere a lo que siente y piensa una usuario con respecto al uso de un sistema completo y como se comporta en consecuencia.Algo parecido sucede a veces con el diseño gráfico, el cual desde luego tiene un rol preponderante, pero NO es UX. Es verdad que es importante que un sitio web o aplicación resulten estéticos, con uso inteligentes de contrastes, colores y comunicación visual, pero solo por nombrar un caso ¿qué pasa si para comenzar nuestro usuario es alguien que no puede ver?, ésta es solo una razón por la que otros factores también tienen un rol importante, como lo son por ejemplo la accesibilidad, la ciencia humana, la arquitectura de información, el análisis de contexto, el análisis y ejecución de pruebas, la mercadotecnia, la psicología, la correcta gestión del proyecto entre otros.Críticas al UX como profesión.
No todo el mundo ve el valor de un diseñador de UX, la mayoría de los argumentos que he escuchado o leído giran en torno ha los costos adicionales involucrados, la redundancia con actividades de otras áreas y/o el miedo/pereza al cambio.Otra observación que algunos pueden tomar como crítica, y admito es un argumento interesante, es que los diseñadores UX no se pueden “crear de cero” como una carrera o disciplina aislada, si no que es más bien el resultado de una “especialización” de personas que han sido diseñadores web o desarrolladores quienes eventualmente deciden profundizar en los temas relacionados al UX, haciendo así indispensable un “background” en programación, desarrollo multimedia, etc. y sumarlo a conocimientos posteriores para efectuar un buen diseño UX. Usted ¿qué piensa de esta postura?
No se puede negar lo innegable.
Ya había hecho un guiño a esta situación, pero la reitero, una organización o proyecto con presupuesto realmente pequeño y personal limitado no puede invertir en un especialista UX por lo tanto el desarrollador solitario, o la compañía compuesta por dos amigos tendrían que integrar algunos (los que puedan) de los conceptos de UX como parte de sus actvidades habituales, lo cual es visto como desventaja por unos y ventaja por otros.¿Más?
Por el momento es todo lo que mi experiencia y memoria dan para mencionar, pero si a usted se le ocurre algo más no dude en comentarlo 😉Algunos enlaces de interés:
Diseño de la Experiencia de Usuario (Parte 1)
Diseño de la Experiencia de Usuario (Parte 2)
El Enfoque de la Planeación Agile
Estos son alguno libros recomendables para saber más:
Emmanuel Herrera
IT professional with several years of experience in management and systems development with different goals within public and private sectors.
Emmanuel worked through development and management layers, transitioning from developer and team development leader to Project Manager, Project Coordinator, and eventually to Scrum Master, Product Owner, and Agile Coach.
Some certifications include: PSM, PSPO, SSM.
2 Comments
Administración / Management / Desarrollo / Development / Diseño Web / Experiencia de Usuario / UX / Ideas / IT / Programación / Programming / Software¿Por qué no se utiliza el UX en su organización?
A lo largo de mi experiencia profesional trabajando en el mundo del desarrollo para Internet, me he topado con una enorme cantidad de discusiones y desacuerdos entre desarrolladores, diseñadores gráficos, project managers, clientes, jefes y un laaaargo etcetera de personas involucradas en el desarrollo de algún proyecto, de manera que muchos de ellos han sido renuentes a incluir procesos o personas explícitamente dedicadas el diseño de experiencia de usuario dentro de su organigrama de desarrollo o de personal, en otros casos, simplemente ignoran la existencia de tal disciplina (…así de triste).
El problema principal con las personas renuentes o que no conocen realmente acerca de la experiencia de usuario como disciplina, es que una vez que se les plantea la inclusión del proceso de UX, por lo general lo ven como un proceso que alarga los ya apretados tiempos de entrega (lo cual es una afirmación coja), o bien, hay gente que argumenta que el UX se “encima” con pasos de metodologías ya existententes (suspiro…esos amados procesos coporativos escritos en piedra). Con todo esto ¿porqué implementar UX en nuestros proyectos de desarrollo?.
¿Qué o quienes se benefician del diseño UX?
Si decimos en voz alta que cualquier sistema se beneficiaría de una sólida implementación de pruebas dirigidas a la experiencia de usuario, desde luego en pro de la satisfacción de este, seguramente encontraremos muy pocos o ningún argumento en contra y todos parecerán estar a favor de tan certera afirmación, pero en la práctica es ooootro cantar.
En la realidad siempre hay recursos y tiempo limitados y muchas organizaciones tienden a concentrar sus esfuerzos en el proceso de elaboración o ejecución per se, dejando descuidadas las estrategias de planeación, adaptación y mejora. Pero incluso en esta situación el diseño orientado a al experiencia de usuario puede ser beneficioso y vale la pena hacer el máximo esfuerzo por incluirlo en las tareas habituales de planeación, ejecución, monitoreo, pruebas y calidad. En mi experiencia (y no sin batallar un poco) he podido identificar algunos casos que se pueden ver particularmente beneficiados del diseño UX:
Sistemas complejos.
Entré más complejo un sistema más relevantes se vuelven la planeación adaptativa, el aprendizaje, la organización, la arquitectura progresiva y validación de condiciones de satisfacción para la correcta creación y uso de nuestro sistema. Mientras que invertir en un equipo interdiciplinario de personas que se dedicarán al UX podría ser excesivo para la elaboración de una pequeña página de presencia que solo contendrá algunos datos de contacto, en otros casos tenemos que el desarrollo de sitios, soluciones empresariales, aplicaciones web o móviles innovadoras o mucho más elaboradas, en donde se requieren de múltiples opciones, vistas y herramientas, y que además pretenden llegar a cada vez más usuarios, son las situaciones donde sin duda se verán ámpliamente los beneficios del UX.
Aquellos sitios y aplicaciones que simplemente muestran información extensa con pobre organización, que no ofrecen métodos de búsqueda efectivos, que priorizan torpemente la información, que antepone agendas propias antes de las necesidades reales del negocio y/o el usuario, que someten a sus usuarios a interminables formularios esperando que estos proporcionen información sin chistar y en una sola “sentada”, para finalmente brindar un servicio mediocre o malo, estarán proporcionando negligencia en cuanto a la experiencia de usuario y al final verán sumamente afectados el éxito, ganancias y/o longevidad de su producto o servicio. Son todos estos casos donde la UX cobra gran importancia para ayudar a prevenir o minimizar estas situaciones y lograr con ello que estos proyectos finalmente se perciban como eficientes, valiosos, exitosos y agradables tanto de ver como de utilizar.
Proyectos con presupuestos moderados y start-ups.
Sin duda las empresas pequeñas o las que apenas comienzan por lo general no cuentan con los recursos para contratar empleados dedicados 100% al la experiencia de usuario.
Otro hecho que podemos ver constantemente es que las empresas pequeñas y medianas en el afán de mantener costos bajos y priorizar entregables para obtener recursos, se concentran más en el proceso de producción o ejecución que en el de planificación, investigación y análisis para mejorar y adaptarse a nuevas condiciones, es decir, estas empresas giran alrededor del lanzamiento de un producto final.
Sin embargo, incluso estas organizaciones que pueden ser iniciativas pequeñas, pero que ya han logrado la venta de algún producto o servicio, comúnmente cuentan con una o más individualidades talentosas que son capaces de tomar diferentes roles en la organización según se necesite. Piense en ese programador, diseñador o persona entusiasta que ya está dentro de su organización y que por alguna razón parece tener cierta afinidad para crear cosas agradables y funcionales que son del gusto de clientes o usuarios. Ese tipo de talento es el que puede comenzar a entrenarse en los principios y procesos de la UX, y eventualmente comenzar a integrarlo al proceso común de desarrollo en la organización de manera incluso paulatina.
Cabe mencionar que las filosfías Lean y Agile puden potencializar mucho el correcto uso de UX gracias a sus enfoques adaptativos, iterativos, enfáticos en el aprendizaje y enfocados a la entrega de valor real más que un estricto apego a planes y procesos.
Empresas que desean reducir tiempos de entrega y costos.
Así como lo lee, a pesar de la suspicacia que despierta en algunos la implementación del diseño UX (como mencioanaba al principio de esta entrada), la integración de este puede acortar eventualmente los tiempos de desarrollo e incluso los costos del mismo.
Es verdad que con UX se deben agregar etapas adicionales a proceso de desarrollo que requieren de tiempo asignado, sin embargo en la teoría un diseñador UX realiza muchas de sus tareas paralelamente al trabajo que hacen los desarrolladores y diseñadores web, e incluso observará que mucho del trabajo que hacían estos ahora quedará en manos del mismo diseñador UX, también puede ocurrir que el trabajo que hacen un project manager, un scrum master, un product owner, un ingeniero de requerimientos, un arquitecto de información un analista de sistemas entre otros, puede verse realmente beneficiado y facilitado por el responsable del diseño UX, así potencialmente los costos causados por el bucle de revisiones y validaciones se verán reducidos y los otros miembros del equipo podrán pasar más tiempo productivo en su respectiva especialidad. Llendo incluso más lejos, la correcta y habitual implementación del diseño UX, al generar clientes más satisfechos eventualmente logrará traducirse en mayores beneficios para usted y su organización.
Enlaces de interés:
Diseño de la Experiencia de Usuario (Parte 1).
Diseño de la Experiencia de Usuario (Parte 3)
El Enfoque de la Planeación Agile
Estos son alguno libros recomendables para saber más:
Emmanuel Herrera
IT professional with several years of experience in management and systems development with different goals within public and private sectors.
Emmanuel worked through development and management layers, transitioning from developer and team development leader to Project Manager, Project Coordinator, and eventually to Scrum Master, Product Owner, and Agile Coach.
Some certifications include: PSM, PSPO, SSM.
3 Comments Desarrollo / Development / Diseño Web / Experiencia de Usuario / UX / Ideas / Programación / Programming / Software
La Experienecia de Usuario siempre ha estado ahí
La primera vez que programé fue por ahí en la década de los 90s, y entonces desarrollé muchas cosas, de las cuales algunas funcionaban y otras (la mayoría) no o por lo menos no como esperaba, así la mayor parte de lo que desarrollaba en esos años eran solo experimentos para mi deleite personal o para cumplir con alguna tarea escolar. Eventualmente algunos de estos experimentos personales se volvieron más o menos populares entre algunos de mis compañeros de clase, o para decirlo en palabras más capitalistas y emprendedoras, comencé a vender tareas (de las clases de programación y relacionadas) por encargo a algunos de mis compañeros, sin embargo, en las primeras ocasiones en que vendí tareas observé que mis “clientes” no entendían del todo (o en lo absoluto) como utilizar los pequeños programas que les entregaba y me resultaba bastante molesto tener que explicar cómo diablos se usaban, y considerando que tenía que parecer que ellos lo habían hecho, me resultaba un problema. Durante un buen tiempo me la pasé pensando en como podía lograr hacer que mis compañeros entendieran más rápido mis programas.
En esos años su servidor era un ávido lector de comics, y entonces comencé a meditar en lo hábiles que eran los dibujantes y escritores de estas historietas para dar a entender cosas complejas con tan solo algunos trazos, algunas viñetas bien colocadas o algunos “globitos” con texto, !y entonces vino la epifanía!, rápidamente comencé a observar con más atención los libros ilustrados e historietas dirigidos a niños, adolescentes y adultos, después de un rato de planificación llegué a que debía cumplir con lo siguiente:
- Distinguir mis usuarios “tontos” de los “menos tontos” para determinar el grado de esmero para los siguientes pasos (no fuí para nada políticamente correcto).
- Asegurarme que mis compañeros explicaran BIEN que era lo que querían para comprenderlo sin ninguna duda (cosa nada fácil).
- Ser los más explícito pero breve que pudiera en todos los textos que presentaba (opciones, menús avisos, etc.).
- Así como hacían los comics, los juegos y esas raras computadoras de manzana de color, tratar de auxiliarme de colores para contrastar unos elementos de otros y si era posible usar imágenes que respaldaran a los textos (este punto era mi favorito).
Palabras más palabras menos, esos fueron los pasos que diseñé para tratar que mis “encargos” salieran a la primera, mis compañeros-clientes molestaran menos y obtener un poco de dinero o alimento (tortas, churros, frutsis, .etc) en el proceso. Quisiera decir que todo fue felicidad y viento en popa, pero escribir mis pasos fue más fácil que seguirlos cabalmente, pero sí puedo decir que aunque la lata de mis clientes no desapareció, sí se redujo drásticamente. Muchos años después caí en cuenta de lo que había hecho de manera ingenua, empírica, simplona y corta de hecho tenía un nombre: Diseño de Experiencia de Usuario.
¿Pero qué es la Experiencia de Usuario?
Si usted busca en la web encontrará muchas definiciones, pero para aportar algo con la propia, la “Experiencia de Usuario“, conocida en inglés como “User Experience” y abreviada como “UX” es la manera en que una persona (un usuario) se siente acerca de su interacción con un sistema, tal sistema puede ser un programa de computadora tradicional, un sitio web, una aplicación web o una aplicación móvil entre otros, todo desde luego en un contexto de desarrollo actual.
La anécdota personal con la que inicié este post fue una feliz coincidencia basada en algo de sentido común, pero en realidad hay gente verdaderamente dedicada al estudio en profundidad del diseño de sistemas pensado en el usuario como el elemento fundamental de cualquier sistema tecnológico, la persona que probablemente ha aportado más en este campo es el Dr. Donald Arthur Norman, un investigador de ciencia cognitiva, diseño y usabilidad.
El Dr. Norman fue el primero en hablar de manera realmente científica y formal de la importancia del diseño de sistemas centrado en el usuario (user-centered design), lo cual es, en términos generales, la idea de que cualquier diseño de sistema debe estar basado en las necesidades reales del usuario (simple pero profundo cual frase de filósofo chino).
¿Porqué es importante la Experiencia de Usuario?
Usted podría pensar: ¡Pues obvio, si me la paso matándome horas programando para tener contento al #$@&% usuario! pero como diría el Dr. Andrés Roemer “no te creas todo lo que piensas“, para nadie en México (donde vivo) y en América Latina es novedad que por lo general estamos un tanto atrasados con respecto a muchas prácticas del primer mundo, donde todo este tema del desarrollo de sistemas centrado en la experiencia de usuario ya lleva un rato tomándose bastante en serio, pero en nuestra región es algo que apenas comienza a cobrar fuerza, es decir, apenas nos estamos dando cuenta de la importancia real de elaborar estrategias, alcances, estructuración, codificación y diseño enfocados realmente en el usuario.
Antes de que alguien me tire tomatazos déjeme decirle algo, para ver si le resulta familiar, aquellos que llevamos tiempo trabajando en la industria del desarrollo hemos tomado decisiones basados en dos cosas principalmente:
- Los elementos e interacciones que construimos en los sistemas son basados en lo que nosotros creemos que funciona. Basamos la estética y la funcionalidad con muy poca idea de como el usuario final usará el sistema, es decir, diseñamos para nosotros mismos (¿dónde está ese documento donde se entrevistaron, evaluaron, cuantificaron, segmentaron a los usuarios finales y sus dispositivos?).
- Todo se elabora en base a lo que el “jefe de alguien quiere ver”. Sucede que todo el trabajo que realizamos está en función del gusto de un individuo con un jerarquía mayor, ya sea de nuestra propia organización o dentro de la del cliente, sí, hablo de ese sujeto que por alguna razón cree ser experto en todo, poseer un sentido común superior y desde luego tener mejor gusto que todos (¿dónde está el documento que dice que ese stakeholder será el único usuario del sistema o si será usuario en lo absoluto?).
Sin embargo, en los últimos años la Internet y por lo tanto la web ha evolucionado y crecido más en su alcance, los sitios en web se han hecho más complejos y con características cada vez más ricas, y por si fuera poco, hoy en día la gente tiene más medios para consumir información en Internet: teléfonos inteligentes y tabletas con diferentes tamaños y capacidades, más navegadores web junto con diferentes tipos de conexiones, y todo ello nos obliga a tener que utilizar estrategias más inteligentes para lidiar con nuestros clientes y usuarios.
Otro punto importante es el tema de la accesibilidad, lo cual se refiere a el acceso universal de los servicios y productos basados en Internet para personas con necesidades diferentes (como débiles visuales por ejemplo) o bien para personas que no cuentan con buenos anchos de banda o que aún utilizan dispositivos viejos.
Tomando en cuenta todos estos cambios, hemos podido observar que todos los productos y servicios que giran alrededor de la Internet y han sobrevivido a lo largo del tiempo son solo aquellos que han logrado adaptarse para seguir siendo útiles y agradables de usar. Así, la moraleja para los que desarrollamos es: todo lo que construimos hoy se convierte en la experiencia que deseamos para con los usuarios que usan lo que hacemos.
Algunos enlaces de interés:
Diseño de la Experiencia de Usuario (Parte 2)
Diseño de la Experiencia de Usuario (Parte 3)
El Enfoque de la Planeación Agile
Estos son alguno libros recomendables para saber más:
Emmanuel Herrera
IT professional with several years of experience in management and systems development with different goals within public and private sectors.
Emmanuel worked through development and management layers, transitioning from developer and team development leader to Project Manager, Project Coordinator, and eventually to Scrum Master, Product Owner, and Agile Coach.
Some certifications include: PSM, PSPO, SSM.