-
What is Desktop Automation?
Desktop Automation focuses on creating automated tests for computer Applications whether these are native Windows Apps or not.
This type of automation focuses on Front End Testing as the interactions and flows cover only the front of the app. It’s similar to Web and Mobile automation as it also uses “drivers” to create a connection that interacts with the App.
The are several tools and frameworks to automate Desktop Apps, but one of the most used and powerful tools to do it is WinAppDriver.
What Inspectors are?
Inspectors are tools that let us see the Document Object Model (DOM) of an app, this DOM is a representation of the structure of an app as an XML Document. By inspecting and seeing the DOM is possible to understand how the elements of the apps like buttons, text, and text boxes are structured, get the properties of these elements as its locators like ID, Name, ClassName, XPaths, and so on, and which of them are contained on specific Panels, Windows and Tabs.
Currently, on the market, we have different inspectors that we can use, the most common for any platform is Appium Inspector and for Windows is Inspect.exe which is contained directly on Windows SDK Kit.
What is WinAppDriver?
Windows Application Driver (WinAppDriver)is a service that supports Selenium UI Test Automation on Windows Applications like Universal Windows Platform (UWP), Windows Forms (WinForms), Windows Presentation Foundation (WPF), and Classic Windows (Win32) apps.
What is BDD?
Behavior Driven Development is an agile software development process that allows the design, creation, and product testing, using the behavior of the product itself and making it easier for technical and non-technical users to understand the product. This approach improves the understanding of Testing for all the Team Members, as instead of showing Testing Scripts full of technical verbose like classes, methods, and variables, we can show the Steps in Natural Language.
The most common tools to implement BDD in Testing are Cucumber and Specflow, the latter is the most used tool in Windows for Visual Studio and C#.
What is Specflow?
Specflow is a test solution to implement BDD in our framework, using Gherkin language and binding of steps definitions for Net-based apps. Currently is really easy to start using Specflow as it can be easily installed using Nuget Manager in any VS project.
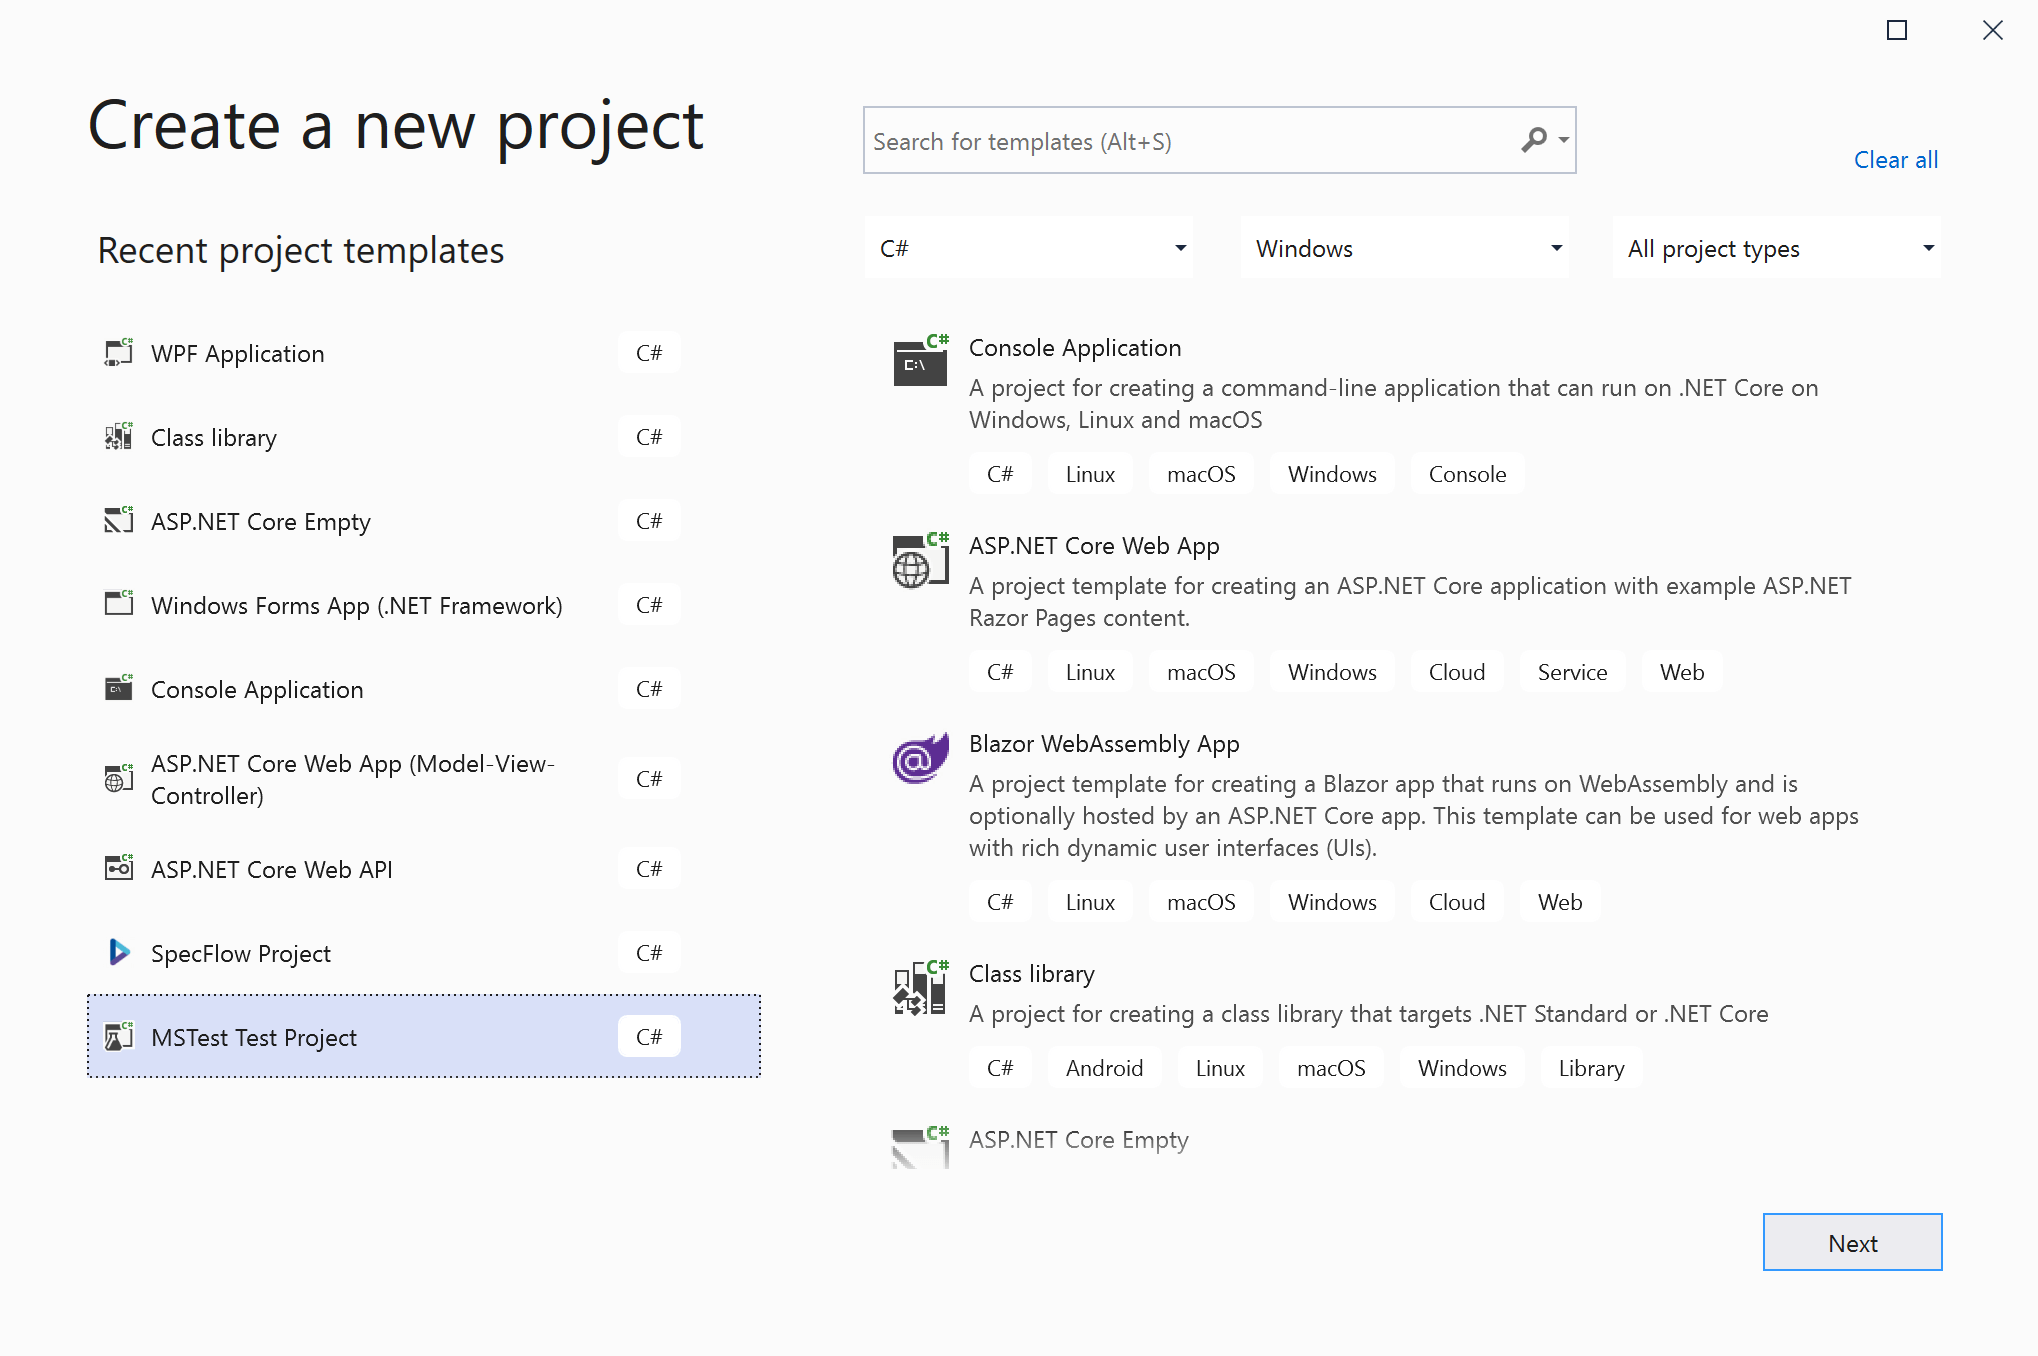
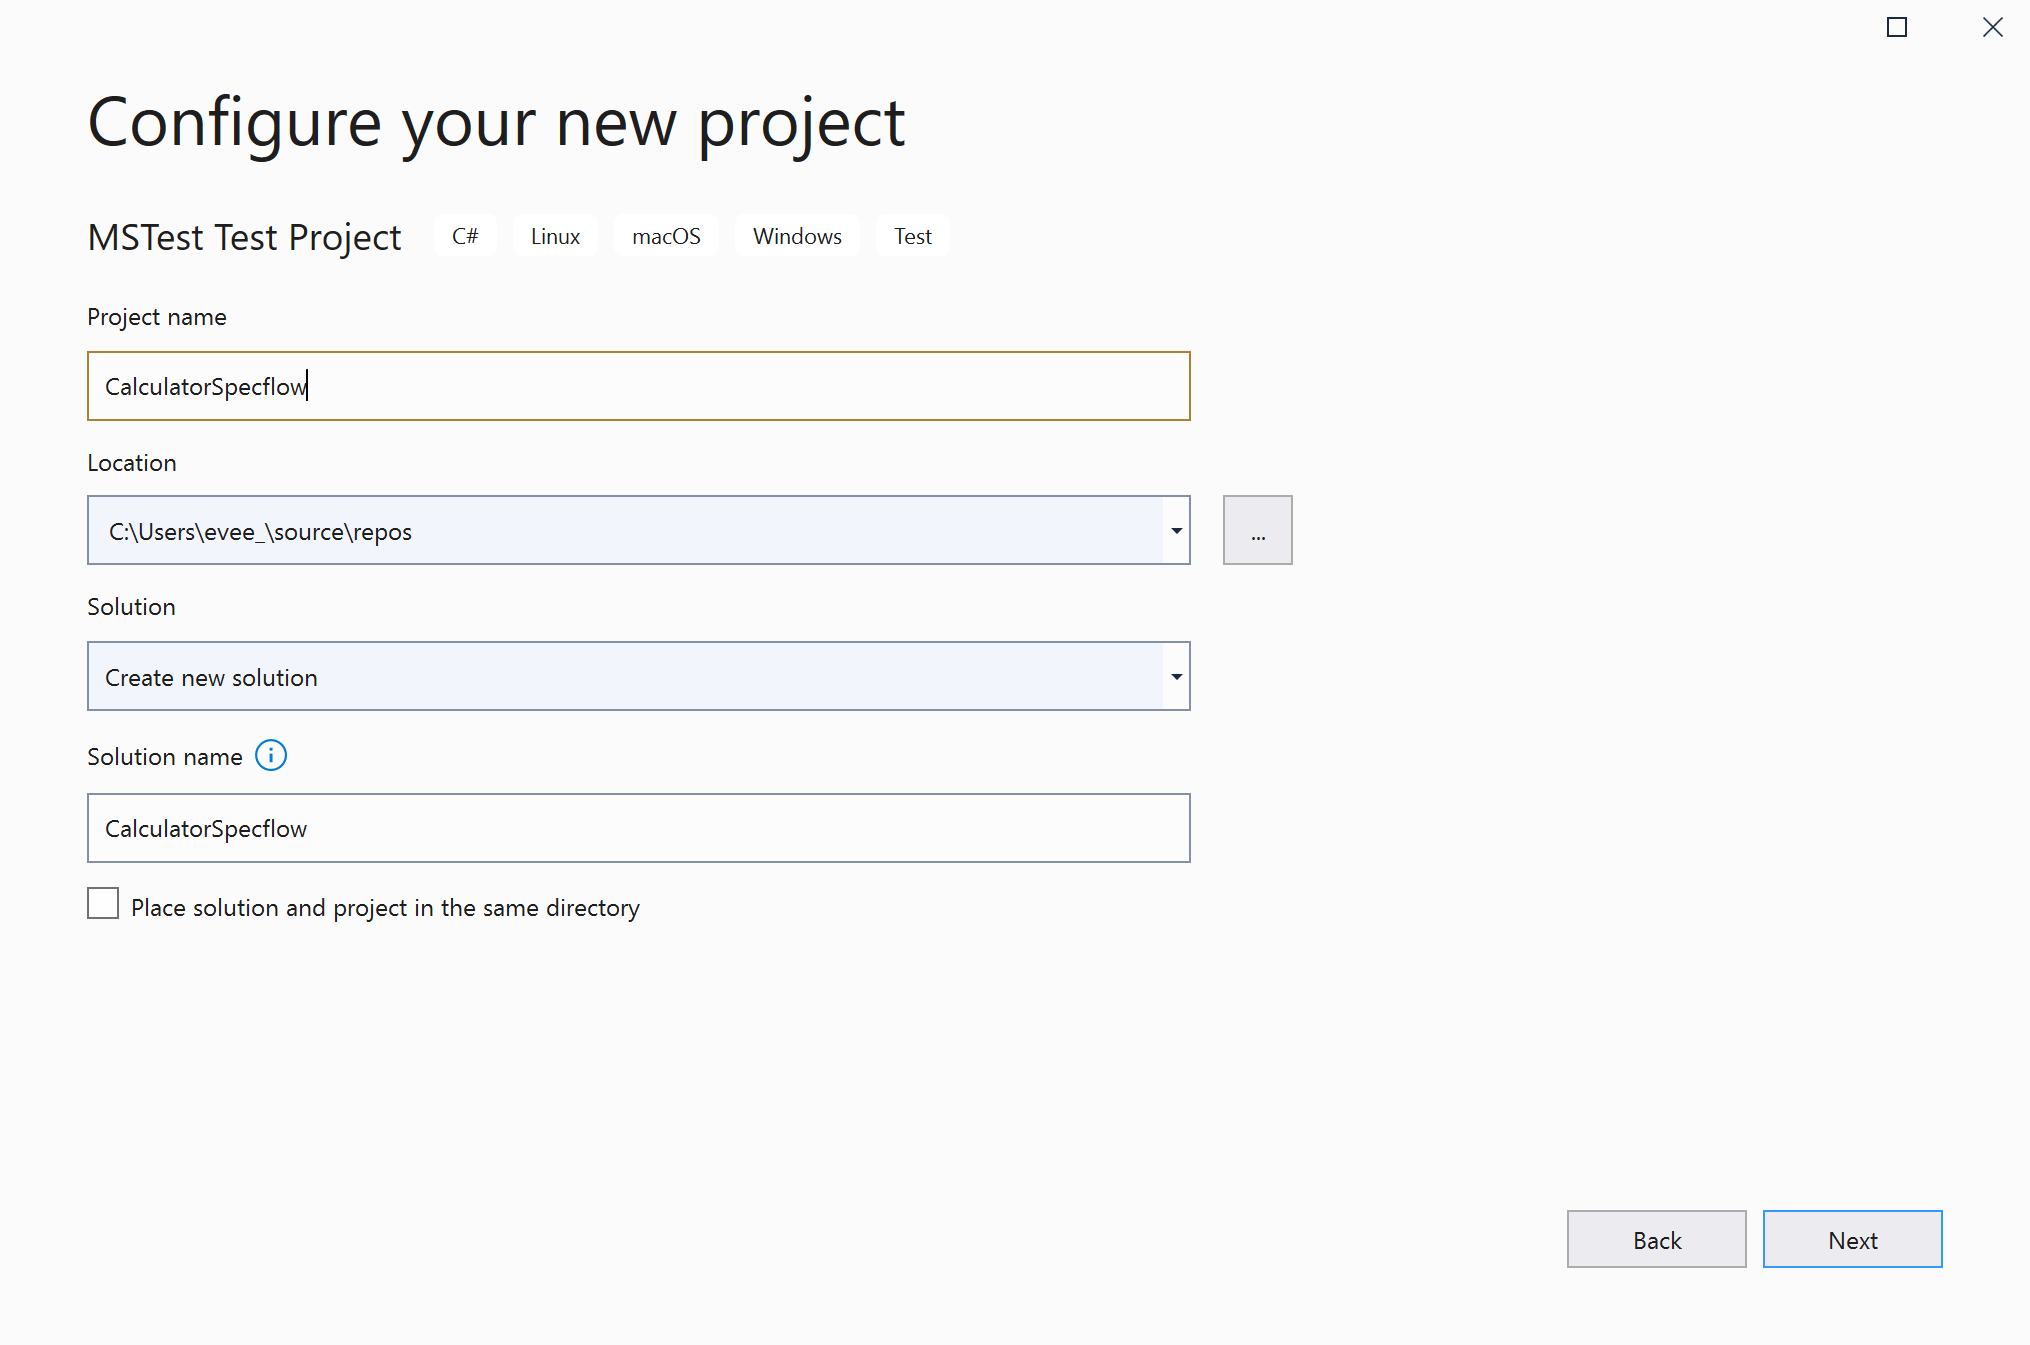
Creating an MSTest Test Project
For this example, we are going to create a VS Project of MSTest Test Project type, is important to notice that we can use any type of project to implement Specflow, even a Specflow-type project.
Enlarge

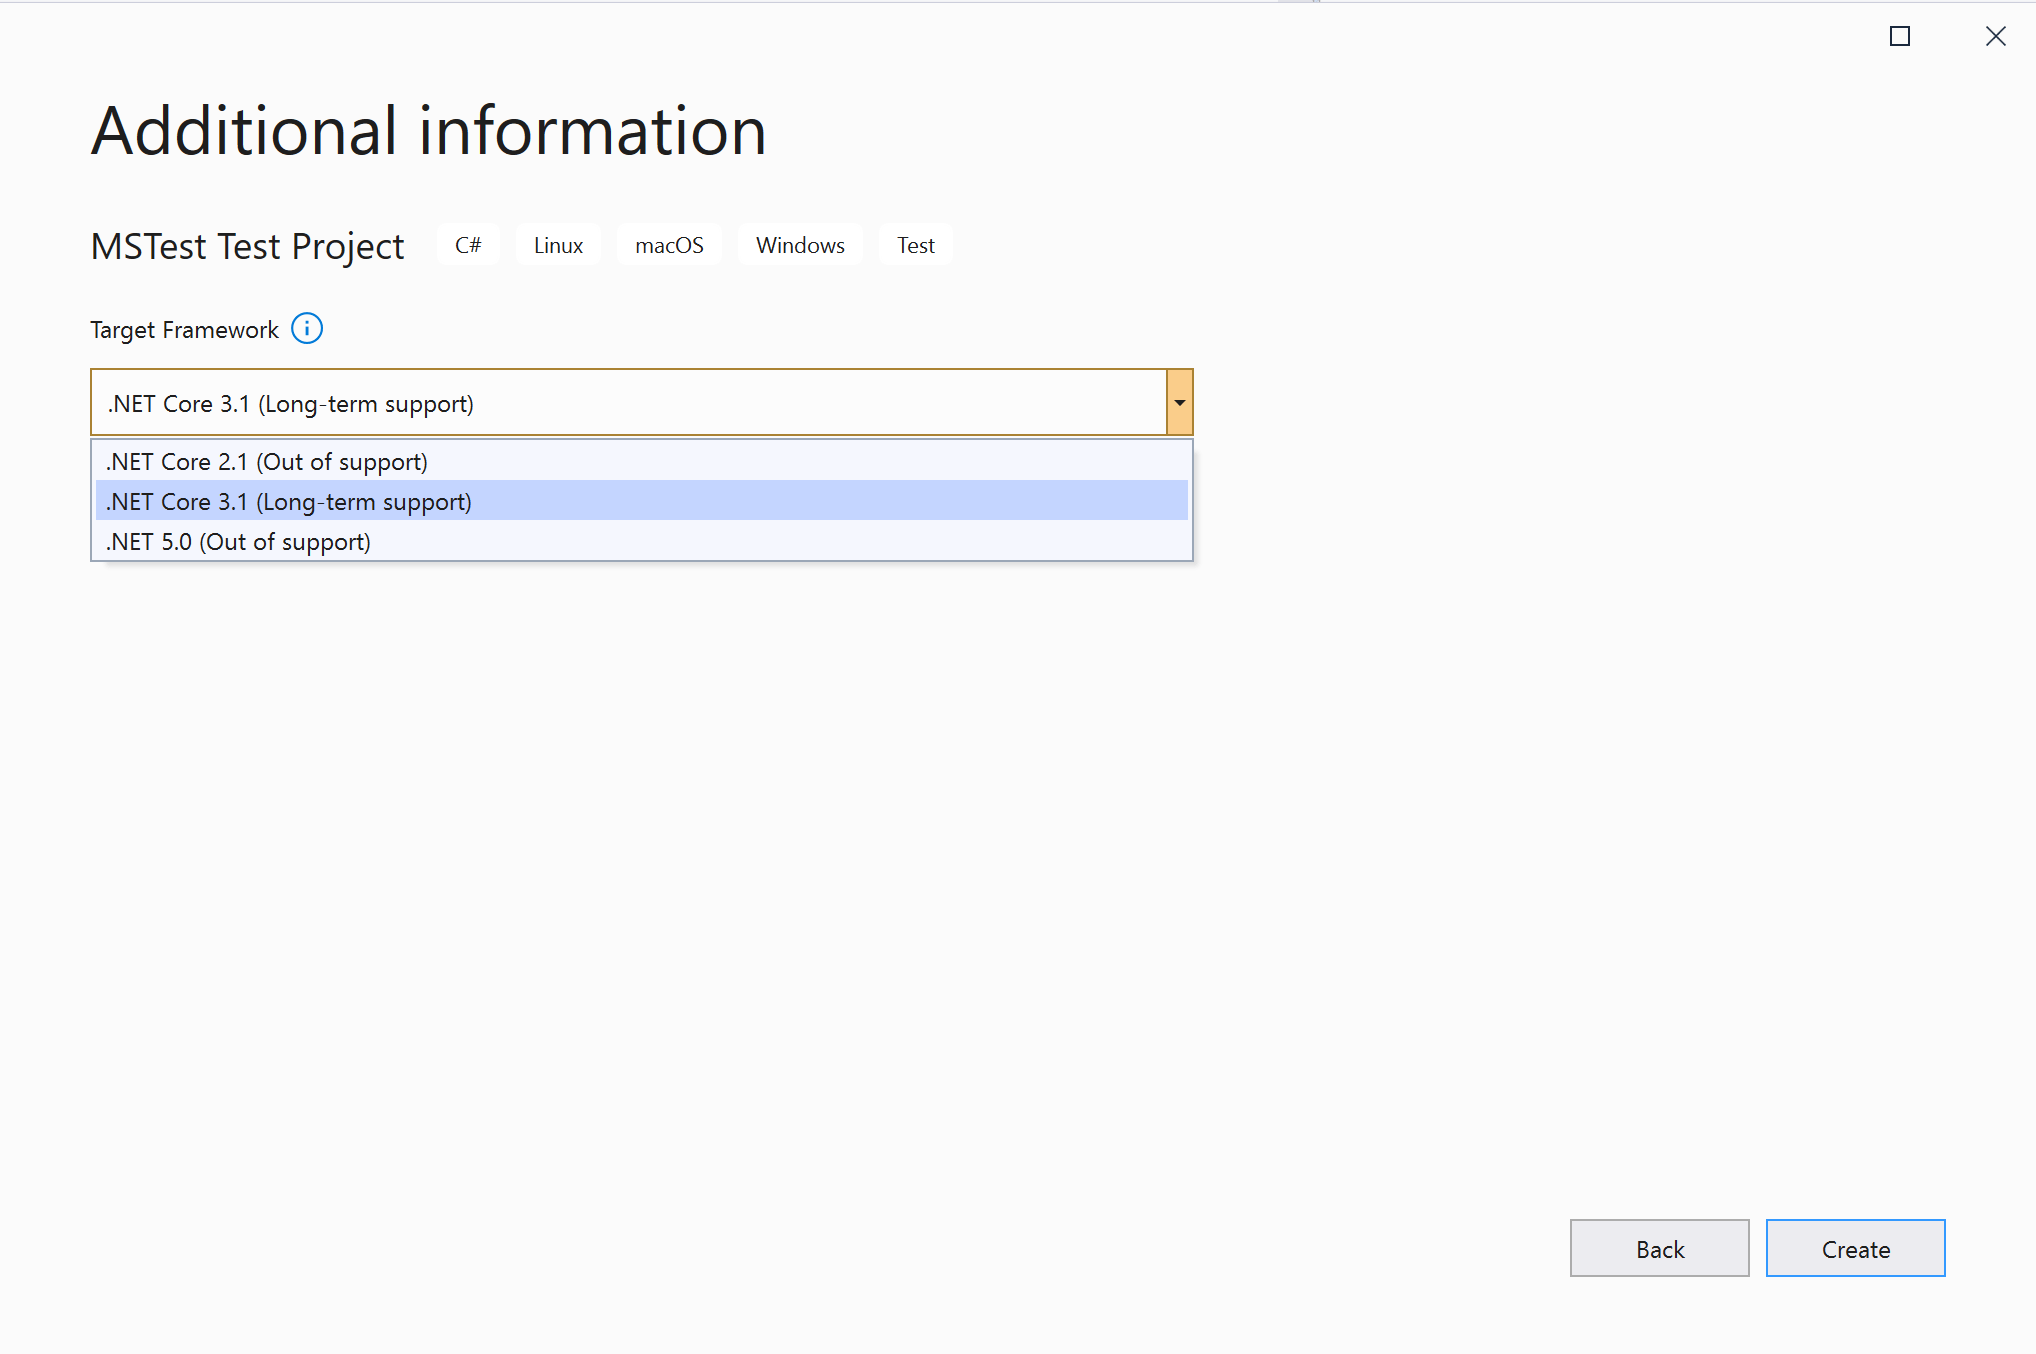
MNP Also is essential to choose the correct Net Core version for our Project, this may vary depending if the automation is going to be forcefully used by the old Net Core version, but keep in mind to always try to choose the latest version of Net Core.
Enlarge

NetCore Enlarge

Configure Project Adding Specflow to VS
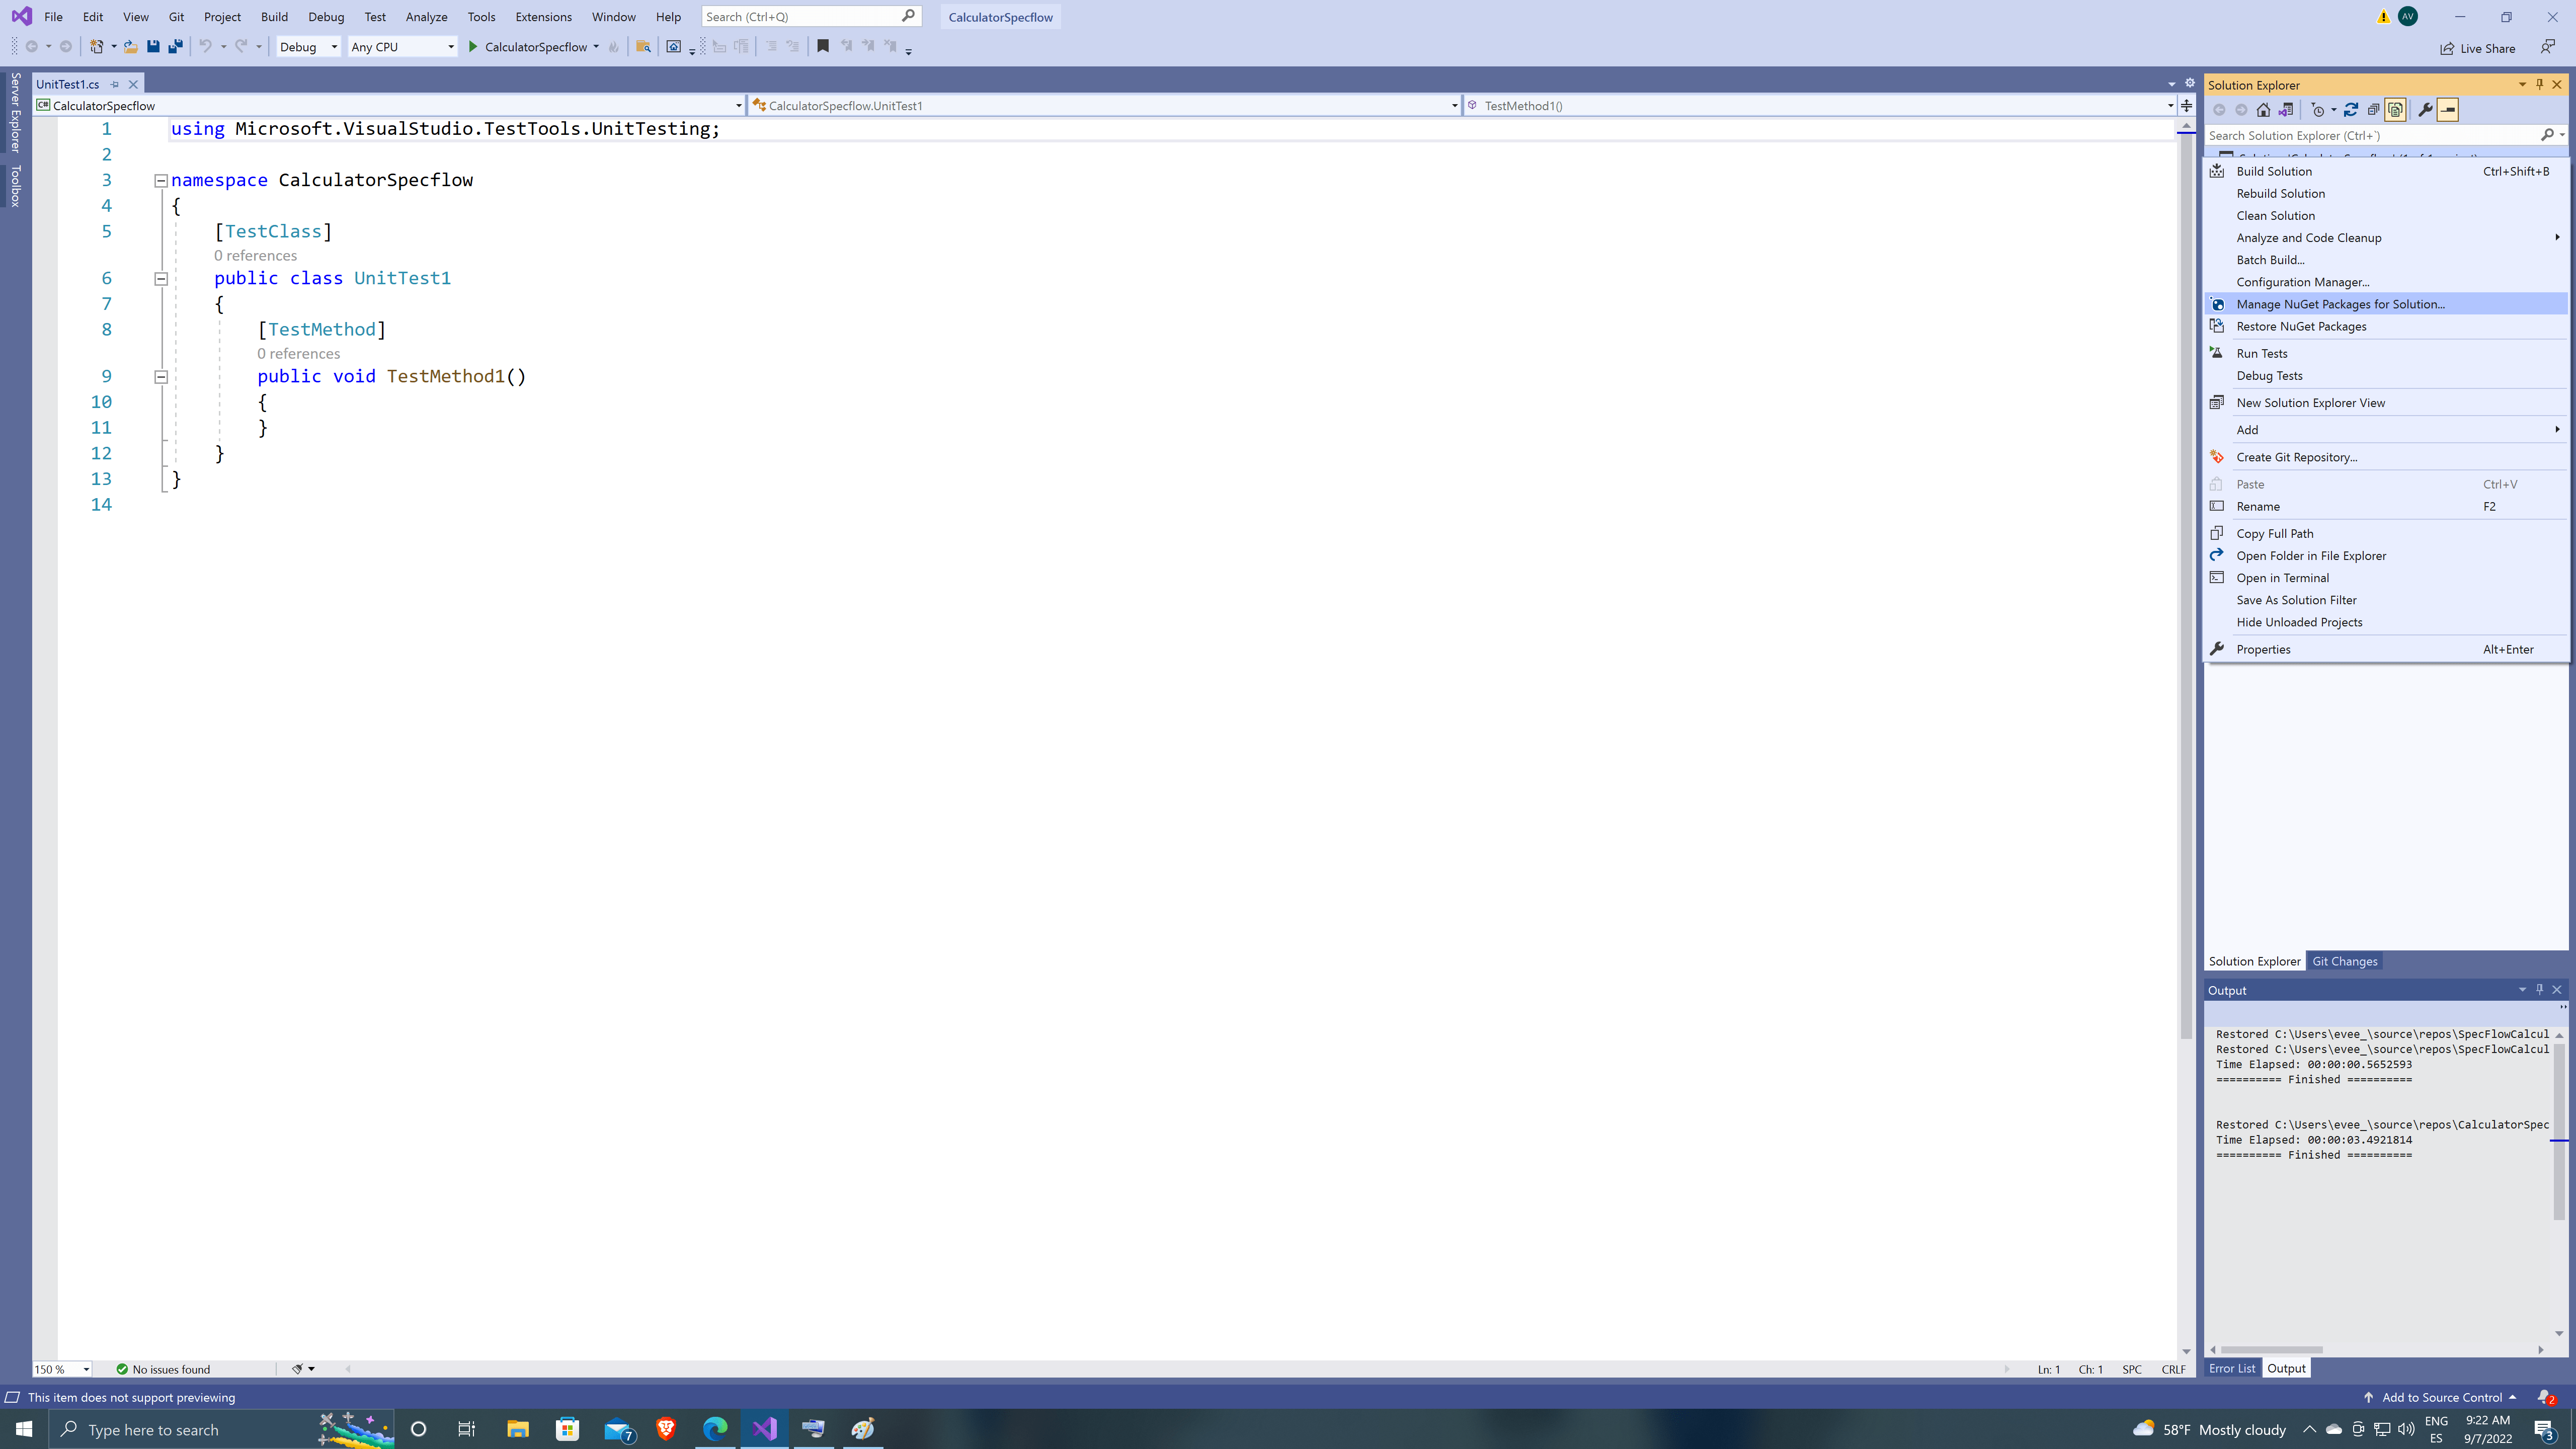
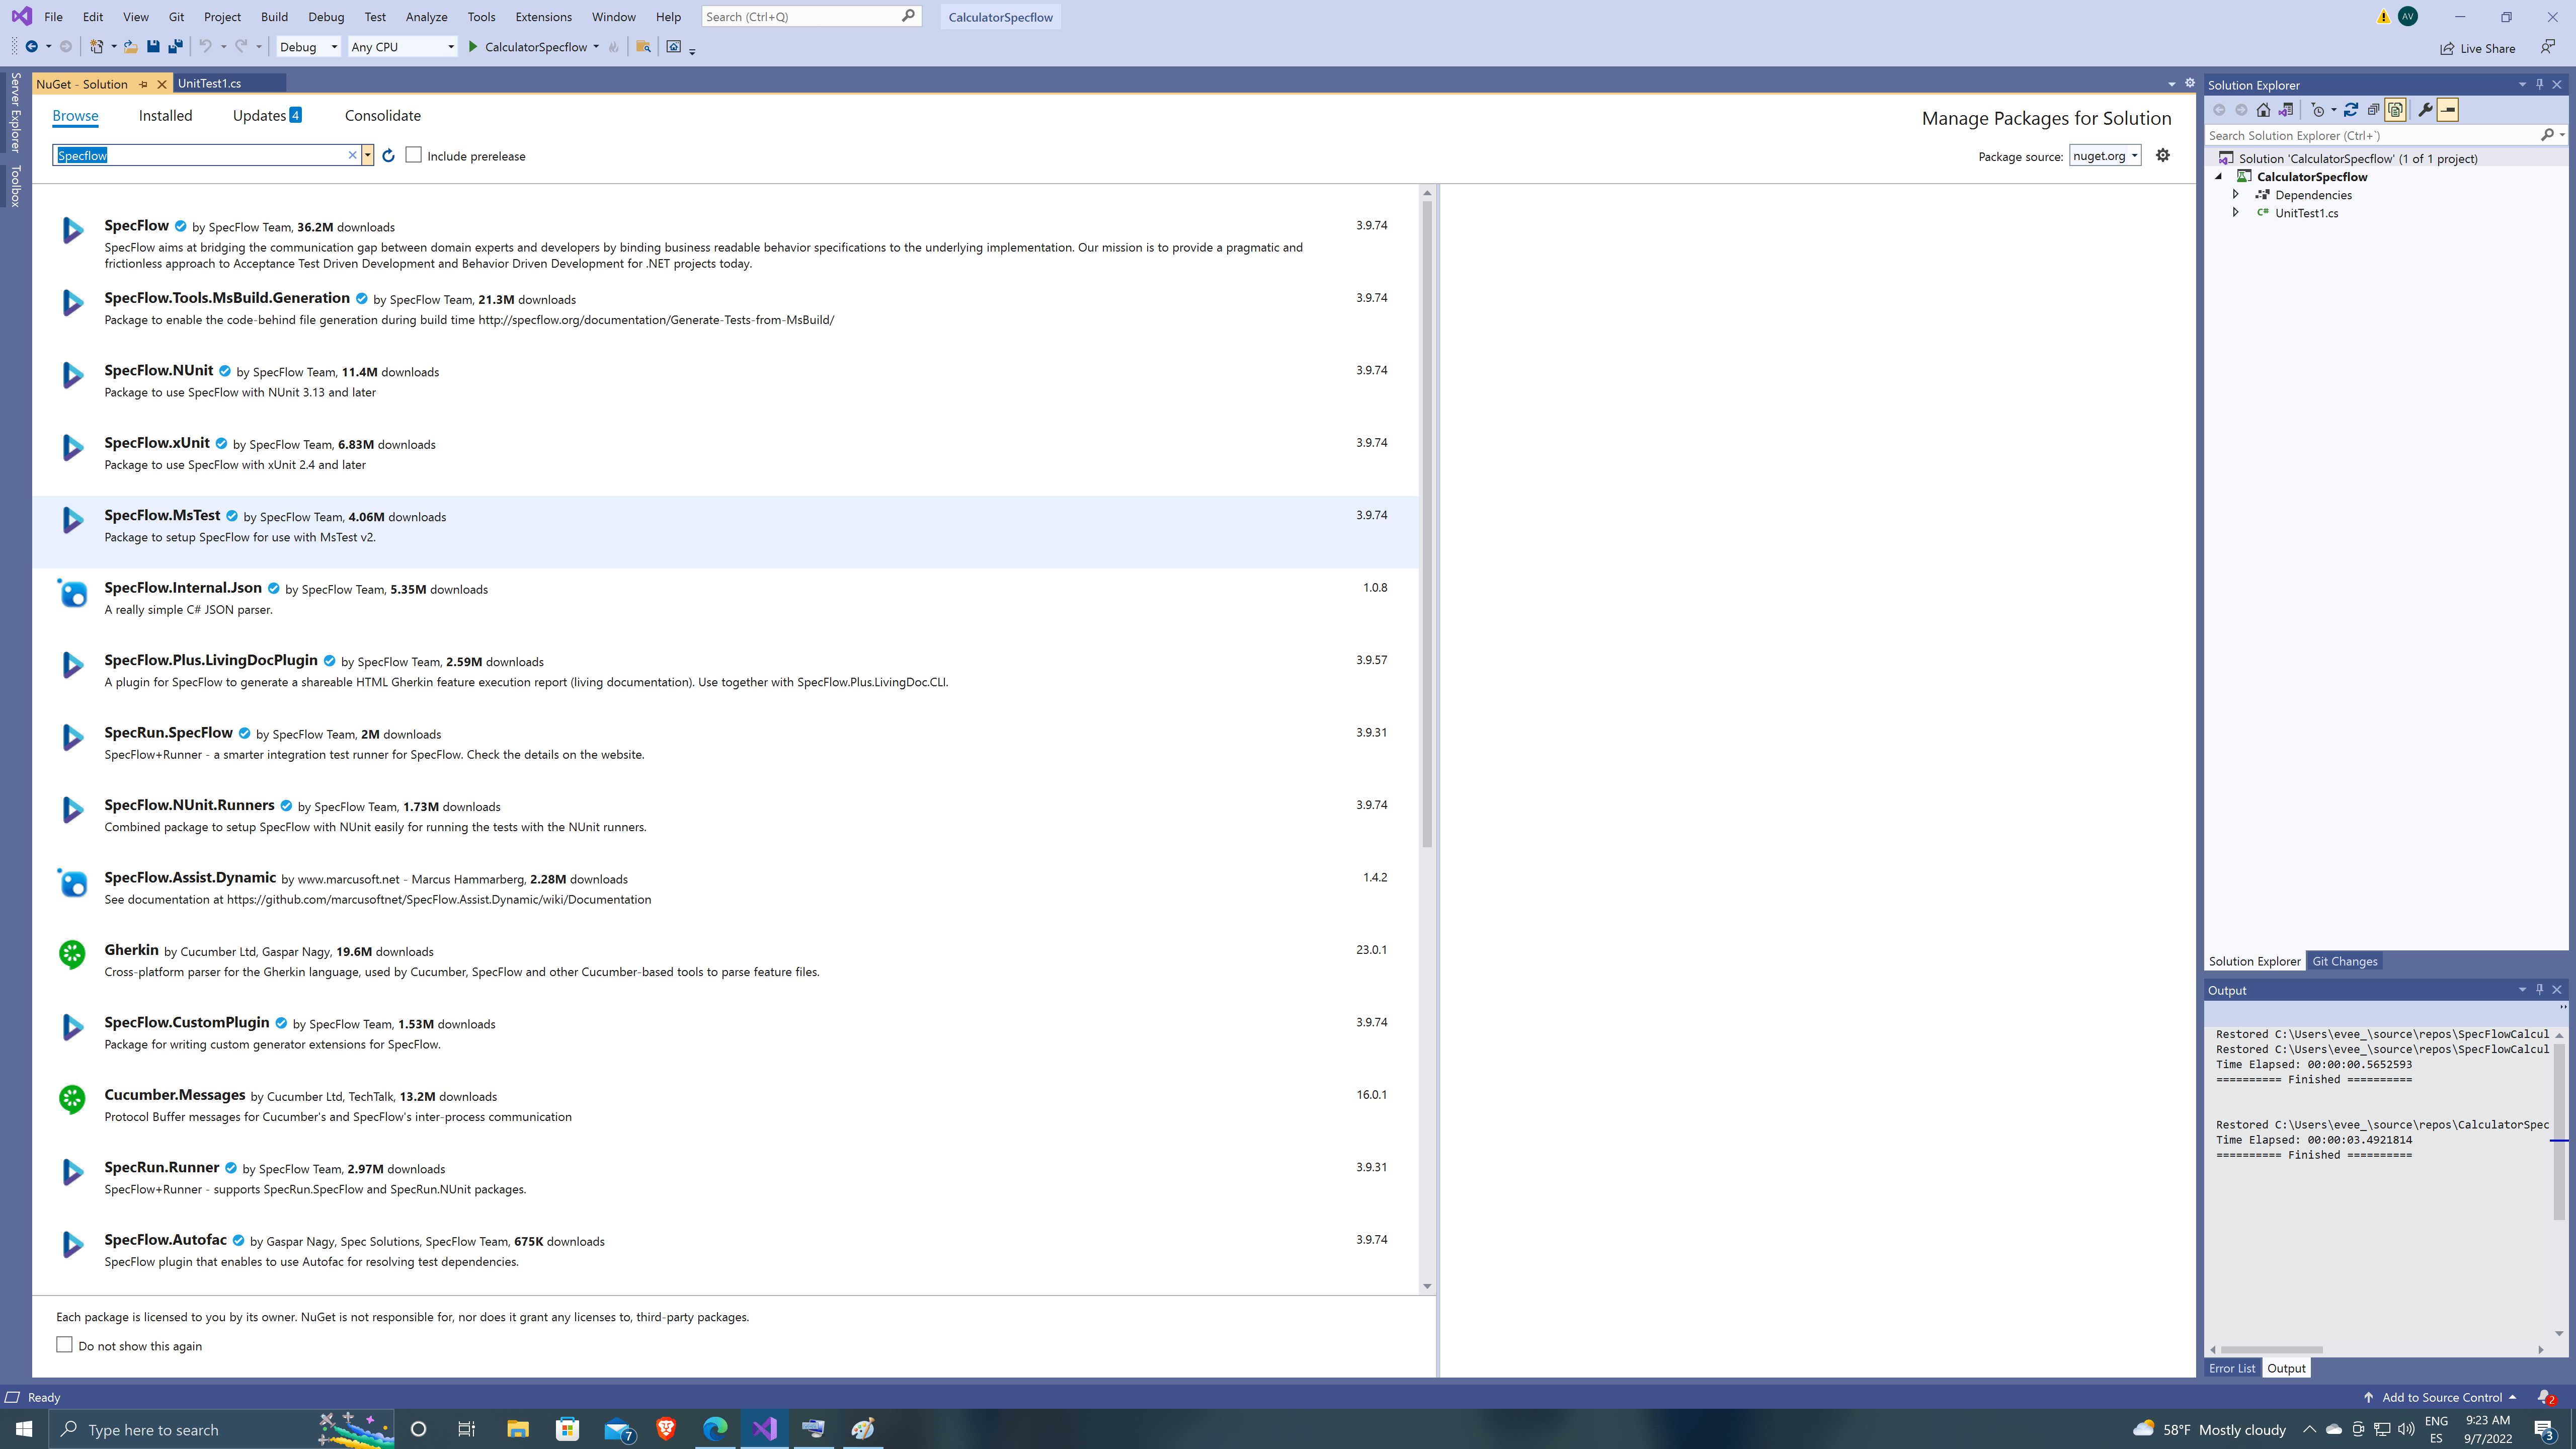
By default VS will create a UnitTest1.cs, we will dispose of this class later, first let’s add Specflow to our project by going to Manage Nuget Packages on our solution.
Specflow has different packages, for this solution we are going to use Specflow.MsTest as is the standard Specflow version to use on MsTest Projects, also we are going to install Specflow.Plus.LivingDocPlugin, to add some HTML results to our tests!
Enlarge

SpecflowMs Installing WinAppDriver and Setting up
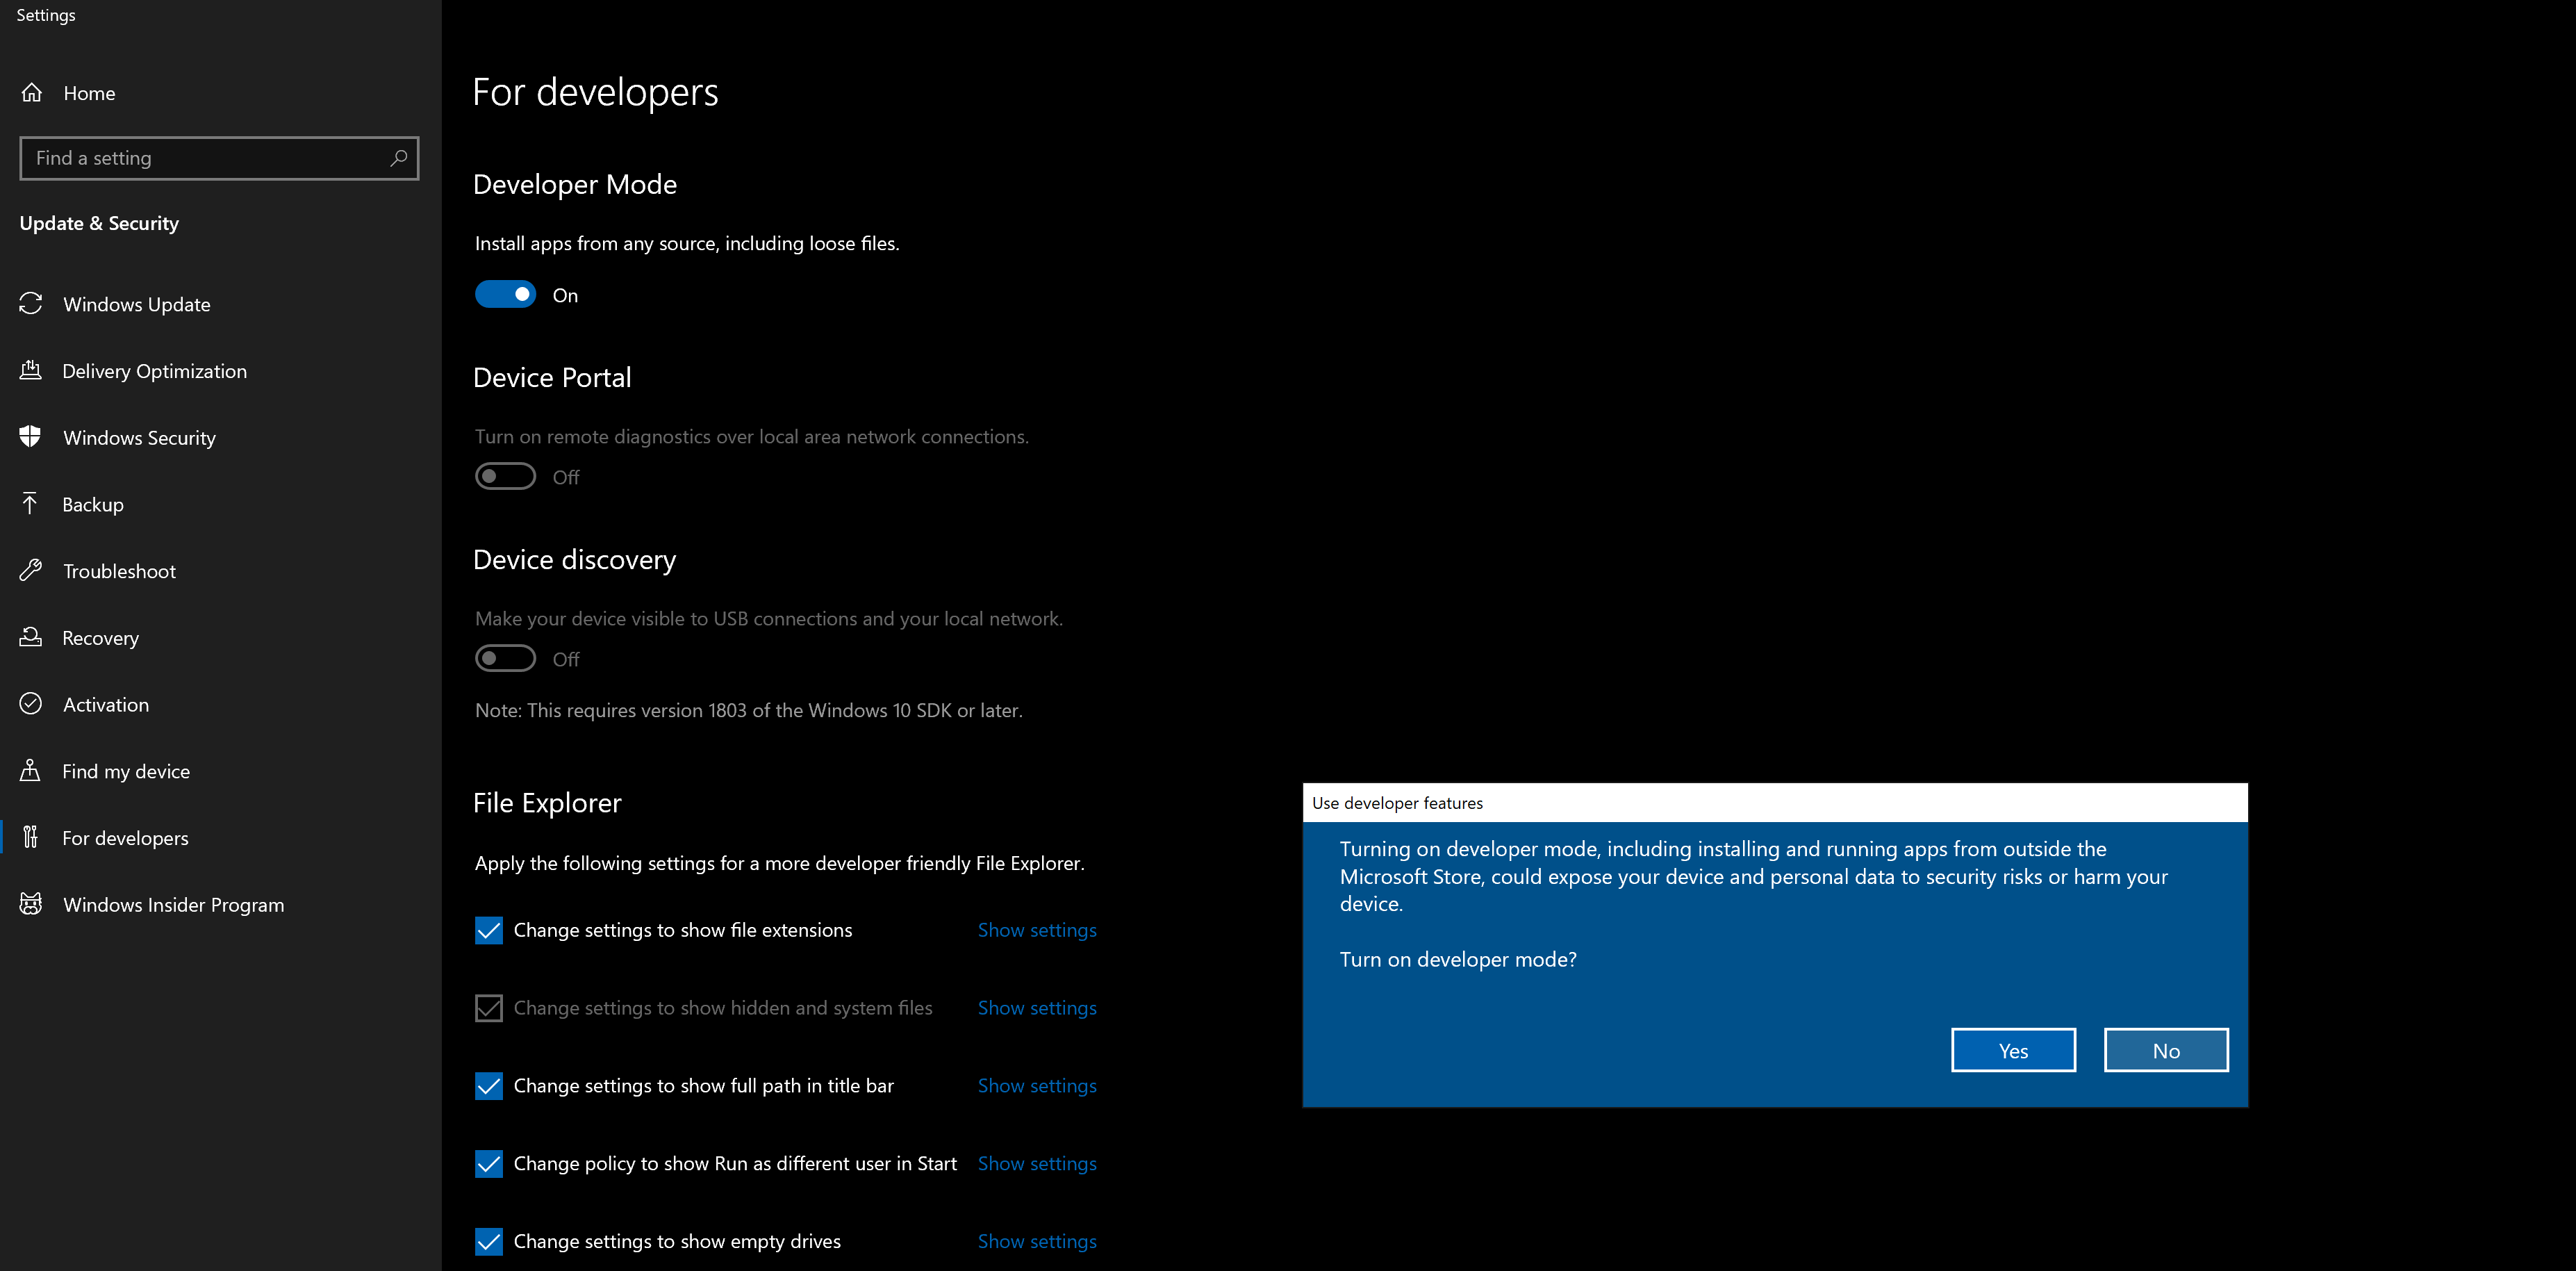
Before continuing we need to install WinAppDriver from GitHub – microsoft/WinAppDriver: Windows Application Driver, to be able to open and interact with the Desktop app, we use WinAppDriver, this app will create a session between the app and our tests.
Please be sure to enable Developer Mode in Windows to run WinAppDriver.
Enlarge

developerMoDE Let’s create our first class that will contain the basic Setup to open the app and create the WinAppDriver session.
To be able to use WinAppDriver classes and methods we need to add to our project more Nuget packages, in this case, Appium.WebDriver.
Using AppiumOptions we can add capabilities, like “app”, this one can get whether the path location to the app or its specific ID, for default Windows apps, it’s better to use this ID, by going to PowerShell and typing “get-StartApps” and locating the Calculator app to obtain it.
Additionally of just creating the session, we are going to add two more methods, one to validate if WinAppDriver Process is already running and the other to Start WinAppDriver else, these methods are useful to avoid having to run WinAppDriver manually.
We can avoid opening the cmd with WinAppDriver logs, but I recommend it to validate the commands and interactions received by WinAppDriver.
Automation Framework
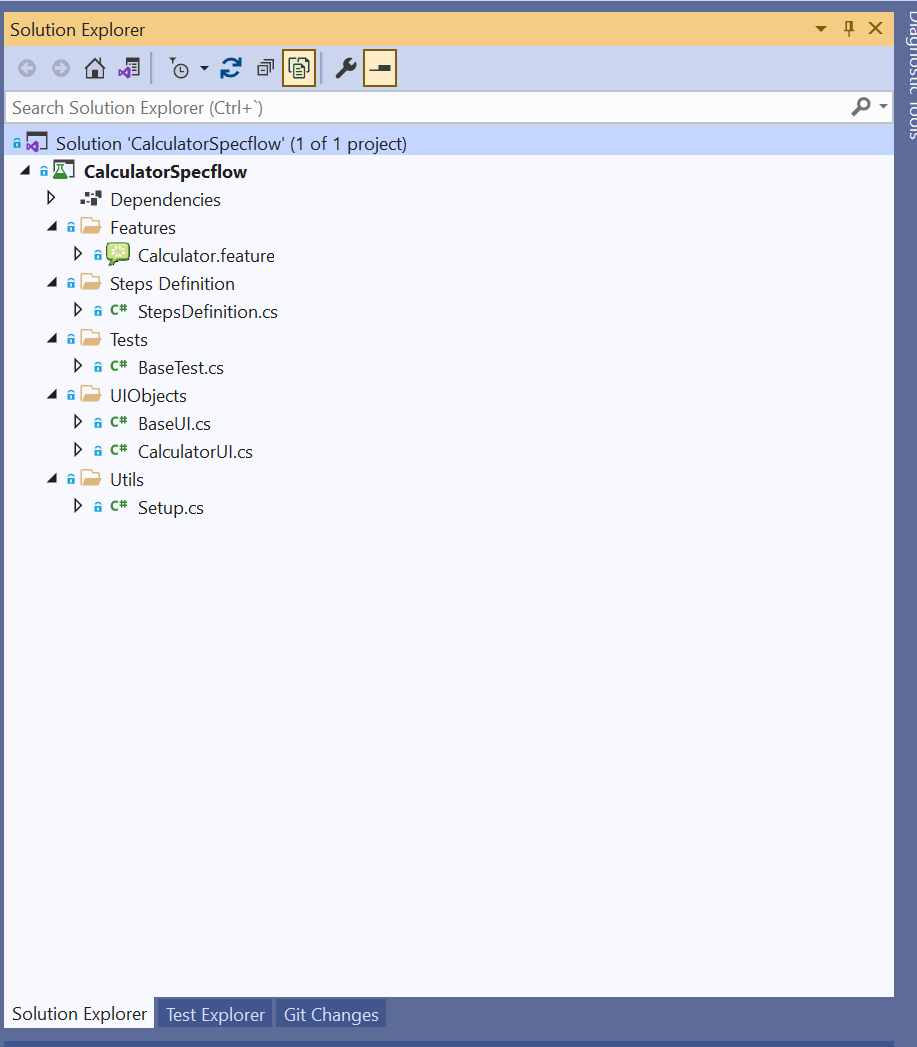
Create the Class “Setup“ under the folder “Utils“.
Let’s create our first feature file, which will contain all the steps need it to make a simple addition of two numbers, this feature file is made using Gherkin, which uses Natural Language. Keep in mind that steps in feature files have to be really simple and easy to understand by every person in the team.
Create the Feature file “Calculator.feature“ under the folder “Features“.
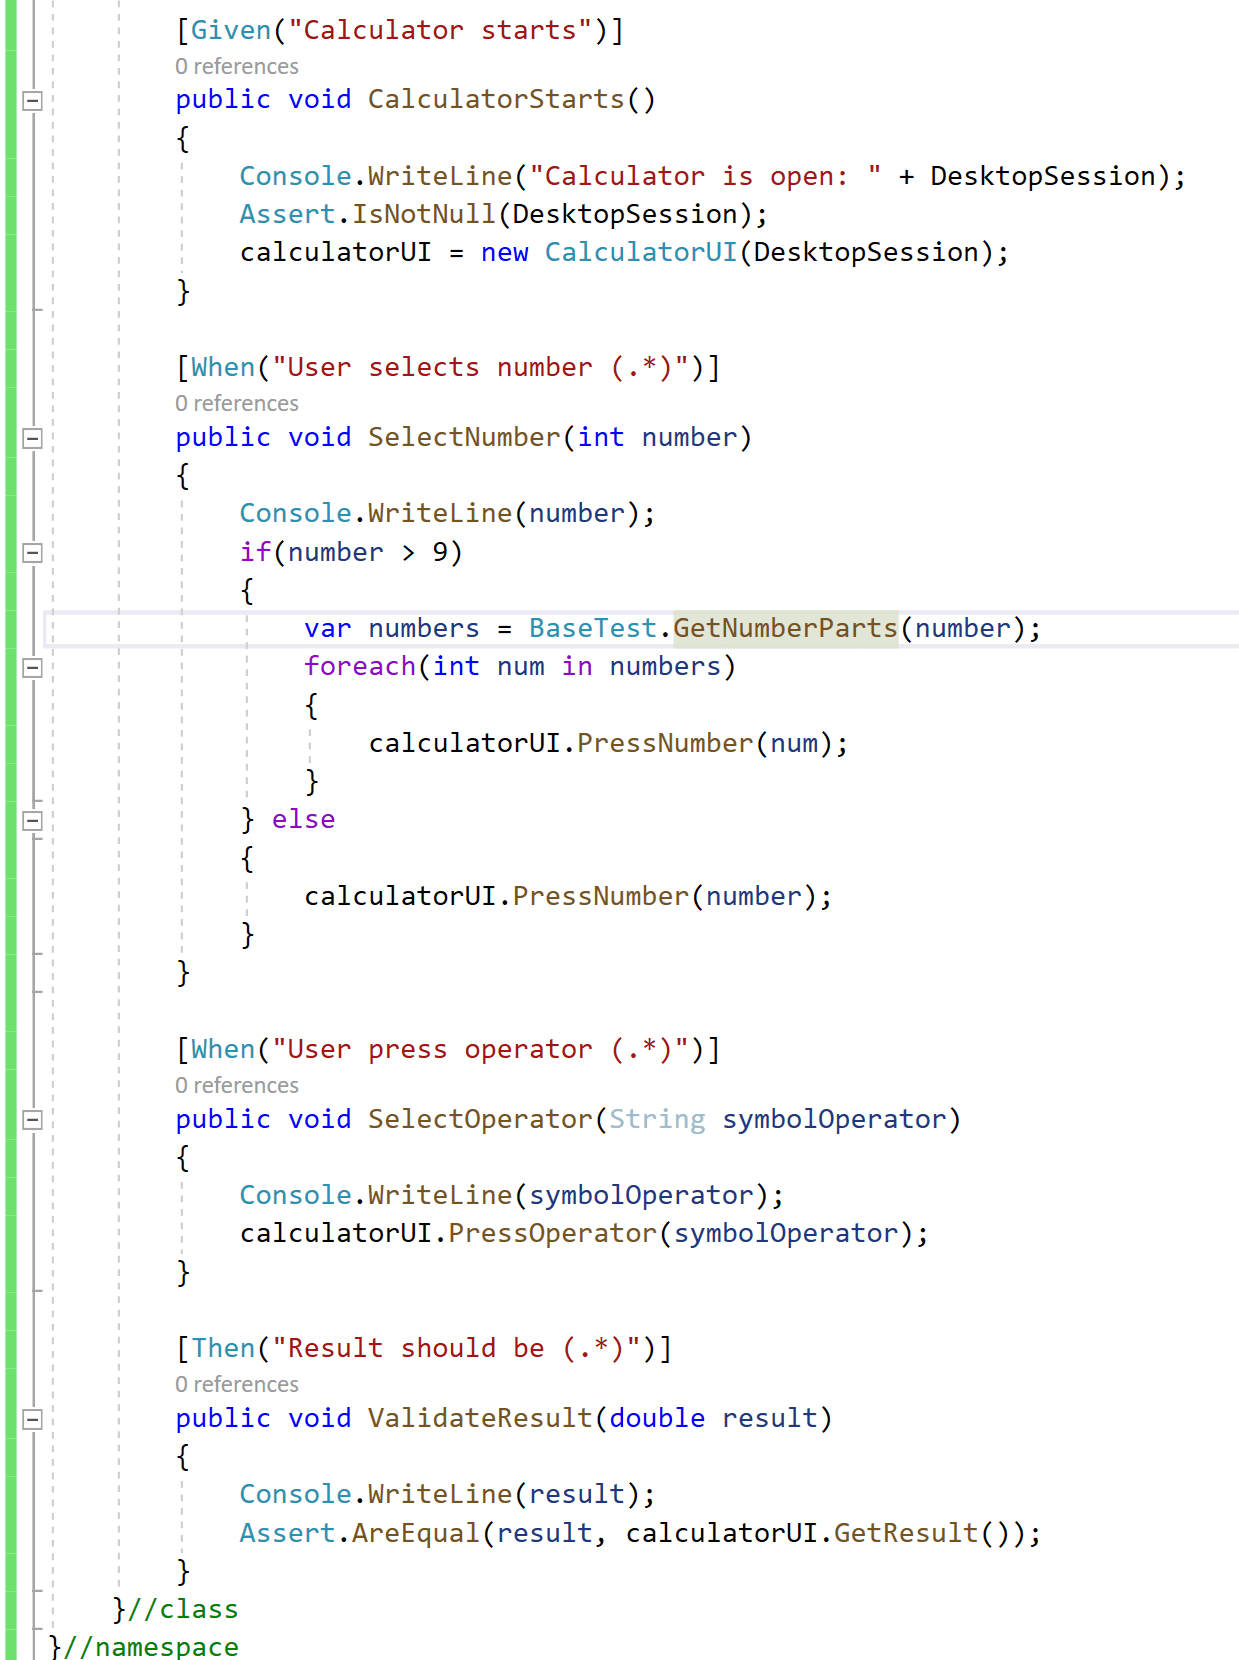
Once we have our Feature file, we have to bind these steps to our code, we are going to create a new class that will contain Methods bound to the steps in the feature.
To get the elements of the calculator, we need to use “inspect.exe” available inside Windows SDK Kit, located at “C:\Program Files (x86)\Windows Kits\10\bin\10.0.22621.0\x86\inspect.exe”.
Open Calculator, and then execute “inspect.exe“, hovering on the element you want to know the locator.
We have different types of locators, but it is always recommended for integrity and speed to use “AutomationID“, as it is unique, if this ID is not defined, we can use “ClassName“, “Name” or get the “XPath” of the element verifying the DOM of the application. It is also possible to use multiple locators.
To have a good handle of WinAppDriver Process, WinAppDriver CMD, and the Calculator App, we need to add two basic methods, one is “BeforeScenario” which contains the creation of WinAppDriver Process, CMD, and the opening of the Calculator.
Next, we have “AfterScenario” which contains the Teardown of all these objects, we can also add other actions that we want always to run when a test finishes, like the creation of evidence, upload of results, and so on.
Create the Class “StepsDefinition“ under the folder “Steps Definition“.
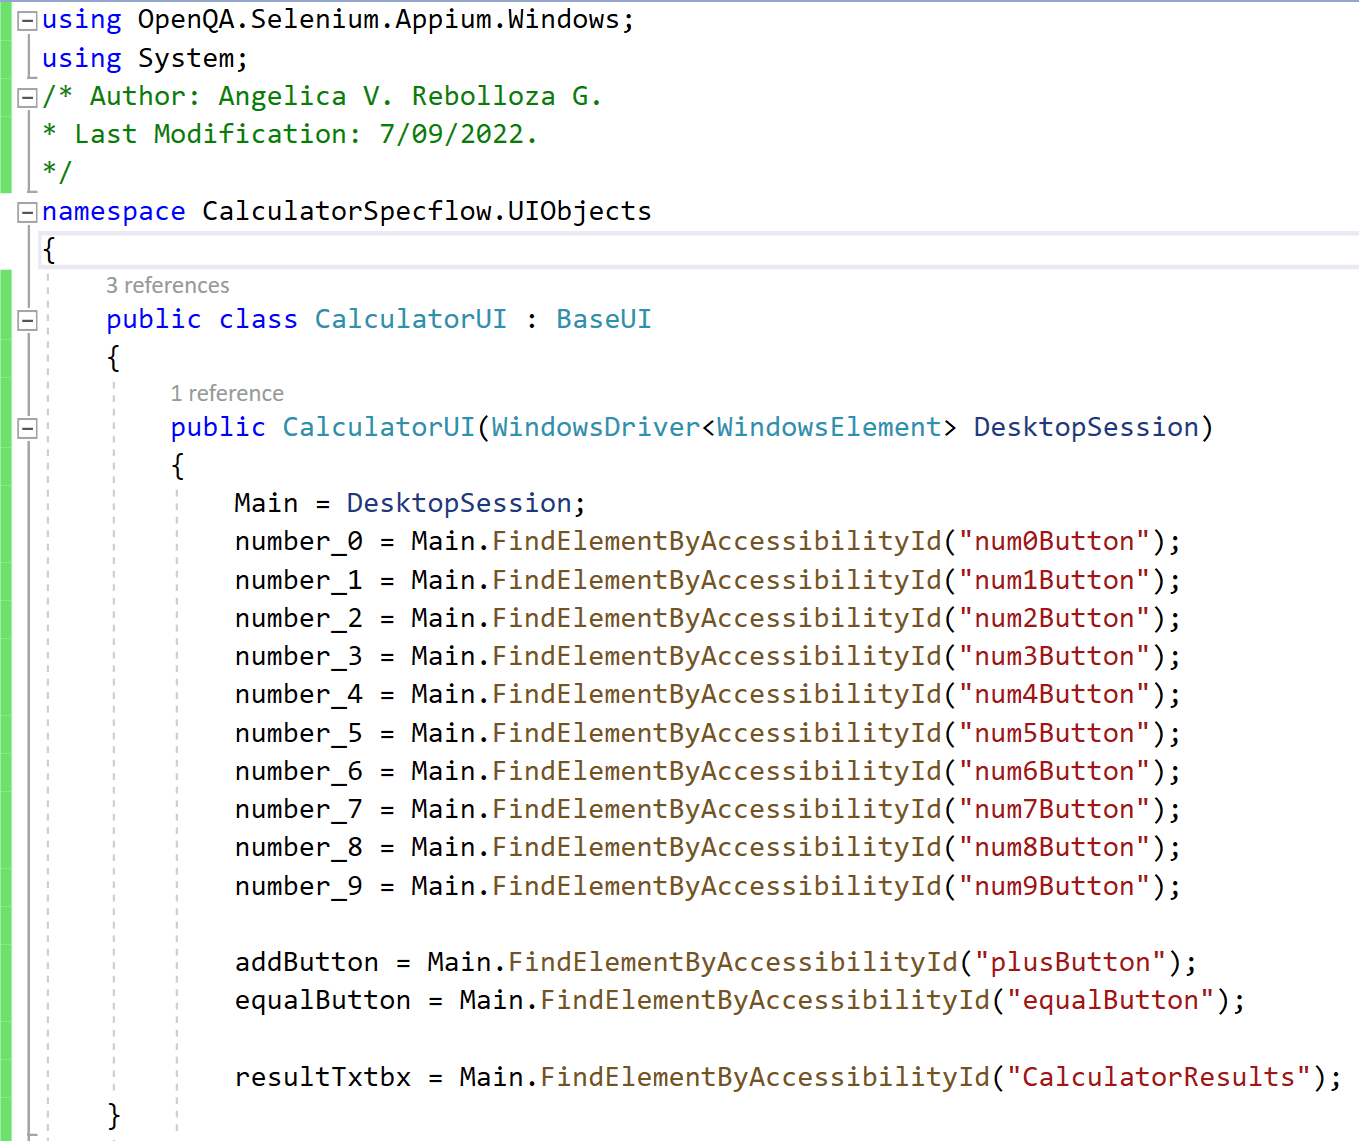
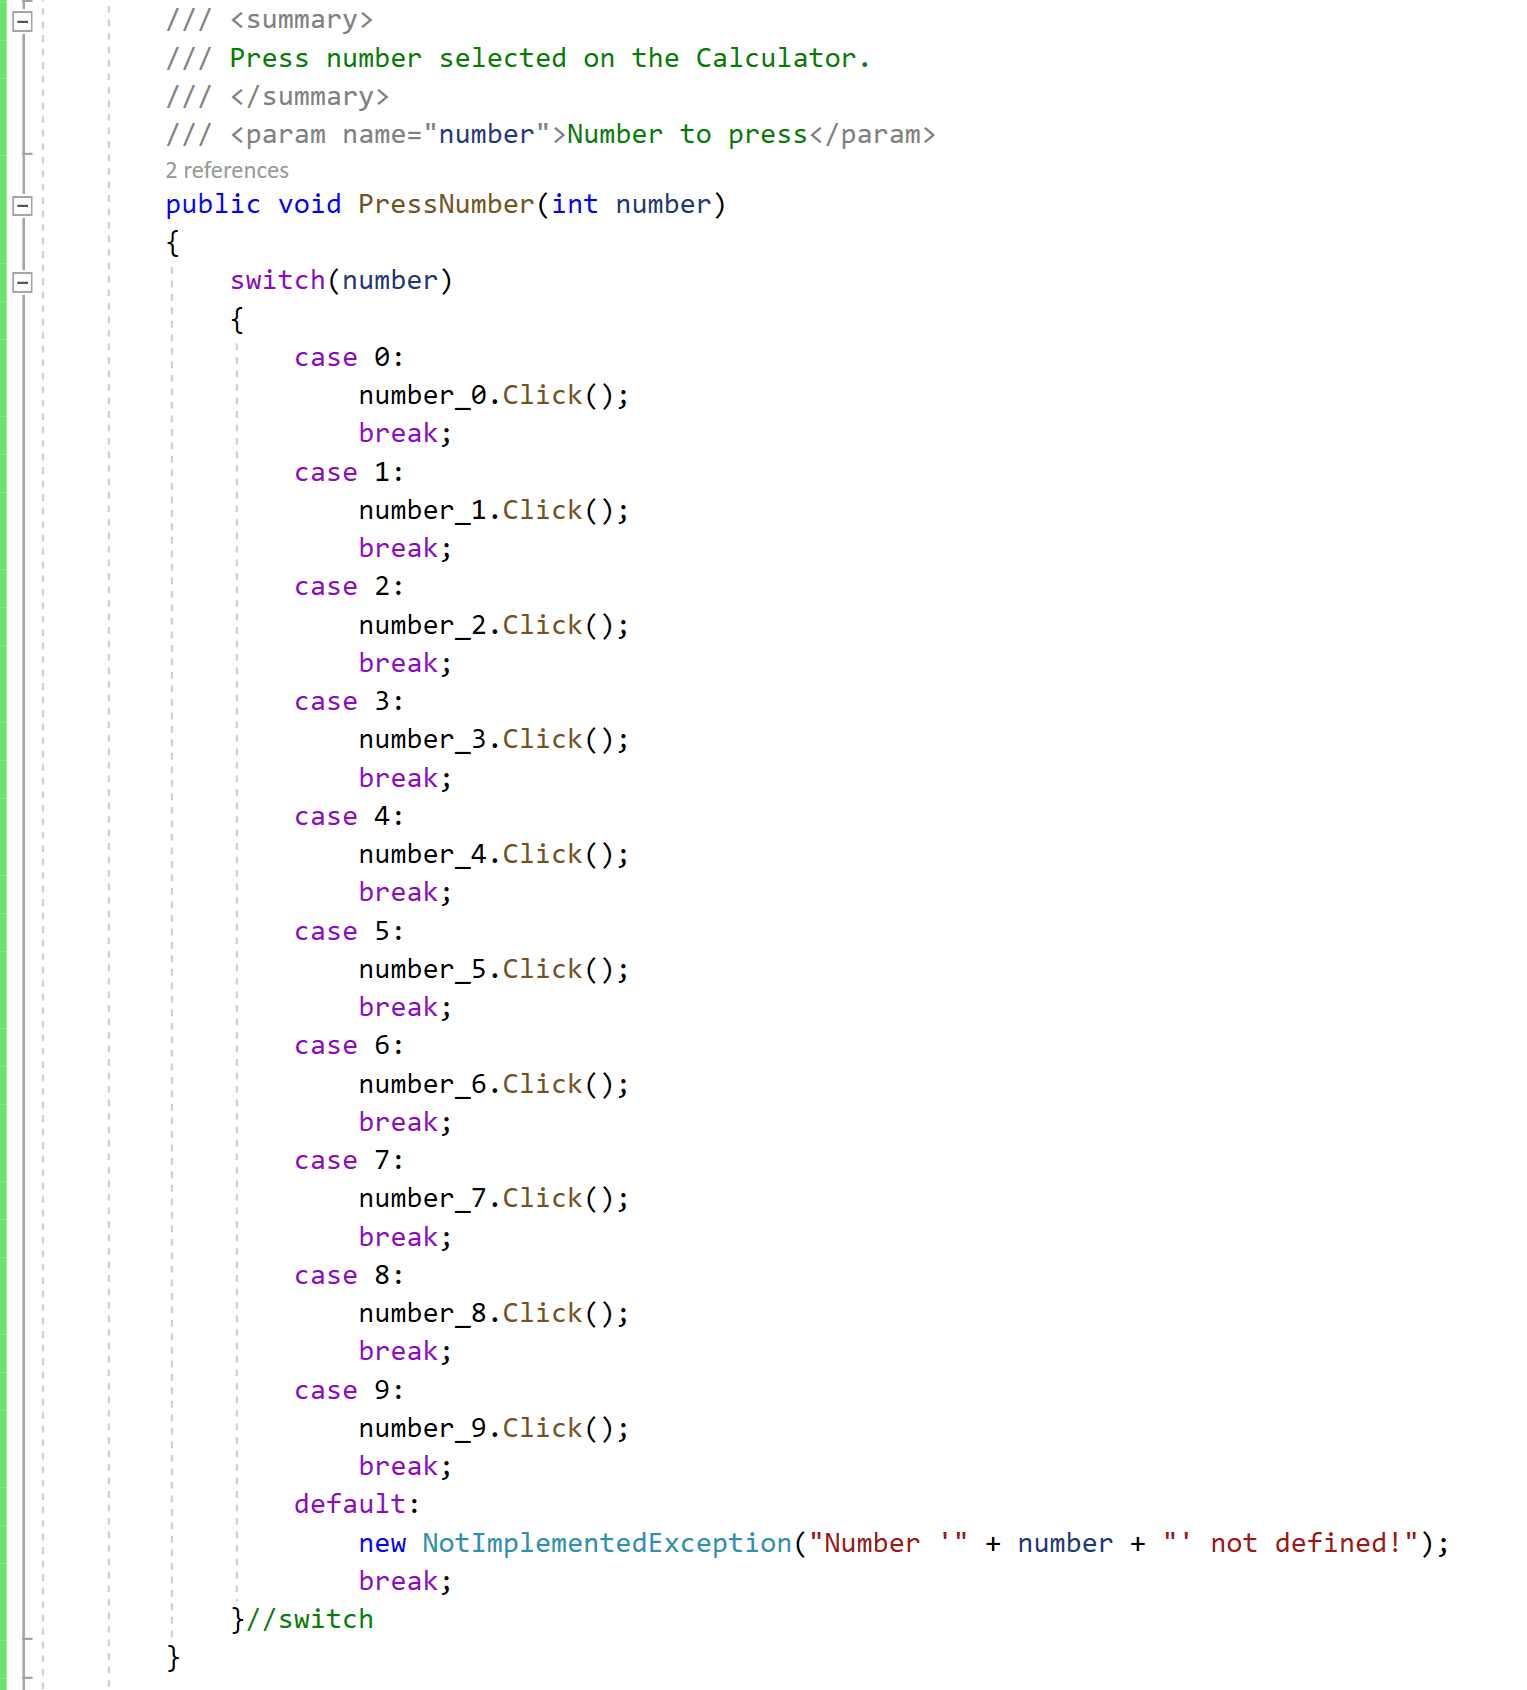
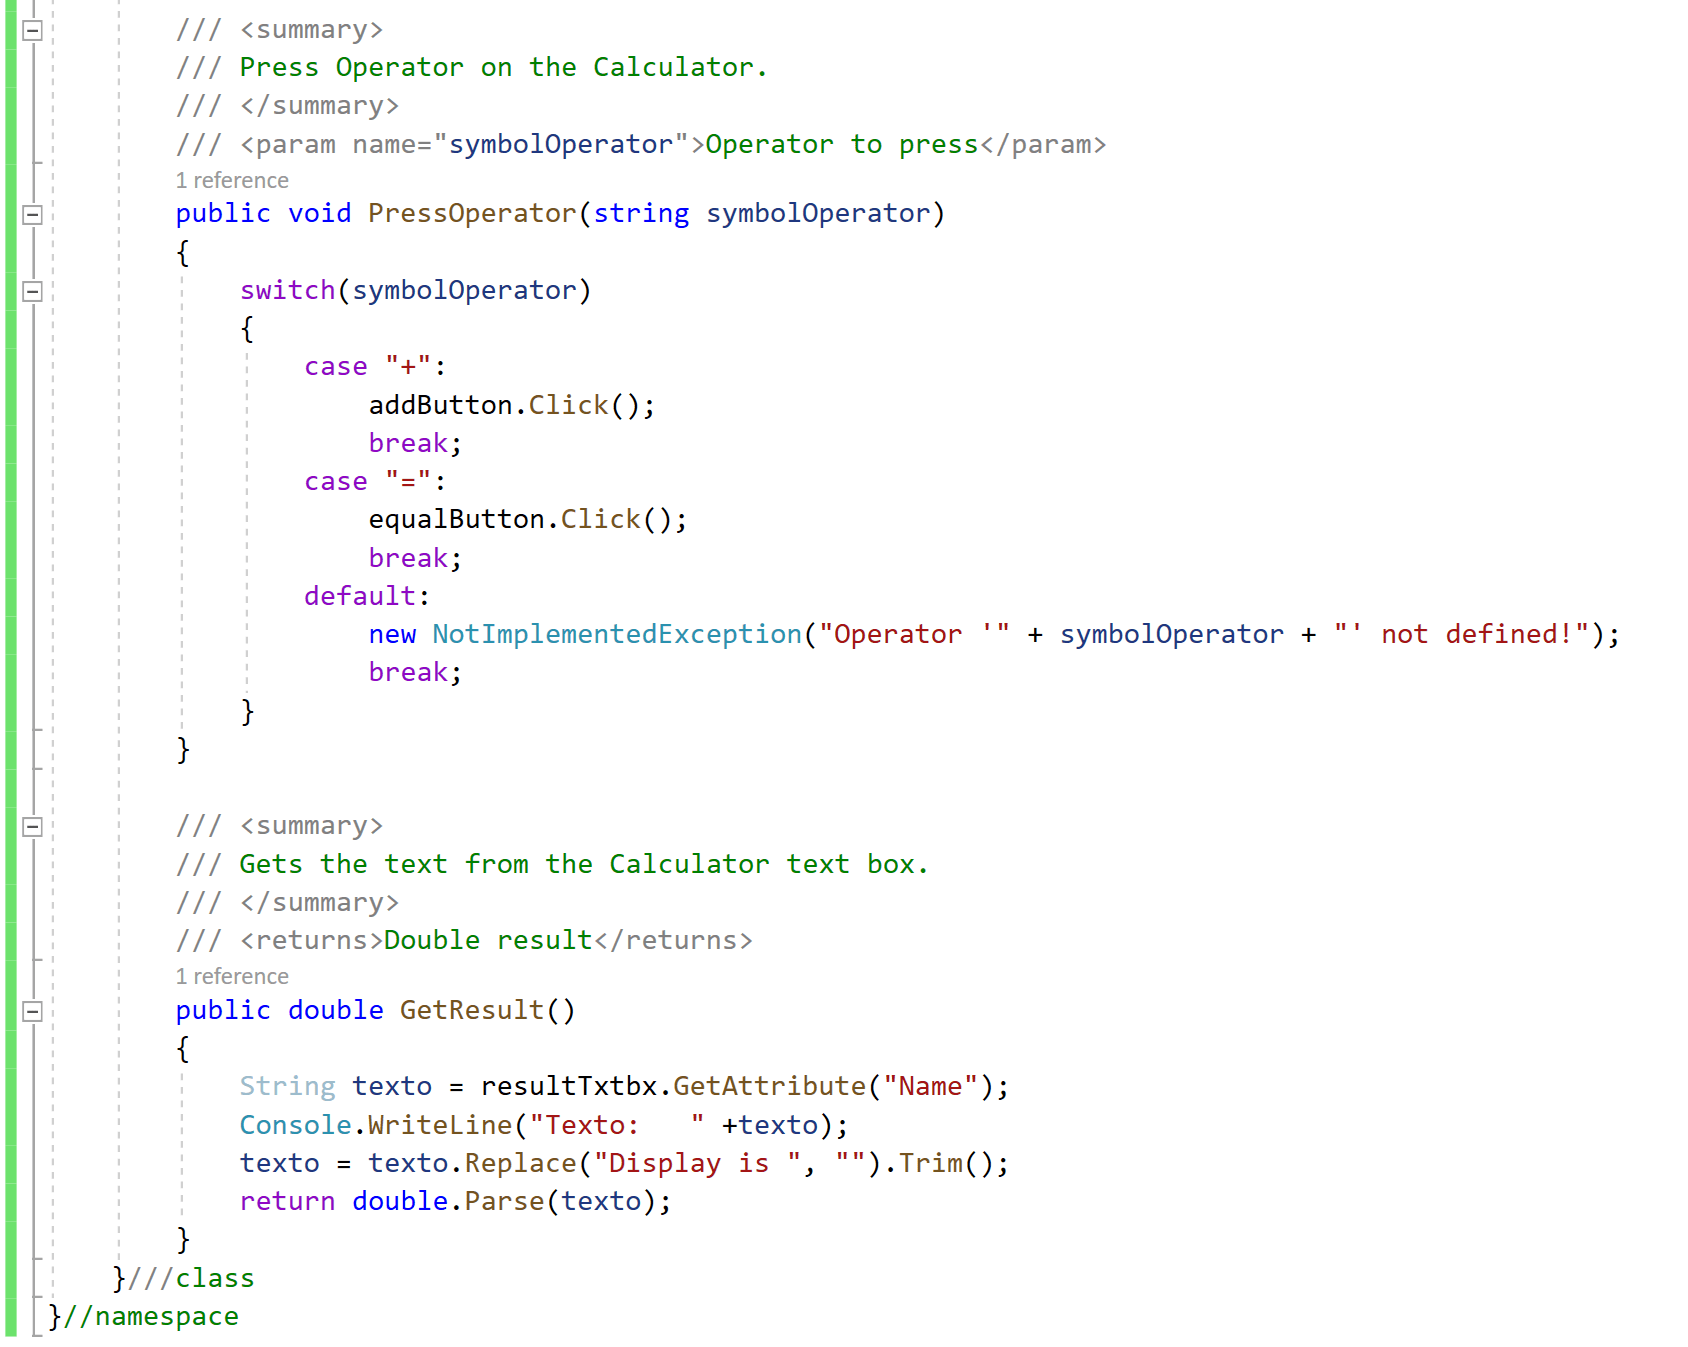
“CalculatorUI“ is a class that will contain all the actions on the UI, like pressing buttons.
Let’s take a look at the “CalculatorUI” class under the folder “UIObjects“.
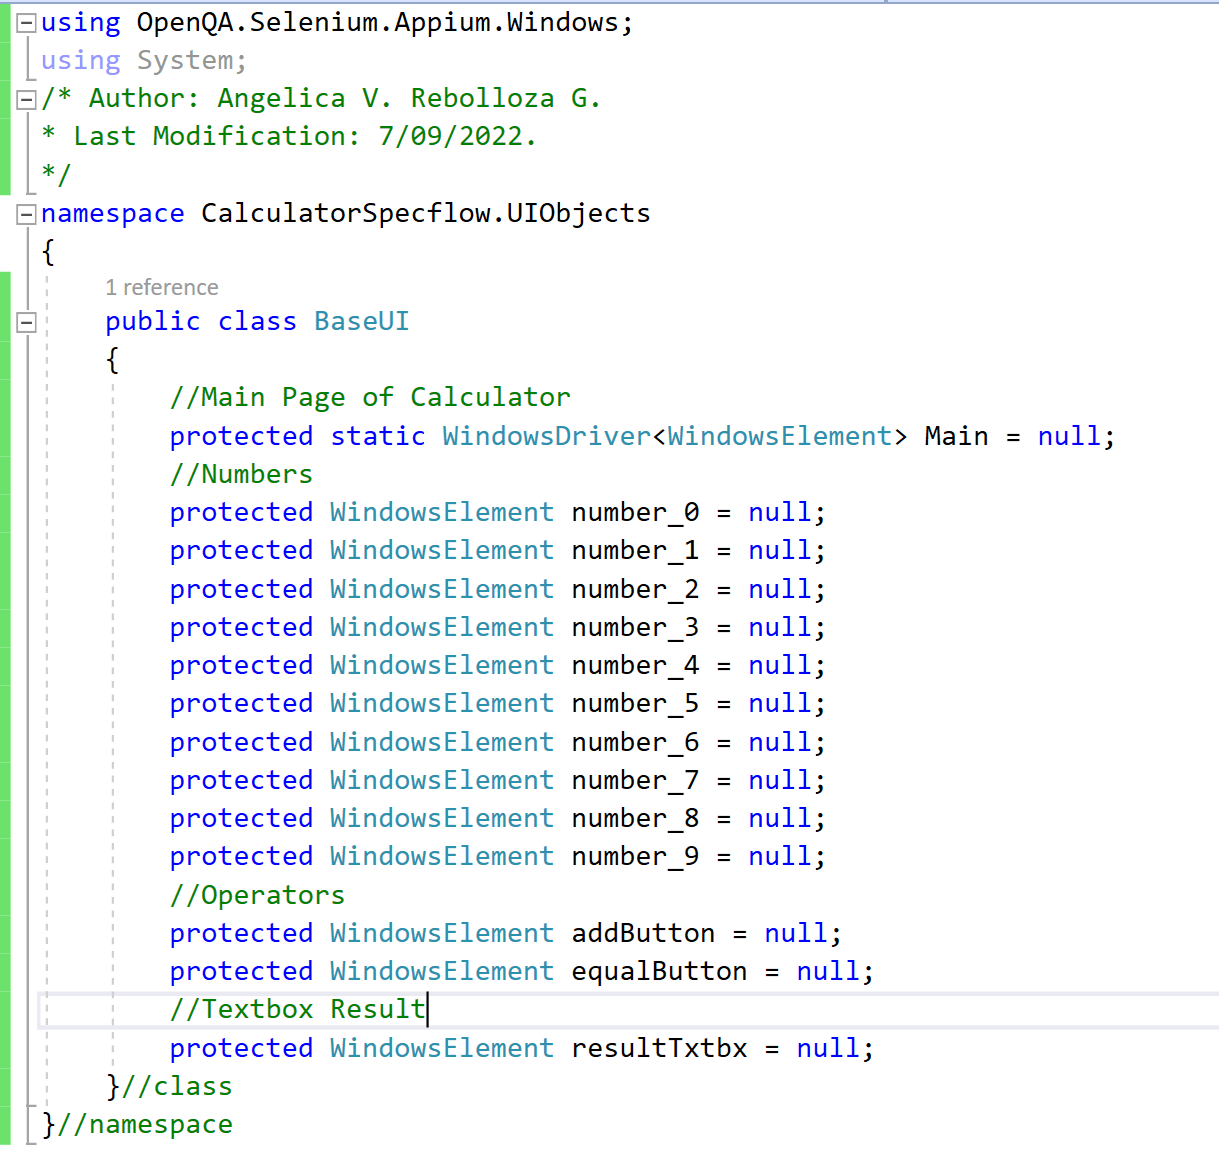
“CalculatorUI“ extends from “BaseUI“, under the same folder “UIObjects“, which contains the definition of all elements used on the Calculator Main Page, and these are initialized in “CalculatorUI“.
If we review “BaseUI“ it contains the definition of all elements used by “CalculatorUI“.
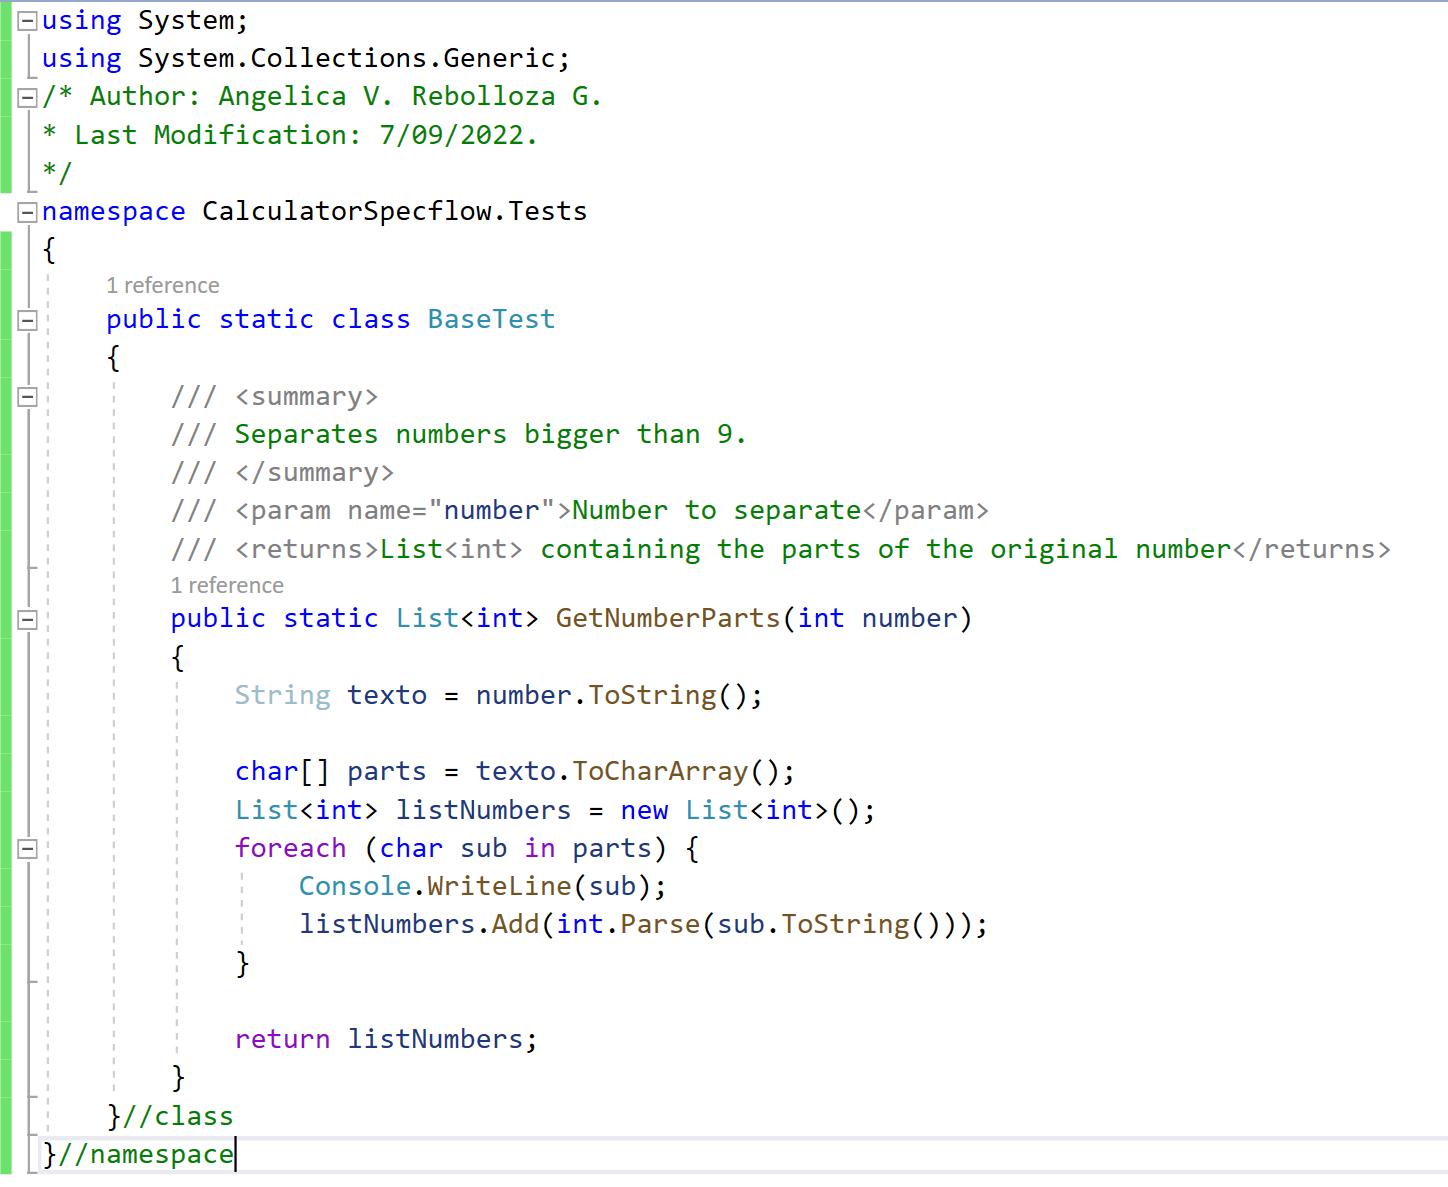
Additionally, to these classes, there is one more class called “BaseTest“, this is a static class that contains extra actions need it, like in this example, contains a special method to separate numbers bigger than 9, to be able to introduce them in the calculator.
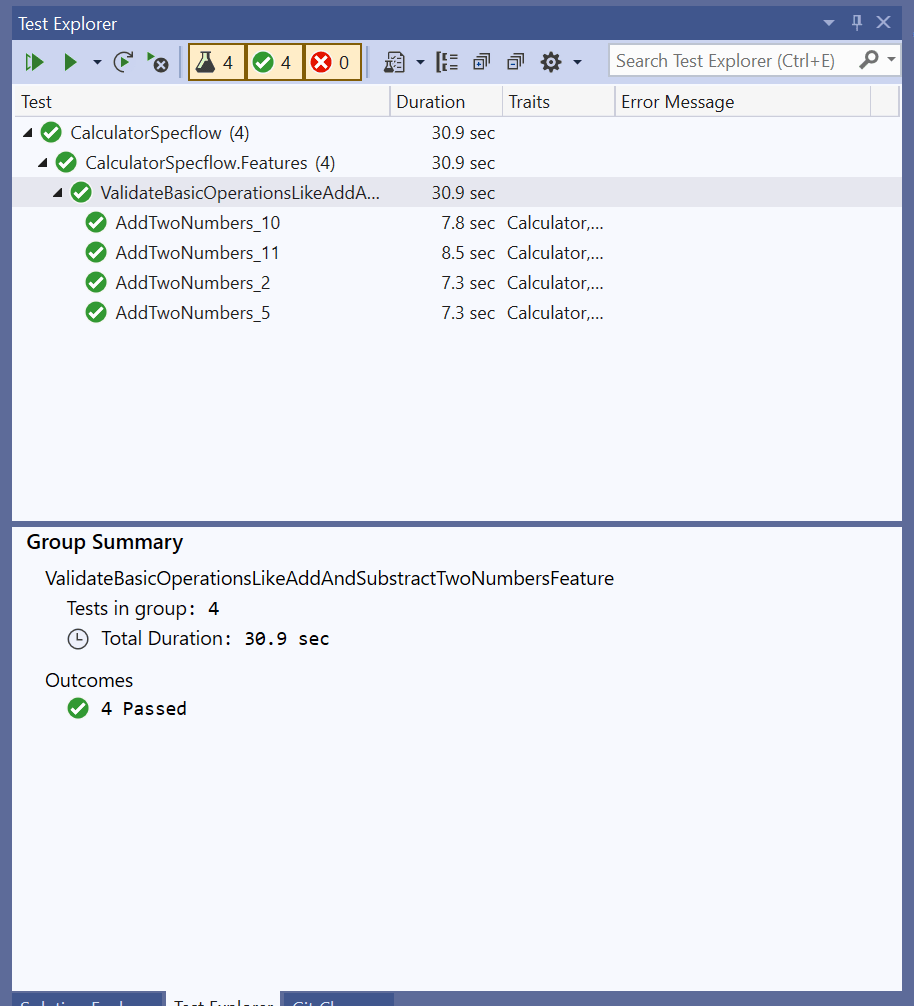
Finally, we can run the test, using “Test Explorer” from Tools in VS.
If you want to download the Project, it is available at Github.
Link of interest:
Automating with Appium – Selenium and TestNG
The Agile Team Approach
The Scrum Team Size
Speed Up Android Testing with TestProject AgentAny help is welcome to help us keeping this effort alive!BTC (Bech32): bc1qx6f8nczr5ram6d57svlnsfmk5mhu6lsr9q7mxwLTC: LdiiMfiJvqrXDw1xPMqDptXGFEkyADZzVVDOGE: DKehWtHnmrf7JTRWpEQ9LtqwqY8HdbdkbUSOL: 3f2RR9w2VwmBqjLm5DmbuUPwWfdYH7GXCbHVWhsq5sky
Angélica Viridiana Rebolloza
Computing Engineer specialized in Automation, working with different tools for Mobile and Web, using languages, tools, and platforms like JAVA, VBScript, JavaScript, C#, Appium, Protractor, UFT (QTP), Selenium, WinAppDriver, Jenkins among others.
Viridiana also has been working using practices like TDD & BDD under Cascade and Agile approaches.
Some certifications include: ISTQB Foundations Certification, SeU Selenium Certified, ITIL Foundations Certification.
No Comment
To have better control and management of our code deployments is highly recommended to upload a project to Github using the command line, in other words, have our code uploaded to a Cloud Repository like Github since is the most used cloud repository used out there, but we can also use other options like Bitbucket or an already implemented solution like Azure DevOps that integrates It’s own cloud repository but also has a connection with Github If is needed.
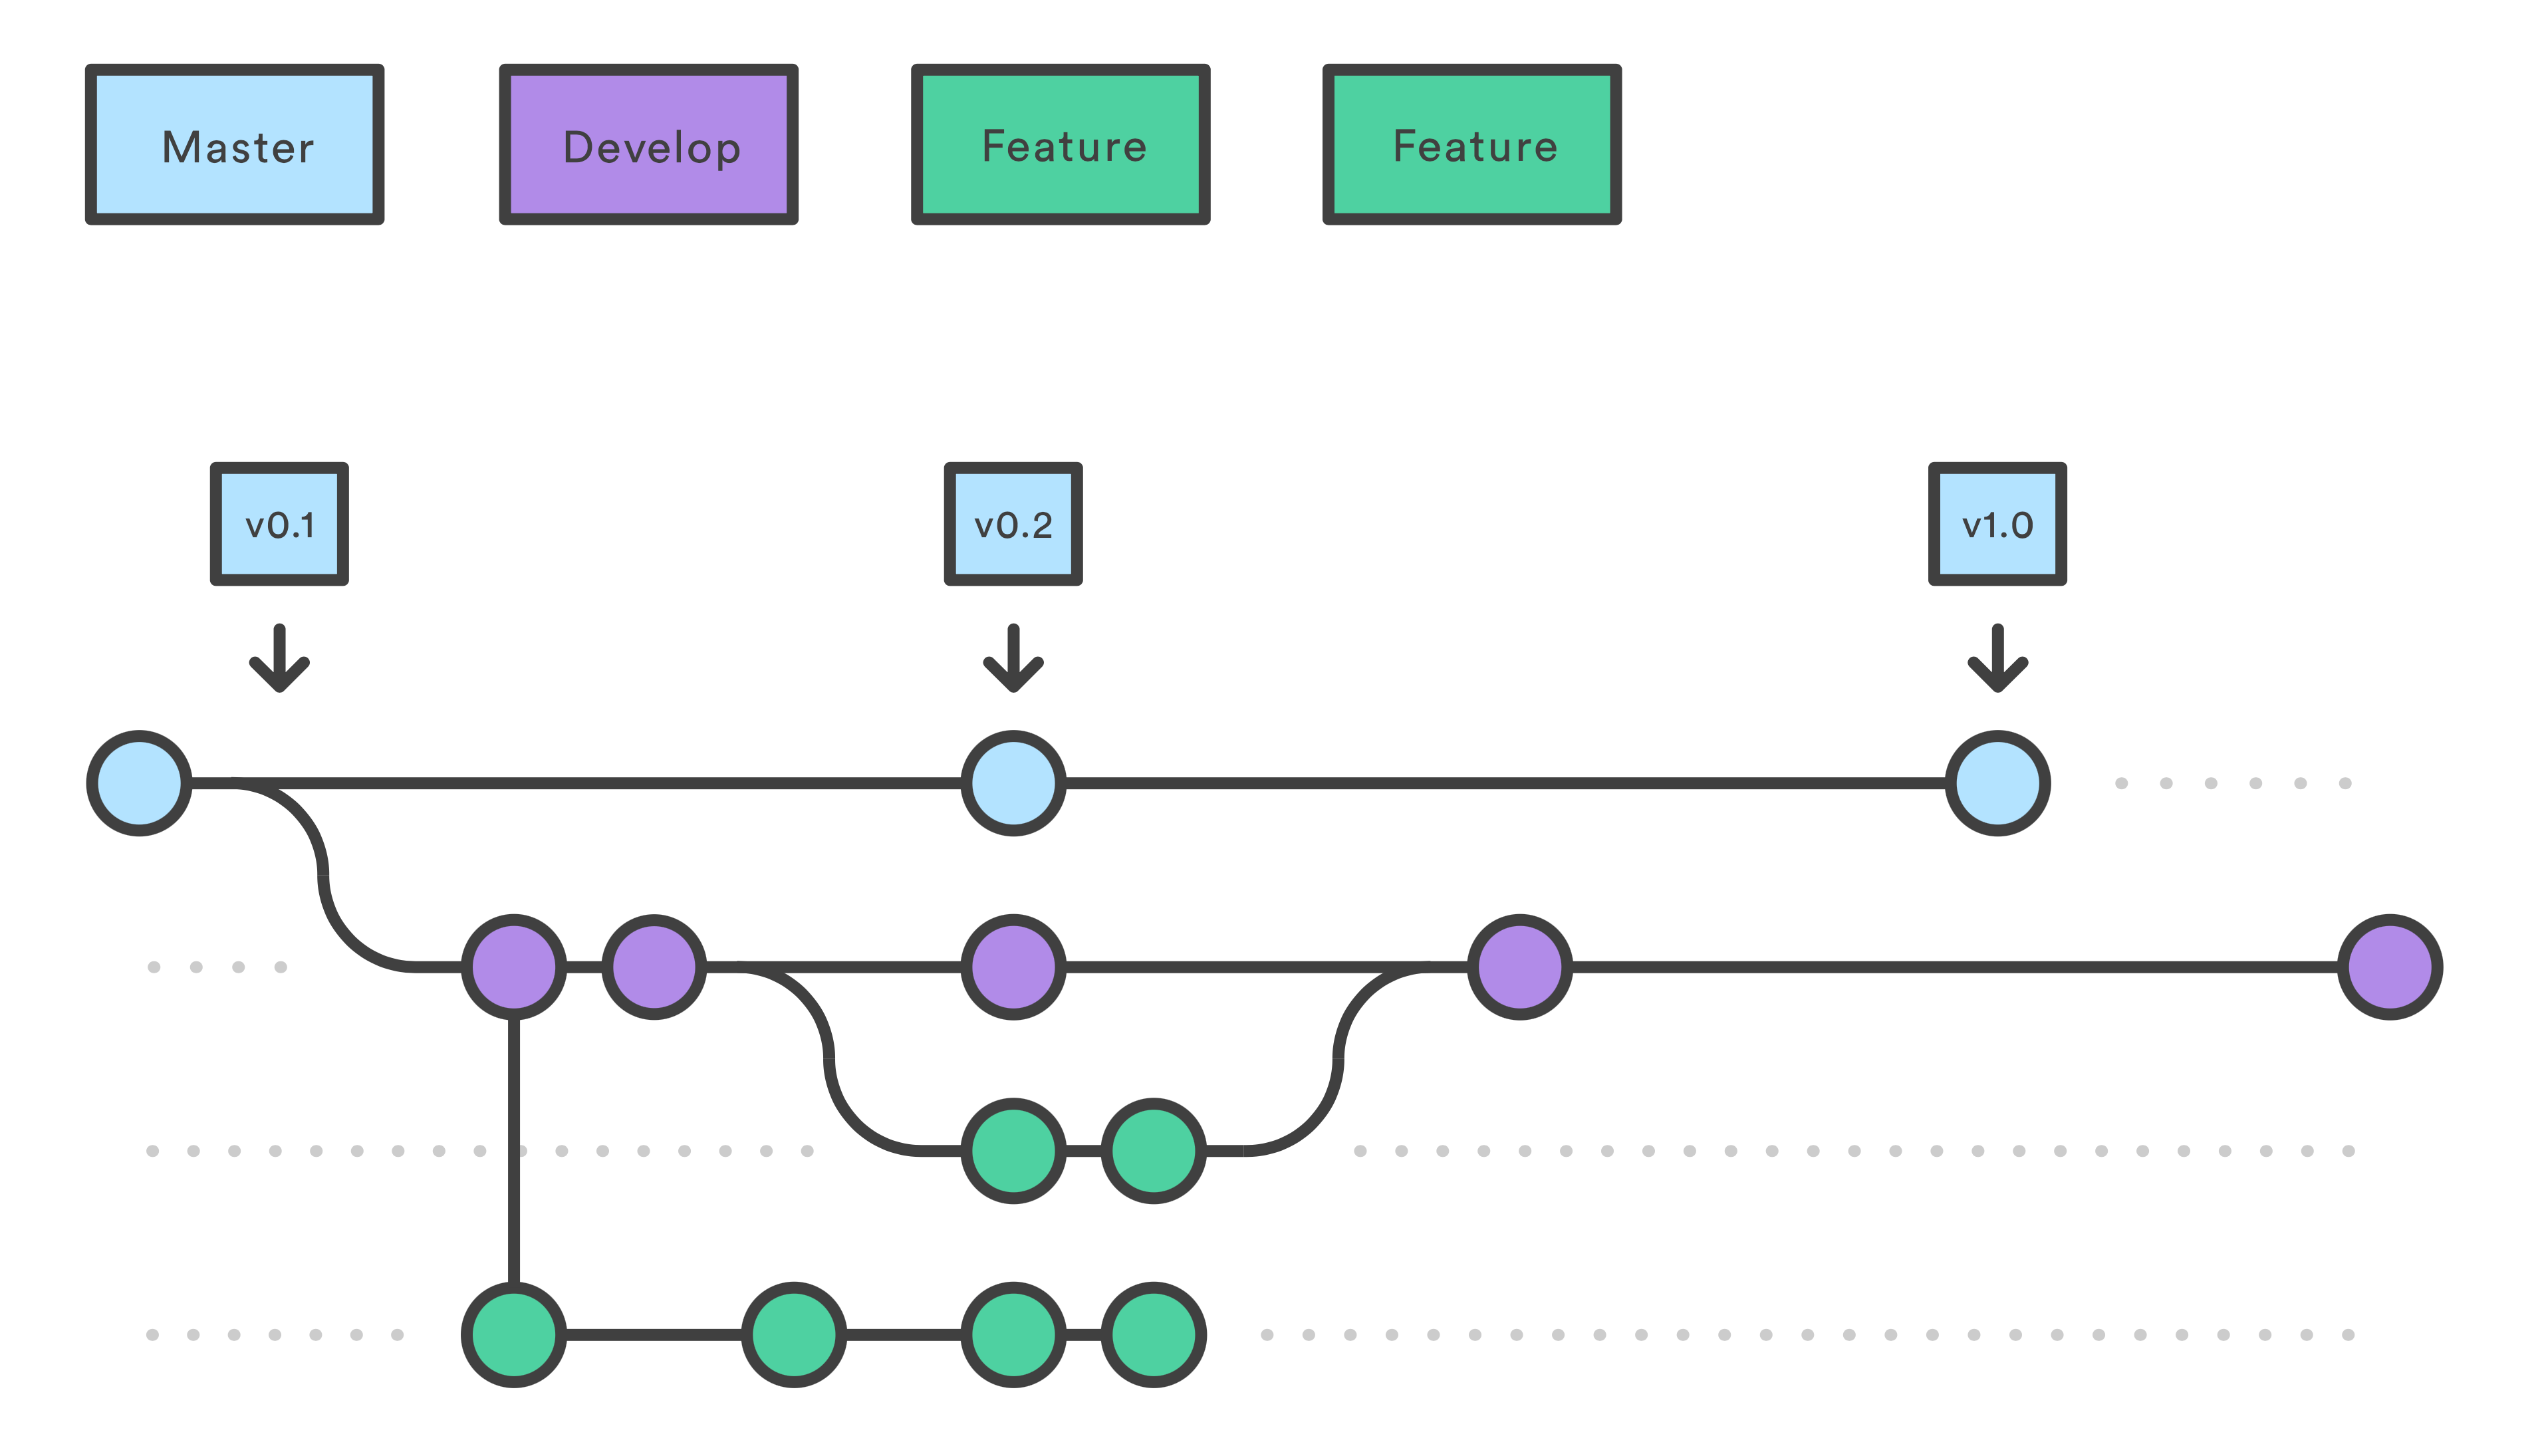
Github is a version control system, this helps us to manage modifications and keep them in a central repository, where a group of developers (contributors) can upload their changes, revert changes, and have to keep each version stored in branches to avoid code conflicts and assure the code integrity and stability.
It’s important to mention that our code repository is going to be stored in “Branches“, “Master Branch” is our main branch where the last stable and verified version of our code has to reside. The rest branches that we create along the way are where the changes like new functionalities, updates are going to be made for later merge them with the Master branch.
In this post, I’m going to teach you how to upload for the first time a workspace project to Github using the command line.
For later management I recommend you to install Github desktop at https://desktop.github.com
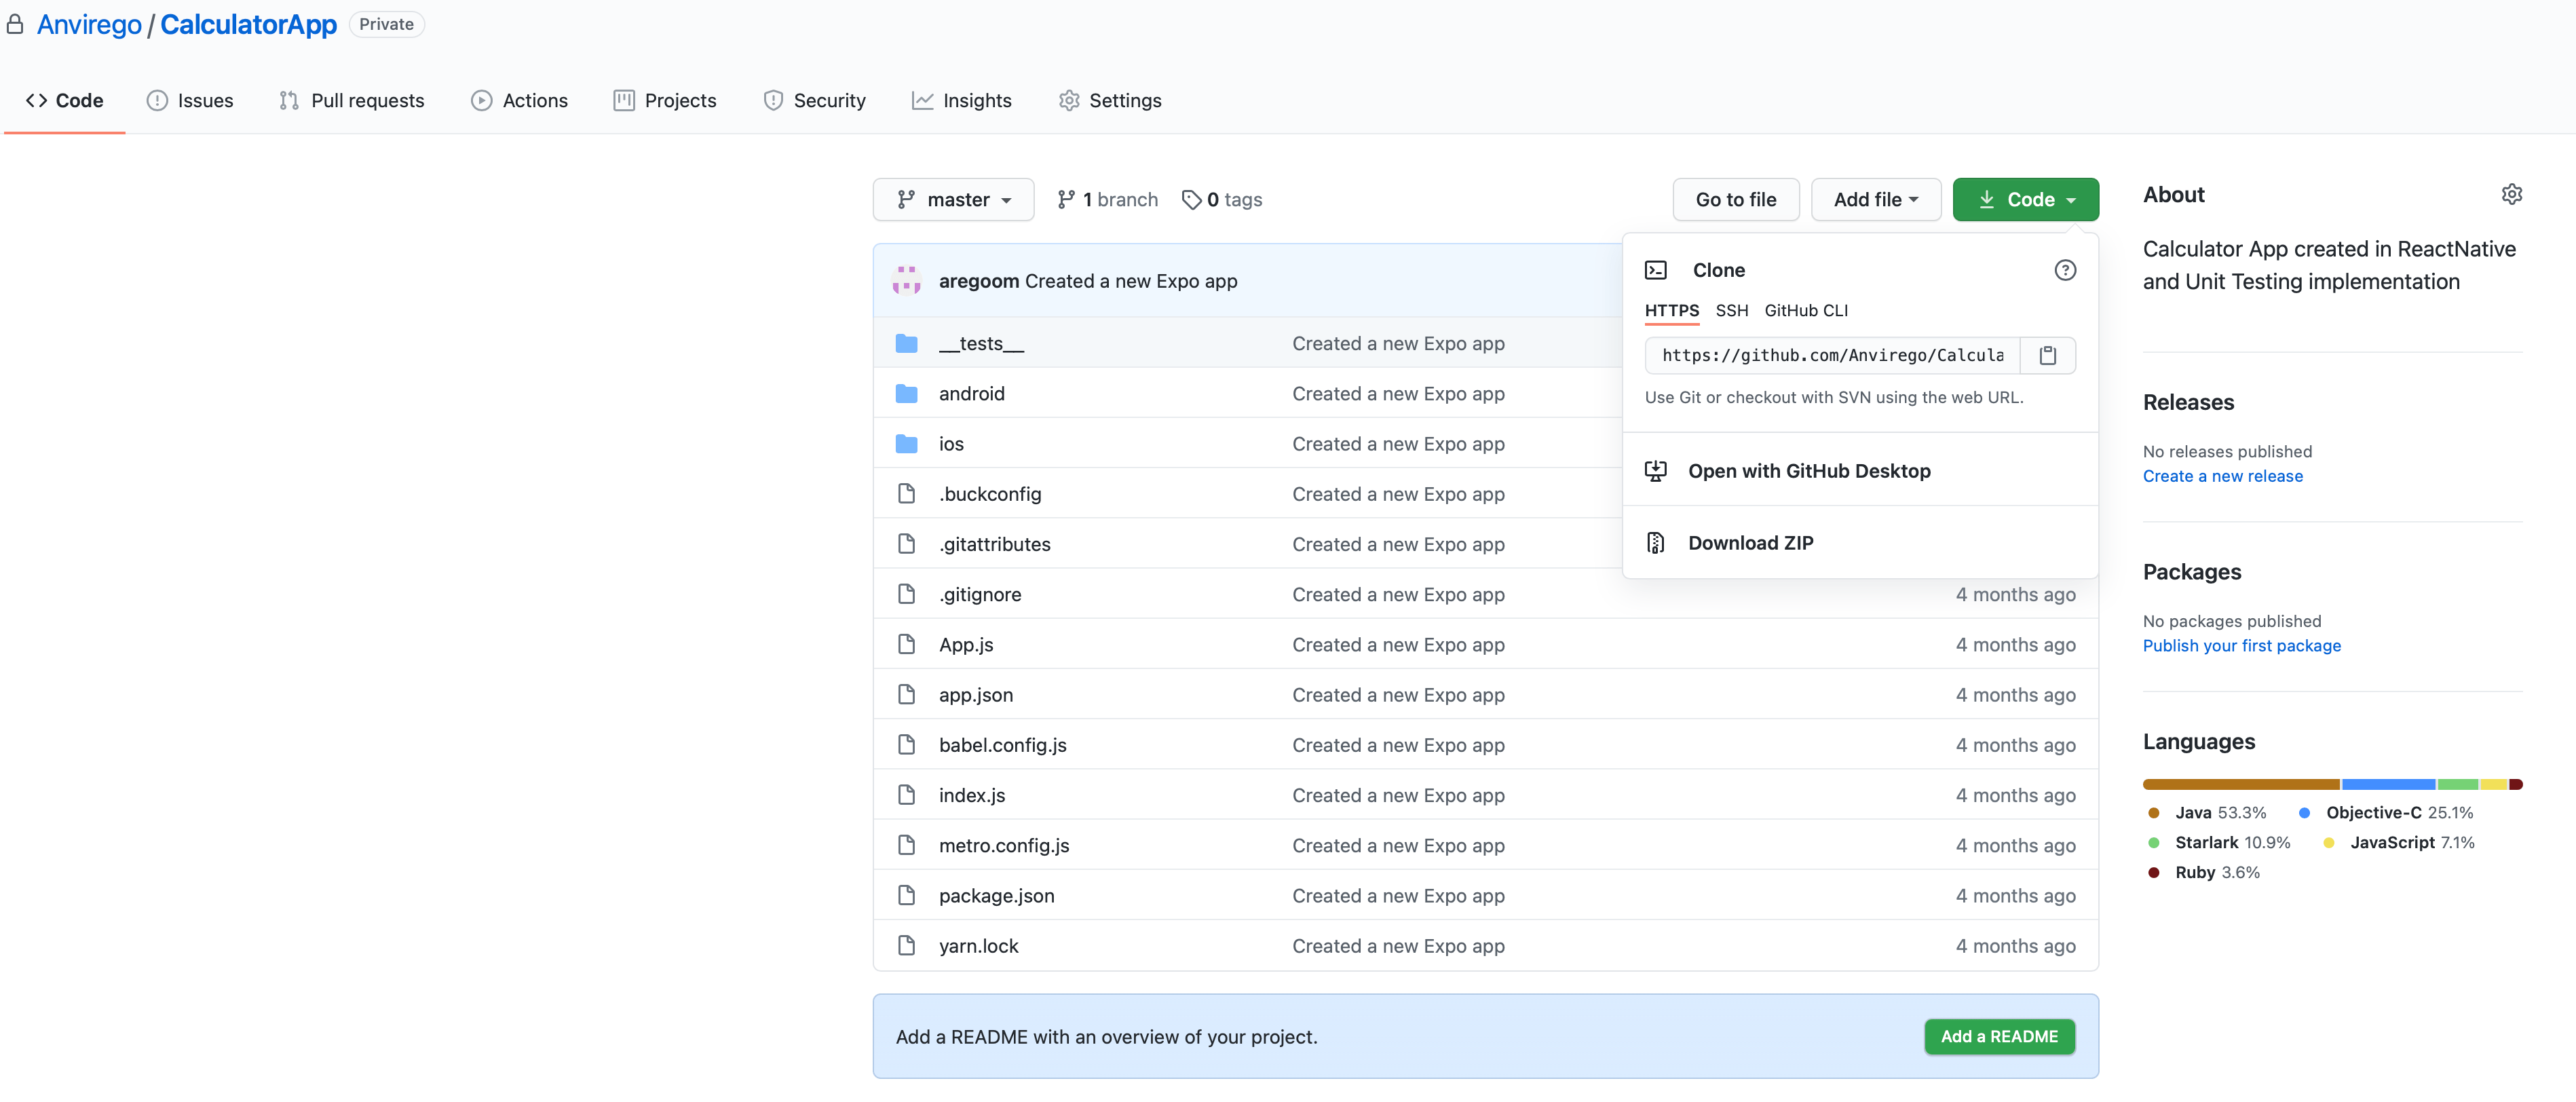
Let’s upload our React-Native mobile app called “Calculator“.
Create Repository
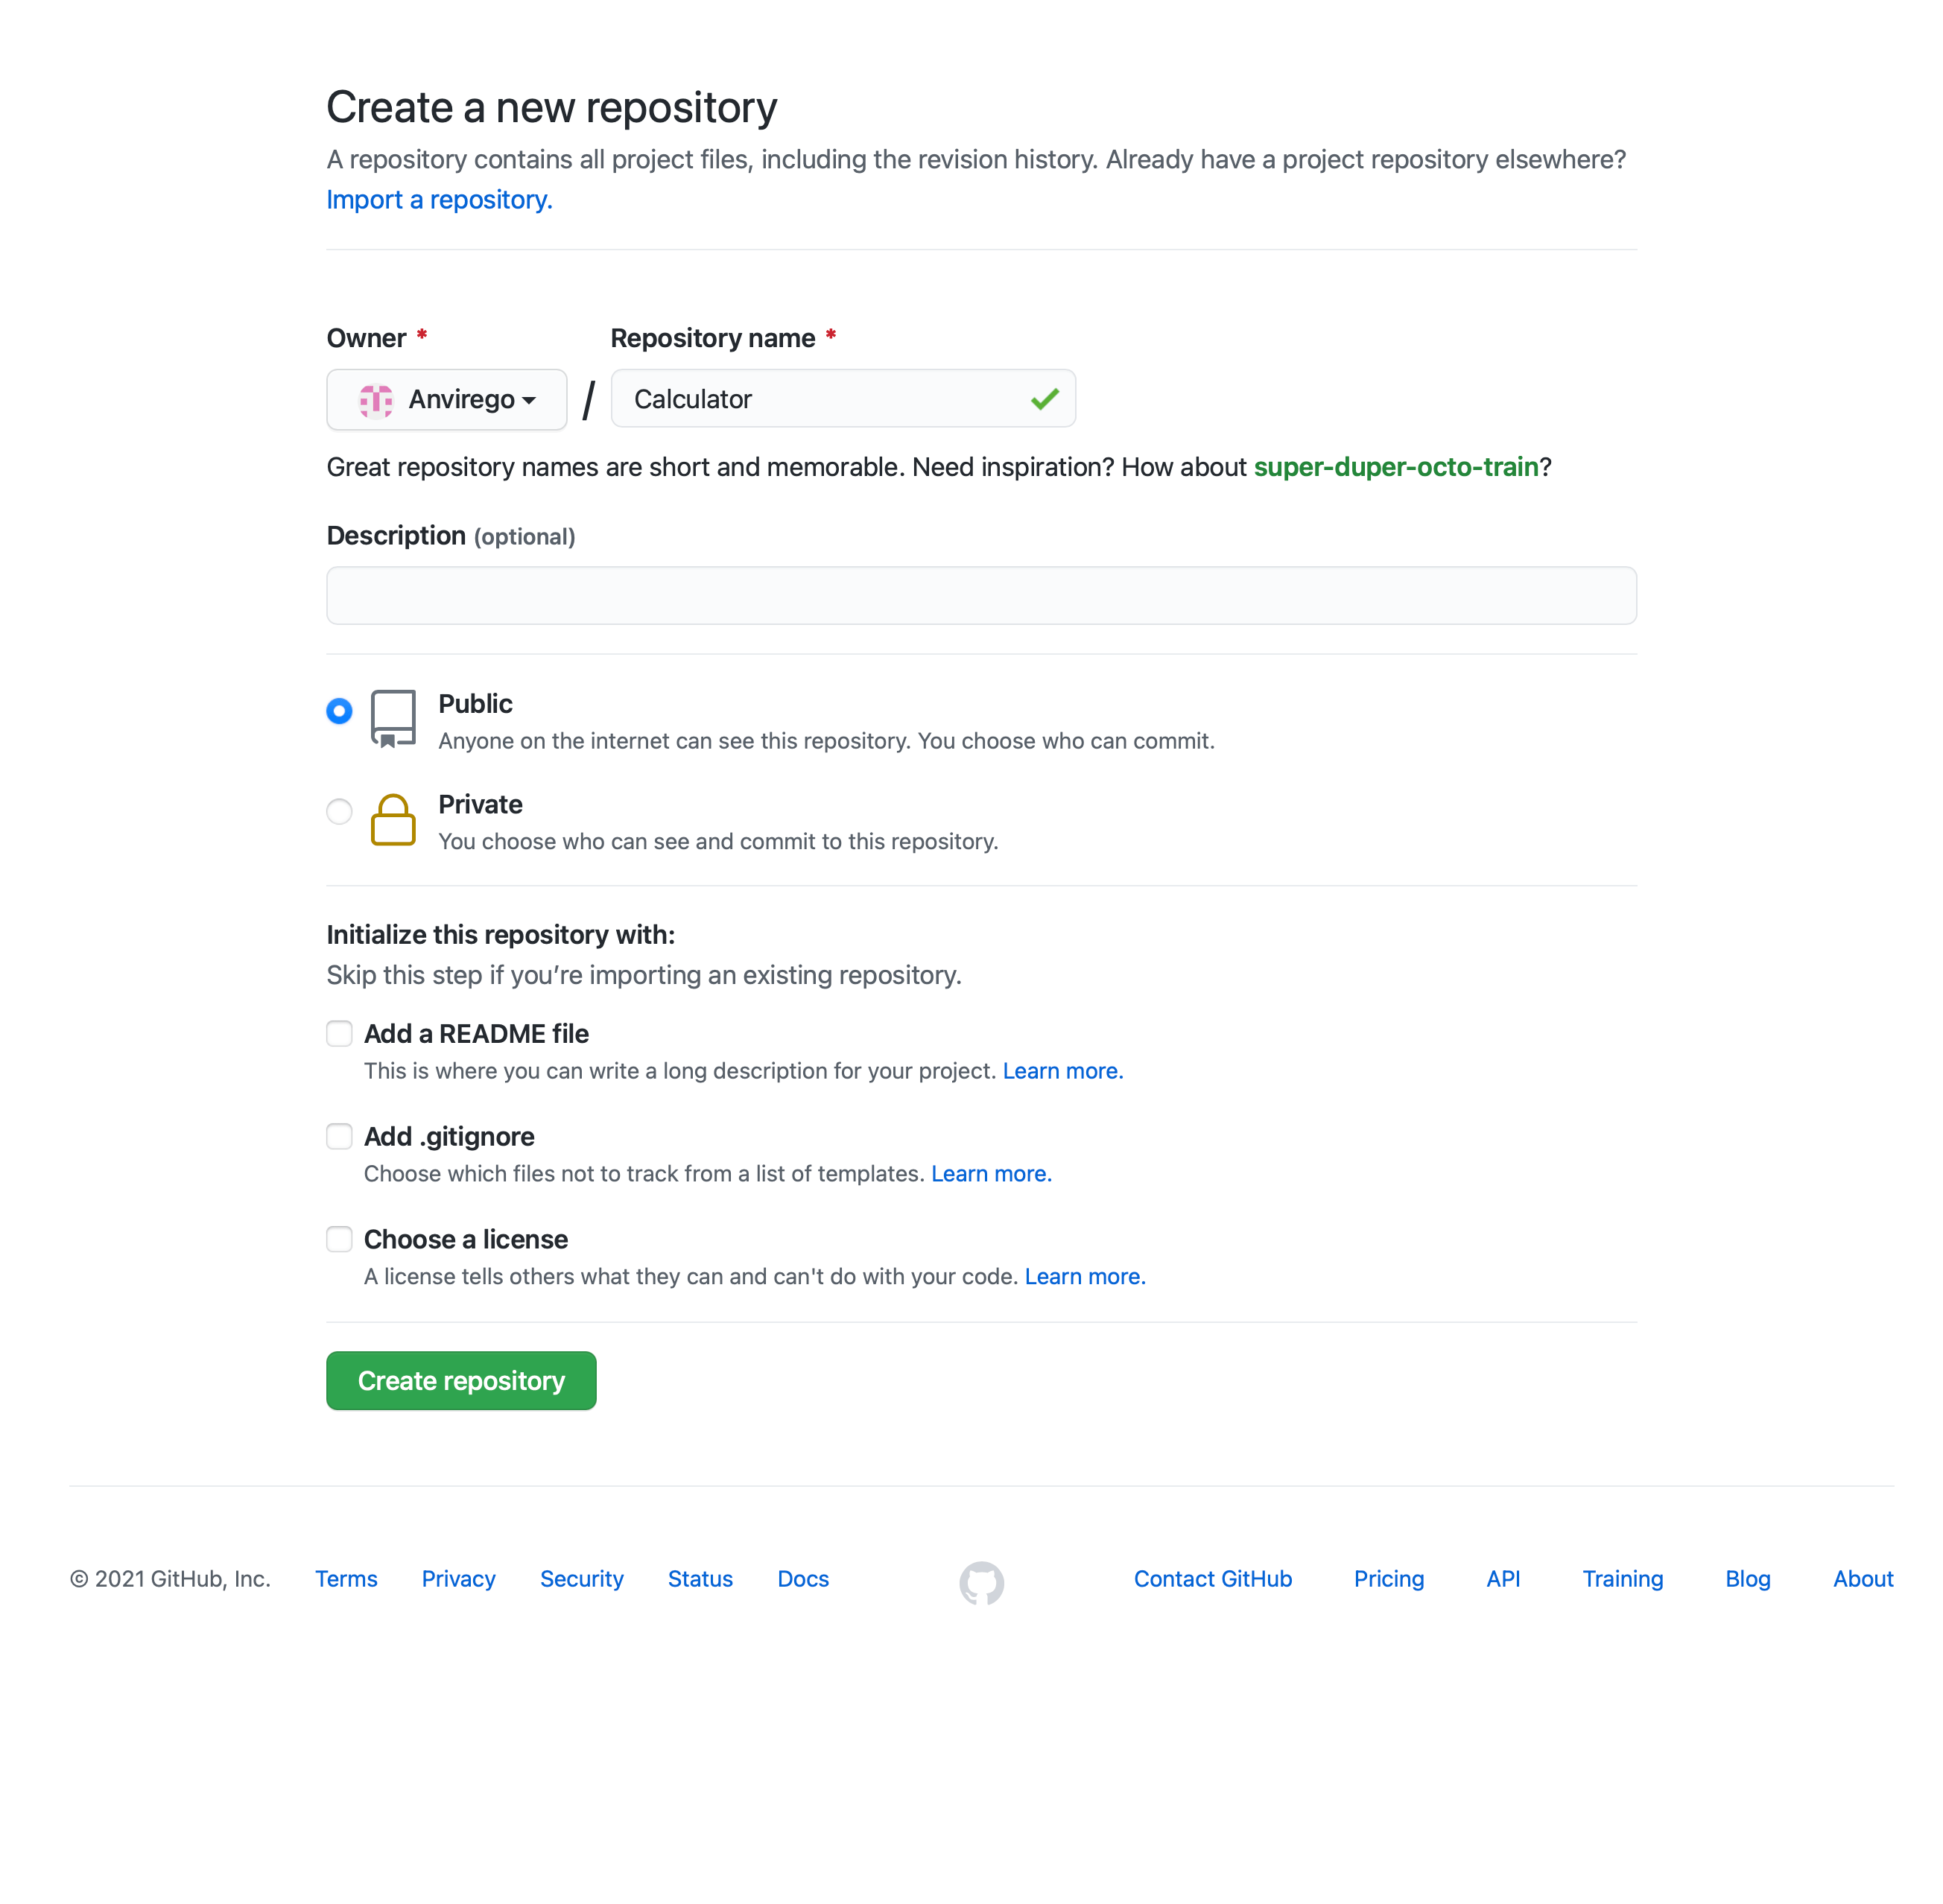
First, we need to create a new Repository, for this go to your main page in Github, and click “New“.
Insert the name of your Repository and choose whether is going to be “Private” or “Public“, for credential management is easier to have as public, if you want it to keep it as “Private” keep in mind that you will need to create an SSH Key to been able to log in with other apps like Jenkins.
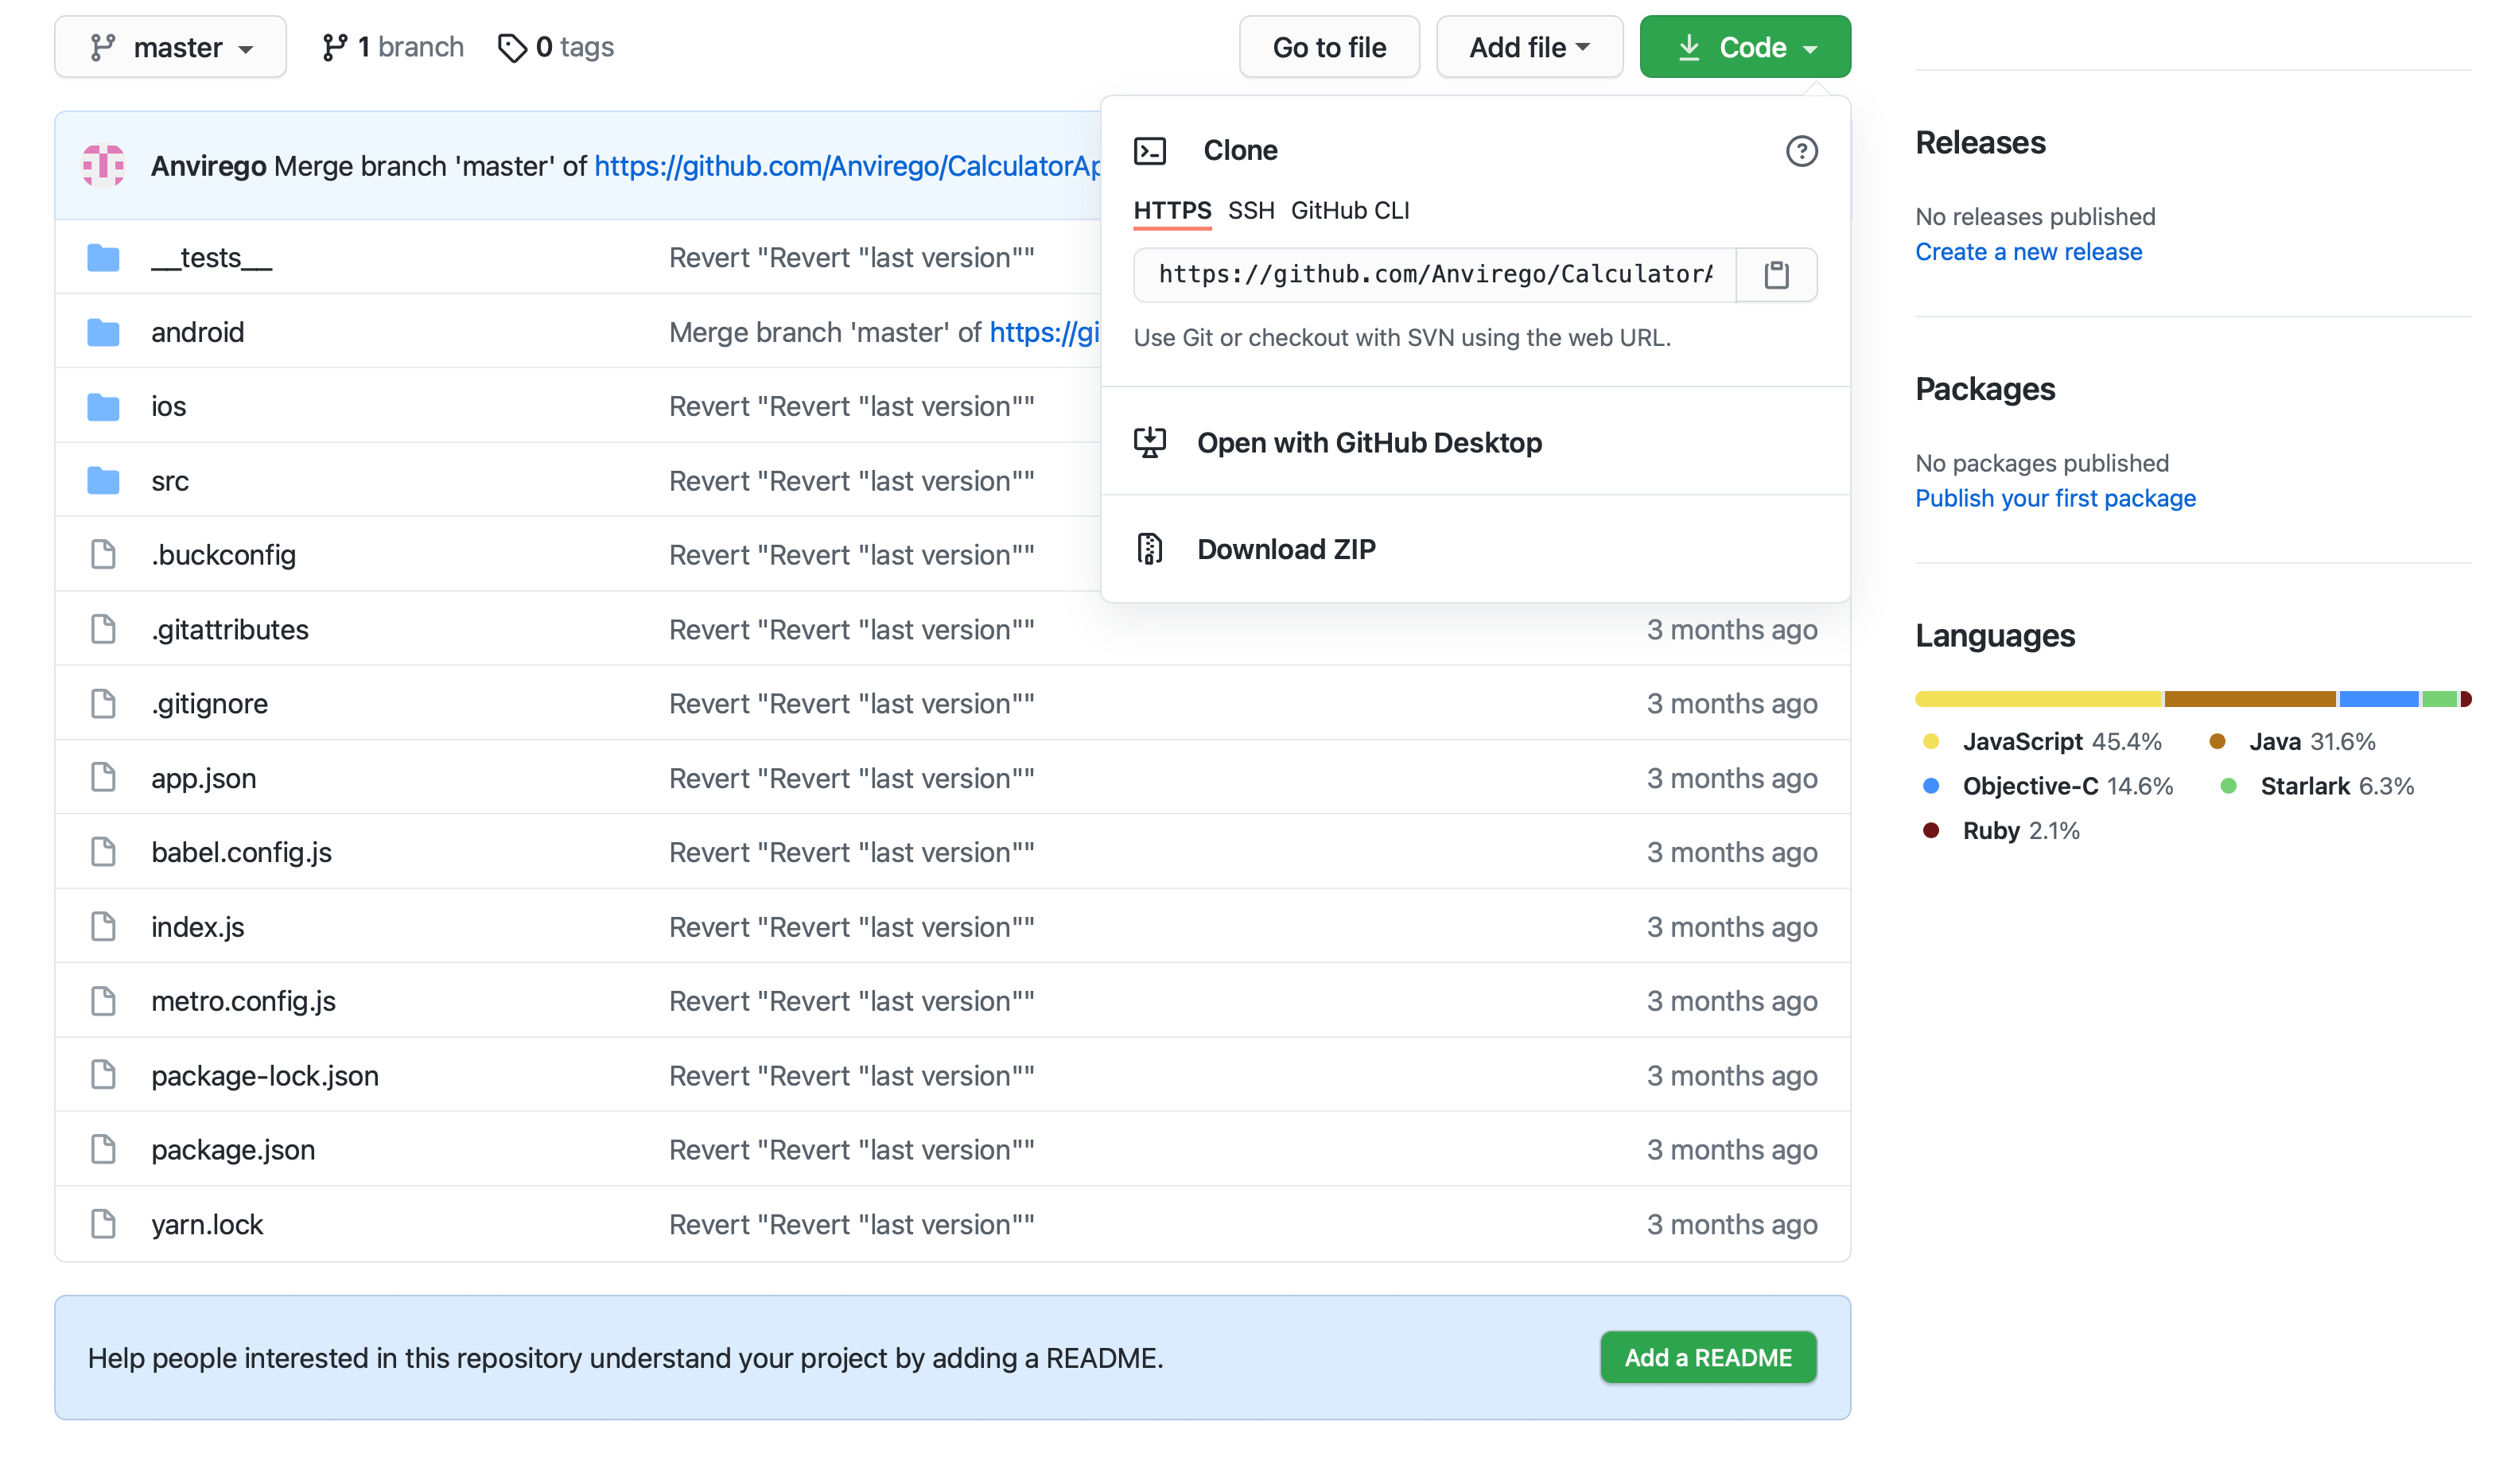
Once the repository is created go to this repo and save the URL of this repo, we’re going to need it later.
Command Line
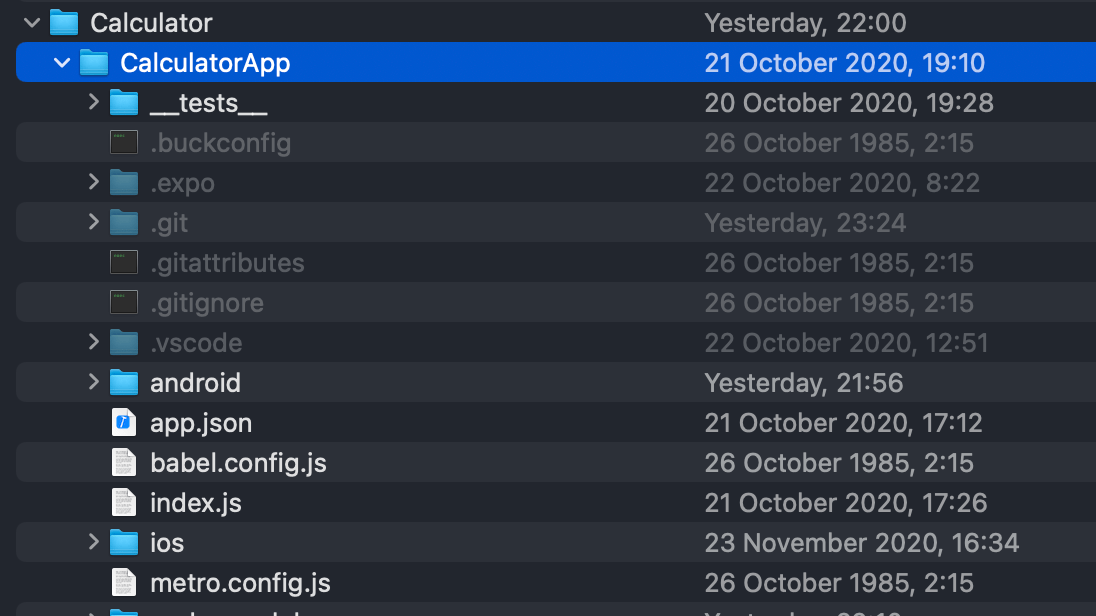
Open cmd and position on the workspace path, like “/Users/angelicaviridiana/eclipse-workspace/Calculator/CalculatorApp“.
Type “git init“.
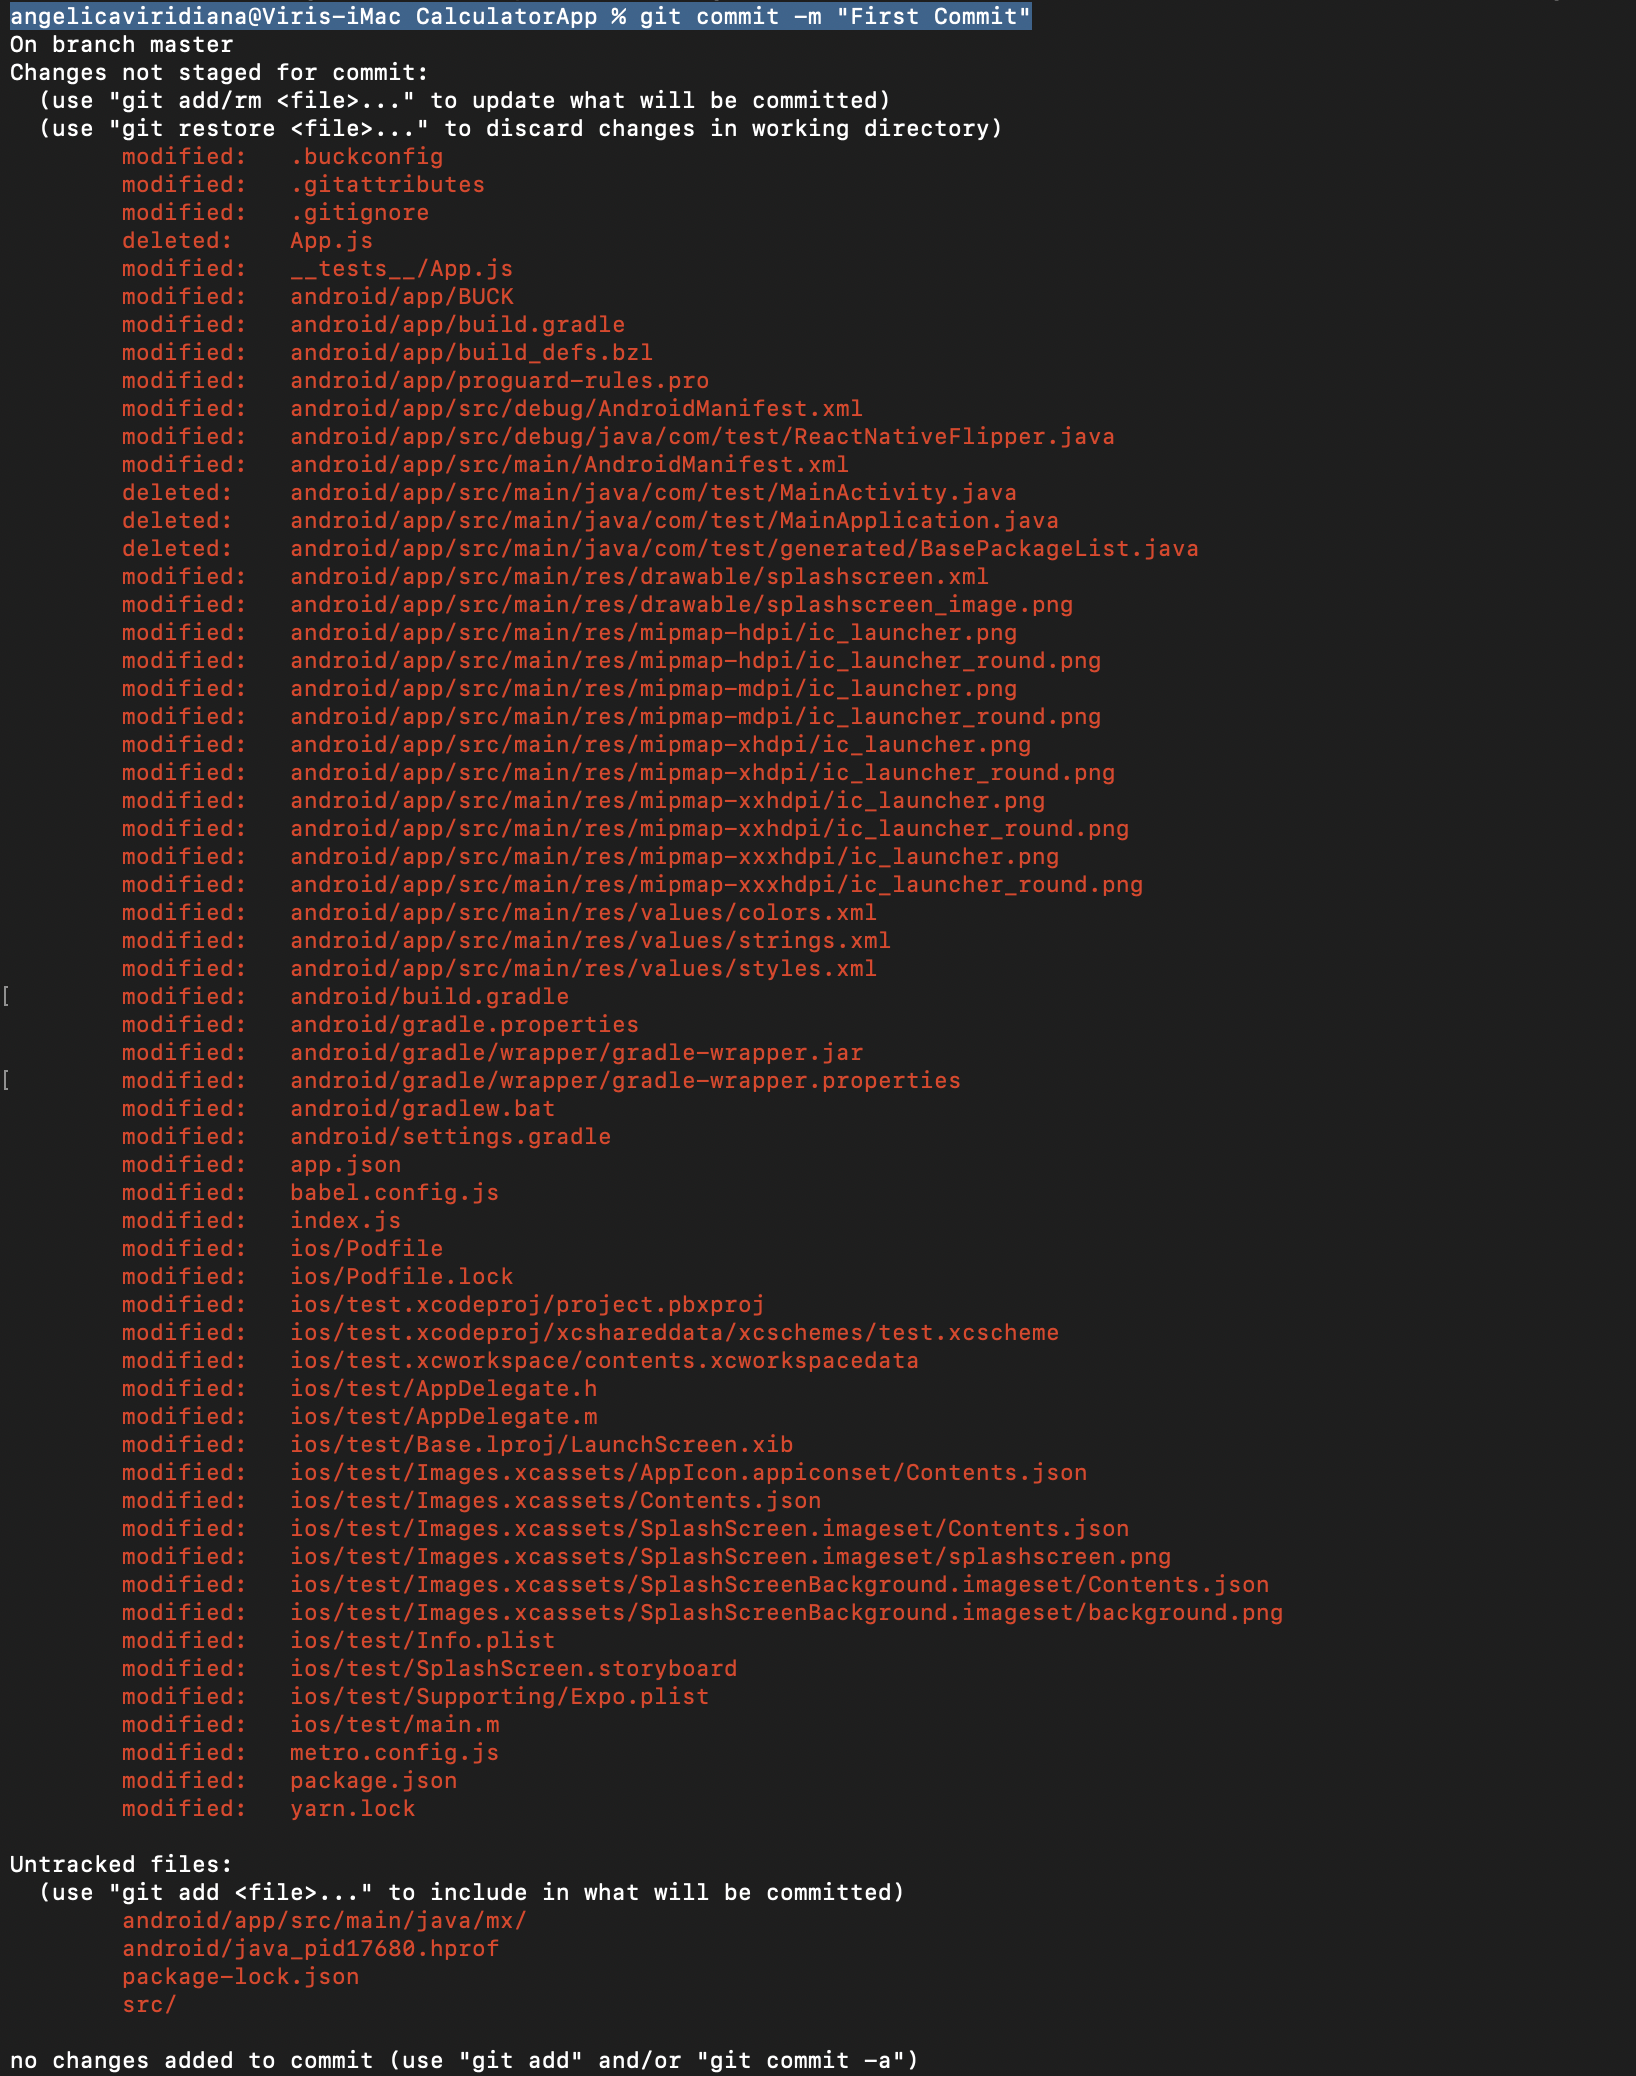
Then “git commit -m “First Commit”“, the text inside “” (First Commit) is the comment of the commit.
You’re going to see all the data inside your project.
Next “git remote add origin https://github.com/USER/REPOSITORY_NAME.git”, this URL is found in Github, when creating a new repo.
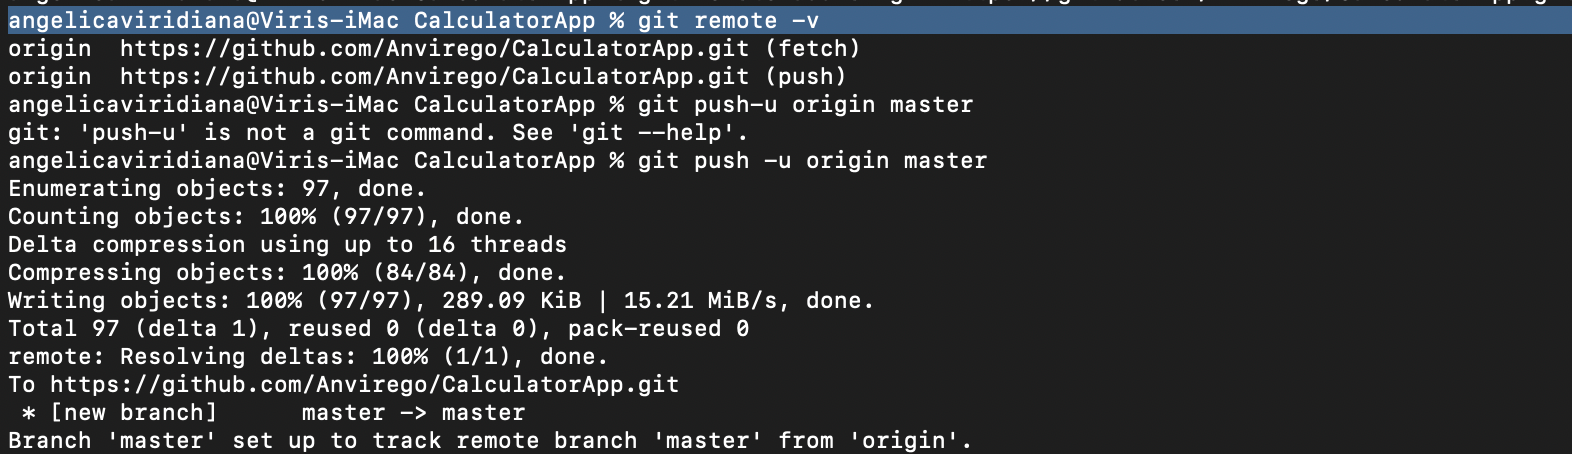
Finally, type “git remote -v“, it’s going to show us to which destination is pointing and the name of this remote repository, in here it’s “origin”.
Finally, if there are no conflicts with our local and remote repository, we can proceed to upload our project using “git push -u origin master“, if everything goes correctly we’re going to see “Writing objects: 100% (84/84), done“.
Corroborate the project has been uploaded, go to your Github Repository.
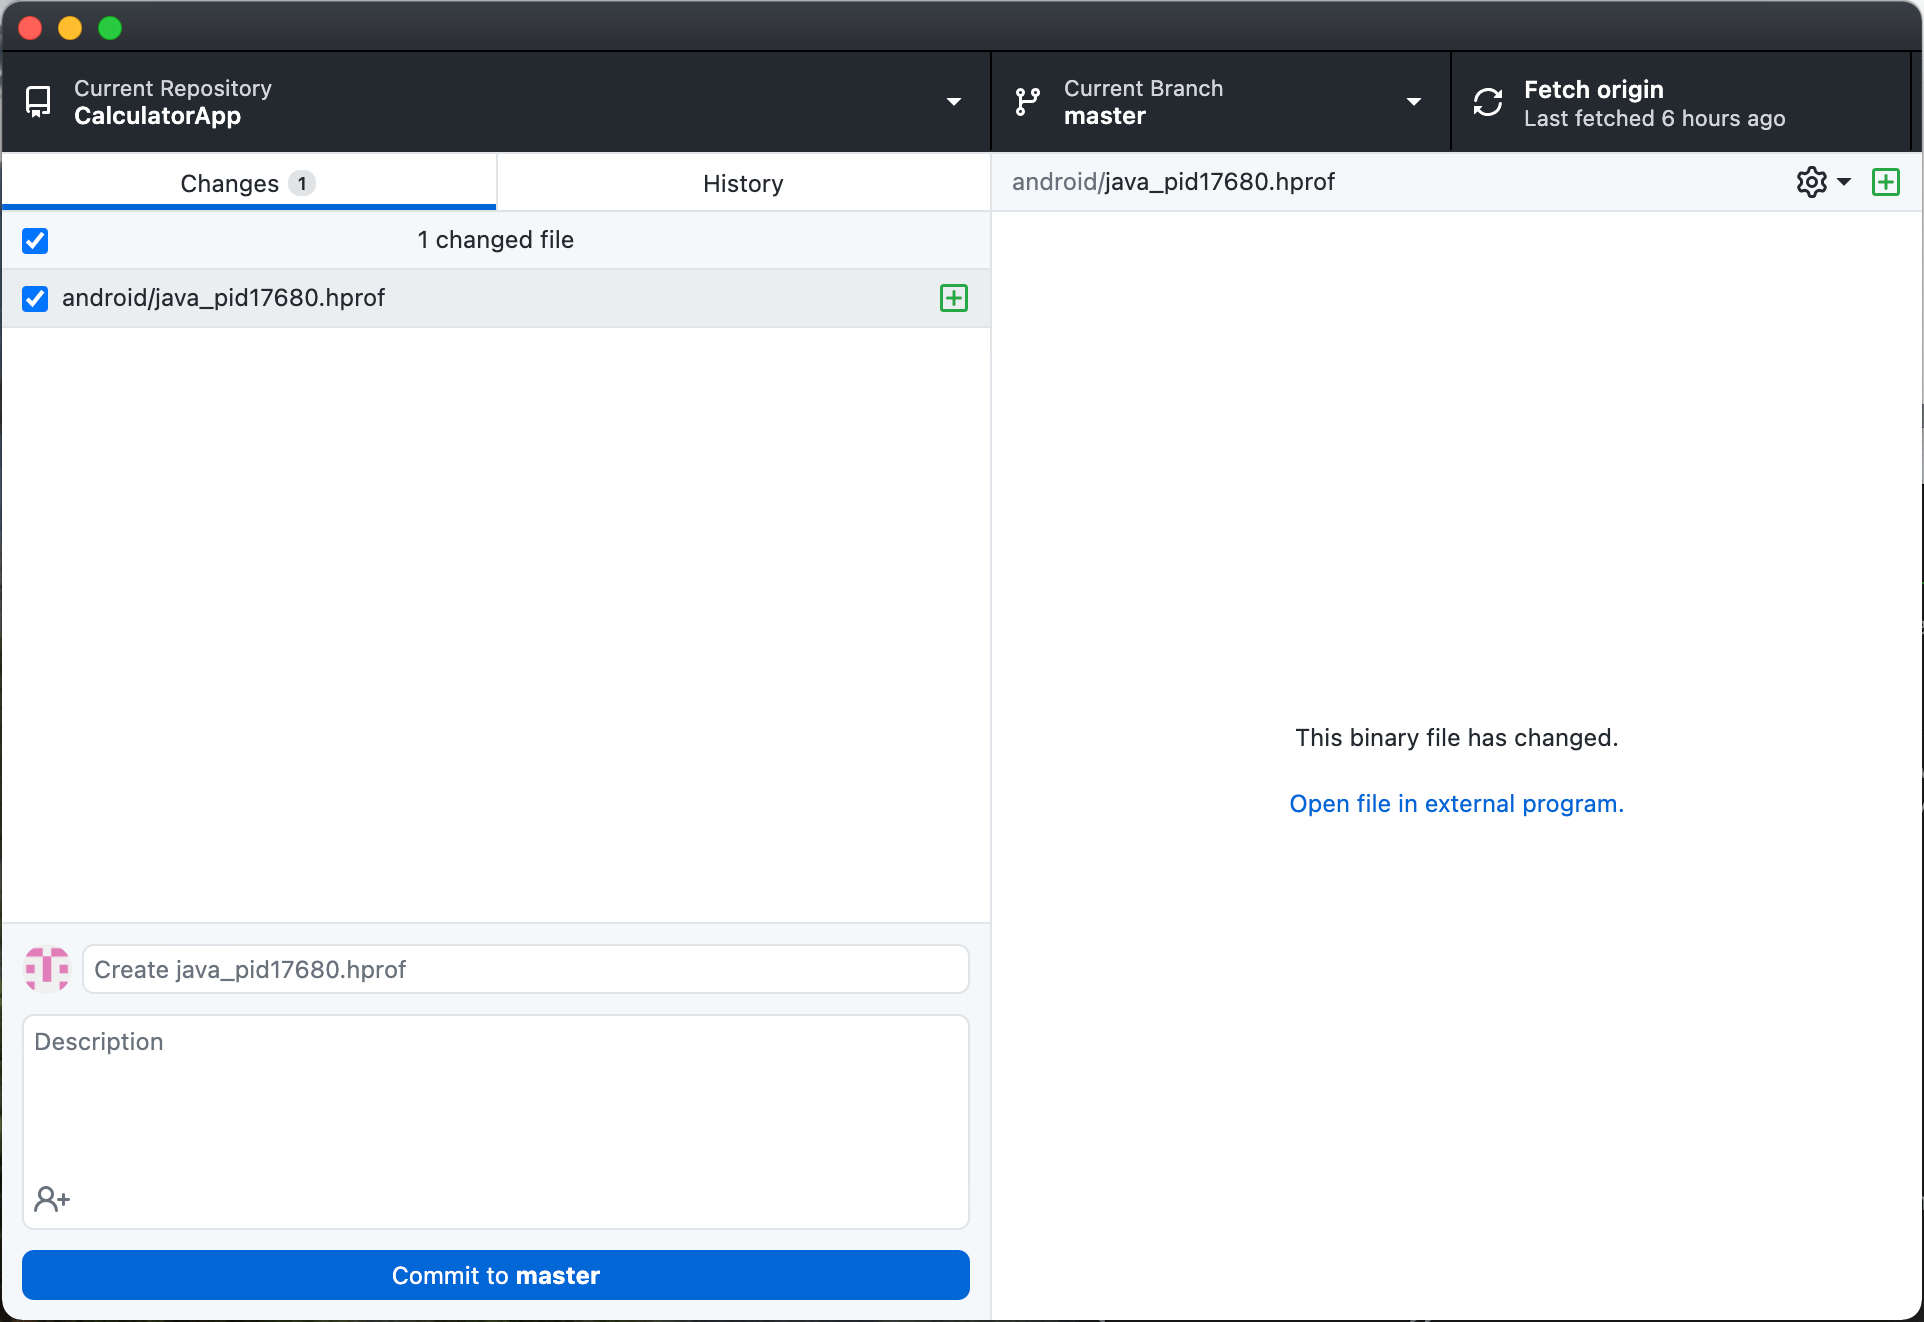
To have easier management with Github, we can use the Github App.
- Current Repository: Name of the Repository we’re managing.
- Current Branch: Branch of the Repository, remember to always create another branch when making changes in the code to later merge it with master. Master branch always has to be the stable version.
- Fetch Origin: Before make changes in our branch we need the last version updated in Github.
- Changes: Displays all the files that have been changed.
- History: History of all the commits made to that repository, we can rollback commits.
- Commit to master: Updates changes with a commit to upload it to Github.
Branches
One of the main functionalities and advantages of having our project to a Remote Repository like Github is the usage of Branches.
Branches help us to work in the same repository and collaborate with others, so let’s say we have our CalculatorApp, but Dev1 it’s working on adding a new feature called “Percentage” and Dev2 it’s working on adding “Trigonometrical Functions”.
To avoid conflicts between these two new functionalities we can create two more branches aside from Master, to push each of these functionalities, like the branch “Percentage” and branch “Trigonometrical”.
Also, this way of working can help us to identify conflicts in our repositories before merging them to our stable version in branch “Master”.
if you want to know more about how Github Branches work you can visit the link here.
Other useful commands:
Command Description git init Initiates a new Remote Repository git add. Adds all content of a Local Repository to be uploaded git rm -r “folderName” Removes specifically a folder, it can also be used with any file that we don’t want to include in the Remote Repository git commit -m “Comment” It’s used to add a commit to our changes git remote -v It’s the name of the Remote and the URL which is pointing git push -u origin master It uploads the Local Repository to the Remote Repository called “origin” in the Branch “Master”.
Links of interest:
Automating with Appium – Selenium and TestNG
Speed up Android Testing with Appium and SDK TestProject Agent
These are some recommended books to learn more:
Any help is welcome to help us keeping this effort alive!BTC (Bech32): bc1qx6f8nczr5ram6d57svlnsfmk5mhu6lsr9q7mxwLTC: LdiiMfiJvqrXDw1xPMqDptXGFEkyADZzVVDOGE: DKehWtHnmrf7JTRWpEQ9LtqwqY8HdbdkbUSOL: 3f2RR9w2VwmBqjLm5DmbuUPwWfdYH7GXCbHVWhsq5skyAngélica Viridiana Rebolloza
Computing Engineer specialized in Automation, working with different tools for Mobile and Web, using languages, tools, and platforms like JAVA, VBScript, JavaScript, C#, Appium, Protractor, UFT (QTP), Selenium, WinAppDriver, Jenkins among others.
Viridiana also has been working using practices like TDD & BDD under Cascade and Agile approaches.
Some certifications include: ISTQB Foundations Certification, SeU Selenium Certified, ITIL Foundations Certification.
No Comment

Jenkins and CI/CD it’s a great idea! let’s see why…
Jenkins and CI/CD, but what is Jenkins?
Jenkins is an open-source server that can automate all sorts of tasks whether in local or cloud (Docker) machines. It’s widely used to create Continuous Integration and Continuous Delivery flows (CI/CD).
What is CI/CD?
CONTINUOUS INTEGRATION (CI)
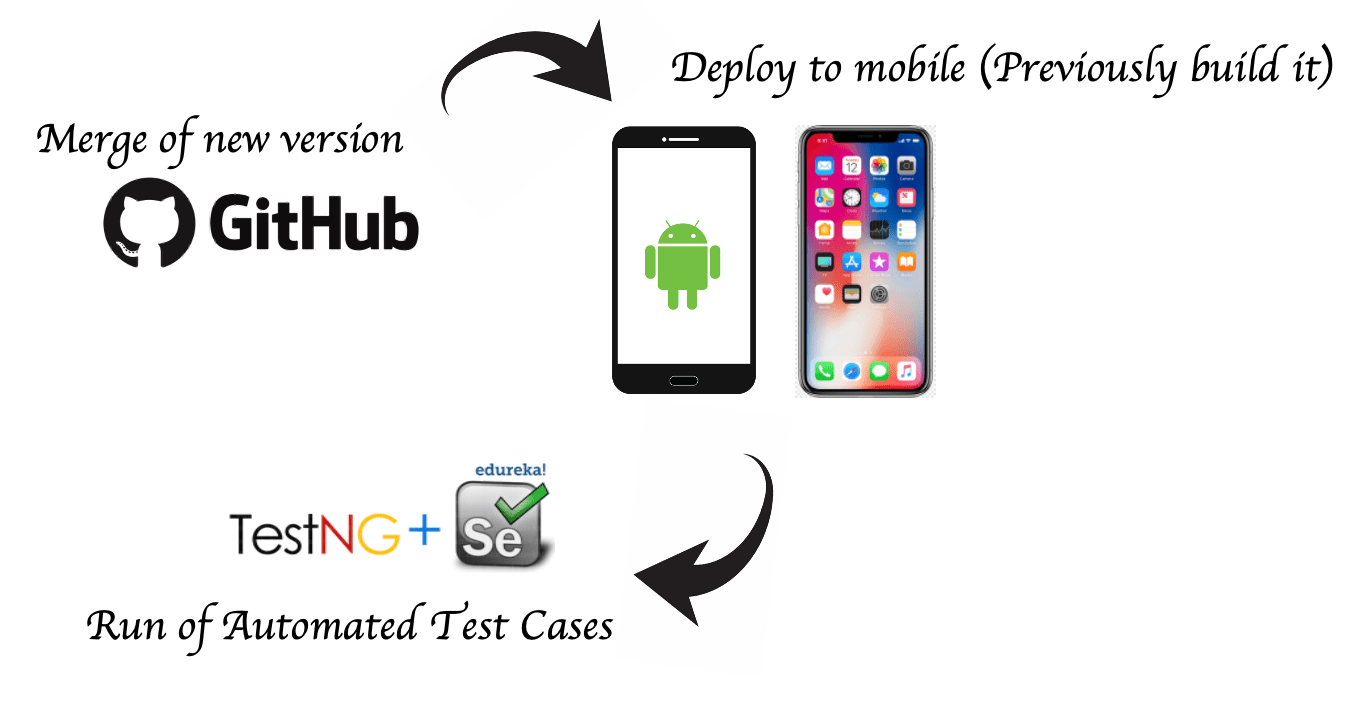
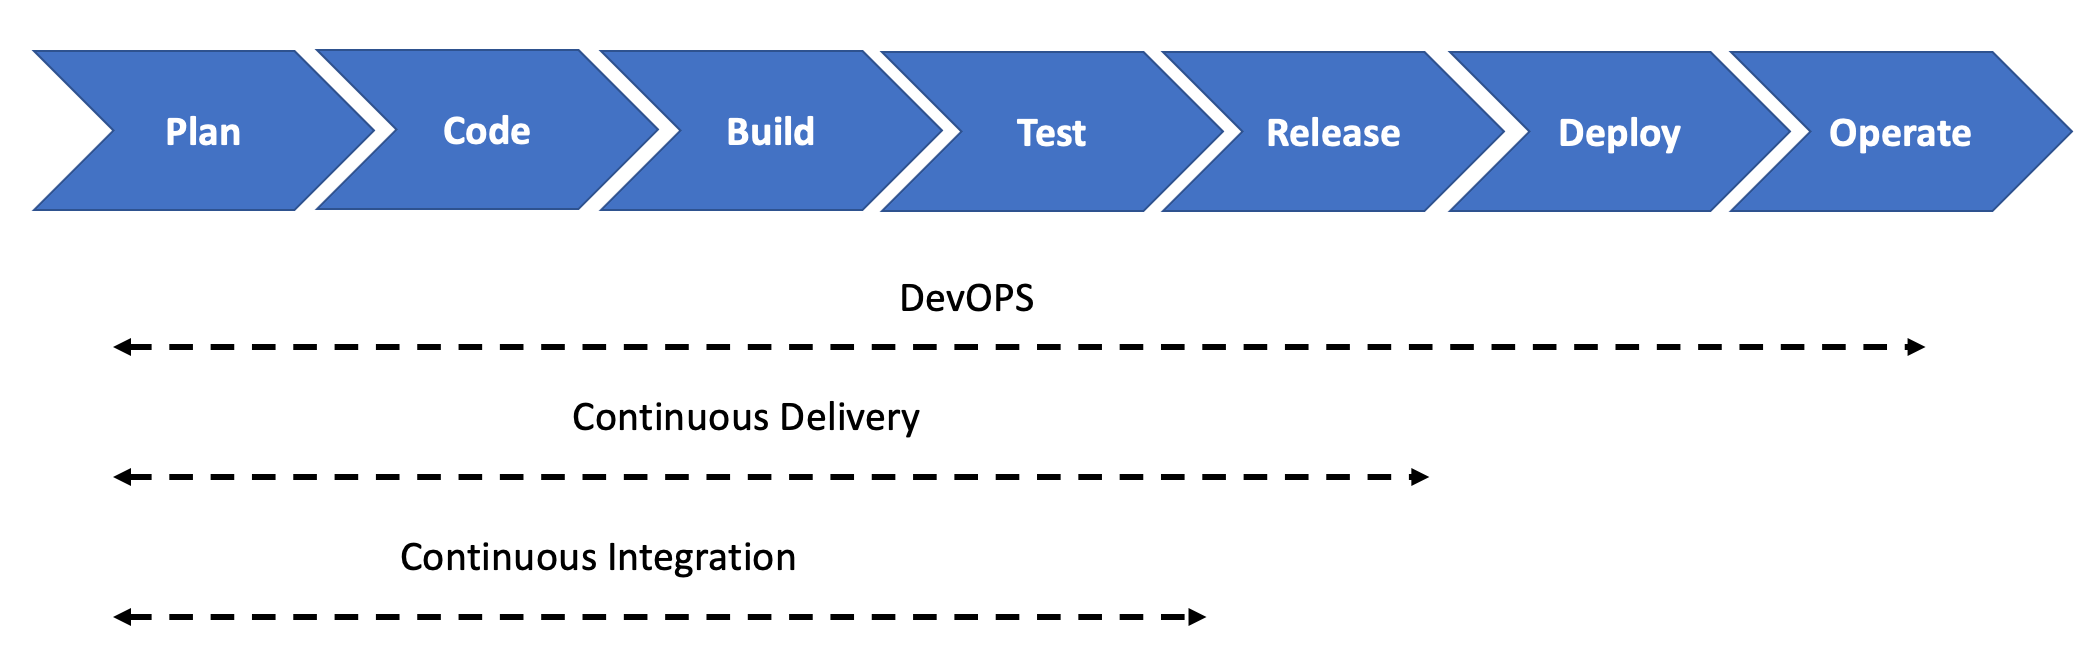
Continuous integration is the first step to Devops’s world (I’ll touch that matter later), basically is the process from when a Developer merges into a master branch new changes to the Run of the Automated Tests. To be totally automated, this process needs that the app’s building tasks, in the case of mobile apps, the deployment (locally or in a personal server) goes to a physical or emulator/simulator device.
CONTINUOUS DELIVERY (CD)
Continuous delivery takes one more step, that is deploy this new version of the app but to a “Testing Environment” such as Staging or UAT environments.
There’s another term, CONTINUOUS DEPLOYMENT, this is usually confused with Continuous Delivery, but it’s slightly different because it’s also deployment of the app but to “Production Environment” where clients can have access to the new app. All these processes need to be automated to be able to call it Continuous Deployment.
What is Devops?
Jenkins and CI/CD is good, but we also need understand somethings about Devops.
In short terms, DevOps it’s the management of all this process including the DEV side, just like technical implementation to the IT tools to create, maintain and apply it.
Enlarge

DevOps To create a Continuous Integration (CI) environment we need to install Jenkins. Take a look at the next steps:
Step 1.
Download Jenkins from the official page, easy 🙂
Step 2.
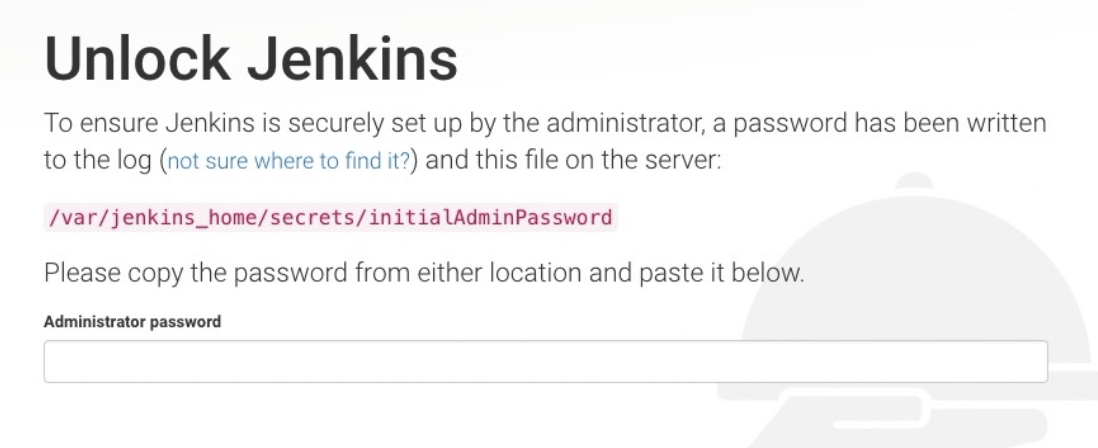
Once installed go to “http//localhost:8080/”, the first time a message like this will appear, so search the key in your computer under “/Users/username/.jenkins/secrets/initialAdminPassword”.
Enlarge

Unlock Jenkins Step 3
Once the password has been entered, Jenkins will ask you to create another admin password and then you’ll see the main page of Jenkins.
Enlarge

Welcome To Jenkins Step 4
Now, let’s go to the Code Repository, in this case, I’ll use Github, the process can change in some configurations with other repositories but not too much.
Step 5
The App should be already uploaded to a Github Repository, if you don’t know how to do this, you can check it out how in https://internet80.com/blog/upload-project-to-github/
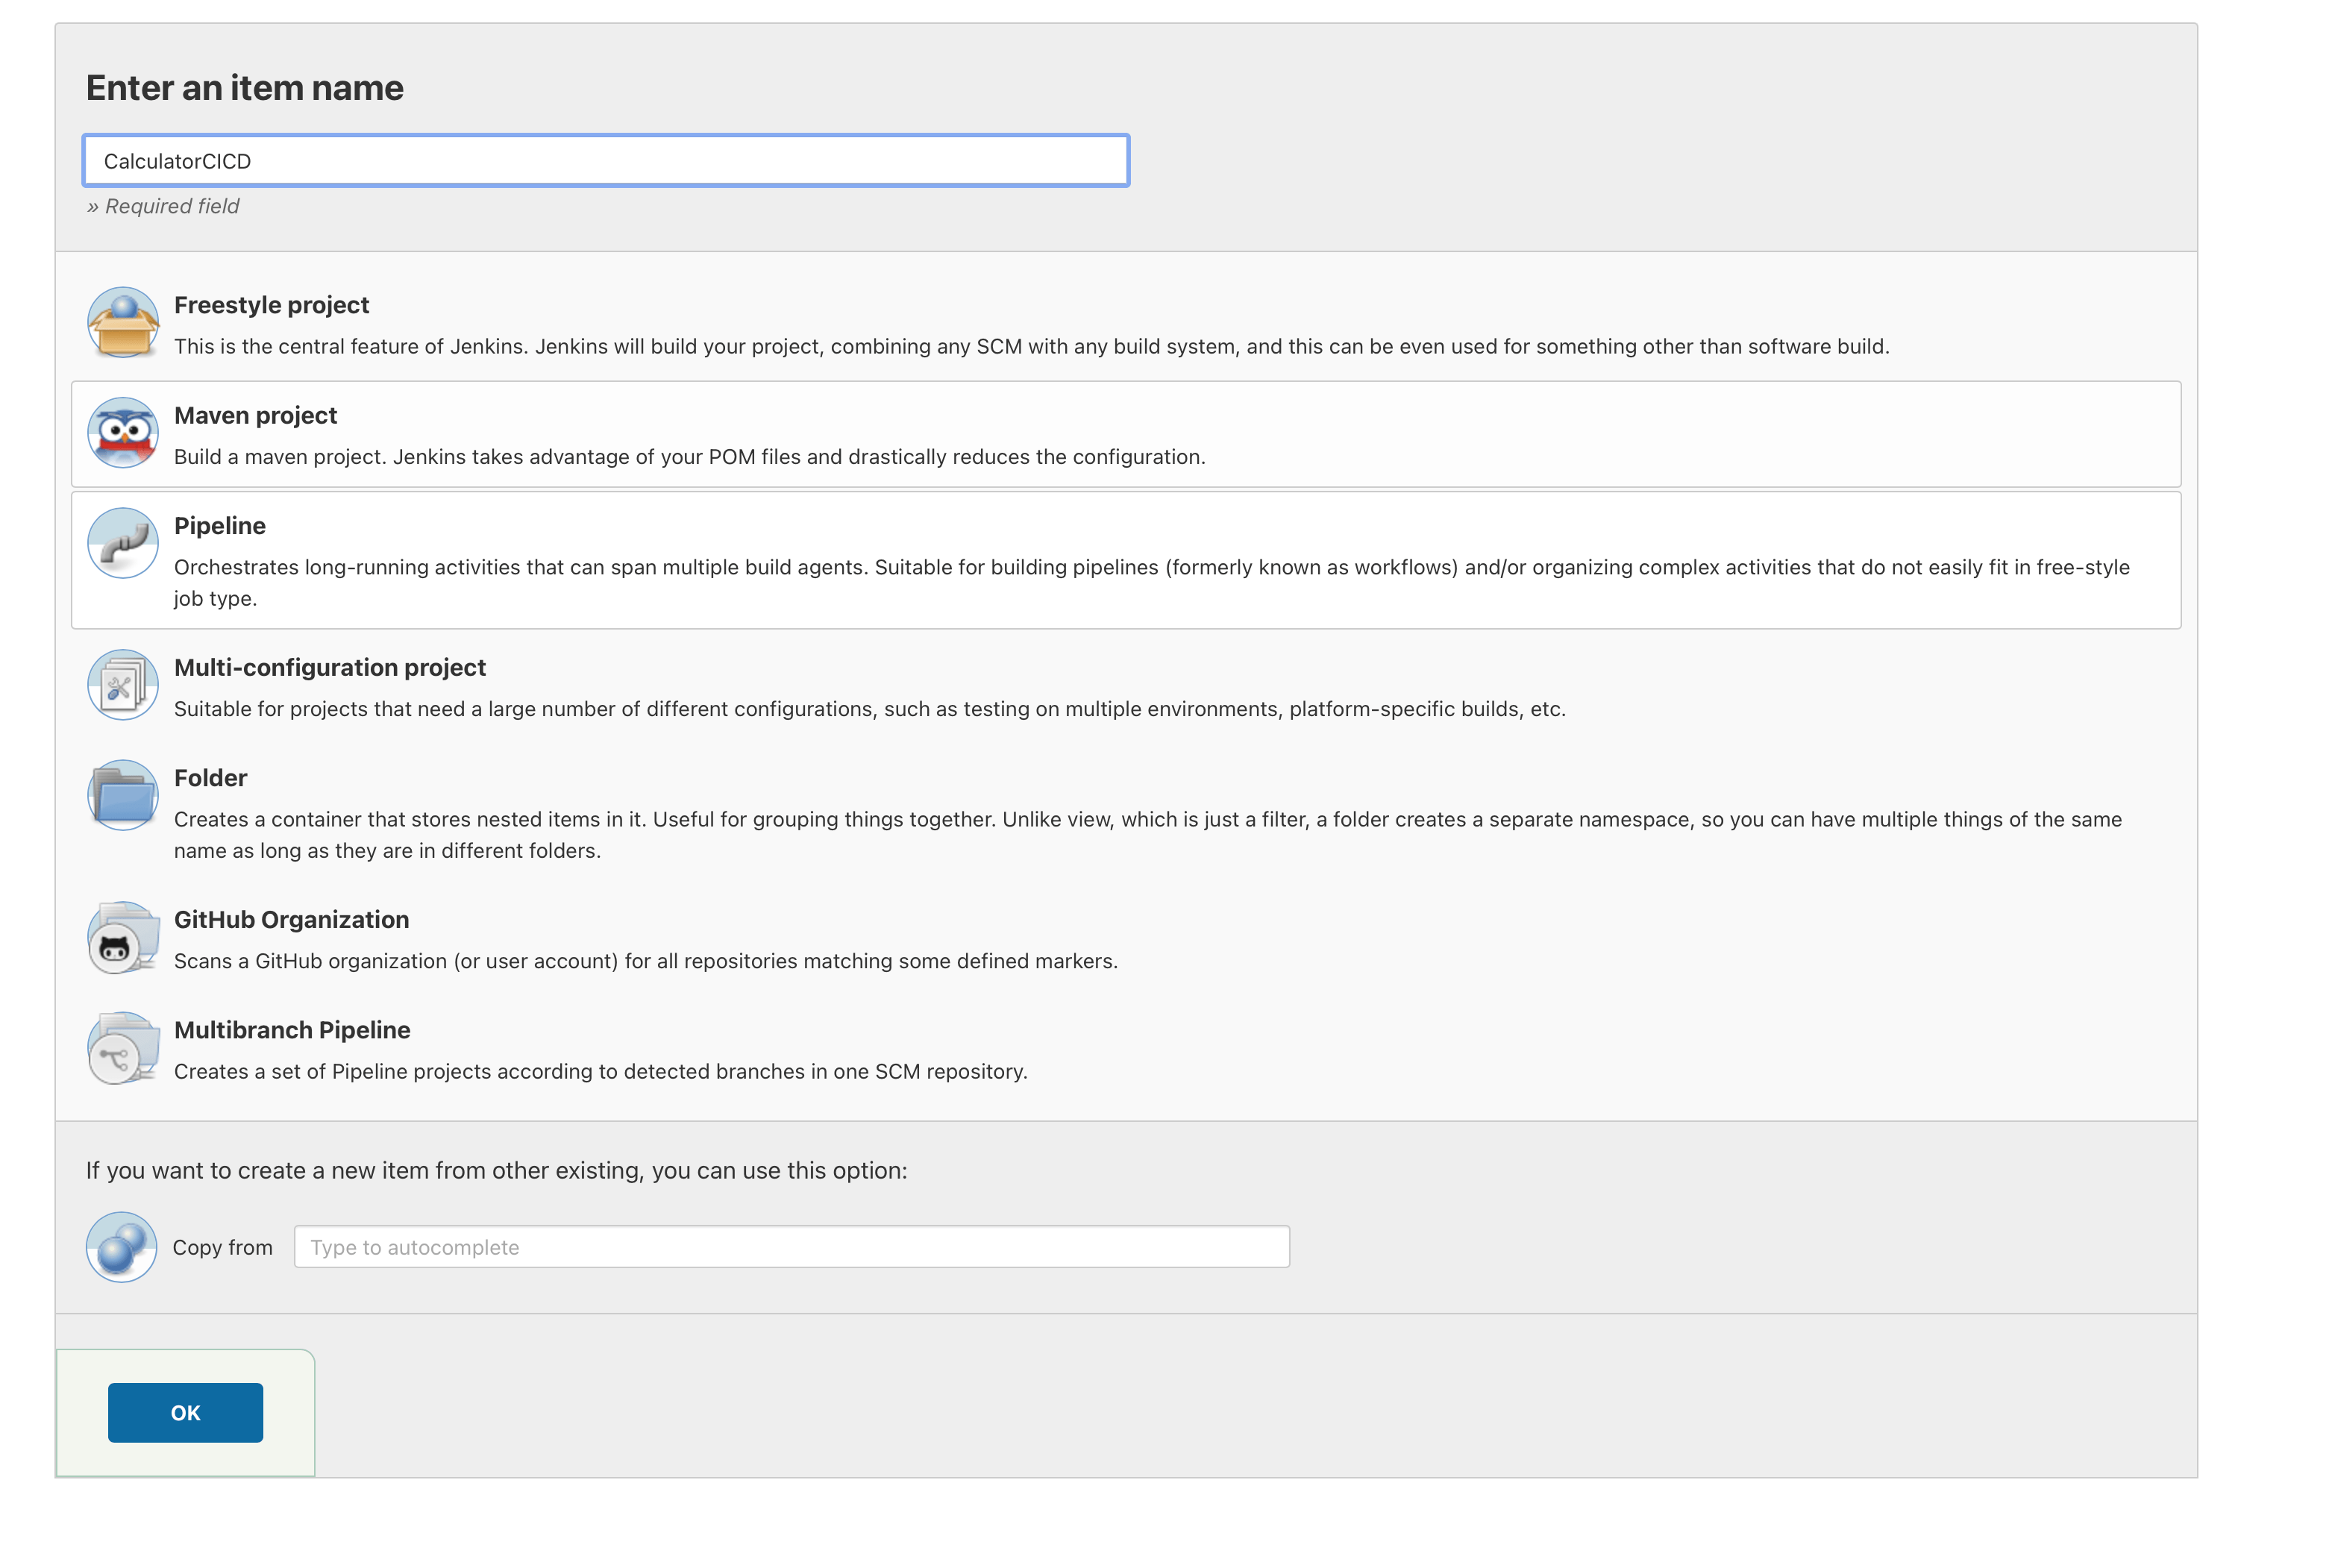
Create in Jenkins a “New Item” as “Pipeline”, in this case, it’s called “CalculatorCICD“.
Enlarge

CalculatorCICD Enlarge

CalculatorCICD 2 Step 6
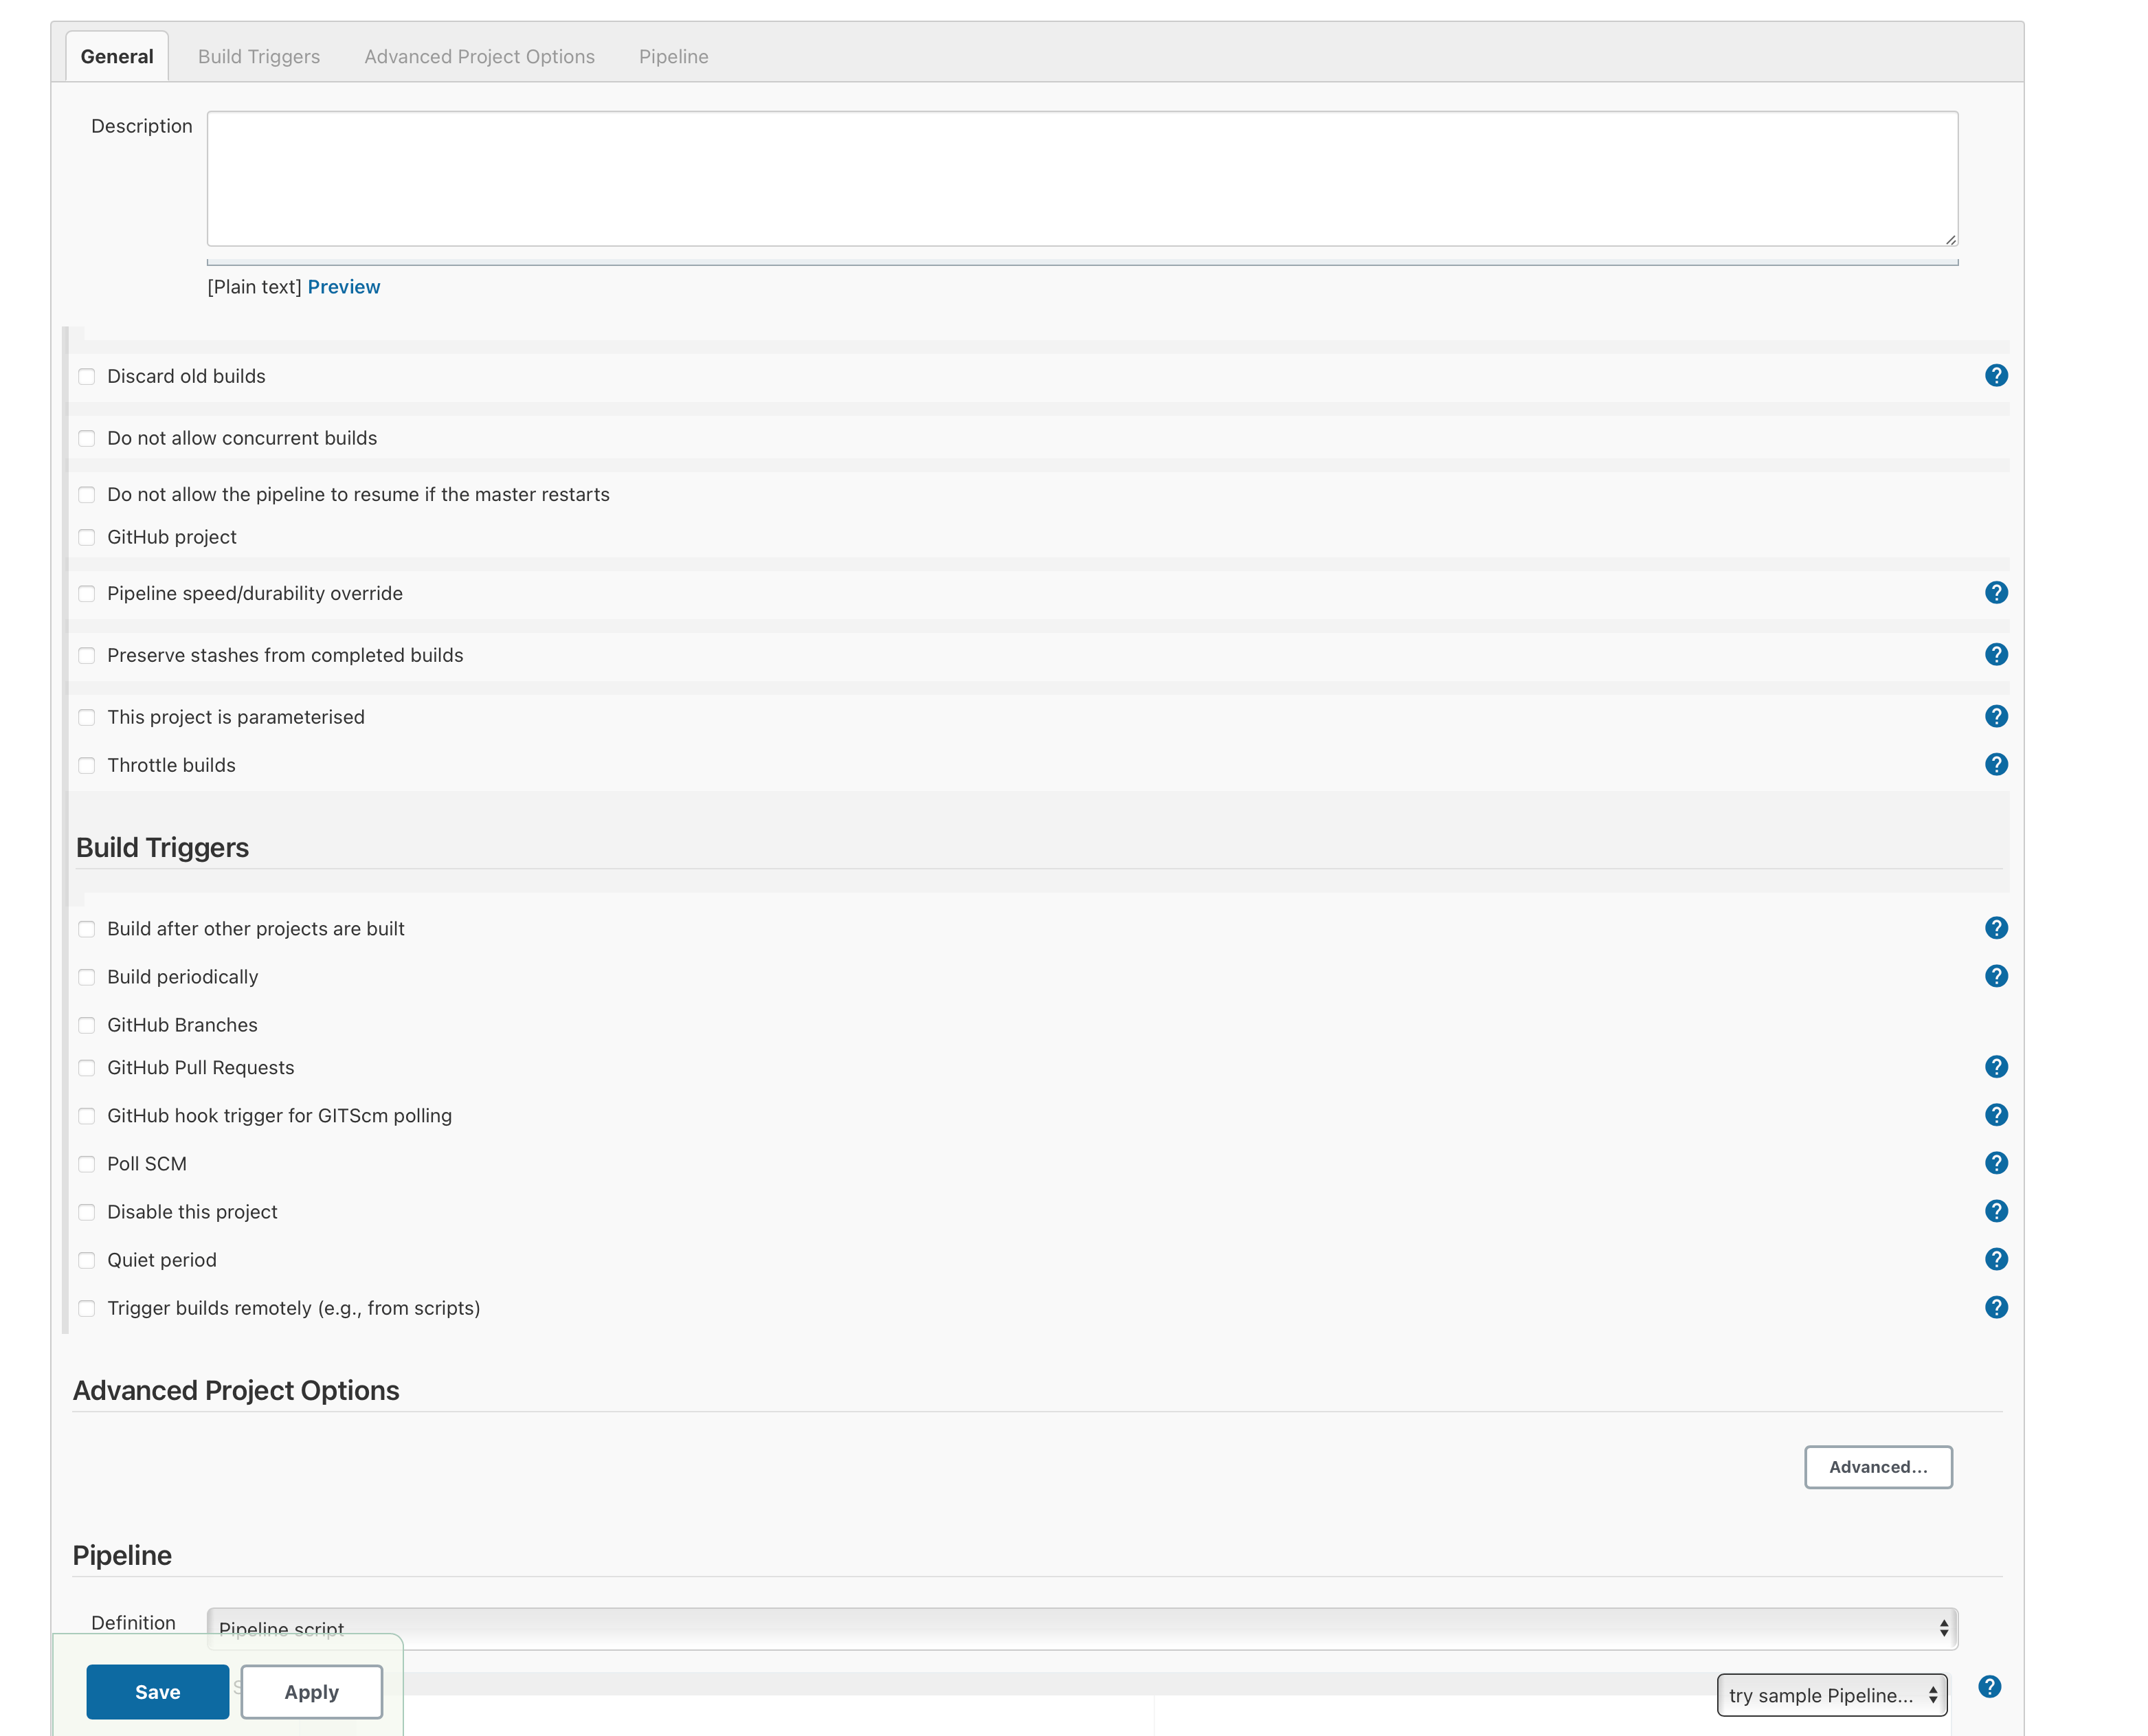
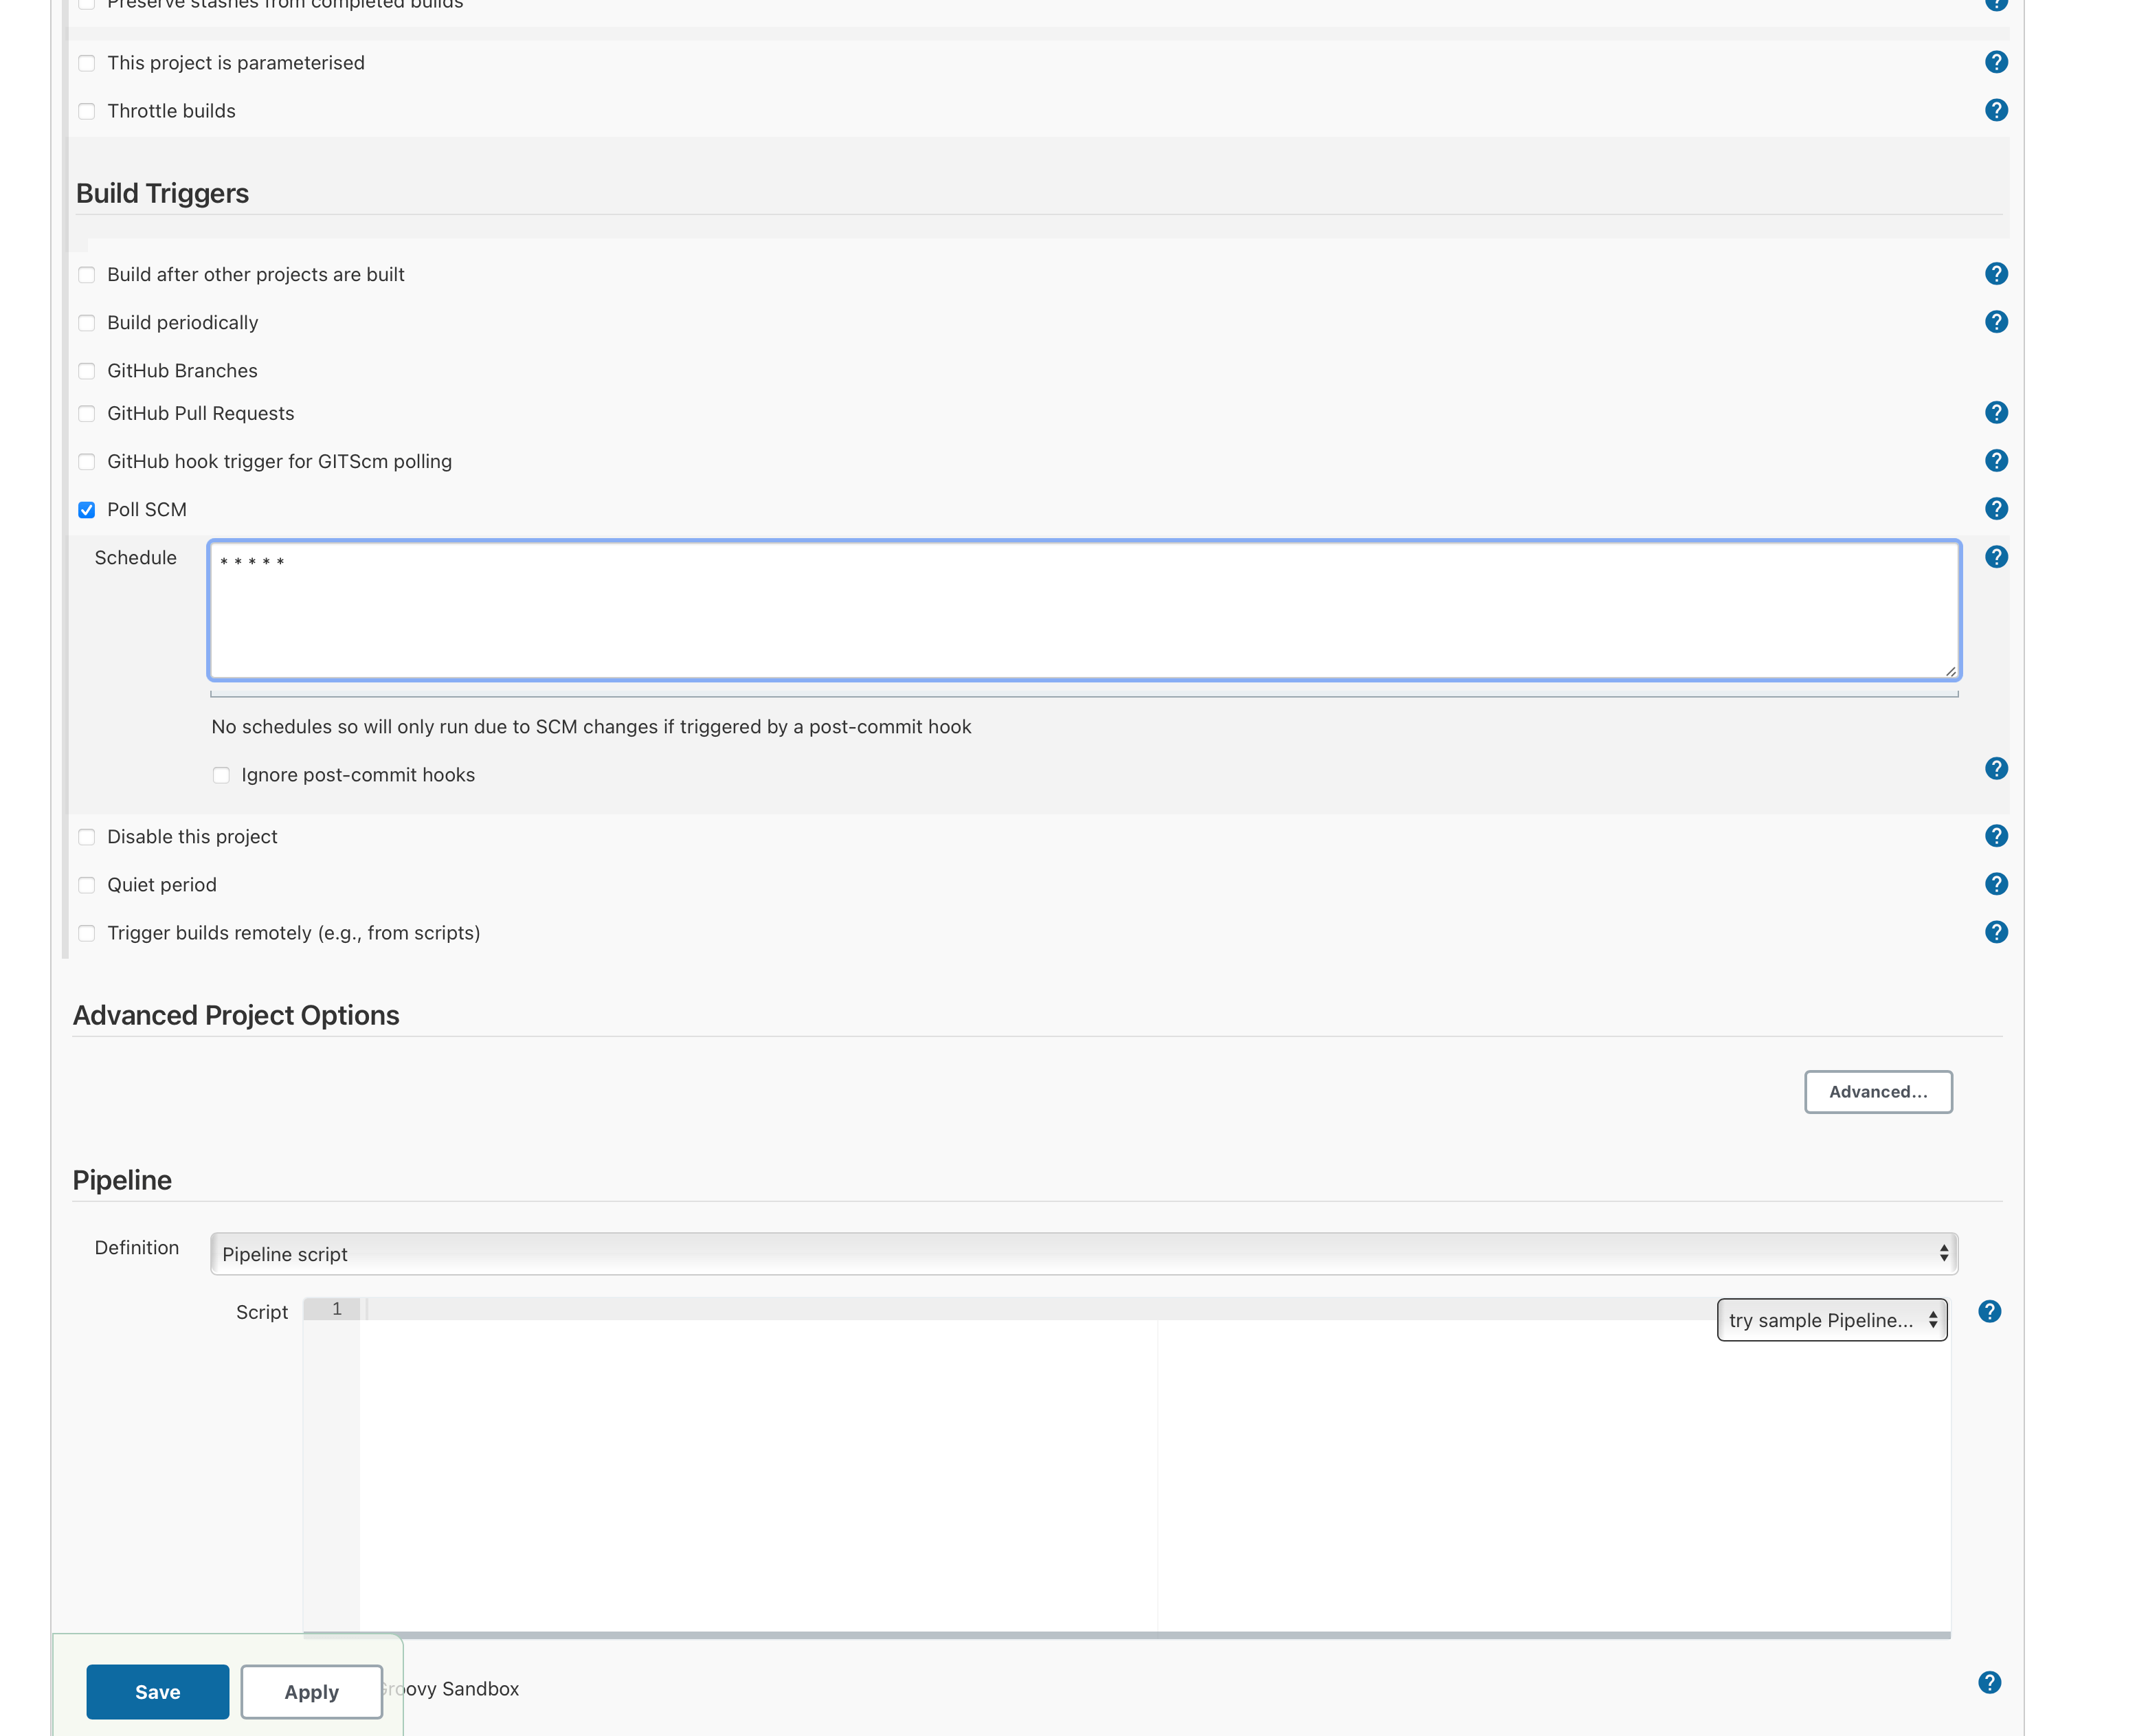
To tell Jenkins to run the pipeline every time there’s a new commit in the repo where the CalculatorApp’s code resides, add in the section “Build Triggers” -> “Poll SCM”, add “* * * * *”.
Enlarge

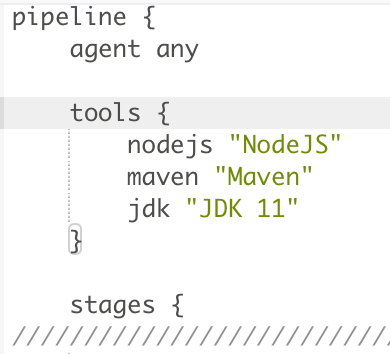
CalculatorCICD 2 Step 7
Now let’s create our first pipeline, to do this, we need to set the flow we’re going to follow. It’s important to mention that Pipelines in Jenkins have a main structure divided by “stages” each stage does a part of the CI/CD process. In this example we’re going to have 4 main stages “Checkout”, “Build”, “Deploy” and “Testing”.
- We need the “Checkout – Github” section to connect to Github Repo to download the code in our Jenkins workspace.
- The “Build Process”, is where once we have the last version of the code copied in our Jenkins workspace, we need to build the app.
- The “Deploy to Emulator”, in here we’re going to deploy the app to an emulator in Android (If you prefer you can deploy it to a physical device too).
- Finally, the last stage is to run our Automated Test Cases, the “Testing” stage.
Step 7.1
Checkout – Github
- Get the URL of the Repo in Github. “https://github.com/Anvirego/CalculatorApp.git”
Enlarge

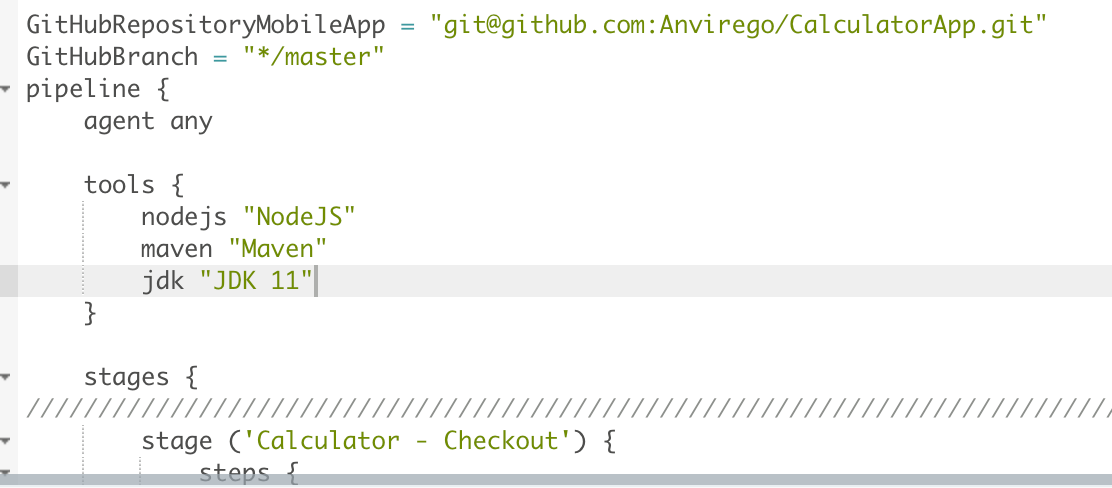
pipe jenking code 01 - To parametric our pipeline we’re going to define “GitHubRepositoryMobileApp” to pass the URL of the Github repo and “GithubBranch”.
Enlarge

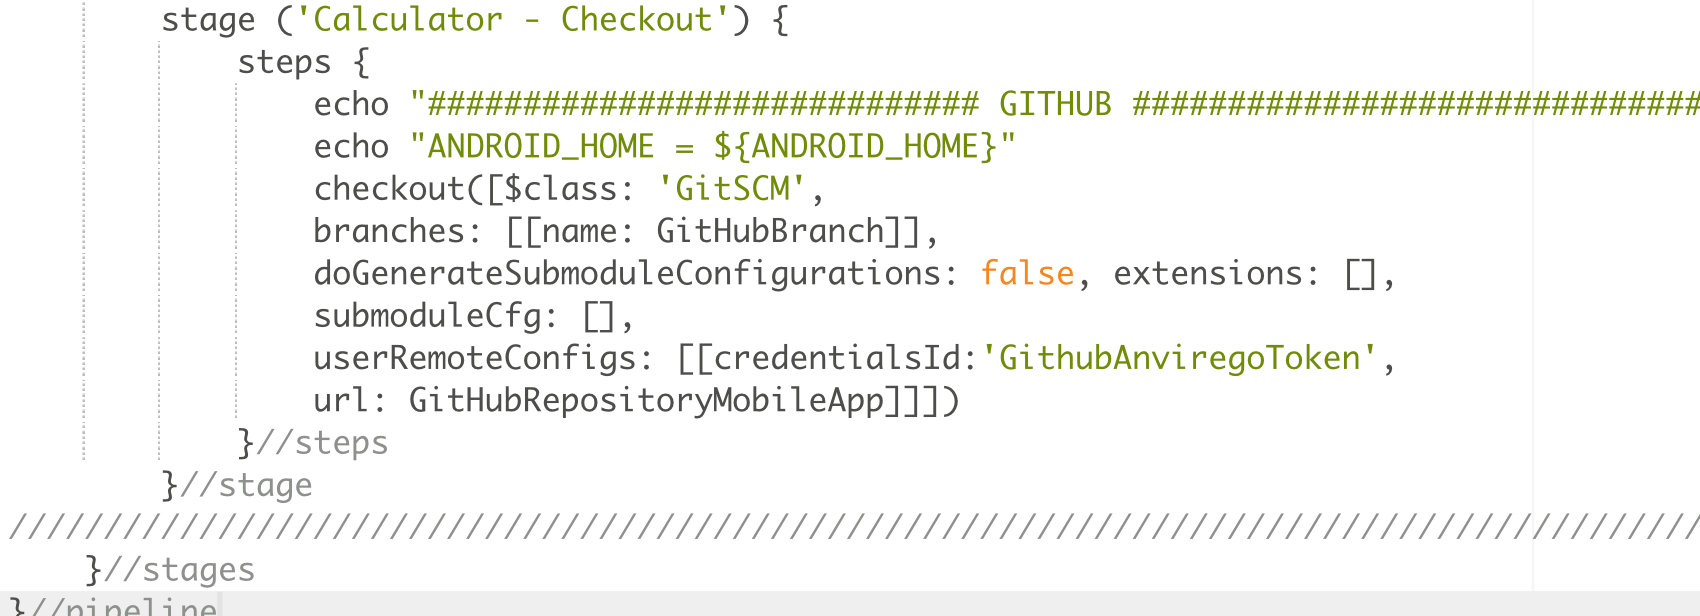
pipe jenking code 02 - Let define the logic under stage (‘Calculator – Checkout’). To authenticate with Jenkins and Github we’re using a “Personal Token” so the repo has to be Public, if you want to have access to a Private repo, you will need to create an SSH Credential in Github. For further information you can go to this link https://docs.github.com/en/authentication/connecting-to-github-with-ssh.
Enlarge

pipe jenking code 03 Step 7.2
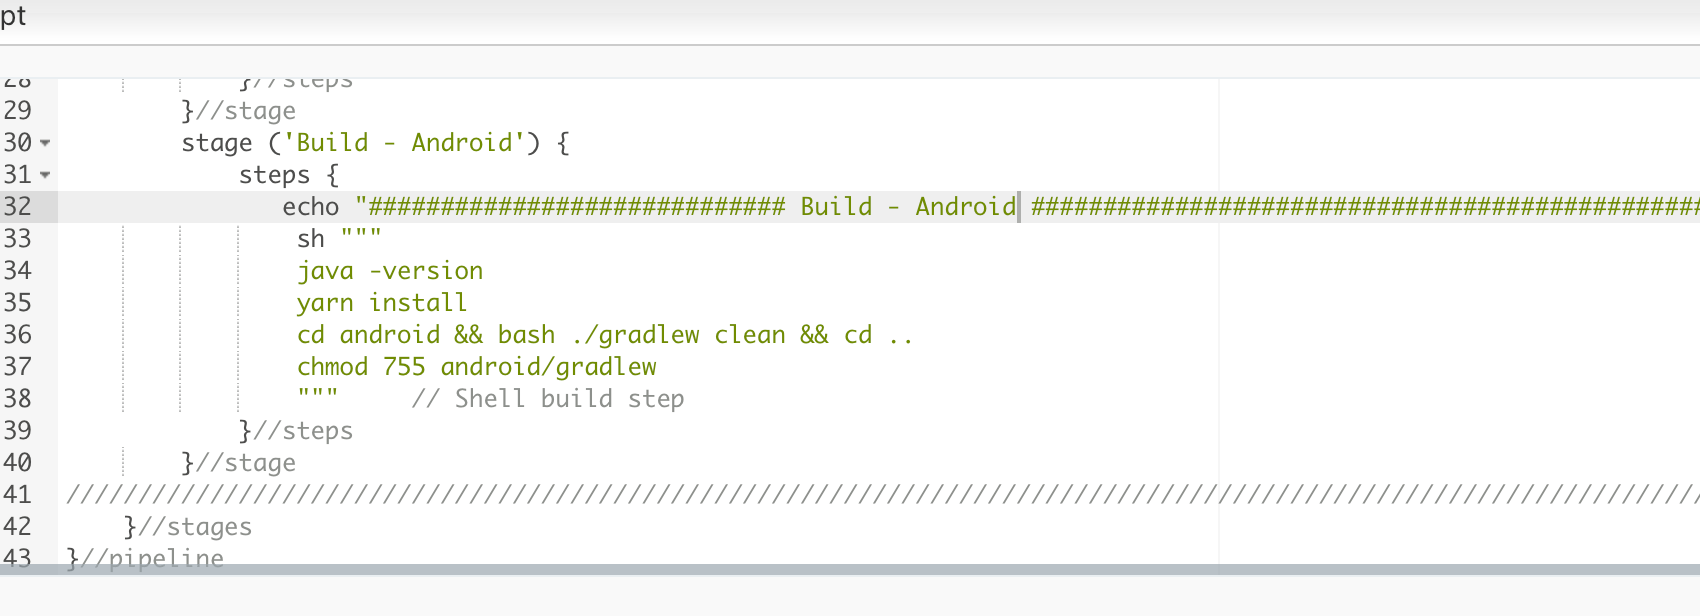
Build – Android
- In the next stage, we need to build the app, for that, we have to follow the steps used to build the app from command.
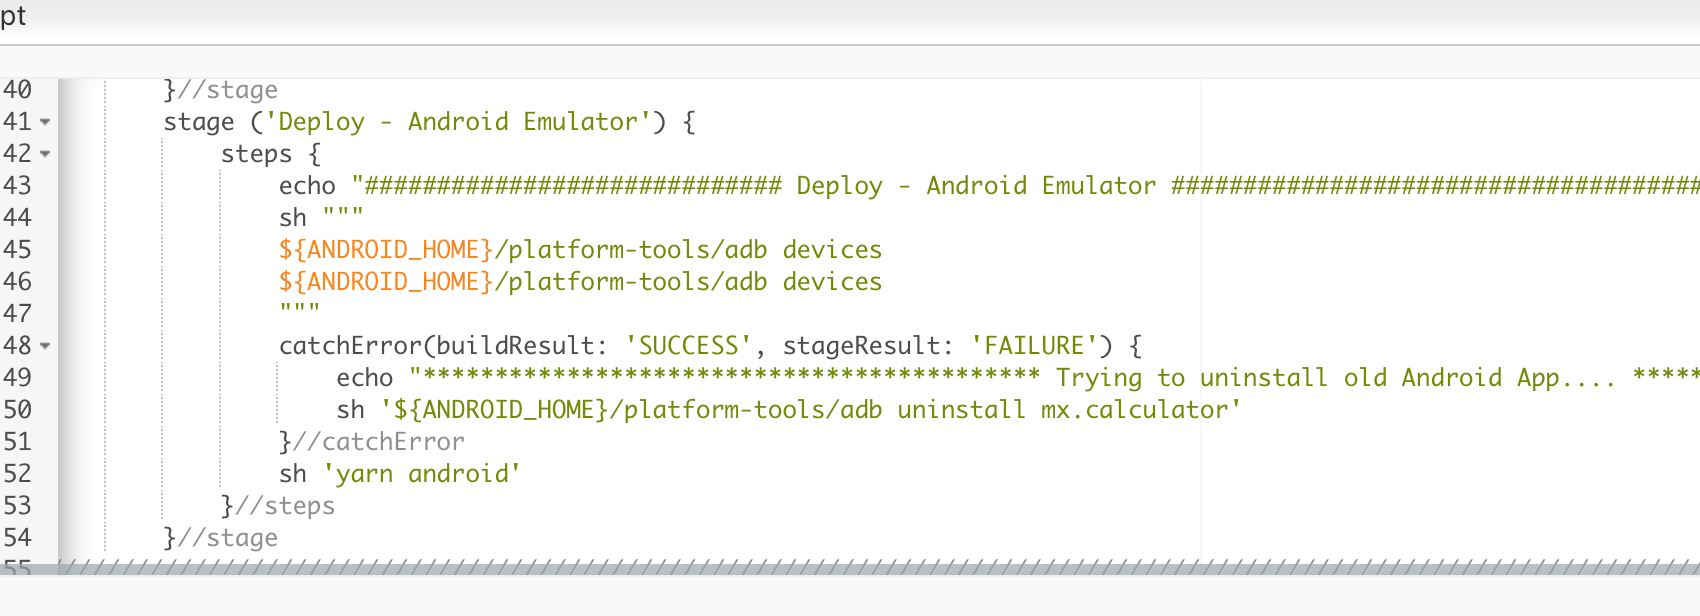
7.2 Deploy – Android Emulator
- In this step, we’re going to finish building the app and deploy it to our Emulator. Inside the cathError{} tries to uninstall the app if it’s already installed (Previous version of the app) and then installs the new version.
Enlarge

Android Emulator Step 7.3
Run Automated Test Cases
- Finally, we’re going to connect to our Test Repository (Local) to run the test cases. This step is going to change depending on how the Automation Framework is made. This automated framework runs using TestNG and Maven.
Enlarge

Run Automated Test To know how to create an Automation Framework using TestNG please go to the post Automating with Appium – Selenium and TestNG
Step 8
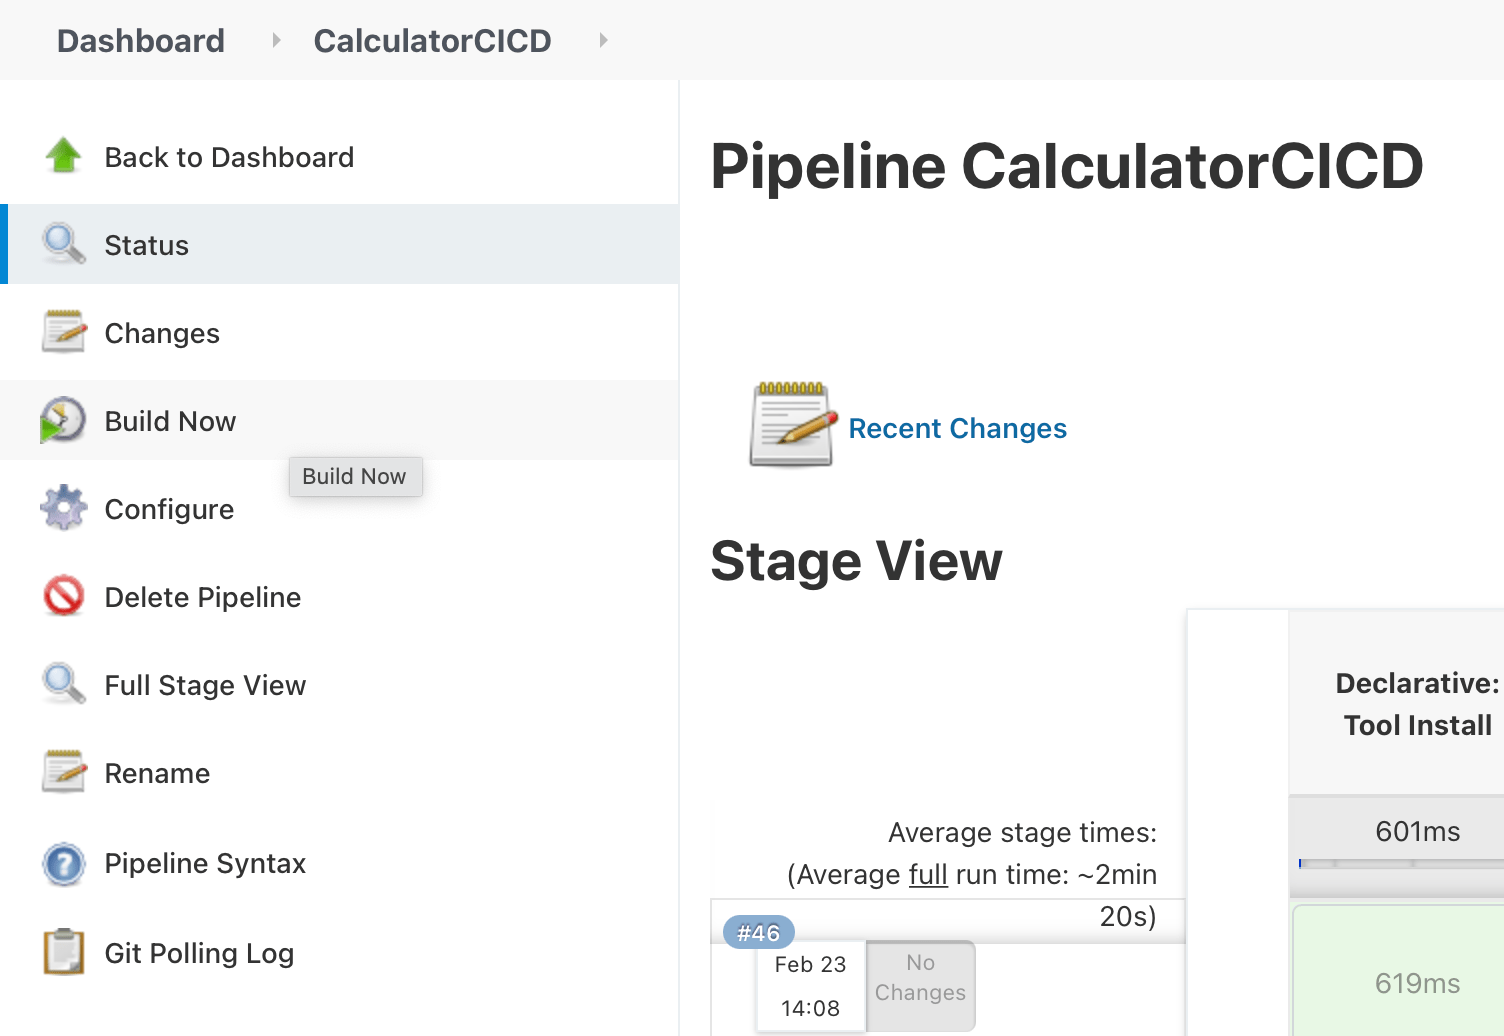
Let’s run our CI/CD Pipeline in Jenkins.
Enlarge

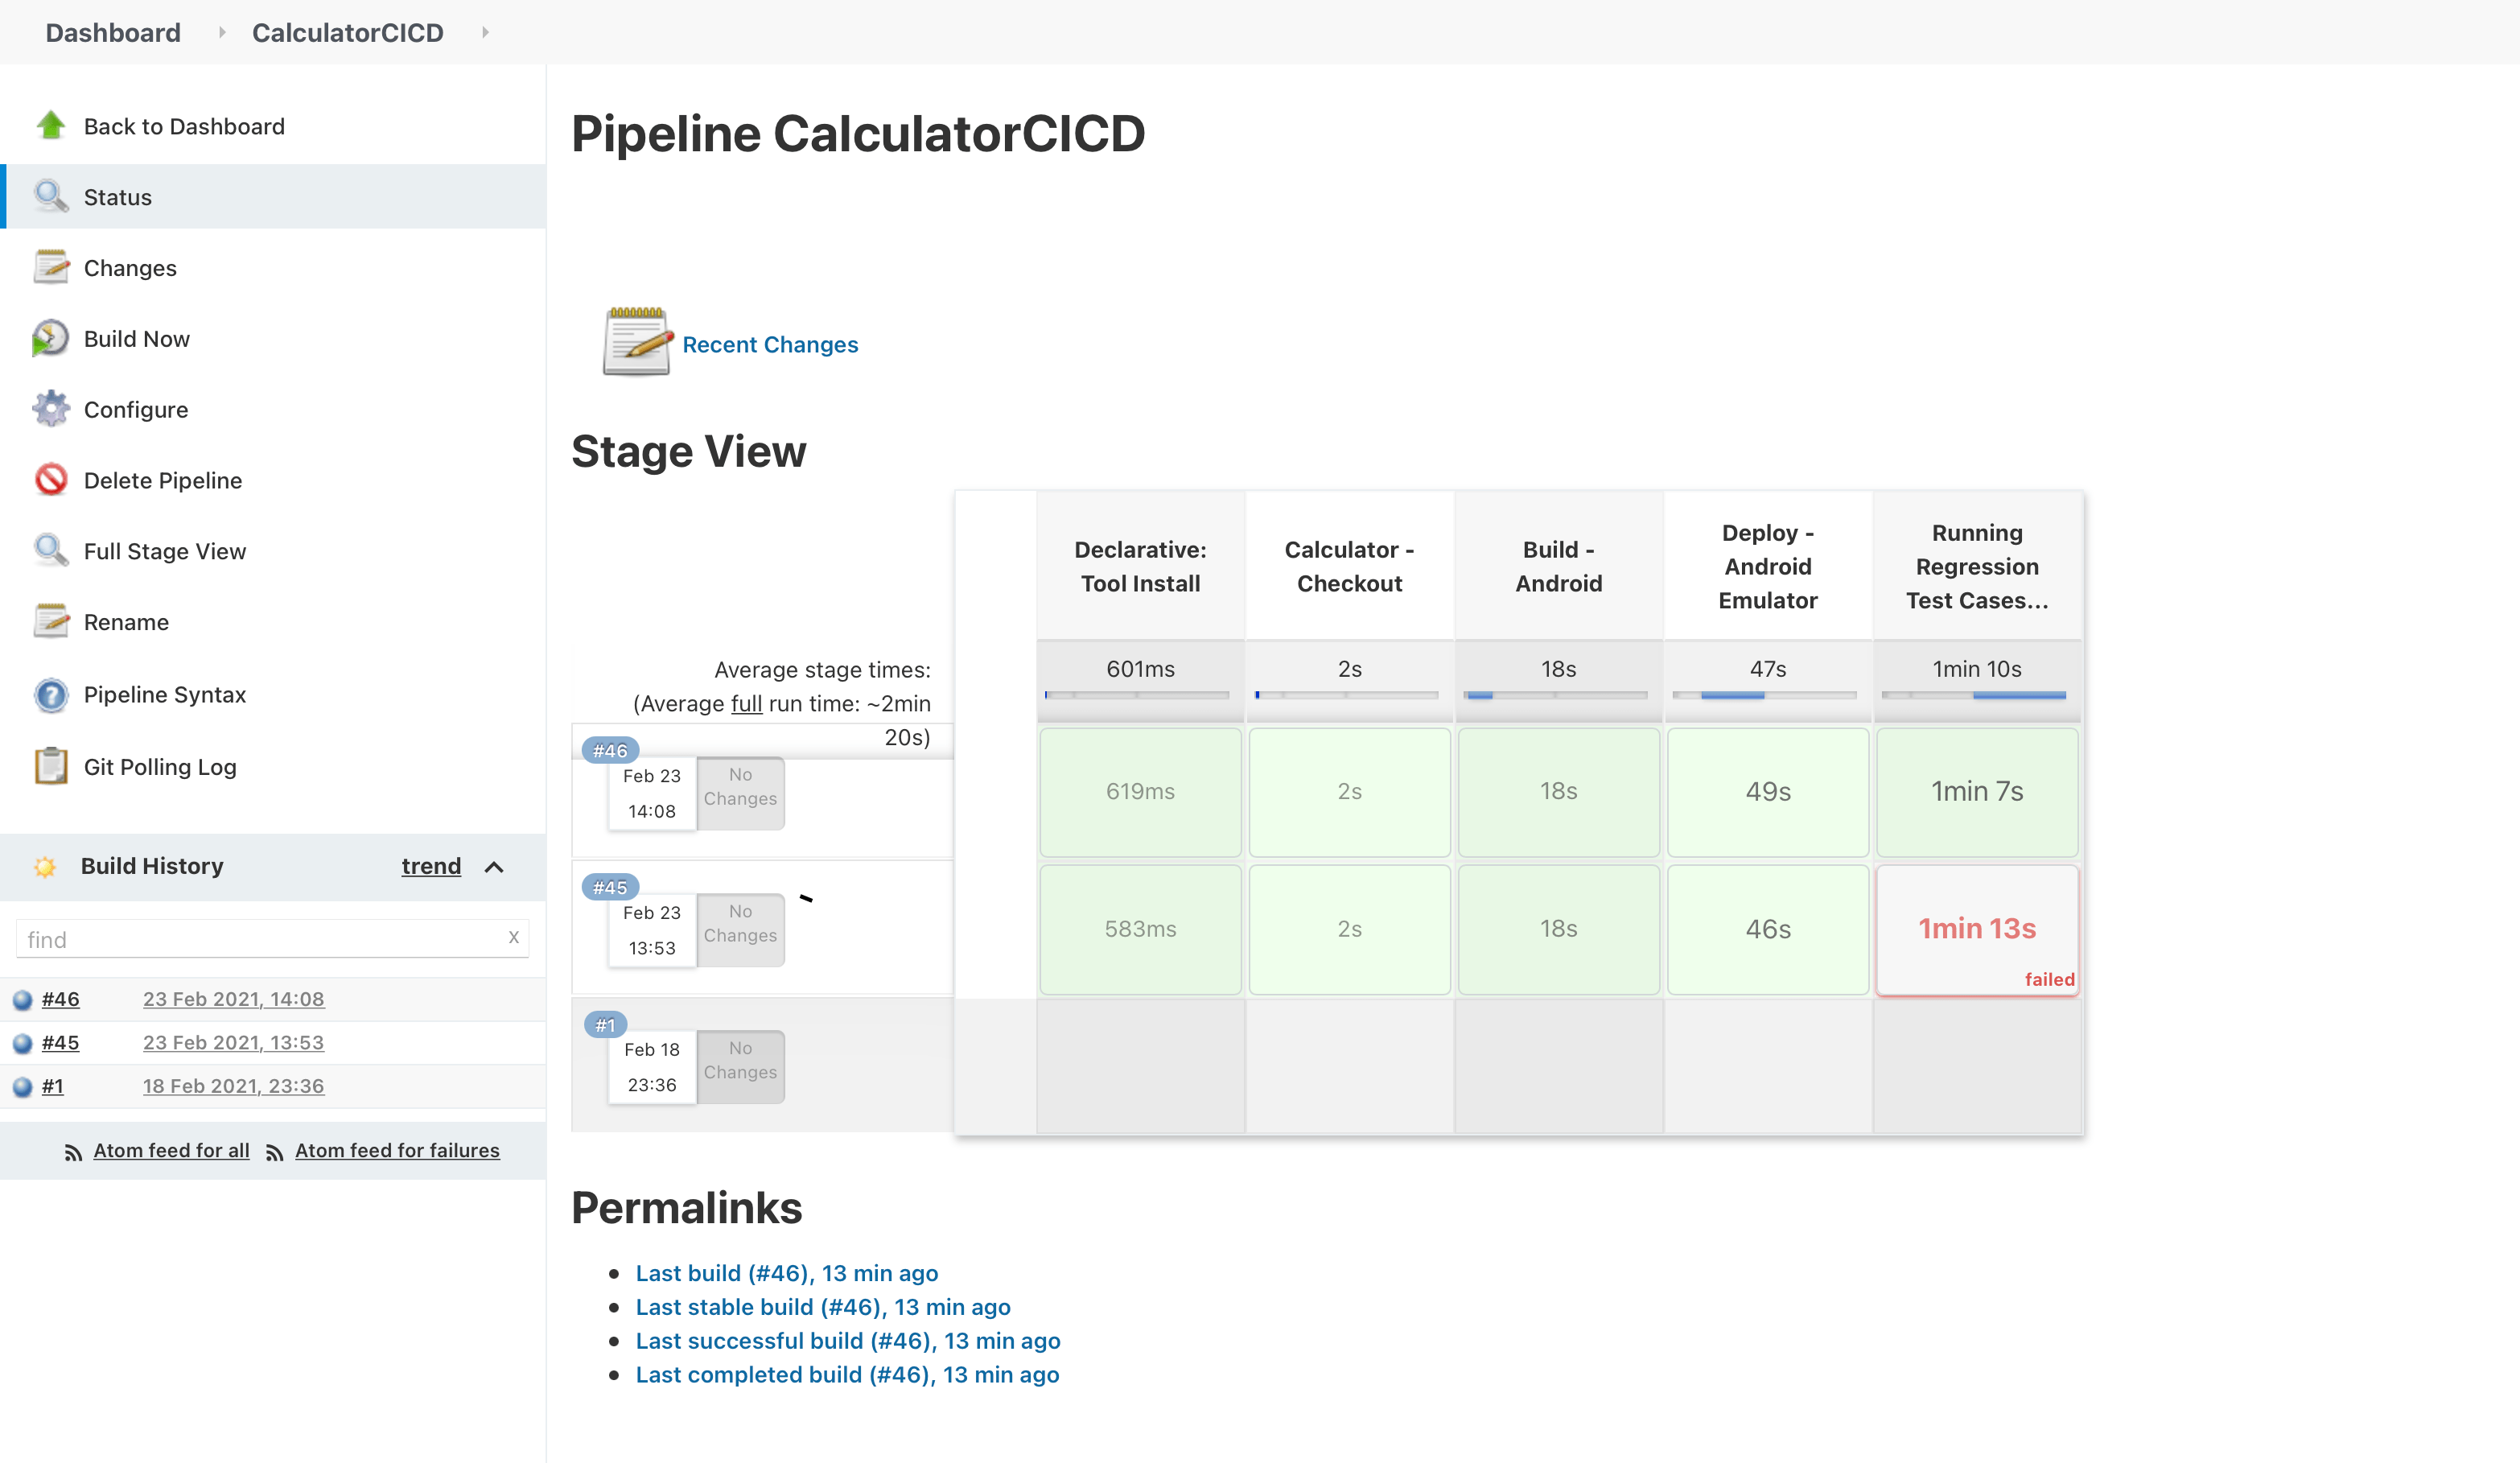
Run Pipeline Jenkins We’re going to see our pipeline results under our project’s dashboard, and the build number.
Enlarge

Run Pipeline Jenkins 02 As you can see create a local pipeline to implement a CI/CD env it’s really easy, from here you can customise your Jenkins pipeline using different plugins according to your needs.
Link of interest:
Automating with Appium – Selenium and TestNG
The Agile Team Approach
What Scrum Master Certification to Choose?
Speed Up Android Testing with TestProject AgentBooks to learn more about:
Any help is welcome to help us keeping this effort alive!
BTC (Bech32): bc1qx6f8nczr5ram6d57svlnsfmk5mhu6lsr9q7mxwBTC: 1DDcWbphm1bKMvWruotNKLSM8ypVaHg5NvETH: DKehWtHnmrf7JTRWpEQ9LtqwqY8HdbdkbUDOGE: 0x58D137fb142D946bCD815f0ded0fa3b3fE5AB3BFAngélica Viridiana Rebolloza
Computing Engineer specialized in Automation, working with different tools for Mobile and Web, using languages, tools, and platforms like JAVA, VBScript, JavaScript, C#, Appium, Protractor, UFT (QTP), Selenium, WinAppDriver, Jenkins among others.
Viridiana also has been working using practices like TDD & BDD under Cascade and Agile approaches.
Some certifications include: ISTQB Foundations Certification, SeU Selenium Certified, ITIL Foundations Certification.
No Comment

Nowadays Mobile Testing is so important to ensure Quality, but one of the most common problems is the speed of an automated test. There’s no point in automating a set of test cases if the execution time of a single Automated Test is more than one or more Manual Tests.
This problem is really common when automating Android Test Cases using Appium and UIAutomator or UIAutomator2, one solution is to use “Espresso Driver” but requires:
- App has to be an Android Native.
- It’s important to have the source code of the App.
But most of the time, Companies doesn’t always provide the source code (Commonly if the App was made by a third-party) or the App’s development is with a No-Native Android App using external frameworks as React-Native.
In these scenarios, there’s also another big problem, not all developers use unique and fast locators while developing an App, whether for Android or IOS like the usage of IDs. Most of the time we have to deal with XPaths, that is not only not recommended, due to the change of the DOM’s structure but also are extremely slow when are processed by Appium’s most common drivers like UIAutomator and UIAutomator2.

Here is where TestProject comes to help, even though I don’t recommend using the UI Interface of TestProject for big Projects because of the lack of maintainability and scalability. Using the UI of TestProject has a lot of dependency on the tool itself because it’s more focused on the “No Coding” Framework. Later on, if there’s a feature or functionality that TestProject doesn’t provide, we’re going to start coding, which it’s going to be more difficult to adapt the code generated by TestProject and adapt it to our necessities.
Anyhow, TestProject comes with an SDK for Java and Python, which easily (there’s almost none of the documentation) to integrate with our code to avoid using Appium and UIAutomator.
- We need to register in TestProject Web Page at https://testproject.io/ and Download the TestProject Agent.

TestProject Agent is available for Windows, Mac OS X and Linux (It’s also available in DockerHub). 2. To be able to run the Agent, we need to get our “Developer Token”, to get it, go to “https://app.testproject.io/#/integrations/sdk”, save this token for later.

3. In a Maven Project, let’s add these new dependencies, “io.testproject”, “org.slf4j” and “org.seleniumhq.selenium”. It’s also important to use the last version of Appium, there’re some libraries problems if the last version of Appium is not used.

This are all the dependencies used in this project. 4. In the class we create our old driver, in this case, it’s “Setup”, let’s remove Appium import and replace it with “io.testproject.sdk.drivers.android.AndroidDriver.

**Modify the Driver.

5. It’s important to add an environment variable called “TP_DEV_TOKEN” with the obtained token in Step 2, under Environment Variables > New System Variable.

6. Let run the TestProject Agent, by clicking on TestAgent.exe.


7. Now let’s run our test and see the performance improvement!. (Don’t forget to change the type of the new Driver in all classes.

In this basic example, there’s no much improvement on the performance and speed of the test, but for complex Apps and Test, the increseace of speed can go up to 50 %. For further information on how to use TestProject consult: “https://testproject.io“.
Links of interest:
Automating with Appium – Selenium and TestNG
The Agile Team Approach
What Scrum Master Certification to Choose?These are some recommended books to learn more:
Any help is welcome to help us keeping this effort alive! PayPal Account BTC (Bech32): bc1qx6f8nczr5ram6d57svlnsfmk5mhu6lsr9q7mxw BTC: 1DDcWbphm1bKMvWruotNKLSM8ypVaHg5Nv ETH: 0x58D137fb142D946bCD815f0ded0fa3b3fE5AB3BF
Angélica Viridiana Rebolloza
Computing Engineer specialized in Automation, working with different tools for Mobile and Web, using languages, tools, and platforms like JAVA, VBScript, JavaScript, C#, Appium, Protractor, UFT (QTP), Selenium, WinAppDriver, Jenkins among others.
Viridiana also has been working using practices like TDD & BDD under Cascade and Agile approaches.
Some certifications include: ISTQB Foundations Certification, SeU Selenium Certified, ITIL Foundations Certification.
No Comment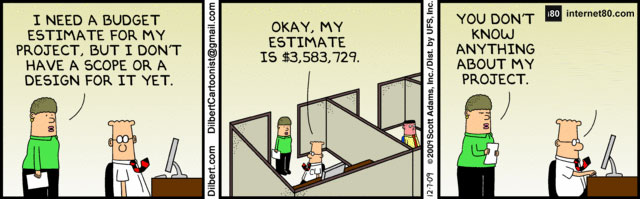

Dilbert’s Estimation The Purpose of Planning
Before talking about the Cone of Uncertainty and estimation lets clarify some things about planning. I constantly tell my friends and co-workers that ideas are not the same as planning. Remember the last time you started something that, for several reasons, you never ended, or that time you said my “plans” are …, but in reality, you never took real actions to execute those “plans” or you just keep putting them off. The main difference between ideas and plans is basically that ideas are vague, aspirational, and desirable; while true planning takes ideas further and establishes goals along with preconceived steps to take that eventually help to estimate, make decisions, and even refine or change the plan.
In the same way that it happens in life, in the software and IT industry in general, estimations and planning are of the utmost importance for the success of any project. The plans are a guide that tells us where to invest our time, money, and effort. If we estimate that project will take us a month to complete and in return, it will generate a million dollars, then we may decide to carry out that project. However, if the same project generates that million dollars in 15 years, then perhaps it is better to reject it. Plans help us to think ahead and know if we are progressing as expected among other things. Without plans, we are exposed to any number of problems.
In my experience as a developer, scrum master, project manager, etc., teams tend to two extremes: They don’t make any plans at all or they try so hard on a plan that they convince themselves that the plan is actually correct. Those who do not plan simply cannot answer the most basic questions, like, when do they finish? or, will it be ready before the end of the year? Those who plan too much, invest so much time in their plan that they fall into assumptions that they cannot confirm, their insecurity grows more and they begin to believe that even by planning more they will achieve more accurate estimations although this does not actually happen. If you feel identified with any of the previous scenarios, in your favor I can say that planning is not easy.
But that plans fail and planning is complicated is not news. At the beginning of a project, many things can be unknown, such as the specific details of the requirements, the nature of the technology, details of the solution, the project plan itself, team members, business context among many other things. But then, how do we deal with these riddles? How do we deal with uncertainty?
The Cone
These questions represent a problem that is already quite old. In 1981, Barry Boehm drew what Steve McConnell later called the Cone of Uncertainty in 1998. The cone shows that in a sequential or “cascade” project that is in the feasibility stage, we will normally give an estimate that is far from reality, in a range of between 25% and 400%. This is for example, that a 40-week project will take between 10 and 160 weeks. By the time we finish obtaining requirements, our estimate will still be between 33% and 50% out of date. At this point, our 40-week project will take between 27 and 60 weeks. Imagine what happens with those projects that are never clear about their requirements.

How to deal with the Cone of Uncertainty?
Buffering (margin of error)
This is to use a percentage of time and/or resources to cushion the effect of materializing risks. You have to be careful, a common reaction is to put double or triple the time to estimate a project, this is NOT buffering, this is “padding” which IS NOT a good practice. Giving a too large number will cause sponsors or clients to resist and not approve your project. Give them a too low number and you will take the risk of running out of time and money. This becomes doubly risky when you are using fixed contracts for your proposal, where there is even more pressure to keep costs down.
It is important that you make use of historical data to compare your current project with other completed projects and obtain reasonable and justifiable numbers in order to get a margin of error or buffering. Include postmortem processes or lessons learned at the end of each project to support your buffering figures in the future.

Estimate in ranges
Something I like about agile approaches for project management is being honest from the beginning and never use closed figures, but be transparent and always use ranges, especially in projects that seek to innovate and try new things where there is a lot of uncertainty. This is for example:
Look. We don’t know how long this is going to take, however, the following is our best bet based on the information we have so far. But if we can do a couple of iterations, we can develop something, evaluate how long it takes, and then have a much better idea of how big this is.
Also, present the best estimate at the moment as a range. This can help project sponsors to decide how much risk they are willing to accept.

Relative estimation
There have been various investigations on how to make estimates of effort and it has been discovered that people are good at estimating the size of something comparing it with a reference (Software Development_Effort Estimation). For example, someone cannot tell you how high the building you live in is, but they can tell you that it is approximately twice the height of the other. You can apply this principle to projects too.

Note. Agile approaches use interesting concepts like Story Points and Ideal Days to make relative estimates.
This is not a foolproof measure, you can still misjudge. But it is certainly good to get initial funding that allows the team to build something and see how long it takes to complete this progress, while simultaneously they learn more about what needs to be achieved, in such a way that this experience is used to reduce the variance of that estimated starting number.

Why is all this happening?
There is no doubt that there is always pressure from the financial sector of organizations to make estimates for an entire project or for a whole year, although these practices ultimately backfire 😀
The best thing to do is to permeate this knowledge in your organization, and constantly remind and communicate that the goal of estimating is not to guess the future, but to determine whether the project goals are realistic or even possible.
Some interesting links:
Part of the list of topics for this post and the idea of the graphic with the little sun 🙂 were partially based on articles from agilenutshell.com
These are some recommended books to know more:
Emmanuel Herrera
IT professional with several years of experience in management and systems development with different goals within public and private sectors.
Emmanuel worked through development and management layers, transitioning from developer and team development leader to Project Manager, Project Coordinator, and eventually to Scrum Master, Product Owner, and Agile Coach.
Some certifications include: PSM, PSPO, SSM.
No Comment

Nowadays Automation has grown so much, that even working in an environment of just ‘Manual Testing‘, it’s really important to ensure and improve the testing process to include a percentage of ‘Automation‘.
It’s important to mention that there’s impossible to cover 100 % of Automated Test Cases because automation has its limits like the abilities and knowledge about coding in a language programming of the Testers, the most used are Java, Python, and JavaScript, which not all actual Testers have.
Another important key is that not all the types of testing are able to automate like look and feel test.
So to keep it simple, if you want to automate a test you have to take the following points at least to start automating:
1. There are Regression Test Cases that you need to run always before a release.
2. There are flows that are just too large but also repetitive.
3. The scope of the Company is implement Continuous Integration (CI).
There are a lot of automation tools for different platforms like Android, IOS, and Web, but also for different scopes like Selenium, Mocha, Jazmine and Espresso.
Let’s start with Mobile (Android & IOS) using Selenium and TestNG with Java.
Create a Maven Project in Eclipse
For the next example, we’ll be using Eclipse as IDE and Maven of libraries management.
1. Create a Maven Project, it’ll look something like this.

2. In Folder “src/main/java“, create the packages “example.enviroment“, “example.pages” “example.test.base” and “example.pages.base“. This packages will contain our code.

3. Now let’s create the class “Setup” for the package “example.environment“, the class “BasePage” for the package “example.pages.base” and the class “BaseTest” for the package “example.test.base”.

4. It’s necessary to add de dependencies to the “pom.xml” file.

5. In Setup class we create de AppiumDriver that will interact with the device and our test.

To Appium to been able to connect your device is necessary to define the next capabilities: - udid = The ID of the device.
- device_Name = Generic name of the device usually just “My Phone”.
- appPackage = Is the name of the application’s package.
- appActivity = Is the name of the main activity (First Page) that the app loads when the app it’s launch.
- noReset = It’s an extra capability to avoid the information of the app got wiped out each time we run a test.
6. Let’s use ADB to obtain the previous capabilities.

By executing “adb devices” we obtain the UDID of the devices and emulator connected to our computer, in this case, is just one device “7MLNW18B29001109”.
To be able to see the device we must enable de “Developer Mode” and the “USB DEBUGGER”.
For the “appPackage” and “appActivity“, let’s type “adb shell” and then “dumpsys window windows | grep -E ‘mCurrentFocus‘”. It’s important to mention that the app to automate needs to be open on the device when we type the last command.
“com.huawei.android.FMRadio“: is the “appPackage” of the app.
“com.huawei.android.FMRadio.FMRadioMainActivity“: is the “appActivity” of the app.Create our First Test using TestNg
1. In class “BaseTest” we are going to call our driver (Setup class) each time a test is executed that’s why it is going to be called in BaseTest is going to be base for all the tests. With the tag @BeforeMethod, we assure that the Setup class and its method are always called before our tests. Also with the tag @AfterMethod we are going to set the close of the objects open, each time a test finishes. The tag @Parameters is going to help us to send the values from the xml file of TestNG.

2. Now let’s run Appium to inspect the elements of our app.

The host is our computer it can be assigned as 0.0.0.0 or 127.0.0.1 is the local host.
The port can be changed if it’s occupied or we want to run tests in parallel (I recommend separate the ports at least 10 units to avoid conflicts).
Now we have Appium Service running, we can use this console to debbug or use the Eclipse console. 3. Let’s click “Start inspection Session“.

4. Insert the next capabilities, click the button “Start Session“, and then we’ll see the app main activity, in this example the “Radio app“.


5. This main activity it’s going to be the “Principal Page“.

We are going to use “Page object Model” (POM) and “Page Factory” for the implementation of the test.
POM is a framework to organize the elements of an application in a way that it’s easier to understand and to maintain via “Pages”, in each page (Class) it’s defined the elements of only that page, in this example, we are only going to have two pages, the “Principal Page” and the “Radio Channels Page“.6. Let’s inspect and get the locators of the elements of “Principal Page“.

The most common locators are “ID” and “XPath“.
The ID locator is a unique locator that avoids having issues like duplicate elements if it is available de ID locator is much better to use it always.
The XPath locator depends on the DOM of the app source, so it’s not recommended to use it because it can change and also affects the performance because it has to go through all the DOM to find an element.
There are other locators like “name“, “class” and “text“, this locator it’s better to use them as a complement of each other because it’s possible that two or more elements have the same name, class, and text.
In this example:
The previous buttons ID is: “com.huawei.android.FMRadio:id/iv_prev“.
The next button ID is: “
com.huawei.android.FMRadio:id/iv_next“.
The Power button ID is: “com.huawei.android.FMRadio:id/btnPower”. 
The stations button menu ID is: “com.huawei.android.FMRadio:id/action_stations“. 7. Now let’s create our methods in the class “PrincipalPage“, create a package called “example.pages.java” and the class “PrincipalPage“.


The first part of the PrincipalPage consists of the following: - This class extends BasePage that will have the methods used by all the pages.
- In the Class’s Constructor it’s defined the “driver” that we create in Setup.
- PageFactory.initElements: Initialize the elements of the page, this is the main function of Page Factory, at the moment it’s instantiated the class PrincipalPage all the elements of the page are initialized.
- The structure to create these page elements are by the tag @FindBy and the type of locator to use like id, XPath, class, name etcetera; and the value of the locator.
Finally, it only needs the name of the element in our case a WebElement.

The last part is the definition of the methods aka actions of the elements.
In these examples the actions of each element are just clicks, this “Click” method/action is defined by Selenium as other many actions like sendKeys, clear, getText, getLocation, and many others.
The failedMethod and staticWait are not declared on this page because it comes from BasePage.8. Let’s define the actions in BasePage.

In this class is defined the methods “failedMethod” that prints the exceptions encountered on each method of the pages, and the method “staticWait” it converts from miliseconds to seconds, is a static wait to see the execution of the test, without it it’s not possible to see the actions. 9. Let’s create the last package where our Test Suites will be called as package “example.test.java” and class “FirstTest“.

10. The main test script resides in FirstTest.

This is the script of the test, where are just called the methods to make the actions. 11. Finally, let’s create the “PossitiveTests.xml” that TestNG will use to execute the tests and also is where the input parameters are defined.

The parameters are the input data of the test in Setup.
The class name is composed: package_name.class_name.
The methods include name is composed : method_name_of_FirstTest_class12. Lets just run it!

Right click on “PossitiveTests.xml“, select “Run As” and then “TestNG Suite”.
If there’s a problem finding this option be sure to have installed TestNG on the IDE, for more information about the installation of TestNG refers to https://testng.org/doc/download.html.
These are the result displayed in TestNG.
Links of interest:
Speed up Android Testing with TestProject Agent
Upload a File With HTML5
The Agile Team Approach
What Scrum Master Certification to Choose?These are some recommended books to learn more:
Any help is welcome to help us keeping this effort alive! PayPal Account BTC (Bech32): bc1qx6f8nczr5ram6d57svlnsfmk5mhu6lsr9q7mxw BTC: 1DDcWbphm1bKMvWruotNKLSM8ypVaHg5Nv ETH: 0x58D137fb142D946bCD815f0ded0fa3b3fE5AB3BF
Angélica Viridiana Rebolloza
Computing Engineer specialized in Automation, working with different tools for Mobile and Web, using languages, tools, and platforms like JAVA, VBScript, JavaScript, C#, Appium, Protractor, UFT (QTP), Selenium, WinAppDriver, Jenkins among others.
Viridiana also has been working using practices like TDD & BDD under Cascade and Agile approaches.
Some certifications include: ISTQB Foundations Certification, SeU Selenium Certified, ITIL Foundations Certification.
2 Comments

¿Qué es Crunchyroll?
Antes de entrar en definiciones me gustaría recordar y compartir con los lectores más jóvenes, que hasta hace un par de décadas, las personas que gustaban del anime tenían que estar sujetas a los camprichos de la compañías importadoras, quedar bien con el amigo que conseguía ilegalmente el video cassette VHS o Beta con la codiciada película, serie u OVA. Años más tarde las cosas mejoraban, pero había que “exprimir” la última gota de ancho de banda disponible sólo para descargar fragmentos de nuestras series o películas favoritas, o dejar descargando por noches enteras y rezar para que nadie hablara por teléfono. Por fortuna los servicios de streaming de video han venido a cambiar todo eso.
Crunchyroll es un servicio de streaming de vídeo de pago global para anime japonés, aunque también contiene animes chinos y coreanos. Es una plataforma de que transmite anime legal y licenciado a distintos países de toda América. Lo más destacable de la plataforma es su rápida emisión de episodios a sólo una hora después de su transmisión en Japón.
¿En dónde puedo usar Crunchyroll?
Crunchyroll, al igual que otras plataformas de vídeo como Netflix, cuenta con una gran variedad de dispositivos donde se puede ver su contenido que ofrece mediante aplicaciones las cuales se encuentran los siguientes sistemas como Android, Iphone, Xbox, Playstation, etc.
La propuesta de Crunchyroll no es muy original en terminos tecnológicos, ni tiene porque serlo, usted sólo debe pagar mensualmente y tendrá acceso a un amplio catálogo animaciones, incluyendo algunos videos de eventos que por lo general son del gusto del aficionado al anime.
La plataforma ha logrado acuerdos con algunos estudios de anime muy populares como Funimation, lo cual garantiza tener varios éxitos como Dragon Ball, One Piece o Shingeki no Kyojin entre otros, disponibles dentro de la plataforma. Pero si desea experimentar con animes menos populares, puede probar un interesante botón que reproducirá aleatoriamente alguno de los animes disponibles.
¿Hay inconvenientes con Crunchyroll?
Desafortunadamente no encontraremos todos los animes o mangas a los que podría estar acostumbrados el fan hardcore más exigente, ya que, como mencioné, transmite los que son producidos por grandes animadoras en Japón o son más populares. Inclusive títulos de antaño que algunos aficionados de vieja escuela quisieran ver, no se encuentran actualmente disponibles, aunque quizá probablemente en algún futuro se encuentren, ya que la plataforma se actualiza constantemente en otros países de habla no hispana.

La plataforma aun utiliza reproductores Flash y no HTML5, lo cual puede ser un inconveniente para algunos navegadores, pero es funcional y no tuve realmente ningún problema durante la reproducción. El reproductor cuenta con las opciones que comunmente vemos en servicios de streaming como control de volumen, pantalla completa, selección de calidad, autoplay, selección de idioma en algunos casos, subtítulos, y selección de calidad.
Competencia de Neflix, Amazon Prime Video y Hulu
Respecto a Netflix, Amazon Prime Video, Hulu y otros, que como ya sabemos cuenta con una oferta de contenido muy amplia y Crunchyroll no compite con ellos en términos de películas, series y producciones exclusivas, pero lo que si es interesante es que estas plataformas han puesto atención al anime, ofreciendo contenidos que no están en Crunchyroll y son muy interesantes.
Netflix cuenta con un catálogo de anime muy moderado pero interesante. Amazon Prime Video está haciendo lo propio con un muy humilde catálogo pero con buena material el cual yo creo que mejorará con el tiempo. Hulu no está disponible en países de habla hispana, pero lo menciono porque su catálogo es bueno y más amplio que el de Netflix y Amazon Prime Video, lo cual creo que indica una tendencia interesante.
Hoy en día por lo menos, se puede decir que Crunchyroll tiene más amplitud de títulos en lo que anime respecta, y se lleva por muchos a la competencia legal, y si usted es muy fan del anime, la decisión es fácil…por ahora.
Otras funcionalidades
La interfaces de la plataforma, no es la mejor que he visto, sin embargo tiene algunas cosas destacables:
- Cuenta con una opción para marcar animes de interés, pero que quieres dejar para después.
- Ya lo mencionaba antes, pero el ícono con forma de dado, lleva a una serie al azar, lo cual ofrece agradables sugerencias que de otro modo no hubiera visto.
- Reanudar la reproducción de un anime que hubo que interrumpir desde el minuto donde sucedió la interrupción en cualquier otro dispositivo es algo que no es nuevo, pero es útil.
- Para los que son muy susceptibles a los spoilers, los comentarios con estos se pueden ocultar.
Conclusiones
Crunchyroll es un buen sitio si lo que quiere es ver anime en calidad HD, con buenos subtítulos, con acceso en dispositivos móviles y con capítulos que se estrenan a tan solo 1 hora de su transmisión en Japón. Además de que hay personas que opinan que es una buena forma de apoyar, para que más anime llegue a los países hispanohablantes.
Por otro lado, no es un servicio perfecto y a muchos puede no agradarles demasiado por dos razones: La primera es porque es un servicio de paga; y en latinoamerica no todos estamos acostumbramos a pagar por algo que vemos gratis por otras fuentes. La segunda razón es por su catálogo, este no es el más amplio, y sin duda le faltan animes; sobre todo los antiguos.
Creo que los aficionados al anime deben considerar que un servicio como este hasta hace sólo unos años era completamente inpensable, por lo que es de agredecer el tener esta propuesta a nuestro alcance. Desde luego que la plataforma tiene espacio para mejorar, pero aun considerando sus posibles inconvenientes, es un servicio muy recomendable.
Quizá también le interese:
Ponte Trebel, la app que compite con torrentes

🙂
No Comment
¿Qué es una VPN?
El Wi-Fi público gratuito en la cafetería podría no ser tan seguro como parece. Si te unes a la red, podría interceptar e inspeccionar todo tu tráfico web, enviando esa información a fuerzas malévolas. Su ISP, o el ISP conectado a esa red Wi-Fi pública, también desea espiar sus actividades web para vender esa información a los anunciantes. Es por eso que necesitas una VPN o Red Privada Virtual (Virtual Private Network) si desea evitar esos riesgos.
Cuando su VPN está activa, su tráfico web viaja a través de un túnel encriptado a un servidor administrado por el servicio VPN. Eso mantiene su información a salvo de los ladrones de datos con redes falsas. También ayuda a protegerse contra los ISP que venden metadatos anónimos sobre sus hábitos web. Cuando su tráfico sale a la web a través del servidor VPN, parece que tiene una dirección IP en la ubicación de ese servidor. Esto protege su identidad real mientras navega por la Web.
Las VPN a menudo son utilizadas por periodistas o personas que viven en países con políticas restrictivas hacia Internet. También son una forma útil de suplantar su ubicación para necesidades menos serias. El contenido bloqueado por región, como los eventos deportivos o las películas de Netflix que están disponibles en algunos países, pero no en otros, se pueden ver con una VPN porque el servicio suplanta su ubicación. Netflix y otros servicios de transmisión de video pueden ser bastante agresivos para bloquear el uso de VPN como resultado.
Precios y características
TunnelBear es uno de los pocos proveedores que he revisado que ofrece un servicio de VPN gratuito. Sin embargo, el nivel TunnelBear gratuito lo restringe a solo 500 MB de datos por mes. Puede ganar más datos al tuitear sobre la empresa, lo que puede aumentar su límite a un total de 1 GB por un mes. La versión gratuita de HotSpot Shield Elite le sirve anuncios en su lugar, pero no restringe el uso de datos.
Puede pagar TunnelBear utilizando las principales tarjetas de crédito o transacciones BitCoin anónimas.
Con una cuenta gratuita o una cuenta de pago, puede usar hasta cinco dispositivos en una sola cuenta TunnelBear. Eso es promedio para VPN, aunque NordVPN ofrece seis, de fábrica. Tanto TorGuard VPN como KeepSolid VPN Unlimited ofrecen ranuras adicionales para más dispositivos a tarifas mensuales.
TunnelBear tiene software de cliente para Windows, macOS, iOS y dispositivos Android. También ofrece complementos de navegador para Chrome y Opera. También me gustaría ver una extensión para Firefox, pero no tuve tanta suerte hasta ahora. El uso de un complemento de navegador VPN solo ejecuta los datos de su navegador a través del servicio VPN, permitiendo que sus otras aplicaciones funcionen sin restricciones, pero también sin protección. Es una característica que me gusta, ya que ofrece protección para casi cualquier dispositivo que pueda ejecutar un navegador. No es, sin embargo, un sustituto de la protección VPN completa del servicio, que es lo que probé.
Protocolos VPN
Las VPN han existido por mucho tiempo y, como resultado, hay una gran cantidad de formas de crear una conexión VPN. TunnelBear protege su conexión con el protocolo OpenVPN para Android, macOS y Windows. Este es mi protocolo preferido, ya que es más nuevo, más rápido, más seguro y de código abierto.
La aplicación TunnelBear iPhone, mientras tanto, usa el protocolo IKEv2, que es una buena opción para esa plataforma. No puede cambiar qué protocolo utiliza TunnelBear en su aplicación, pero eso está bien para la mayoría de los usuarios.
Servidores y ubicaciones de servidores
Cuando reviso las VPN, considero cuántos servidores ofrece, dónde están ubicados esos servidores y cuántos de esos servidores son virtuales. El primer punto es simplemente un reflejo de la solidez del servicio VPN. Es cierto que una empresa más grande que haga más negocios probablemente tendrá más servidores, y también es cierto, que las empresas harán girar los servidores hacia arriba y hacia abajo según sea necesario. Pero mientras más servidores proporcione una empresa, es menos probable que tenga que compartir ancho de banda con muchos otros usuarios en el mismo servidor.
La distribución de servidores de una VPN también es importante. Cuantas más ubicaciones de servidor tenga un servicio, más opciones tendrá para suplantar su ubicación. Una gran diversidad geográfica también significa que es más probable que encuentre un servidor cercano al viajar al extranjero, que probablemente será más rápido y resistente que uno distante.
Los servidores virtuales son servidores definidos por software. Eso significa que varios servidores virtuales pueden ejecutarse en un solo servidor físico. También significa que un servidor virtual puede configurarse para comportarse como si estuviera ubicado en un país, cuando en realidad está en otro. Si le preocupa qué países específicos manejan sus datos, desea saber cuántos servidores virtuales usa una VPN y dónde se encuentran realmente.
Su privacidad con TunnelBear
La mayor fortaleza de TunnelBear, además de sus poderosos usos, es su postura sobre la privacidad. Tiene una de las mejores políticas de privacidad que he visto, explicando en gran detalle y con un lenguaje sencillo, exactamente lo que recopila y por qué. También incluye secciones de discusión, donde la compañía explica cómo llegó a una decisión en particular. Por ejemplo, una sección de extracción explica cómo la compañía solía reunir los nombres de los usuarios para personalizar las comunicaciones, pero decidió que no era necesario recopilar o almacenar esta información y que su pérdida podía poner en riesgo a los clientes.
La política de privacidad de TunnelBear también establece claramente que no almacena las direcciones IP de quienes visitan el sitio web de la compañía, la dirección IP de los usuarios al conectarse, las consultas DNS de los usuarios mientras están conectadas o cualquier información relacionada con otras actividades de los usuarios mientras usan TunnelBear. Esto incluye otras aplicaciones que pueda estar ejecutando u otros sitios que pueda visitar. Al no tener esta información en primer lugar, no se puede obligar a la compañía a entregarla a la policía, o perder el control de la misma en una violación de datos.
Notablemente, TunnelBear dice que no divulgará, venderá o intercambiará información personal con compañías de terceros. Ese es un compromiso notable que no todas las compañías VPN hacen. TunnelBear utiliza terceros para el procesamiento de pagos, pero esto no es inusual. Además, un representante de la compañía me confirmó que la única fuente de ingresos de TunnelBear son las suscripciones, no la minería de datos o la reorientación de anuncios.
La compañía tiene su sede en Canadá, y un representante de la compañía explicó que no está sujeta a ninguna ley obligatoria de retención de datos.
TunnelBear tiene la notable distinción de haber completado una auditoría de código independiente y publicado públicamente los resultados. El objetivo de una auditoría de código es encontrar fallas potenciales en el diseño de la aplicación, por lo que esta es una buena noticia. Este tipo de evaluaciones de terceros no siempre se llevan a cabo o se hacen públicas, y me alegra ver que TunnelBear considera que la privacidad y seguridad son lo suficientemente serias como para tomarse el tiempo de someterse a la auditoría.
Manos a la obra con TunnelBear
Anteriormente, la aplicación TunnelBear utilizaba una interfaz útil pero anticuada que dependía en gran medida de metáforas visuales antiguas como conmutadores y diales. La compañía se ha alejado de este enfoque y me gusta el resultado. El nuevo cliente es elegante y sutil, construido alrededor de un mapa central del mundo que muestra las ubicaciones de servidores de la compañía. Seleccione la ubicación que desee desde el menú de arriba, active la protección y recibirá una animación sorprendentemente suave de un oso que se aleja de su ubicación actual. Las aplicaciones móviles usan el mismo diseño, por lo que tendrás una experiencia familiar sin importar a dónde vayas con TunnelBear.
A diferencia de otras aplicaciones Windows VPN, TunnelBear incluye un modo minimizado. Esto es más funcional que el atajo de la barra de tareas pero menos gráfico que la aplicación en toda regla.
TunnelBear tiene una actitud irónica que aporta a todos los aspectos de su aplicación. Es encantador y colorido, sin ser dominante ni empalagoso. Por ejemplo, cada vez que se conecta a un servidor VPN, aparece una notificación con un oso con un sombrero representante de ese país.
TunnelBear no tiene muchas ubicaciones entre las que elegir, pero un cuadro de búsqueda de ubicación sería una excelente adición, como lo sería una lista de servidores, con información básica, como carga y tiempo de ping. NordVPN hace un excelente trabajo al transmitir estadísticas vitales sobre sus servidores VPN, y ofrece servidores especializados para conectarse a Tor, transmitir video y más.
La aplicación TunnelBear incluye algunas características avanzadas, como el Modo Vigilant. Esto evita que los datos se escapen a través de su conexión a Internet durante los segundos que demora TunnelBear en volverse a conectar en caso de que se desconecte. GhostBear tiene como objetivo eludir el bloqueo de VPN al disfrazar el tráfico VPN como tráfico HTTPS normal.
Otra característica de seguridad importante es Trusted Networks. Esto es básicamente una lista blanca de redes Wi-Fi en las que confías. Cuando esta función está activada, TunnelBear se conectará automáticamente si la red Wi-Fi en la que se encuentra no es una de las redes en su lista blanca. Me gusta esta característica, pero otras compañías que incluyen una característica similar la enmarcan más claramente al decir que la VPN se conectará en redes que no son de confianza. Aún así, hace el trabajo.
TunnelBear y Netflix
Si bien nadie puede saber que eres un perro en línea, las empresas de transmisión como Netflix sí toman nota de tu ubicación. Eso se debe a que las empresas a menudo tienen que respetar las restricciones geográficas con el contenido que proporcionan. Por ejemplo, si vive en los EE. UU., Debe pagar una suscripción a CBS All Access para ver Star Trek: Discovery. Si vives fuera de EE. UU., Puedes mirar el programa a través de Netflix. Esta es la razón por la que Netflix en particular ha sido tan agresivo al bloquear usuarios de VPN.
Afortunadamente, no tendrás esos problemas con TunnelBear. No tuve problemas para acceder a Netflix desde mi teléfono Android mientras la VPN se estaba ejecutando. También funcionó sin problemas en una computadora que utilizaba el complemento Chrome VPN de TunnelBear.
Después de leer los Términos de uso de Netflix, no tengo claro si la compañía considera que es una violación usar una VPN para cualquier propósito. La sección 6c de los Términos de uso dice que Netflix intentará verificar su ubicación y que solo se le garantiza el acceso al contenido dentro de su país de residencia principal. Lo que está claro es que a Netflix no le gustan las VPN.
Más allá de VPN
Cuando la mayoría de las compañías VPN incluyen bloqueo de anuncios, tienden a hacerlo a nivel de red, bloqueando los anuncios incluso antes de que lleguen a su computadora. TunnelBear no hace esto. En cambio, la compañía lanzó discretamente un complemento de navegador independiente llamado Blocker. Conserva los osos y el encanto de la marca TunnelBear, y está sorprendentemente bien pulido para un plugin de Chrome.
Cuando visita un sitio, la cantidad de anuncios bloqueados aparece en la boca del icono del pequeño oso, como si los hubiera arrancado del cuerpo aún caliente del sitio web. Al hacer clic en la flecha al lado de la sección Bloqueo, se expande una lista de todos los elementos bloqueados. Me gusta esto, ya que te permite bloquear algunos elementos en un sitio web, pero no todos. Podría, por ejemplo, bloquear rastreadores que desafían la privacidad y, al mismo tiempo, permitir la publicación de anuncios. TunnelBear Blocker también maneja elementos más complejos, como etiquetas ultrasónicas. Estos son tonos de alta frecuencia que se reproducen durante los anuncios y que las aplicaciones reciben para indicarles a los anunciantes que se está viendo su anuncio.
Los controles finos, como las listas blancas del sitio, son especialmente importantes con los bloqueadores de anuncios. Algunos bloqueadores rompen elementos en los sitios, lo que los hace prácticamente inutilizables. A veces, aguantar algunos anuncios es el precio a pagar para ver un sitio en funcionamiento.
Del mismo modo, TunnelBear lanzó un administrador de contraseñas llamado RememBear. Actualmente, la compañía ofrece clientes RememBear para Android, iOS, macOS y Windows. Es gratis para usar en un dispositivo, pero si desea la conveniencia de sincronizar en todos sus dispositivos. Descubrimos que es un buen servicio que maneja los conceptos básicos de una manera divertida y caprichosa, con muchos osos animados. Sin embargo, carece de funciones avanzadas de administración de contraseñas, como autentificación de dos factores, uso compartido seguro y herencia de contraseñas.
Prueba de velocidad
No importa la VPN que elija, verá un impacto en su experiencia de navegación web. Eso es porque estás agregando algunos aros adicionales para que tu tráfico salte. Las velocidades son una preocupación perenne para los consumidores, pero procuro y desanimo a cualquiera de usar solo los resultados de velocidad como un punto de referencia para elegir un servicio VPN.
En el mundo a menudo osificado y excesivamente técnico de los productos de seguridad, es alegre y simpático. La compañía siempre ha puesto especial énfasis en el diseño y la experiencia del usuario, que es muy necesario en el mundo de las VPN específicamente y en general en la seguridad digital en general. TunnelBear hace todo eso sin dejar de ofrecer un producto seguro y simple con una red troncal robusta. Es una gran compra, y una que se ha vuelto más convincente desde la última vez que la evaluamos. Lo que es más importante, tiene una política de privacidad clara y sólida (puede estar seguro de que no se cansará de estos osos).
Sin embargo, no es un producto perfecto. El servicio carece del tipo de diversidad geográfica amplia que nos gusta ver. Tampoco tiene servidores especializados, aunque podría argumentarse que evita estos a favor de la simplicidad. Y aunque no creemos que los puntajes de las pruebas de velocidad sean la mejor medida del valor de un servicio VPN, los resultados de las pruebas de TunnelBear están significativamente por debajo del promedio en algunas categorías.
Lo que TunnelBear hace bien es crear un producto de seguridad que realmente usará. Es un producto potente y asequible.
Otras ligas de interés:
Ponte Trebel, la app que compite con torrents
Google Wallet y Android Pay Son Uno, son Google Pay
🙂
No Comment
Descrubriendo Trebel
En 2015, en un viaje relámpago a EU, tuve oportunidad de probar un poco Trebel Music, la cual a primera vista, parecía similar a la versión gratuita de Spotify. Mi primera impresión fue que en un mundo dominado por Apple Music, Play Music y Spotify a este jugador no le esperaba un vida tan larga.
Casi al final de ese viaje me topé con un grupo de estudiantes norteamericanos de entre 16 y 18 años de edad y noté que muchos de ellos usaban la misma app. Mi curiosidad creció suficiente como para acercarme un grupo de algunos de esos estudiantes y preguntar porque usaban esa app, y los muchachos me dijeron:
Oh! se llama Trebel, esta buena porque no tienes que pagar suscripción y puedes escuchar la música offline.
Esa respuesta llamó mi atención y de inmediato comencé a probarla, lo malo es que en ese momento sólo pude probarla algunos minutos, pero lo suficiente para notar que la app utilizaba publicidad para permitir la descarga de música, también me encantó percibir mucho elementos de Gamifición.
Desafortunadamente como la aplicación solo estaba disponible en EU y yo ya de regreso en mi país, no la seguí utilizando y eventualmente la olvidé. Pero en 2018, tuve la sorpresa de enterarme que la app ya estaba disponible en mi país México, y aparentemente con planes de expandirse a otros lugares, así que ahora sí tu ve la oportunidad de probar más a fondo esta app.
Un modelo de negocio diferente
Como mencioné, usted podría pensar que esta app compite directamente con Apple Music, Play Music, TuneIn u otras, y eso puede ser cierto, sin embargó Gary Mekikian, CEO de M&M Media, quienes crearon Trebel, dice lo siguiente:
Competimos con sitios de torrents. Trebel no es un servicio de streaming… No somos un servicio de radio. Somos un servicio de descarga y reproducción.
Con Trebel, un usuario puede descargar cualquier canción del catálogo de la aplicación y luego reproducir esa canción sin hacer streaming. De esta manera, los usuarios tienen la libertad de reproducir cualquier canción que quieran pero sin tener que pagar una tarifa regularmente. De esta manera, Trebel Music imita a los sitios de torrents, pero con esta aplicación, los artistas son recompensados por su trabajo.
Trebel compensa a los artistas llenando la aplicación con publicidad, eso quizá sea de esperarse, pero lo interesante es que cada vez que el usuario ve un anuncio, obtiene una moneda digital o T-Coins, lo que le permite descargar y escuchar más canciones. Esta moneda digital es el insentivo para los usuarios que a su vez ayuda a pagar a los artistas por su música.
El usuario también pude obtener monedas solo por registrarse en la aplicación, por invitar a otros a registrarse, ver videos promocionales y hacer check-in en comercios afiliados, o bien, también puede pagar para no exponerse a toda esta publicidad (¿alguien dijo Gamificación? 🙂 ).
M&M Media trae una solución interesante, debido a que si bien pensaron principalmente en jóvenes que aún no están percibiendo un ingreso, y que son atraidos a descargar música ilegalmente, la verdad es que en paises de economía emergente como el mio, hay mucha gente que no es necesariamente joven pero tampoco quiere o puede pagar por un servicio premium.
Le doy 3.5 de 5
En general, mi experiencia con Trebel Music ha sido positiva, pero ciertamente no perfecta. El concepto único de la aplicación permite a los usuarios escuchar música sin invertir en un costoso plan de datos o esperar por buffering. Sin embargo, al usar la aplicación, la sentí como si se hubieran dedicado más esfuerzos a las características sociales y cosméticas que al factor real de venta de la aplicación, por supuesto esto pude deberse también a que estoy demasiado viejo para estar en el nicho principal de esta app. 😀
Una bonita característica de la aplicación es que cuando tocas una canción, la portada del álbum gira como un disco. Incluso puede interactuar con el disco virtual girándolo hacia adelante para saltar adelante en la canción, o girando hacia atrás para rebobinar.
Esta característica es efectiva, pero hubiera sido bueno tener más interactividad. En un disco real, escuchas un cierto efecto de sonido cuando giras el vinilo manualmente. La falta de este sonido como retroalimentación en la aplicación hace que parezca que falta algo, pero es un detalle perdonable.
En términos de características sociales, Trebel toma nota de otras aplicaciones. El usuario puede seguir a otros usuarios, compartir listas de reproducción con sus contactos dentro de la app e incluso enviarles monedas virtuales, compartir en redes sociales, y todo lo que esperaría a ese respecto. Pero Trebel intenta llevar el tema social un paso más allá, conectándolo con sus compañeros de colegio con la opción Campus. Los estudiantes pueden ver las canciones principales reproducidas y descargadas en su colegio, aunque esta opción por ahora no incluye escuelas Mexicanas ni Latinas, ignoro cual sea el proceso para incluir más colegios.
Este tema de la edad es aun más claro al ver el catálogo disponible, ya que es fácil encontrar los éxitos pop del momento, pero si el usuario desea algo más exquisito de décadas pasadas las opciones no serán tantas, aunque muchas veces el mensaje “próximamente” aparece, y como la app solo tienes unos meses en México, mis esperanzas aún no mueren…de lo contrario siempre está Radio Universal (chiste reservado para habitante de la Ciudad de México).
La aplicación funciona bien la mayor parte del tiempo, pero ocasionalmente se encuentra con un error donde el hacer clic en una canción no la reproduce. También me encontré con el problema de que la descarga se cuelga (no avanza) incluso por WI-FI.
La verdad sea dicha, aún sigo prefiriendo mi stock personal de música guardada en mi teléfono de manera tradicional y el amplio catálogo de Spotify, pero Trebel es útil para álbumes en los que no quiero gastar dinero o que todavía estoy valorando.
Sin embargo, hay que tener en cuenta que Trebel es un competidor nuevo, y seguramente mejorará en el futuro cercano. Los inconvenientes son comunes en cualquier iniciativa nueva, pero me parece que el concepto y el diseño de Trebel hacen que valga la pena la descarga la cual está diponible en la App Store de Apple y Google Play Store.
Otras entradas que pueden ser de su interés:
Emmanuel Herrera
IT professional with several years of experience in management and systems development with different goals within public and private sectors.
Emmanuel worked through development and management layers, transitioning from developer and team development leader to Project Manager, Project Coordinator, and eventually to Scrum Master, Product Owner, and Agile Coach.
Some certifications include: PSM, PSPO, SSM.
No Comment Desarrollo / Development / Destacadas / Featured / Experiencia de Usuario / UX / Gamificación / Gamification / Ideas
Gamification Success Case
Previously, I spoke about the generalities of gamification, I expressed the definition and the objectives that gamification pursues, if you aren’t familiar with the subject before to continue reading, I recommend you that you go and read the previous post.
As part of a project in which I participated recently, I was analyzing how some organizations and their web solutions were using the gamification concept, and one of these solutions which it seems to one of the most interesting and outstanding using this concept is LinkedIn. As many already know, LinkedIn is a social network oriented to professional relationships, and as part of its operation, this social network uses a set of elements that integrate the gamification idea in its design. Now we’ll take a look on some of them, we’ll find out how they work and what is the purpose of the Gamification strategy and LinkedIn.
Profile
To make this network of professionals valuable, as much as for LinkedIn as for its users, the information from each member is required. The more information is provided by the user the greater the benefit which the network gets overall. When a new user signs in, tend to provide only the minimum information, usually doubting about how much information should provide, this apparently due mainly to distrust about sharing personal data, lack of time or laziness from network users.
LinkedIn, using gamification and UX (User Experience) elements, implemented a progress bar that appealed to the “sense of finishing something incomplete” to gently suggest and motivate to achieve a better percentage and thus obtain more information from the user, using a strategy where the percentage increase was easy to obtain at the beginning, but gradually it required more effort to reach 100% which added a touch of fun and challenge that invited to provide more data.
Eventually and very intelligently, LinkedIn realized that a disadvantage about just use a simple progress bar is that other data that arise as a consequence of changes in users’ working life, such as new job positions, new responsibilities, new certifications and academic progress, didn’t obtain relevance.
With the foregoing in mind, the percentage bar scheme was changed to a sphere that fills up as a cup with water, which is known as profile strength. Depending on how much the circle is filled, names are assigned to the “efficiency levels”, thus gauging ALL the data that is provided and also making LinkedIn members more willing to provide and update the information provided. it asks for them with a little invasive method and in addition without giving a foot to notice that the users are being “gameficated”.
Trying to improve even more their interface LinkedIn implemented some kind of mashup between their previous progress bar and the sphere ‘s efficiency levels, and currently is using a new progress bar.
But even with the previous gamification elements, with which the design encourages users to provide information and thus increase the strength of their profiles, what is obtained is a self-description of the user qualities, which should be verifiable by other means. To solve this, the skills and expertise were devised, which, taking advantage of the social network inherent advantages, allow other users to validate the skills and experience, which creates a more accurate view of the user of interest.
Views
No profile makes much sense if it’s not being seen. The social network provides statistics to its members about how many times their profiles have been seen in recent days.
It also shows who have been the last person to see the profile. This not only stimulates the motivator of being the “center of attention”, but also encourages clicking on the profile of those people to potentially connect with them.
Updates
The LinkedIn users not just share personal and professional information, the network’s mechanic encourages them to share their articles, events, job opportunities and other types of related information with its members’ labor life; offering with it, the number of visits, their respective likes and the possibility of following other users or interesting groups, which are gamification techniques already tested by the social network habitual users.
Groups
Belonging to a group, contributing with posts and answers can increase the potential influence of a user as an expert within a community. The number of members is an indicator for the group owner about how successful are the actions derived from organizing a group of people around a certain topic.
Others
During my research about LinkedIn and its gamification strategies, I found mentions of some that I have not been able to corroborate, but I have seen mentioned in different places. Apparently there have been mailings and messages with congratulations to some members for a variety of “achievements”, such as being one of the most viewed profiles according to certain criteria of time and views or being a prominent member with a number of shared articles and views obtained to them, as well as some other similar motivators that pretend to be fun.
Do you know some other gamification techniques used on other sites? do you currently use gamification or do you intend to do it? do you think it’s worth use gamification? share it with us.
Other links that could be interesting for you:
How Gamification Motivates the Masses
Top 10 Groundbreaking Gamification Examples
Some interesting publications:
Emmanuel Herrera
IT professional with several years of experience in management and systems development with different goals within public and private sectors.
Emmanuel worked through development and management layers, transitioning from developer and team development leader to Project Manager, Project Coordinator, and eventually to Scrum Master, Product Owner, and Agile Coach.
Some certifications include: PSM, PSPO, SSM.
No Comment Desarrollo / Development / Destacadas / Featured / Diseño Web / Experiencia de Usuario / UX / Gamificación / Gamification / Ideas / Programación / Programming
Playing while working, studying, exercising or using the web
Those of us who have been or are gamers know that the idea or concept of gamification has been hovering around forever (at least, about 3 decades). Remember old phrases like, learn by playing! lose weight while having fun! etc. Now, although the concept is old, the term was coined thanks to a computer programmer named Nick Pelling in 2002, but in reality, the concept has begun to attract attention only in recent years.
Lately, I have met many people who use dazzling terms such as “game mechanics”, “game dynamics” or aims to establish as something complex and laborious the implementation of the concept, confusing the basic idea of gamification with complex marketing campaigns and big data. Certainly, you can create a sophisticated gamification implementation, but based on my experience involved in multimedia development teams since 1998, I can say that a lot about implementing gamification is just common sense.
Without being or pretending to be an expert in gamification, below I share some ideas, terms, and approaches that I’ve learned over time:
What is gamification?
There are lots of sites where you can get nice definitions about what gamification is, but to save the trip to Wikipedia, this is its definition:
Gamification is the application of game-design elements and game principles in non-game contexts. Gamification commonly employs game design elements to improve user engagement, organizational productivity, flow, learning, crowdsourcing, employee recruitment and evaluation, ease of use, usefulness of systems, physical exercise, traffic violations, voter apathy, and more. A collection of research on gamification shows that a majority of studies on gamification find it has positive effects on individuals. However, individual and contextual differences exist. Gamification can also improve an individual’s ability to comprehend digital content and understand a certain area of study such as music.
Did you understand that? Basically, it means, turns a task into something more interesting by adopting the logic of a game. The simplest way would be giving some sort of reward for doing some activity. The prize can be as obvious as a trophy or as vague and subjective as simply seeking to offer fun while doing a specific task. But of course, there’s much more that can be done, especially when human behavior is considered.
But to meet the cliché, this is my personal definition:
Gamification is the application of the metaphor of gaming to common or compulsory tasks to influence behavior, giving more motivation and increasing involvement, preference or loyalty.
Are video games useful?
For some years I was a World of Warcraft player, a very popular video game with millions of users, which I think is a great example of how these games can be related to the real world. Within World of Warcraft, one of the objectives is to make money. This money can be obtained in several ways, but most of it is completing quests (missions). As a result of solving the missions you get gold, which the player uses to obtain different things like buying clothes, weapons, materials, improvements, information for new missions, etc. (Does this sound familiar?), this is the basics of any business and an important part of life. Day by day World of Warcraft players spend their time making goods, offering services and fulfilling missions. In the real world, we do the same, we earn money to obtain some achievement; We spend that money on buying new things or we invest in something that allows us to earn more money or do something more efficiently or comfortably.
Enlarge

Blizzard Entertainment
A valid question would be why these players are so willing to spend so much time doing what they could do in real life? The answer is easy: because it’s fun.
Adopting the idea
At this point It’s important to clarify that not everything is about video games, we will not see in the immediate future someone willing to play the latest game of Microsoft Project or Word (although, you never know 😉). What we are trying to do is take ideas from games and insert them into some routine task, so these tasks don’t have to be boring to death.
With all the above in mind I have to be honest, despite the relatively recent popularity of the idea of gamification, not everyone knows what it is, not everyone is interested, it seems that to get hear and understand the term is required of some curiosity, wanting to know what is in vogue about developing, UX, etc., or just having a little bit of geekness. All this makes selling the idea to or in an organization is not as easy as it might seem (at least not here in the third world).
Recently I participated in a project where customer asked my team, to propose “innovative” ideas (another oversold term) to improve the technological proposal of an organization, as part of this I eventually proposed the idea of incorporating some initial and modest strategy of gamification, giving some overall but concrete examples including just enough detail, not exactly as something “innovative” but as something that only intended to “update” the technological solution implemented at the time. Surprisingly, although the organization which I was working with, develops technological solutions, 90% of those involved did not know what the hell I was talking about (shame on you Infotec); I had to explain the idea to business analysts, deputy directors, directors, contractors and developers without much success (nobody is a prophet in his own land, but I like to think I threw some light on lost souls).
I have to add that the word gamification is weird English and the translations into Spanish sound even worse, so the word doesn’t help too much to sell the concept, as a result of this experience I came up to the conclusion that in order to adopt the idea more easily, we must use words such as Productivity, Behavior Changes, Motivation and Preference (or engagement if you prefer the marketing jargon).
Points, Medals, Trophies, Position Tables
As responsible for a project some time ago, I needed to make a quality assurance in a series of contents for courses, with a lot of information to review and very little time, I told the members of my team, that the two people who found more errors would earn a big coffee every day for the next week. Suddenly a game was on.
Fortunately, we do not always need to resort to real physical awards in all cases. The management of information that users provide their organization, website or mobile application can be used to award prizes in different ways, the most common are:
- Points
- Medals
- Trophies
- Levels
- Position Tables
- Challenges
- Achievements
En un sitio o sistema web, por ejemplo, el concepto es utilizado ampliamente para que sus usuarios hagan más dentro del sitio o estén más tiempo expuestos a determinada información. Algún sitio donde se hacen trámites, puede hacer del llenado de sus formularios algo más ameno dando alguna especie de puntaje o jerarquía relacionada con un progreso por cada paso completado. Un sitio de ventas puede dar trofeos o medallas por las reseñas que un usuario coloca acerca de algún producto.
These examples are certainly very simple since only seek to motivate more users to carry out a task, and of course, they leave much more to exploit the concept, but they’re a good starting point to explore the benefits of gamification.
Not everything is about money
A strange and limited argument that I came across when I proposed gamification, is that accordingly with someone’s assumption, gamification was about giving economic incentives in the form of cash, coupons or discounts, which of course is not necessarily true, and falling into that assumption usually creates concern and even rejection from the sponsors of any project or production chain. Money is a good motivator for a user (it always is), but there is a word that you will find very often in blogs and books about gamification and also I already mentioned, this is engagement, this means that money will always motivate you doing some task but won’t necessarily “hook” you to it nor will make the activity enjoyable.
What else?
If you start to delve deeper into gamification issues, you will eventually realize that there is much more than just depending on incentives and certainly much more than relying on money. You will be using human behavior and the famous reptilian brain, that is, use in your favor something that is within human nature itself, play. Using gamification you will be appealing to feelings of pride and need for recognition, with which you could achieve even more than offering money in exchange.
In conclusion
I’ll share with you a couple of videos about some educational projects where I was involved and I used gamification (they’re old but still valid to understand the concept) and some bibliographies that I found useful and interesting:
Books:
- Why we do what we do: understanding self-motivation
- For the Win: How Game Thinking Can Revolutionize Your Business
- A Theory of Fun for Game Design
Videos:
Risk Prevention
Mexico’s Economic Development
English Learning Card Game
Thanks to @Mordred77M for the English translation, he’s not a natural English speaker and he´s still learning so don’t be grumpy and help him to improve :)
Related links:
Mint (Empresa con aplicaciones fintech que utiliza gamification para las finanzas personales)
Emmanuel Herrera
IT professional with several years of experience in management and systems development with different goals within public and private sectors.
Emmanuel worked through development and management layers, transitioning from developer and team development leader to Project Manager, Project Coordinator, and eventually to Scrum Master, Product Owner, and Agile Coach.
Some certifications include: PSM, PSPO, SSM.
No Comment
First of All
If you don’t know the four Agile Value Statements, I invite you to take a look at Agile’s origins and values post before continuing, if you already did or already know these values, now you can focus your attention on how the agile team approach actually is in the field. Together, the Agile Value Statements add up to a highly iterative and incremental process and deliver tested code at the end of each iteration. The next points, in general, include the overall way I which an agile team carries the project:
- Works as one
- Works in short iterations
- Release something every iteration
- Focuses on business priorities
- Inspects and adapts
The Agile team works as one
Unfortunately, is usual to see some business and systems analysts throw processes or requirements to designers and programmers like a ball over the wall and just continuing with their lives, also there are designers and architects who elaborate their appealing designs without the slightest consultation to their programmer coworkers, or talented programmer who finish their assigned part of the system and then shake their hands and disappear; and we can go on with sad stories. A successful agile team must have a “we’re in this together” mindset.
I really like using video games analogies, because are a great way to illustrate what happens in real life. A lot of online games are team games, where each member of the team has a role. In this teams, there are roles such as the healer who heals his teammates, the tank who receives hits becoming in a shield for the rest of team who can attack more efficiently, the DPS who do damage to the enemy and the special class who does some kind of damage. When a player doesn’t perform their role properly, puts the rest of the team at a considerable disadvantage, sometimes this breaks the whole team completely. Everybody must work as one!
Just like happens in this games, the agile teams also have roles, and it’s worth identifying them in a general way:
Product Owner
The main responsibilities of the product owner include making sure that the whole team shares the same vision about the project, establishing priorities in a way that the functionalities that contribute the most value to the business are always in which the team is working on. Take decisions that take the best return on investment of the project is the highest priority.
Customer
The customer is the person who made the decision to finance the project, usually represents a group or division. In these cases, it is common for this role to be combined with the product owner. In other projects, the customer can be a user.
Developer
In the context of agile teams, a developer title is used in a wide way, this is a developer can be a programmer, a graphic designer, a database engineer, user experience experts, architects, etc.
Project manager
We have to take this carefully because an agile project manager focuses more on leadership than traditional management. In some projects and agile frameworks, this figure doesn’t even exist or if it does, the person in charge of this role shares the traditional project management responsibilities with other roles such as product owner. Also can be an advisor on the adoption and understanding of the agile approach. In very small projects can even have a role as a developer, but this practice is not recommended.
The Agile team works in short iterations
Already mentioned this in previous posts, in agile projects, there is not a phase delineation too marked. There are not an exhaustive establishment of requirements at the beginning of the project followed by an analysis, there is not architectural design phase for the entire project. Once the project really starts, all the work (analysis, coding design, testing, etc.) occurs together within an iteration.
The iterations are done within a previously delimited time-space (timeboxed). This means that each iteration is completed is the agreed time without excuses, even if the planned functionalities are not finished. The iterations are often very short. Most agile teams use iterations between one week and four weeks.
The Agile team release something every iteration
Something crucial in each iteration is that within its space of time one or more requirements are transformed into codified, tested and potentially packageable software. In reality, this does not mean that something is delivered to the end users, but it must be possible to do so. The iterations one by one add up the construction of only some functionalities, in this way an incremental development is obtained by going from one iteration to the next.
Because a single iteration usually does not provide enough time to develop all the functionalities that the customer wants, the concept of release was created. A release comprises one or more (almost always more) iterations. Releases can occur in a variety of intervals, but it’s common for releases to last between 2 and 6 months. At the end of a release, this can be followed by another release and this one can be followed by another, and so on until the project is finished.
The Agile team focuses on business priorities
Agile teams demonstrate a commitment to business priorities in two ways. First, they deliver functionalities in the order specified by the product owner, which is expected to prioritize and combine features in a release that optimizes the return on investment for the project organization. To achieve this, a plan is created for the release based on the capabilities of the team and a prioritized list of the new desired functionalities. For the product owner to have greater flexibility in prioritization, the features must be written down minimizing the technical dependencies between them.
Secondly, agile teams focus on completing and delivering functionalities valued by the user instead of completing isolated tasks.
The Agile team inspects and adapts
It is always good to create a plan, but the plan created at the beginning does not guarantee what will happen in the future. In fact, a plan is just a guess at a point in time. If you live persecuted by Murphy’s Law like me 😀, there will be many things that will conspire against the plan. Project staff can come or go, technologies will work better or worse than expected, users will change their minds, competitors can force us to respond differently or faster, and so on. Agile teams see that each change represents both, an opportunity and the need to update the plan to improve and reflect the reality of the current situation.
At the beginning of each new iteration, an agile team incorporates all the new knowledge obtained in the previous iteration and adapts accordingly. If a team learned something that is likely to affect the accuracy or value of the plan, the plan must be updated. That is, perhaps the team discovered that they have overestimated or underestimated their ability to progress (capacity) and that a certain type of work consumes more time than previously thought.
In the same way, the plan can be affected by the knowledge that the product owner has gained from the users. Perhaps because of the feedback obtained from a previous iteration the product owner has learned that users want to see more of some kind of functionality and no longer value so much that they had considered. This type of situation can alter the plan, so you have to adapt it to improve its value.
Sorry about my English I’m not a natural speaker (don’t be grumpy, help me to improve).
This is all for now folks, I hope this can be useful for you.
Related links:
Agile’s origins and values
Roles on Agile Teams: From Small to Large Teams
What Is Agile?These are some recommended books to know more:
Emmanuel Herrera
IT professional with several years of experience in management and systems development with different goals within public and private sectors.
Emmanuel worked through development and management layers, transitioning from developer and team development leader to Project Manager, Project Coordinator, and eventually to Scrum Master, Product Owner, and Agile Coach.
Some certifications include: PSM, PSPO, SSM.
No Comment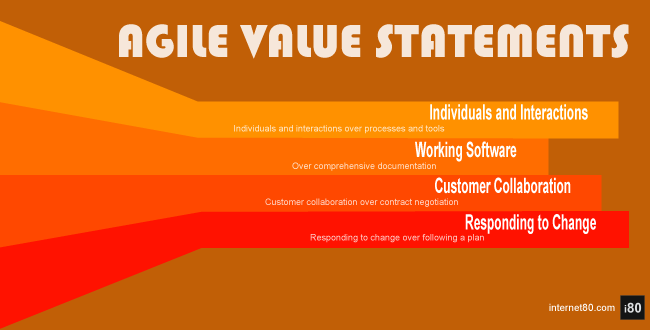

Winds of Change
Much is heard about Agile, Agile project management or the “Agile methodology” as something from the 21st century, but actually, the origin and Agile values began to take shape a little earlier. The 90s were a very interesting decade, MTV had its best moment, the Grunge music invaded the radio and the Internet came to the life of the masses. Along with the Internet boom, the way of making software changed completely, companies began to learn how to create software on a large scale and for interconnected users all over the world, which brought new demands. In the search for success, many of these companies began to import “good practices” from other industries expecting good results, which in the end were mixed in many cases (see Waterfall Model).
Many electromechanical systems were already beginning to be replaced by electronic systems, and sometime later the software began to have more and more relevance, but the development and interaction of these elements were trapped in predictive models that tried to know all elements involved in a system of beforehand, which were (and still are) very difficult to establish at the beginning of software projects with high levels of uncertainty, which has since caused very long development periods with hard-to-predict end dates. This situation led to the frustration of many leaders, who despite the situation were creating and adapting their own techniques, methods, and frameworks to the traditional models of development, which eventually gave rise to the first winks of Agile thinking.
Agile is born
After several previous meetings, in February of 2001, a group of professionals had a new and now famous meeting whose main contribution was The Agile Manifesto. This manifesto was written and signed by seventeen software development leaders (now known as the Agile Community). Their document gave a name to how this group was developing software and provided a list of Agile value statements:
- Individuals and interactions over processes and tools
- Working software over comprehensive documentation
- Customer collaboration over contract negotiation
- Responding to change over following a plan
And this group added:That is, while there is value in the items on the right, we value the items on the left more.
You can know more about history and the original manifesto at agilemanifesto.org
In particular, these opinion leaders looked for ways to quickly build functional software and put it in the hands of end users. This quick delivery approach provided a couple of important benefits. First, it allowed users to get some of the business benefits of the new software faster. Second, it allowed the software team to obtain quick feedback on the scope and direction of software projects on a regular basis. In other words, the Agile approach was born.
Behind the Agile Value Statements
You already know the list of value statements, but let’s see what are the reasons behind them:
Value people and interactions over processes and tools. Those of us who have a path in the development world know that a team with great people works well even using mediocre tools also these teams always overcome other dysfunctional teams with mediocre people who have excellent tools and processes. If people are treated as disposable pieces there will be no process, tool or methodology capable of saving their projects from failing. Good development processes recognize the strengths (and weaknesses) of individuals and take advantage of it instead of trying to make everyone homogeneous.
Value software that works over the comprehensive documentation. Because it leads us to have incrementally improved versions of the product at the end of each iteration. This allows us to collect early and often, some feedback about the product, and the process allows us to know if we should correct the course of action, make adjustments or move forward with the same vision. As the developed software grows with each iteration, it can be shown to the probable or real users. All this facilitates the relationship with customers and improves the chances of success.
Value the collaboration with the customers over contracts negotiation. Because in order to create Agile teams we must seek that all parties involved in the project work to achieve the same set of goals. Contract negotiation sometimes conflicts with the development team and the customer from the beginning. I think the multiplayer online battle arena games are a great example, personally, I like games like Heroes of the Storm o League of Legends. These are cooperative games where teams with five members are formed, the objective is that the team must destroy the base of the enemy by working together. All players win, or all players lose. These matches are surprisingly fun, and what we would like, for software development teams and customers, is to come together with this same attitude of collaboration and shared goals. Yes, contracts are often necessary, but the terms and details of a contract can exert a great negative influence on the different parties involved, and turn a collaborative environment into an inner competitive one.
Value responding to change over following a plan. Because the main objective is to provide the greatest possible amount of value to the project’s customers and users. In large and/or complex projects, you will find that it is very difficult even for users and/or customers, to know every detail of each feature they want. It is inevitable that users come with new ideas, or that they decide that some critical features initially are no longer so. For an Agile team, a plan is a vision of the future, but many points of view are possible and environmental factors can change over the time. As a team gains knowledge and experience about a project, the plan should be updated accordingly.
With the four Agile Values Statements from the Agile Manifesto in mind, I think you can begin to understand what it means to have an Agile approach to estimating and planning.
Sorry about my English I’m not a natural speaker (don’t be grumpy, help me to improve 🙂 ).
Related links:
To agility and beyond: The history—and legacy—of agile development
What Scrum Master Certification to Choose?
These are some books to know more:
Emmanuel Herrera
IT professional with several years of experience in management and systems development with different goals within public and private sectors.
Emmanuel worked through development and management layers, transitioning from developer and team development leader to Project Manager, Project Coordinator, and eventually to Scrum Master, Product Owner, and Agile Coach.
Some certifications include: PSM, PSPO, SSM.
No Comment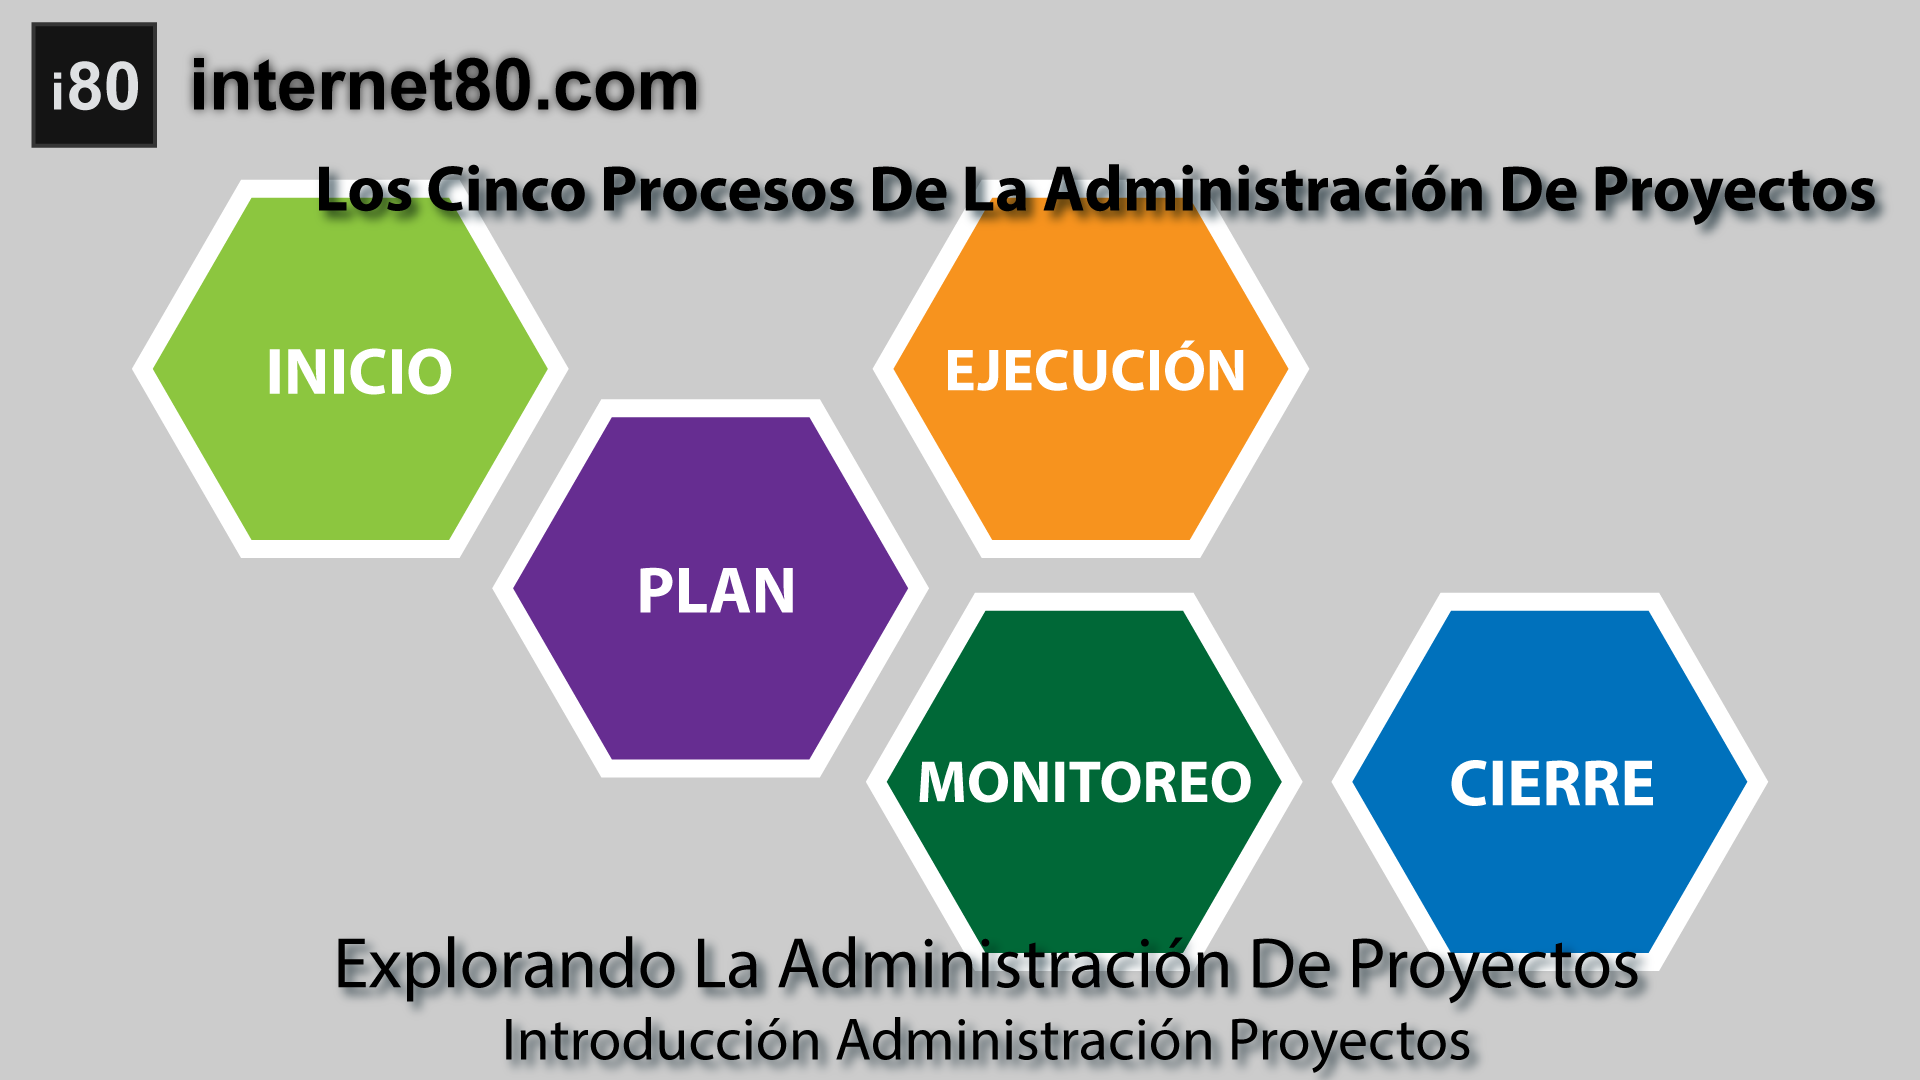 Administración / Management / Administración de Proyectos / Project Management / Agile / Cursos / Courses / IT / Scrum
Aquí está el cuarto video del curso gratuito en video de Introducción a la Administración de Proyectos desde cero. Esta vez se abordarán los cinco grupo de procesos de la administración de proyectos de acuerdo al Project Manament Institute o PMI. En mi opinión el PMI en su Project Management Body of Knowledge o PMBOK es donde mejor engloban los procesos generales y las áres de conocimiento requeridas para la gestión de proyectos; independientemente de metodologías, técnicas o herramientas.
En el video se explica brevemente la relación entre los cinco grupo de procesos de la administración de proyecto y las preguntas que nos planteamos en el video Definición de Gestión de Proyectos. Los temas tratados en el video son:
- Inicio
- Planeación
- Ejecución
- Monitoreo y Control
- Cierre
Todos los videos previos están disponibles en YouTube o si prefiere, en los siguientes enlaces:
- Definición de Proyecto (Video)
- Definición de Gestión de Proyectos
- Lo Necesario Para Ser Un Administrador de Proyectos
Estos videos forman parte del primer capítulo del curso Explorando La Administracion De Proyectos. La estructura del curso puede verla aquí, la cual estaré actualizando con los enlaces apropiados según suba los respectivos videos.
El mundo de YouTube vive de vistas, likes y suscripciones (un fastidio pero así es ¯\_(ツ)_/¯ ) por lo tanto agradeceré sus manitas arriba, shares, suscripciones y todo eso que los youtubers siempre piden. También puede ver todos los videos en Patreon ahí las almas voluntariosas puede ayudar a la causa 🙂 y además pueden obtener:
- Video descargable en alta definición.
- Transcripción del contenido.
- Documentos y preguntas de práctica (sólo los videos que lo ameriten).
Como parte de Introducción a la Administración de Proyectos, del Capítulo 1 Explorando la Administración de Proyectos tenemos este cuarto video:
Algunas publicaciones recomendables para saber más:
Emmanuel Herrera
IT professional with several years of experience in management and systems development with different goals within public and private sectors.
Emmanuel worked through development and management layers, transitioning from developer and team development leader to Project Manager, Project Coordinator, and eventually to Scrum Master, Product Owner, and Agile Coach.
Some certifications include: PSM, PSPO, SSM.
No Comment Administración / Management / Administración de Proyectos / Project Management / Agile / Cursos / Courses / IT / Scrum
Ahora tenemos el tercer video del curso gratuito en video de Introducción a la Administración de Proyectos desde cero. En esta oportunidad veremos lo necesario para ser un administrador de proyecto o project manager, veremos cuál es el perfil general que este rol require para hacer una adecuada gestión de proyectos, habilidades como:
- Habilidades técnicas
- Comprensión del negocio
- Habilidades interpersonales
- Liderazgo
El primer y segundo video están disponibles en YouTube o si prefiere, en los siguientes enlaces:
- Definición de Proyecto (Video)
- Definición de Gestión de Proyectos
- Los Cinco Procesos De La Administración De Proyectos
El mundo de YouTube vive de vistas, likes y suscripciones (un fastidio pero así es ¯\_(ツ)_/¯ ) por lo tanto agradeceré sus manitas arriba, shares y todo eso que los youtubers siempre piden. También puede ver todos los videos en Patreon ahí las almas voluntariosas puede ayudar a la causa y además pueden obtener:
- Video descargable en alta definición.
- Transcripción del contenido.
- Documentos y preguntas de práctica (sólo los videos que lo ameriten).
La estructura del curso puede verla aquí, estoy actualizando esta estructura según avanzo en la misma.
*Algo que no mencioné en el video es que este aplica también para Scrum Masters, aunque en la aproximación Scrum este rol cambia un tanto respecto al de Project Manager tradicional, ambos comparten una buena cantidad de reponsabilidades y características.
Sin más el tercer video de Introducción a la Administración de Proyectos, del Capítulo 1 Explorando la Administración de Proyectos. Este tercer video se titula Lo Necesario Para Ser Administrador de Proyectos:
Algunas publicaciones recomendables para saber más:
Emmanuel Herrera
IT professional with several years of experience in management and systems development with different goals within public and private sectors.
Emmanuel worked through development and management layers, transitioning from developer and team development leader to Project Manager, Project Coordinator, and eventually to Scrum Master, Product Owner, and Agile Coach.
Some certifications include: PSM, PSPO, SSM.