-
What is Desktop Automation?
Desktop Automation focuses on creating automated tests for computer Applications whether these are native Windows Apps or not.
This type of automation focuses on Front End Testing as the interactions and flows cover only the front of the app. It’s similar to Web and Mobile automation as it also uses “drivers” to create a connection that interacts with the App.
The are several tools and frameworks to automate Desktop Apps, but one of the most used and powerful tools to do it is WinAppDriver.
What Inspectors are?
Inspectors are tools that let us see the Document Object Model (DOM) of an app, this DOM is a representation of the structure of an app as an XML Document. By inspecting and seeing the DOM is possible to understand how the elements of the apps like buttons, text, and text boxes are structured, get the properties of these elements as its locators like ID, Name, ClassName, XPaths, and so on, and which of them are contained on specific Panels, Windows and Tabs.
Currently, on the market, we have different inspectors that we can use, the most common for any platform is Appium Inspector and for Windows is Inspect.exe which is contained directly on Windows SDK Kit.
What is WinAppDriver?
Windows Application Driver (WinAppDriver)is a service that supports Selenium UI Test Automation on Windows Applications like Universal Windows Platform (UWP), Windows Forms (WinForms), Windows Presentation Foundation (WPF), and Classic Windows (Win32) apps.
What is BDD?
Behavior Driven Development is an agile software development process that allows the design, creation, and product testing, using the behavior of the product itself and making it easier for technical and non-technical users to understand the product. This approach improves the understanding of Testing for all the Team Members, as instead of showing Testing Scripts full of technical verbose like classes, methods, and variables, we can show the Steps in Natural Language.
The most common tools to implement BDD in Testing are Cucumber and Specflow, the latter is the most used tool in Windows for Visual Studio and C#.
What is Specflow?
Specflow is a test solution to implement BDD in our framework, using Gherkin language and binding of steps definitions for Net-based apps. Currently is really easy to start using Specflow as it can be easily installed using Nuget Manager in any VS project.
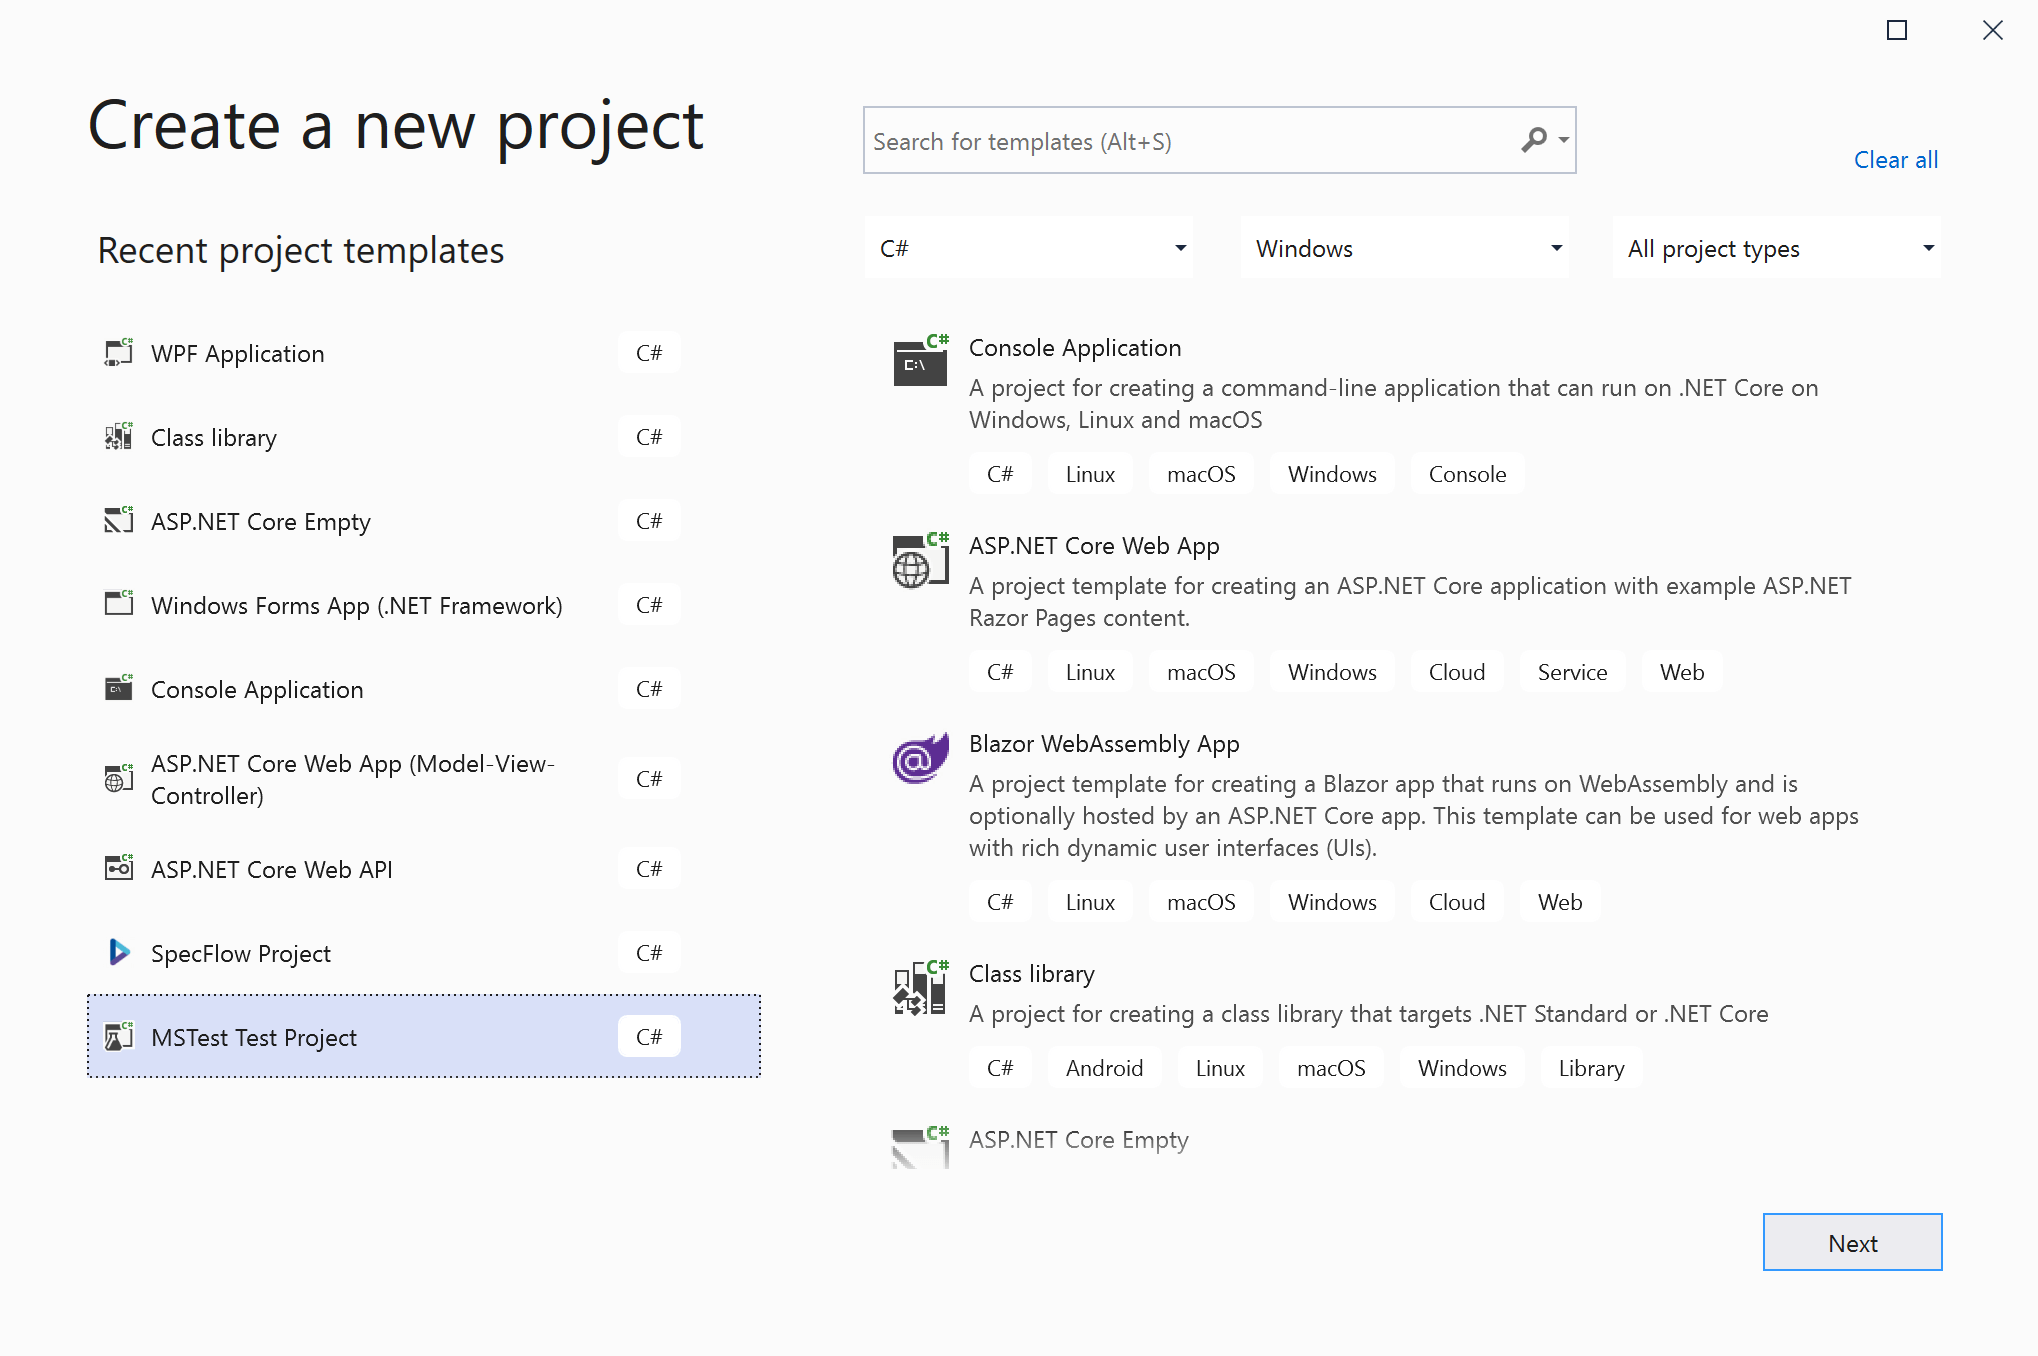
Creating an MSTest Test Project
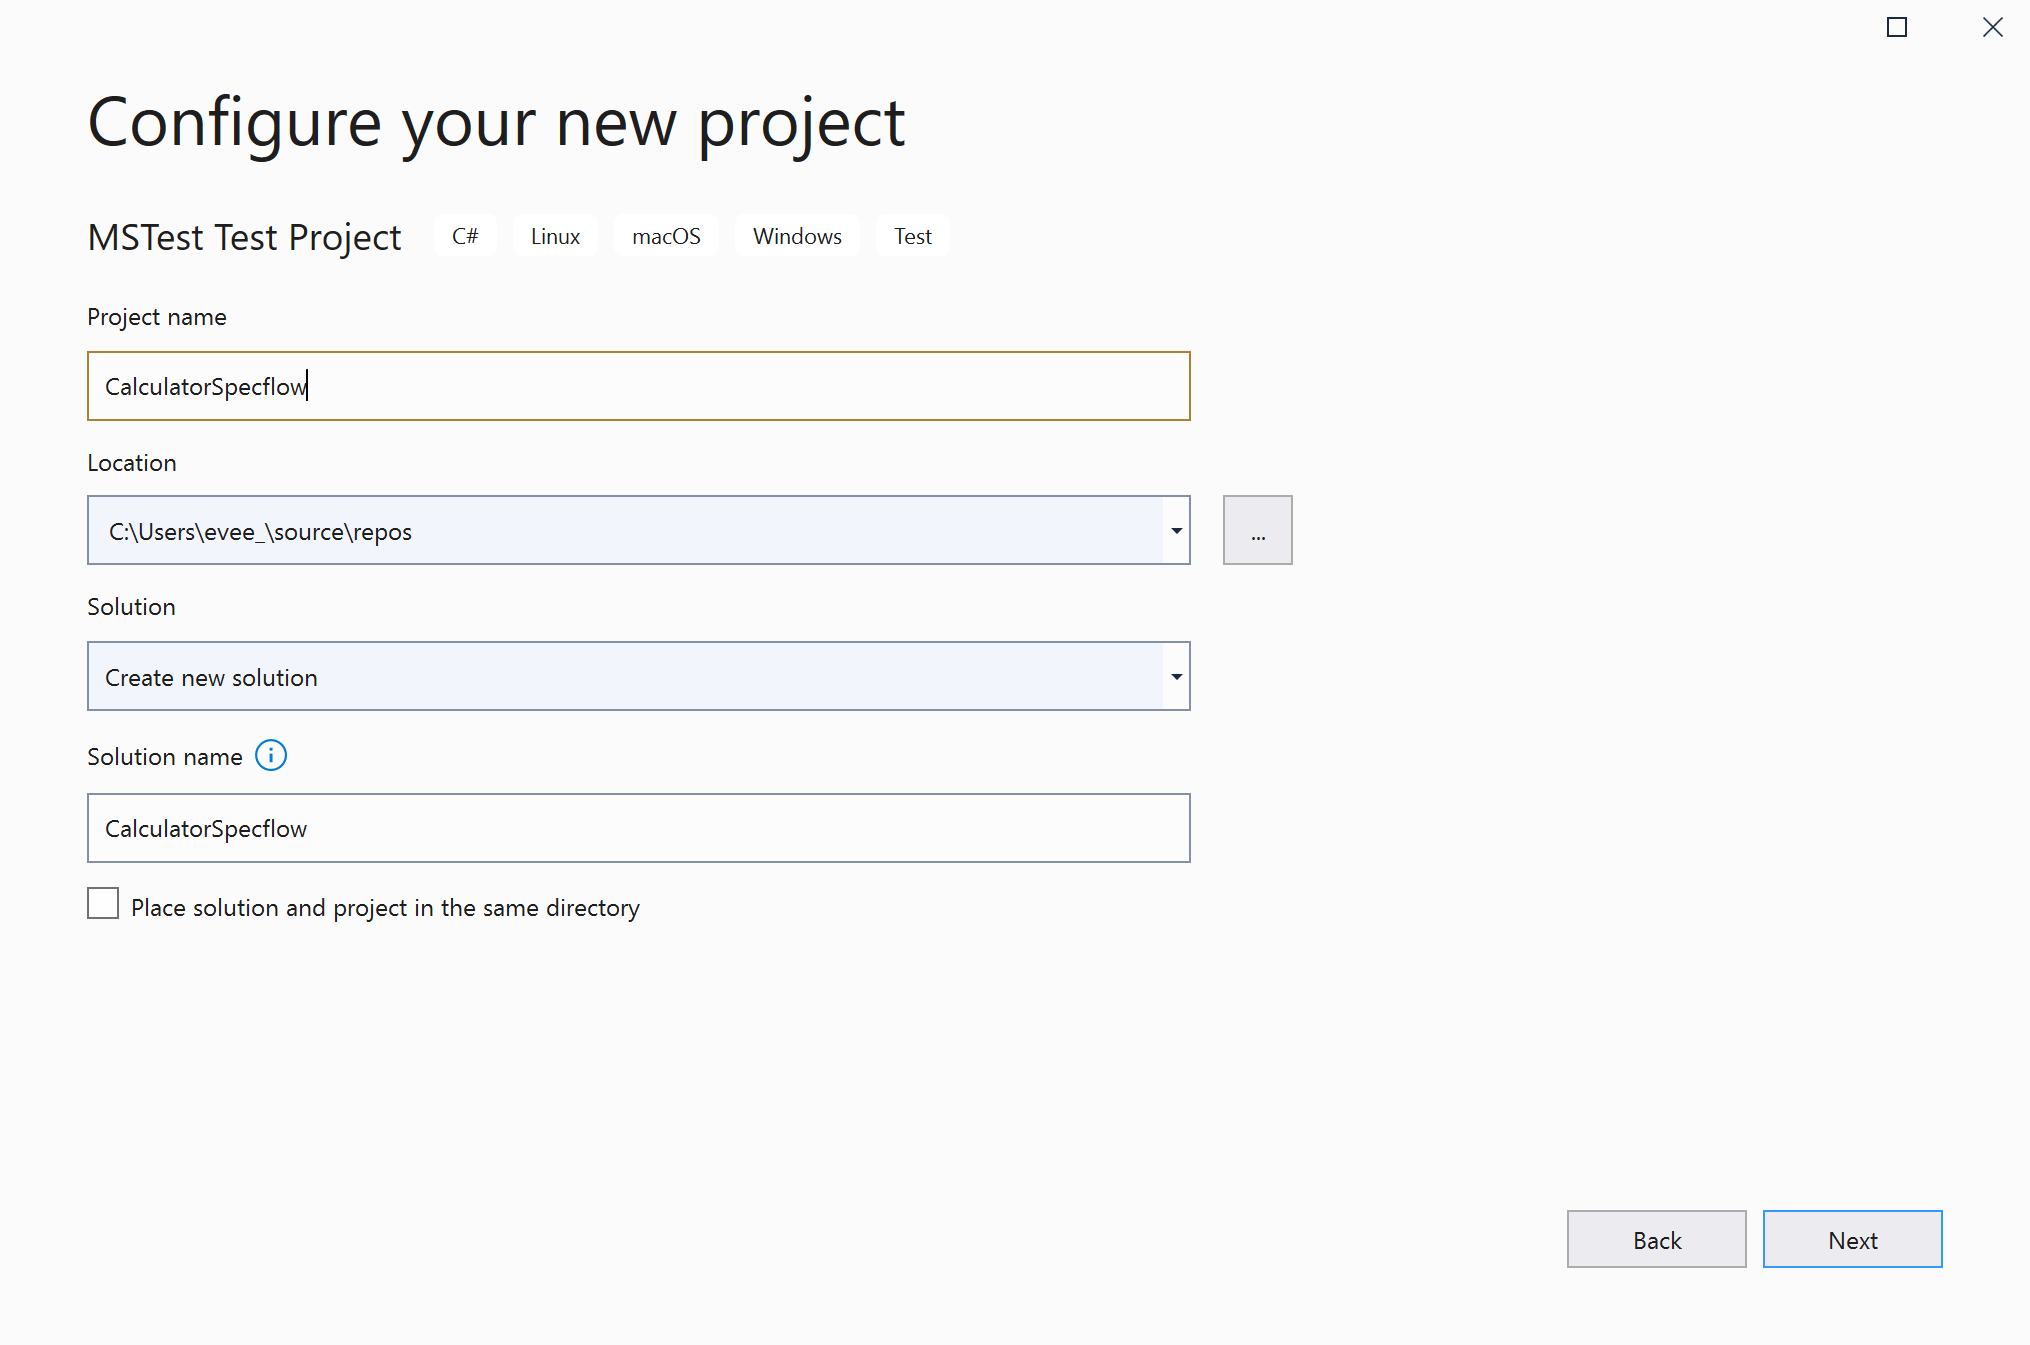
For this example, we are going to create a VS Project of MSTest Test Project type, is important to notice that we can use any type of project to implement Specflow, even a Specflow-type project.
Enlarge

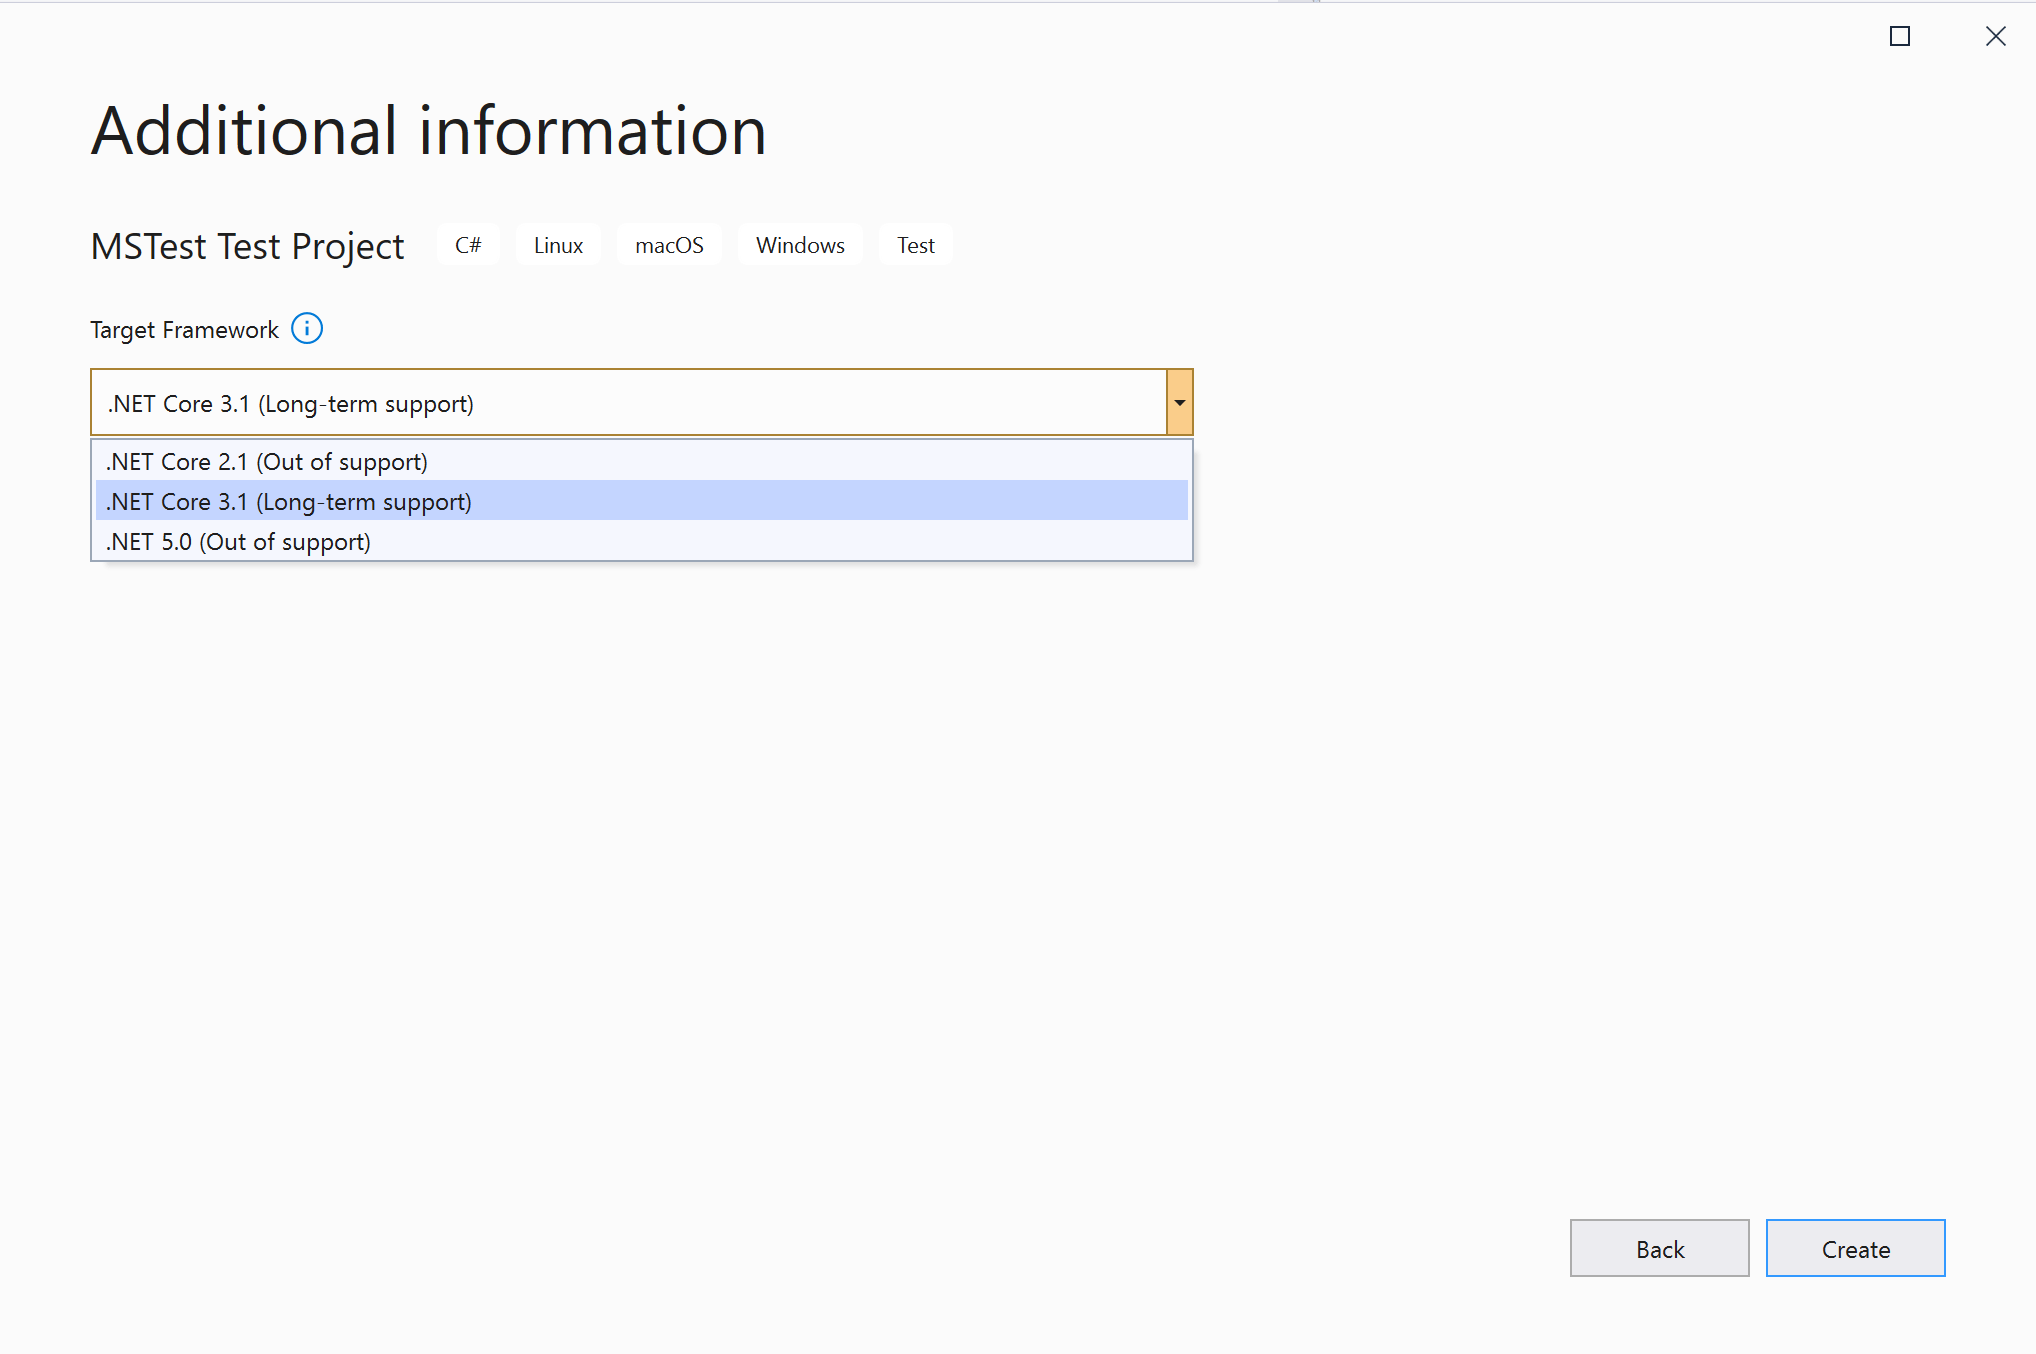
MNP Also is essential to choose the correct Net Core version for our Project, this may vary depending if the automation is going to be forcefully used by the old Net Core version, but keep in mind to always try to choose the latest version of Net Core.
Enlarge

NetCore Enlarge

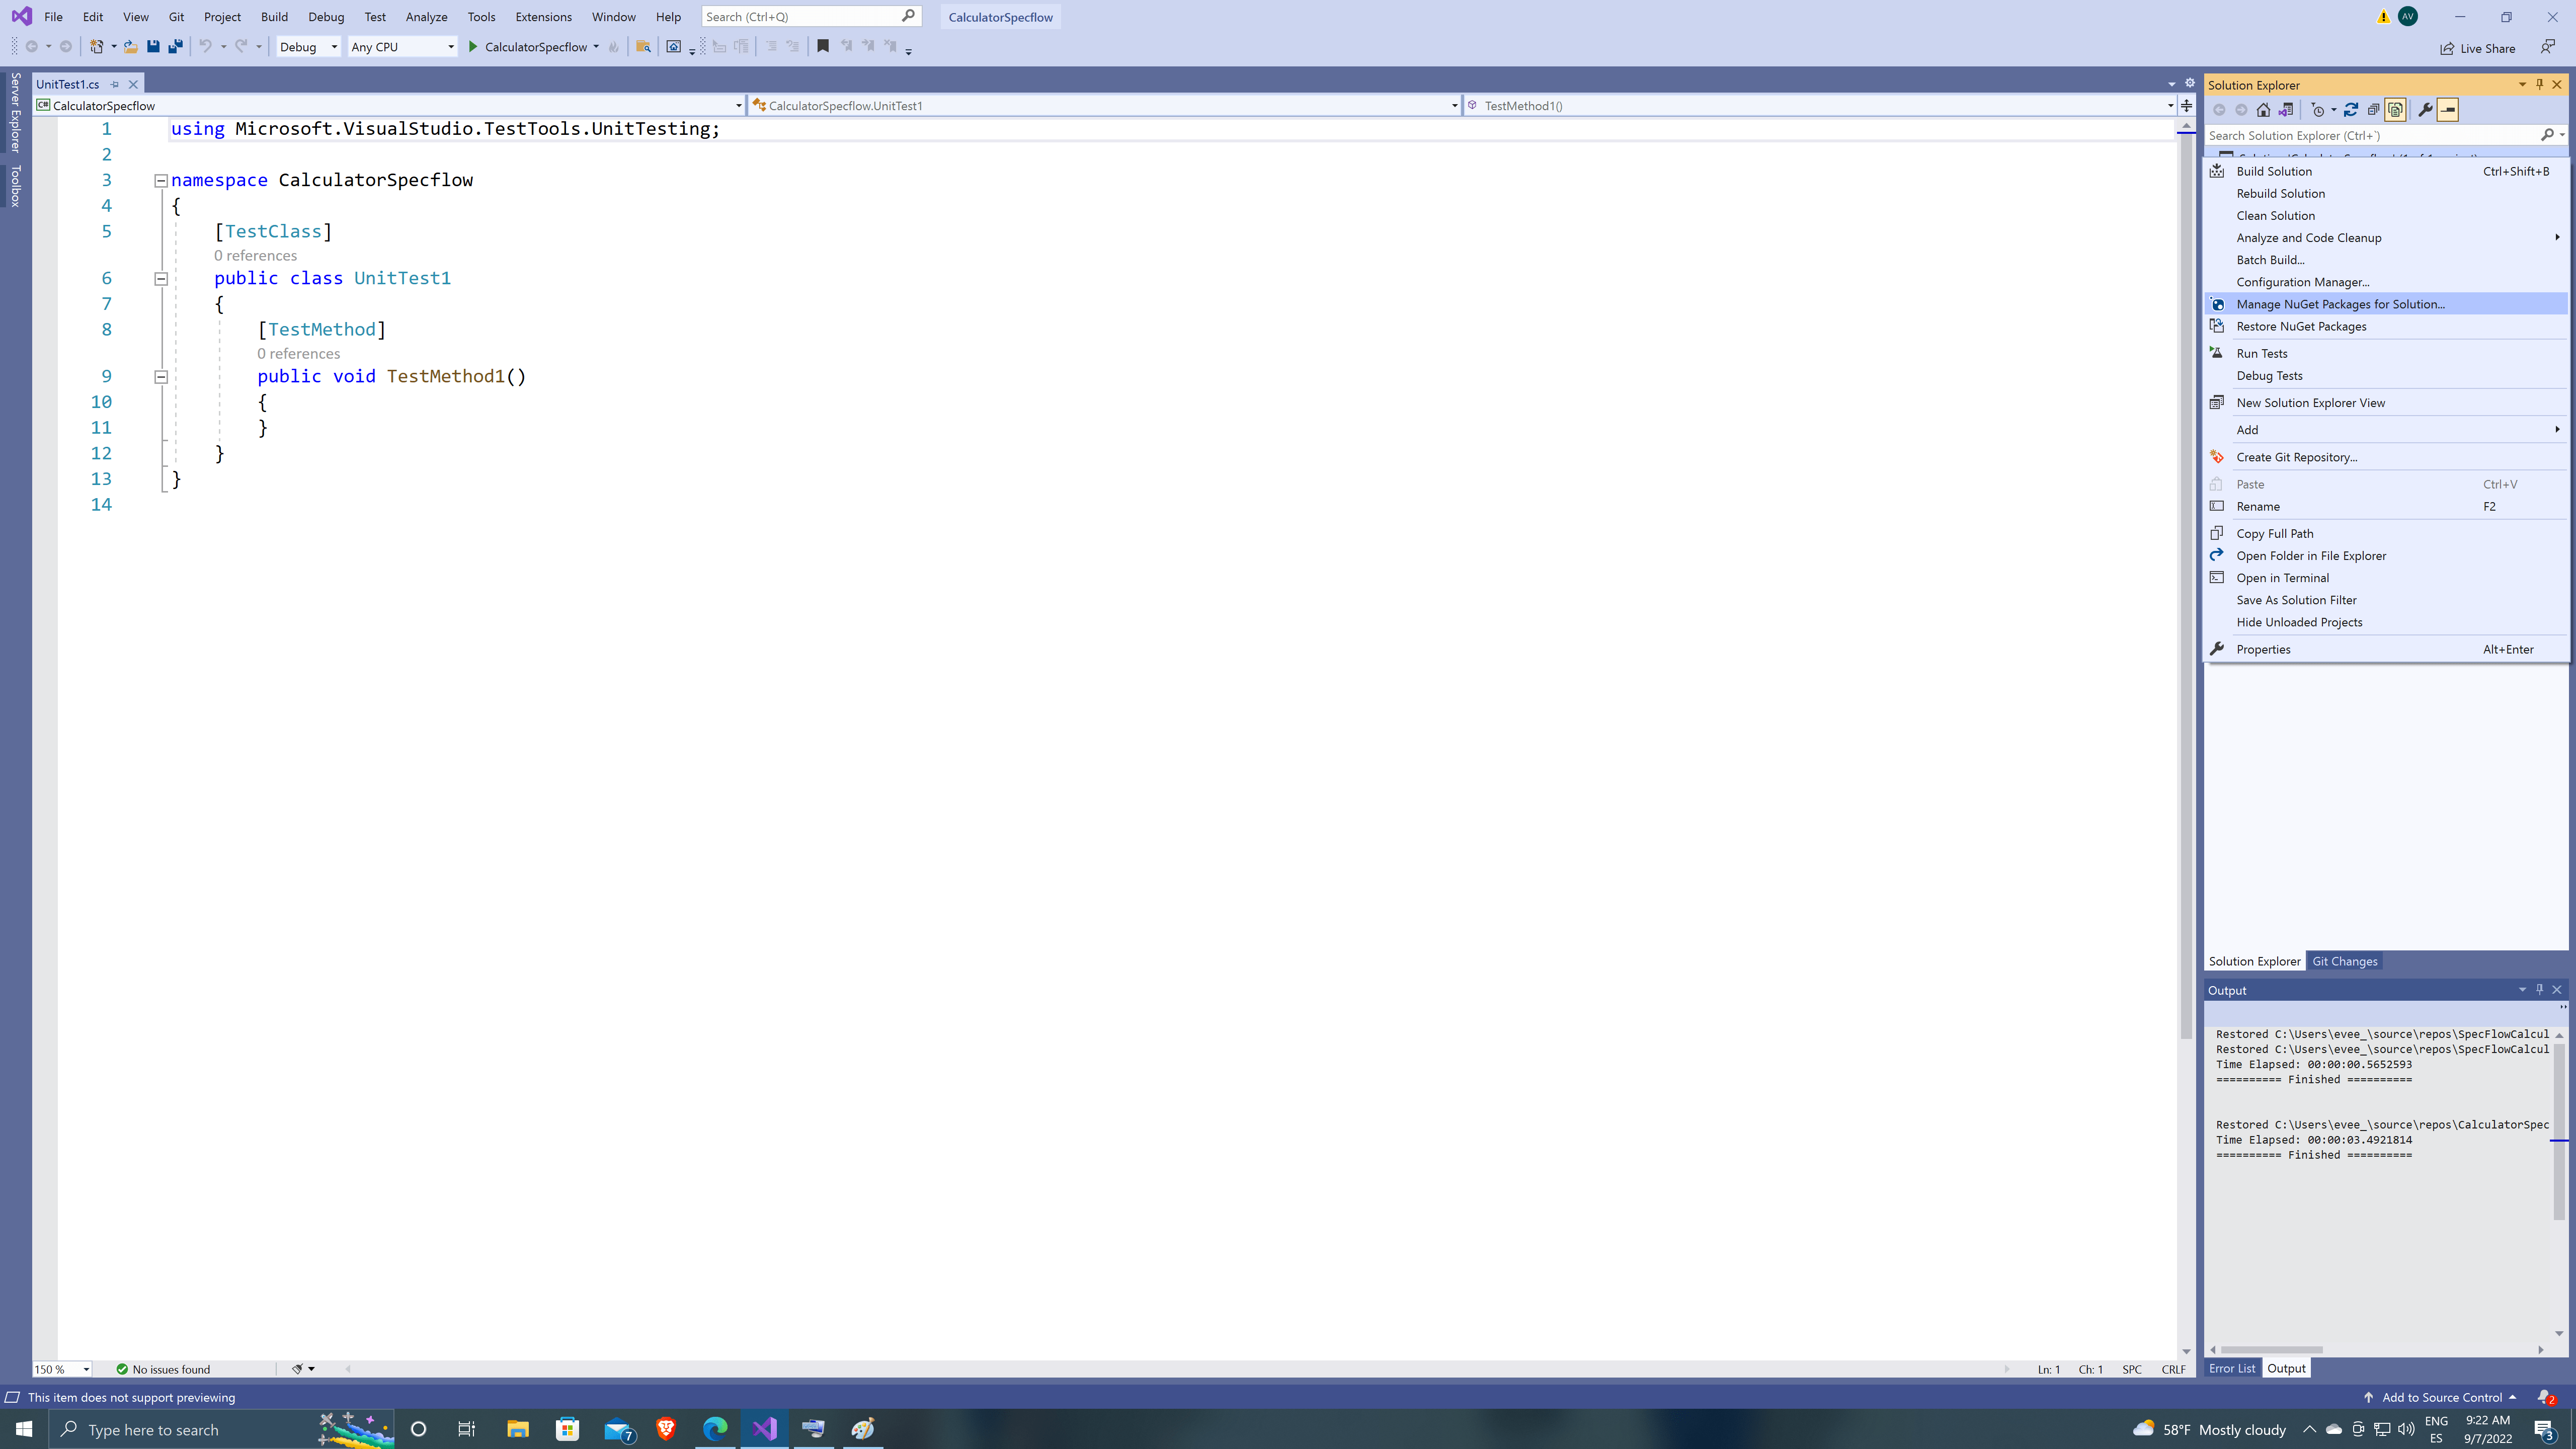
Configure Project Adding Specflow to VS
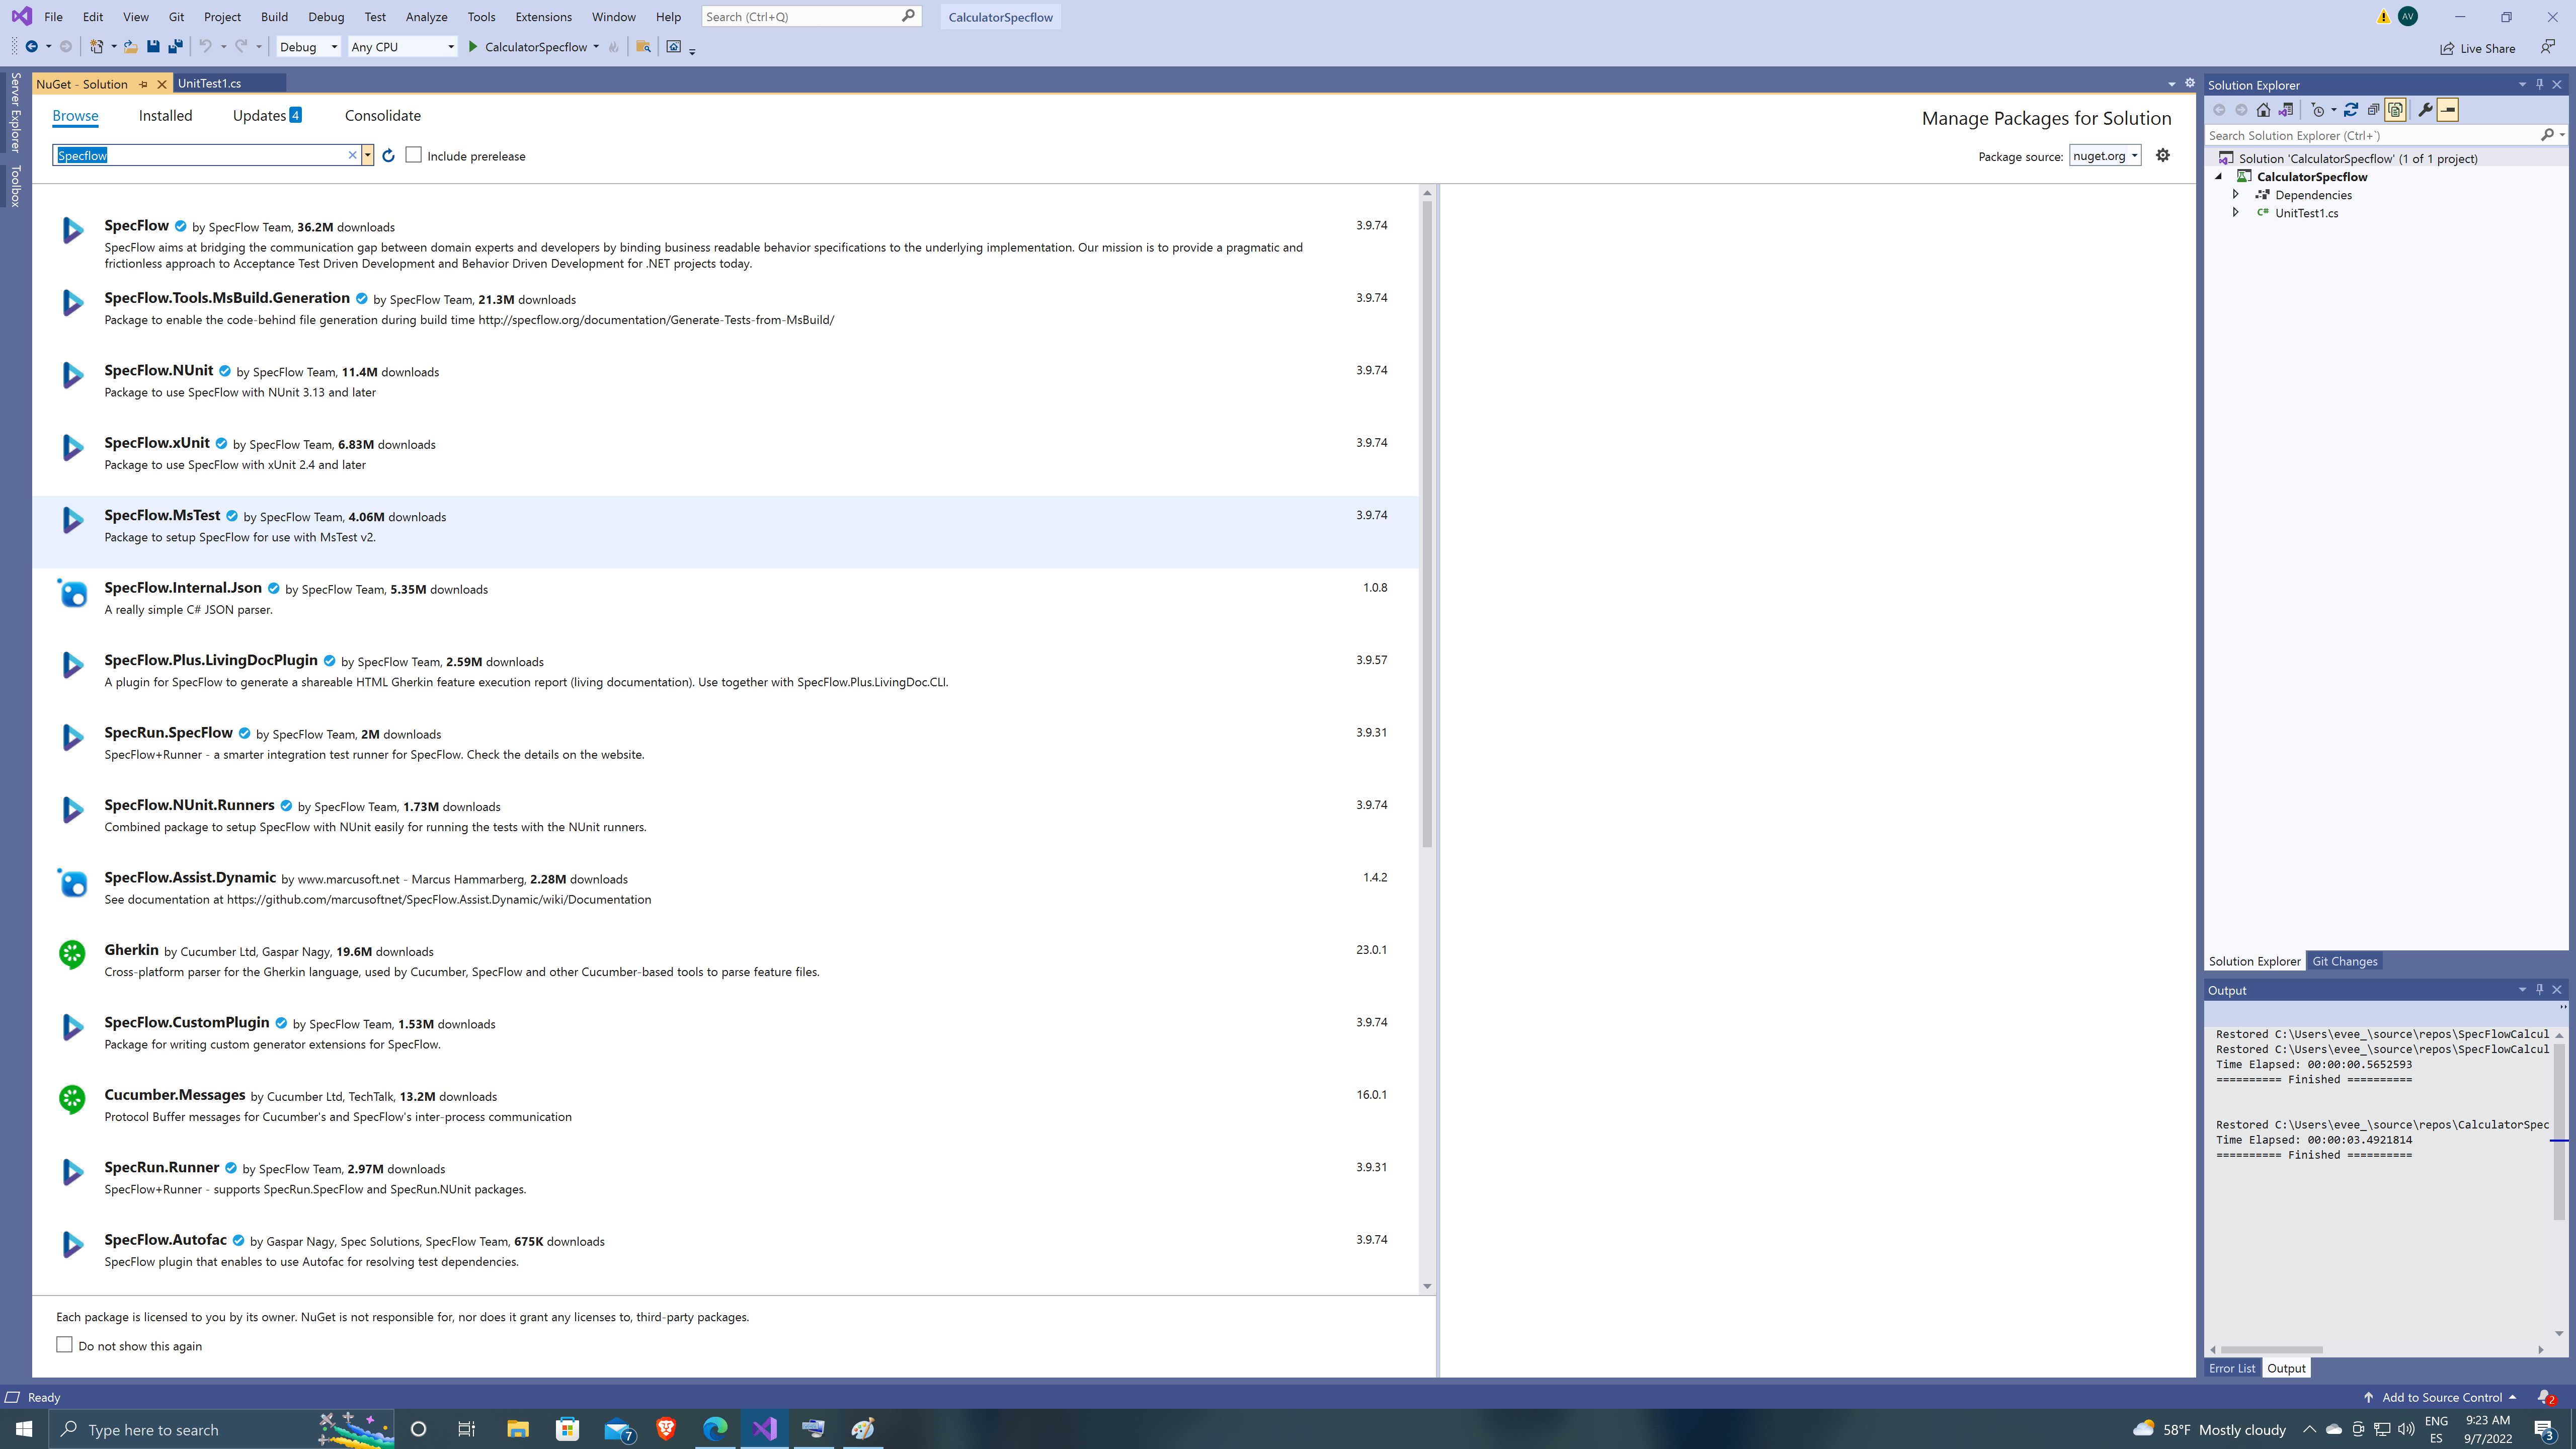
By default VS will create a UnitTest1.cs, we will dispose of this class later, first let’s add Specflow to our project by going to Manage Nuget Packages on our solution.
Specflow has different packages, for this solution we are going to use Specflow.MsTest as is the standard Specflow version to use on MsTest Projects, also we are going to install Specflow.Plus.LivingDocPlugin, to add some HTML results to our tests!
Enlarge

SpecflowMs Installing WinAppDriver and Setting up
Before continuing we need to install WinAppDriver from GitHub – microsoft/WinAppDriver: Windows Application Driver, to be able to open and interact with the Desktop app, we use WinAppDriver, this app will create a session between the app and our tests.
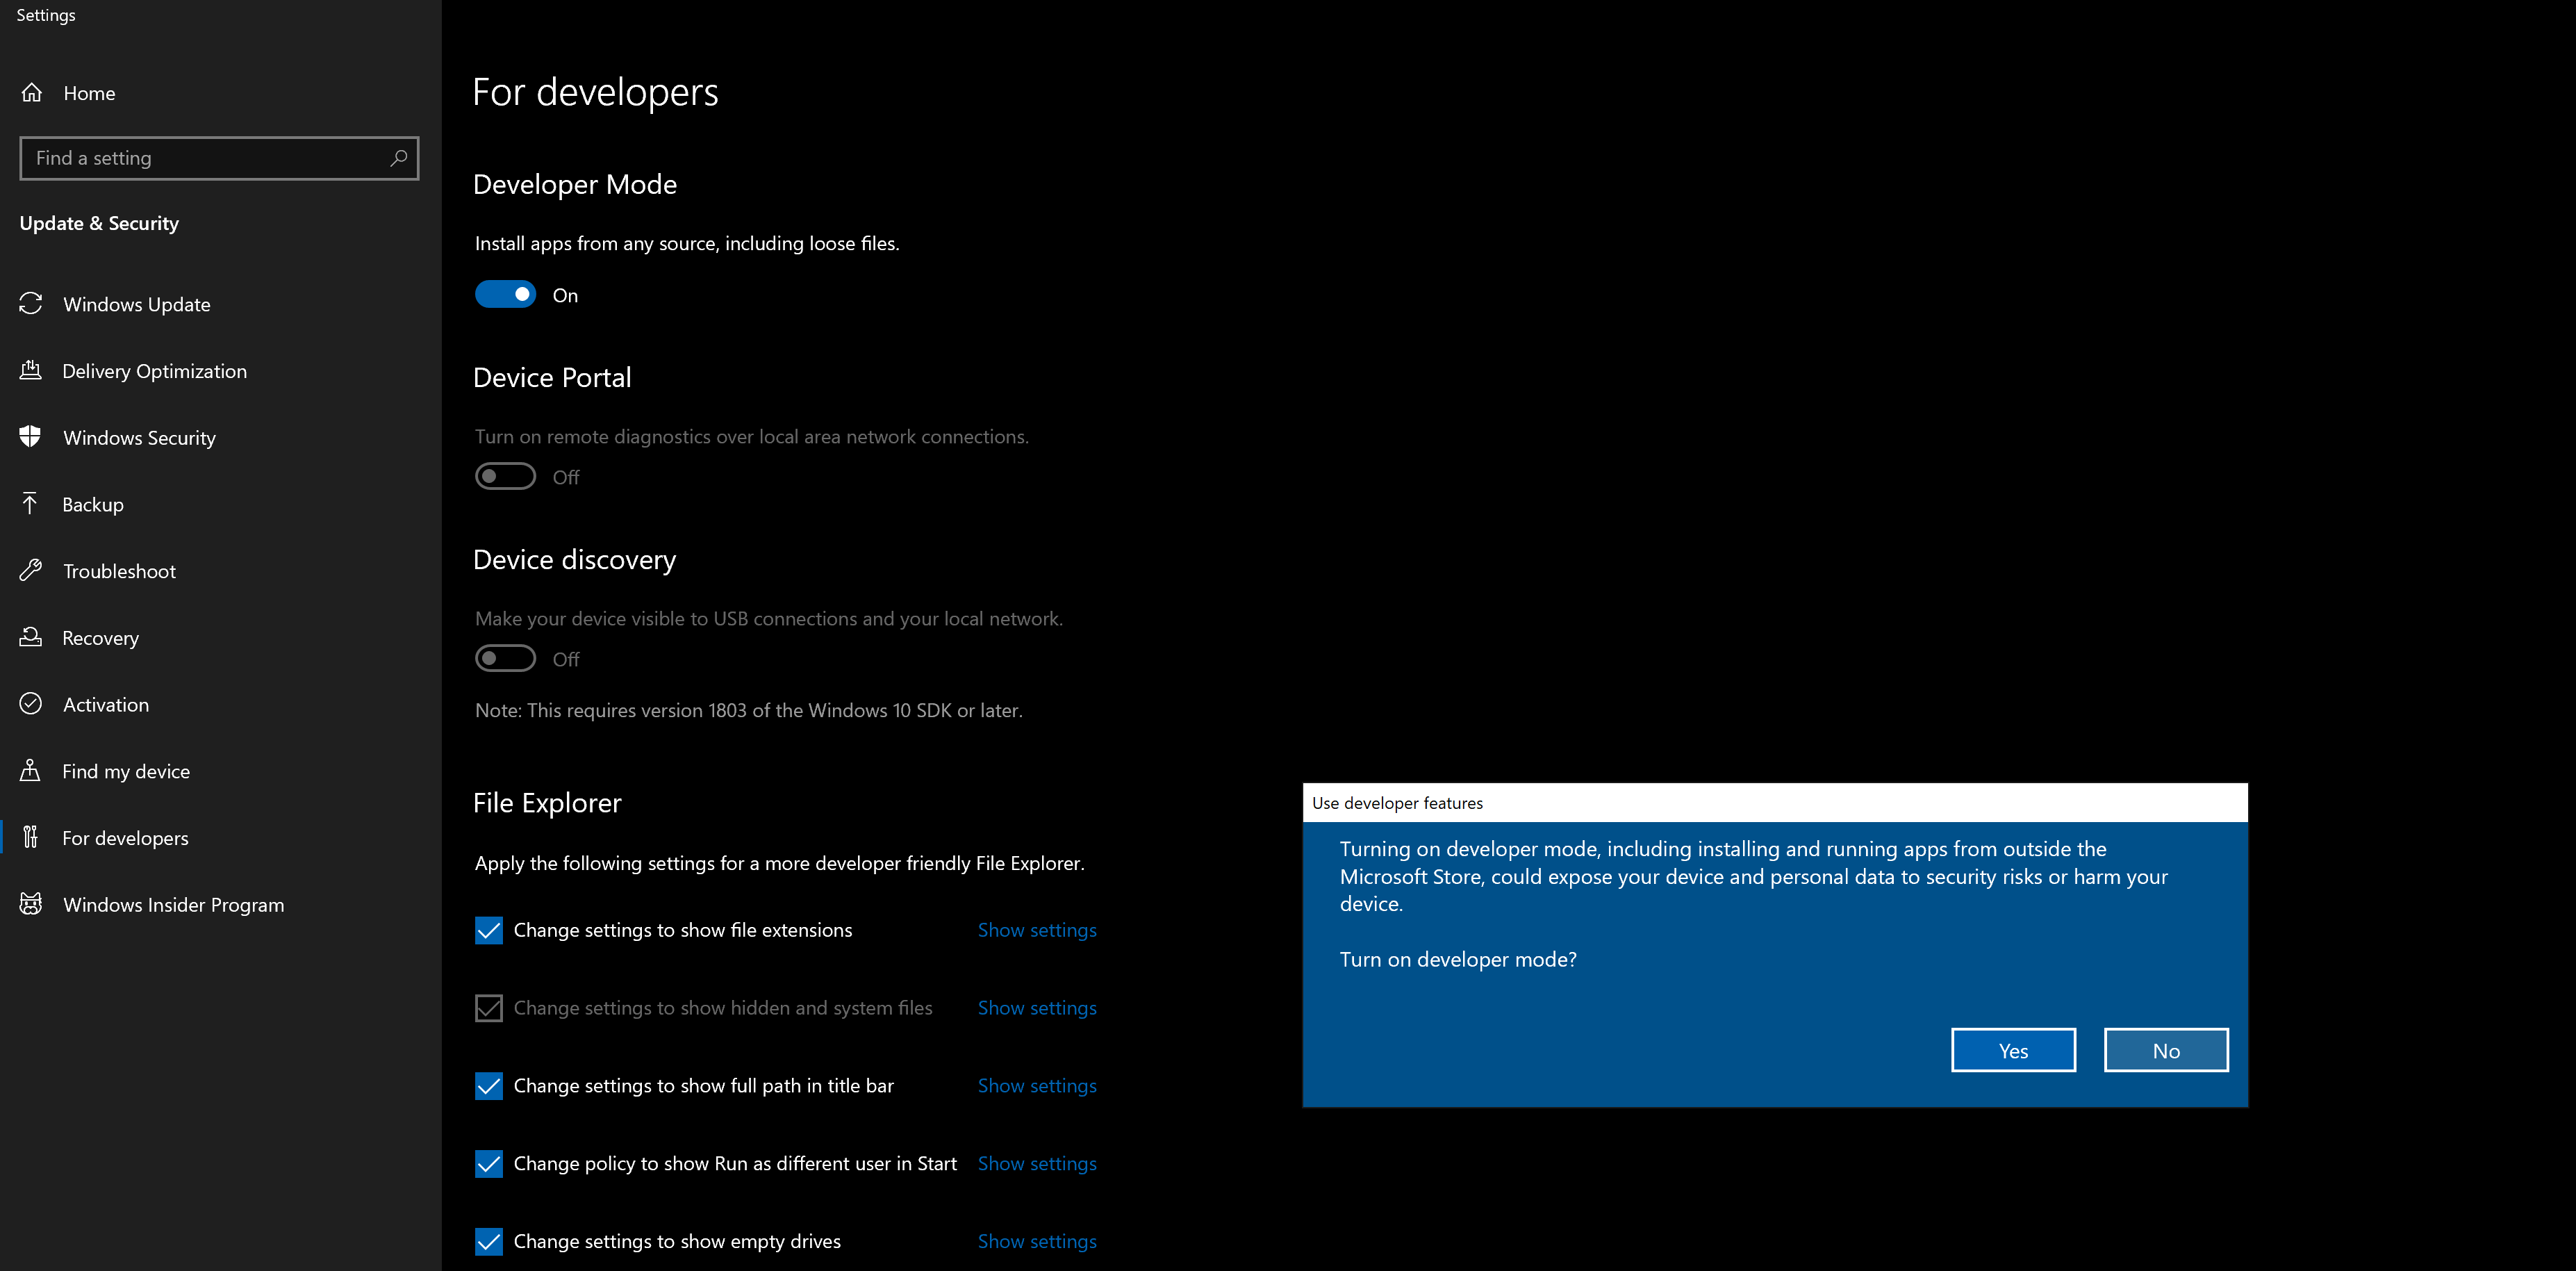
Please be sure to enable Developer Mode in Windows to run WinAppDriver.
Enlarge

developerMoDE Let’s create our first class that will contain the basic Setup to open the app and create the WinAppDriver session.
To be able to use WinAppDriver classes and methods we need to add to our project more Nuget packages, in this case, Appium.WebDriver.
Using AppiumOptions we can add capabilities, like “app”, this one can get whether the path location to the app or its specific ID, for default Windows apps, it’s better to use this ID, by going to PowerShell and typing “get-StartApps” and locating the Calculator app to obtain it.
Additionally of just creating the session, we are going to add two more methods, one to validate if WinAppDriver Process is already running and the other to Start WinAppDriver else, these methods are useful to avoid having to run WinAppDriver manually.
We can avoid opening the cmd with WinAppDriver logs, but I recommend it to validate the commands and interactions received by WinAppDriver.
Automation Framework
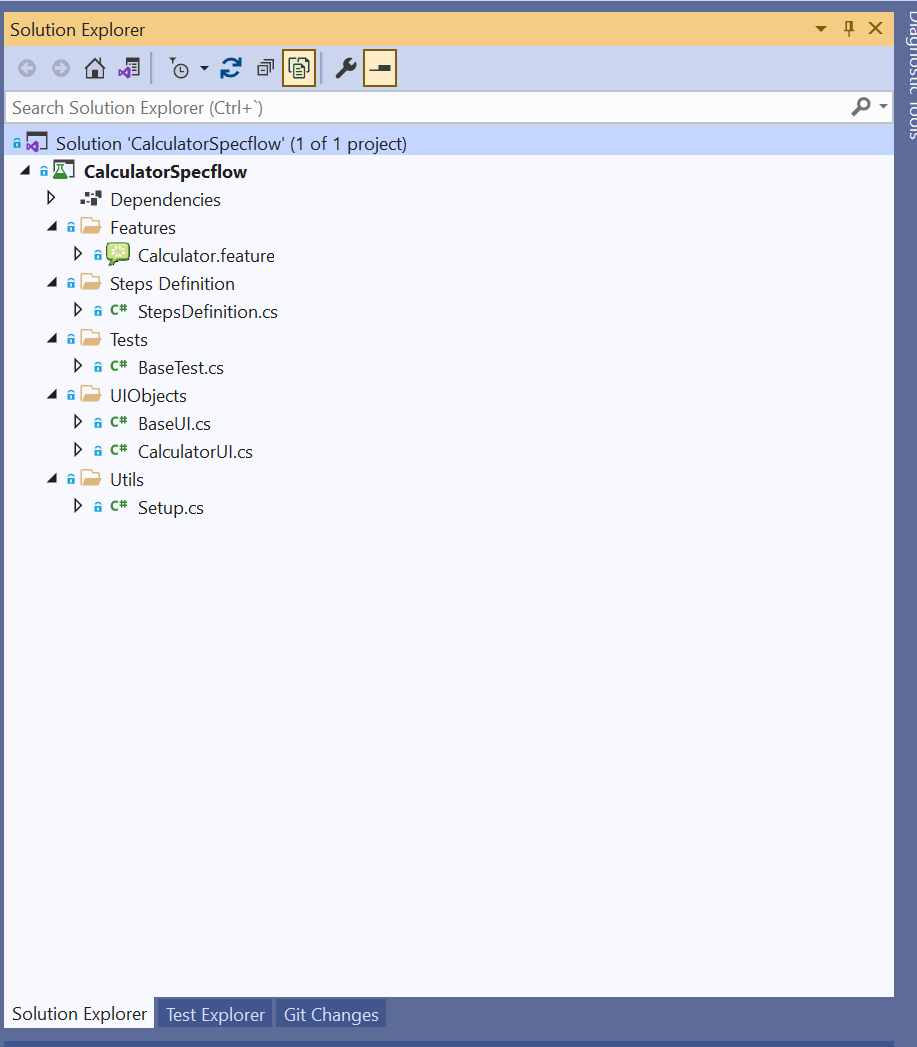
Create the Class “Setup“ under the folder “Utils“.
Let’s create our first feature file, which will contain all the steps need it to make a simple addition of two numbers, this feature file is made using Gherkin, which uses Natural Language. Keep in mind that steps in feature files have to be really simple and easy to understand by every person in the team.
Create the Feature file “Calculator.feature“ under the folder “Features“.
Once we have our Feature file, we have to bind these steps to our code, we are going to create a new class that will contain Methods bound to the steps in the feature.
To get the elements of the calculator, we need to use “inspect.exe” available inside Windows SDK Kit, located at “C:\Program Files (x86)\Windows Kits\10\bin\10.0.22621.0\x86\inspect.exe”.
Open Calculator, and then execute “inspect.exe“, hovering on the element you want to know the locator.
We have different types of locators, but it is always recommended for integrity and speed to use “AutomationID“, as it is unique, if this ID is not defined, we can use “ClassName“, “Name” or get the “XPath” of the element verifying the DOM of the application. It is also possible to use multiple locators.
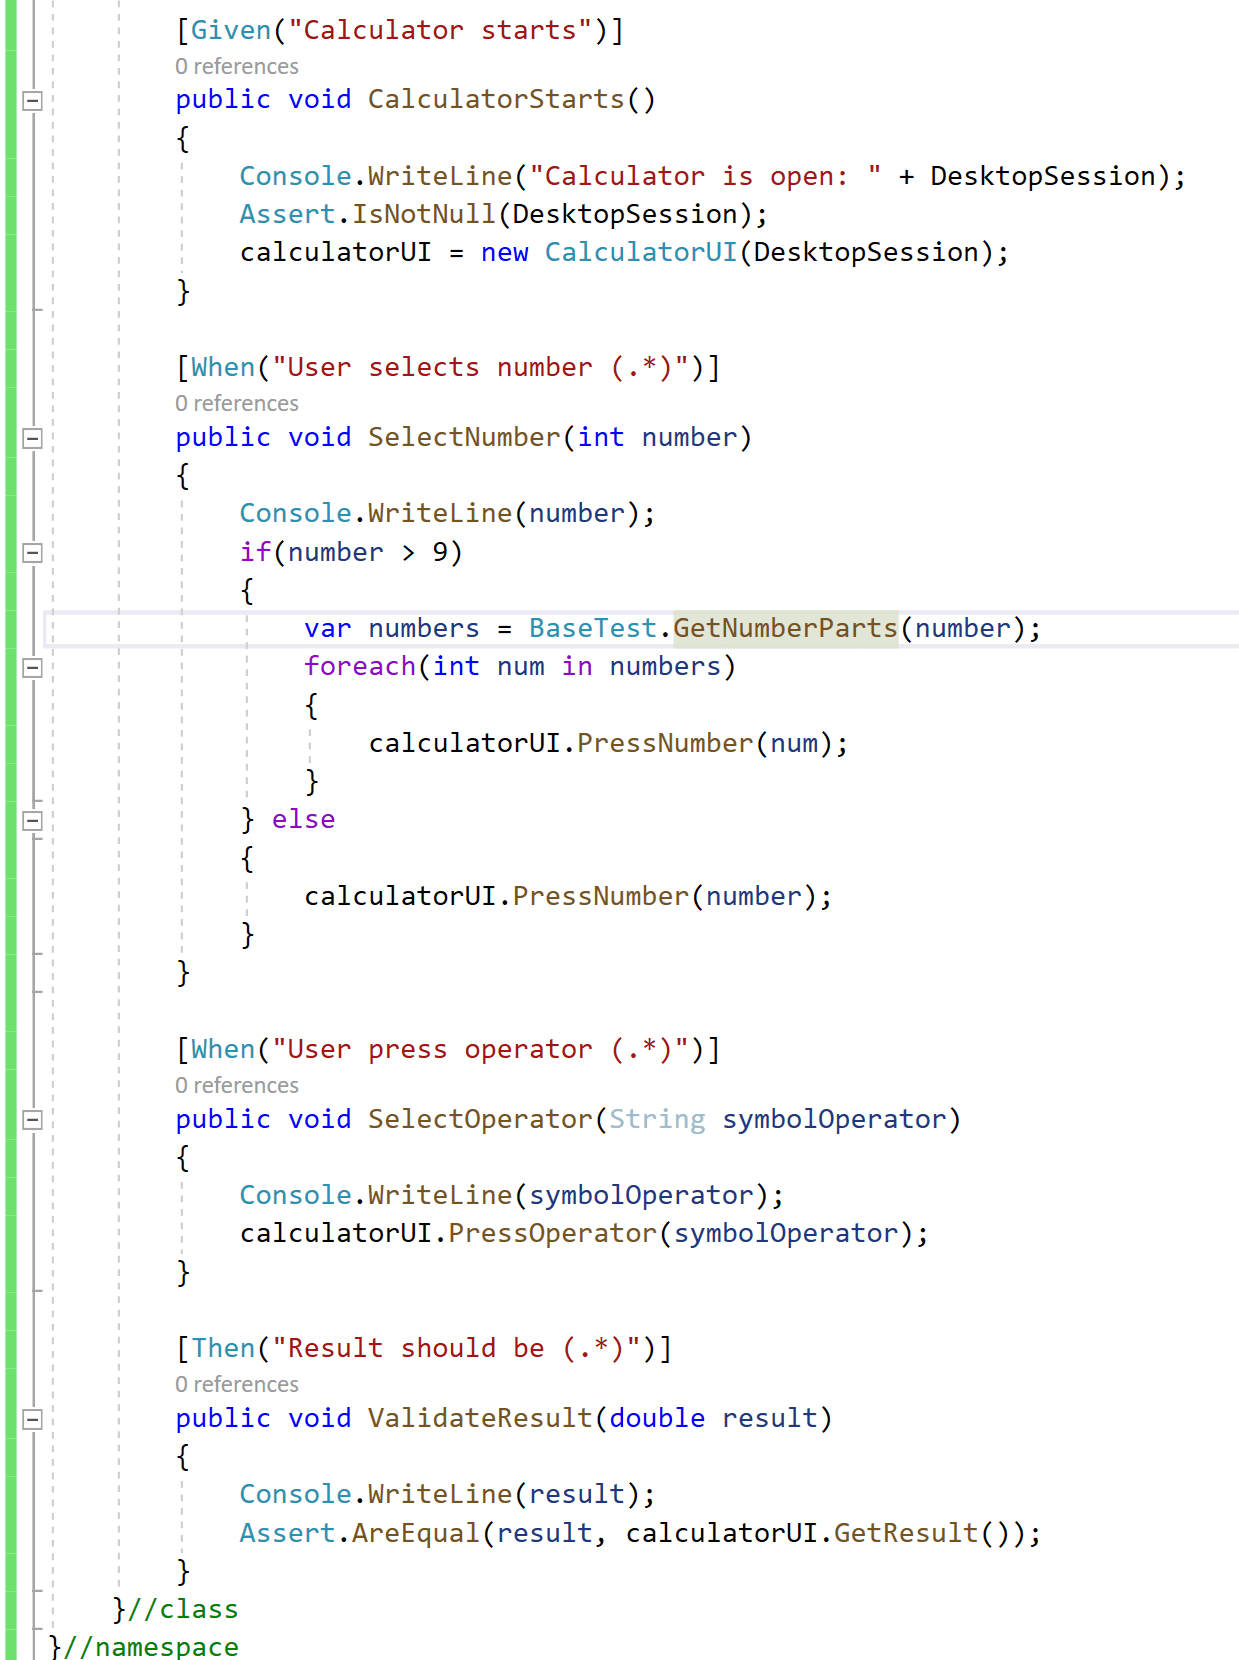
To have a good handle of WinAppDriver Process, WinAppDriver CMD, and the Calculator App, we need to add two basic methods, one is “BeforeScenario” which contains the creation of WinAppDriver Process, CMD, and the opening of the Calculator.
Next, we have “AfterScenario” which contains the Teardown of all these objects, we can also add other actions that we want always to run when a test finishes, like the creation of evidence, upload of results, and so on.
Create the Class “StepsDefinition“ under the folder “Steps Definition“.
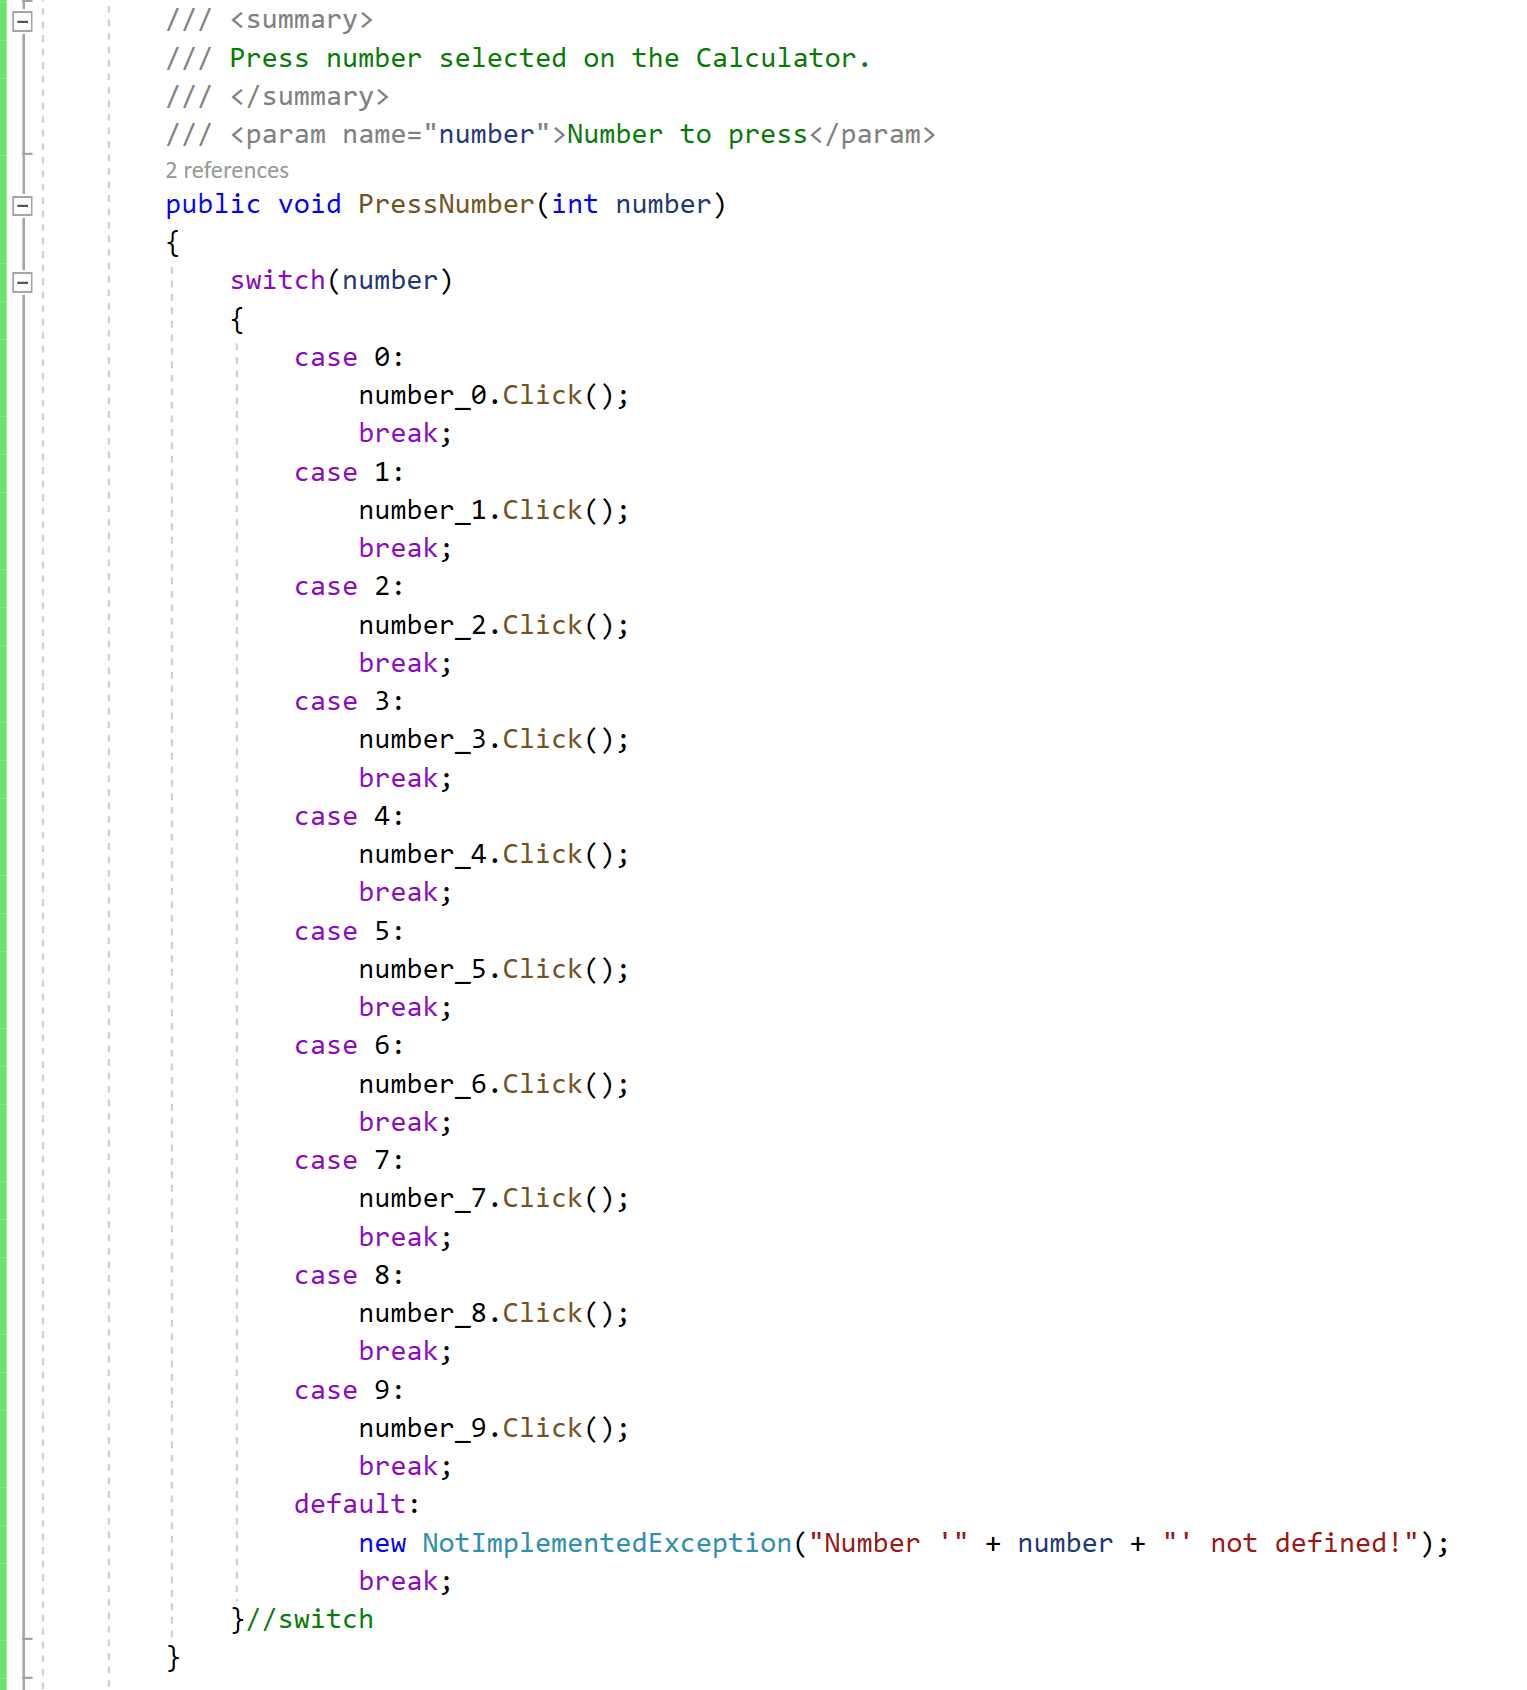
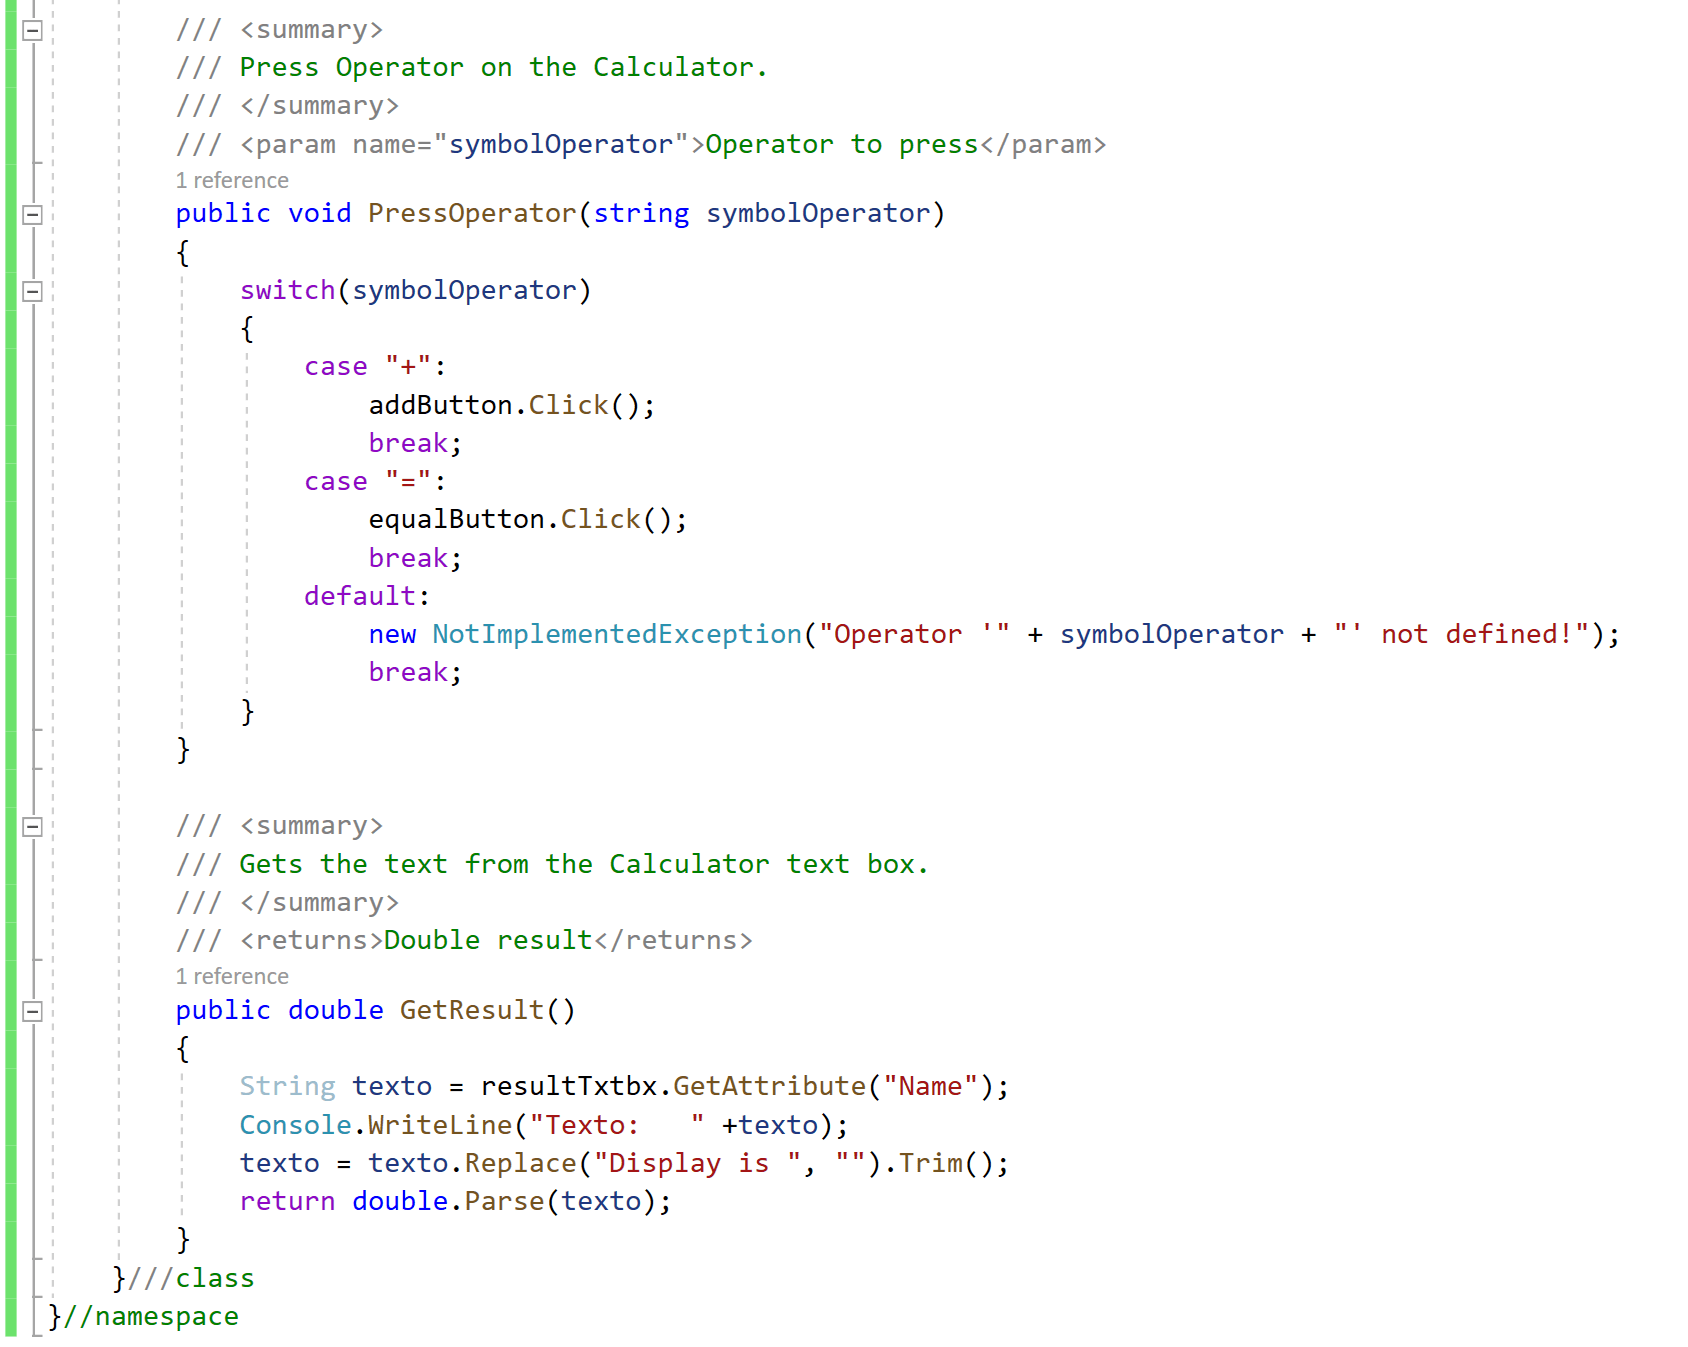
“CalculatorUI“ is a class that will contain all the actions on the UI, like pressing buttons.
Let’s take a look at the “CalculatorUI” class under the folder “UIObjects“.
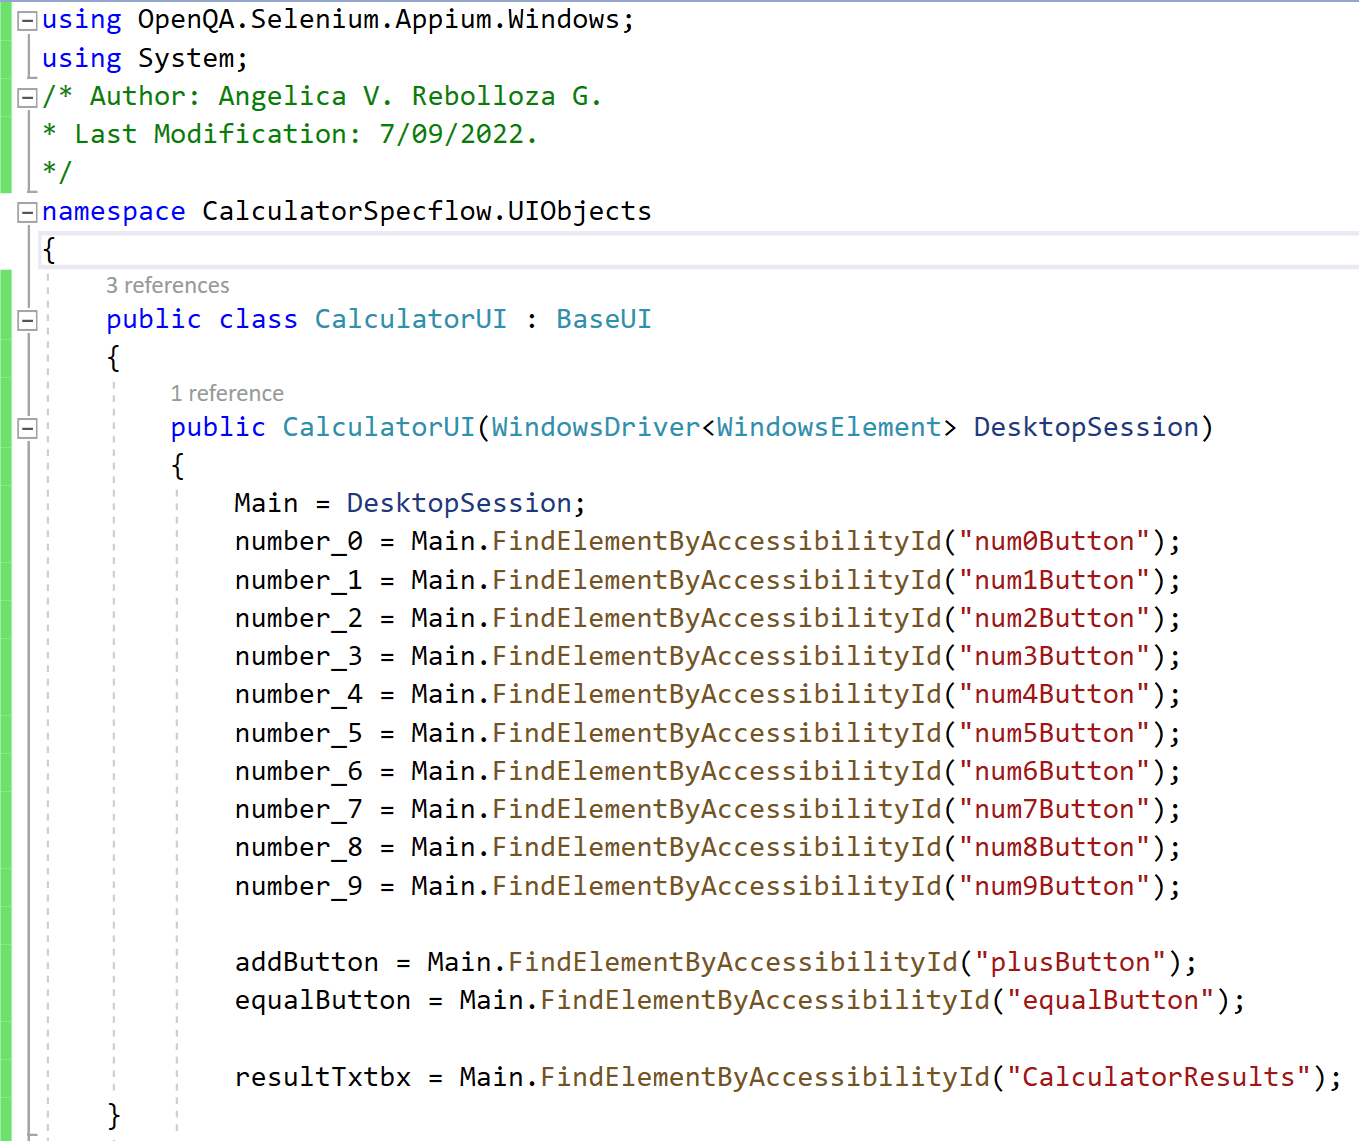
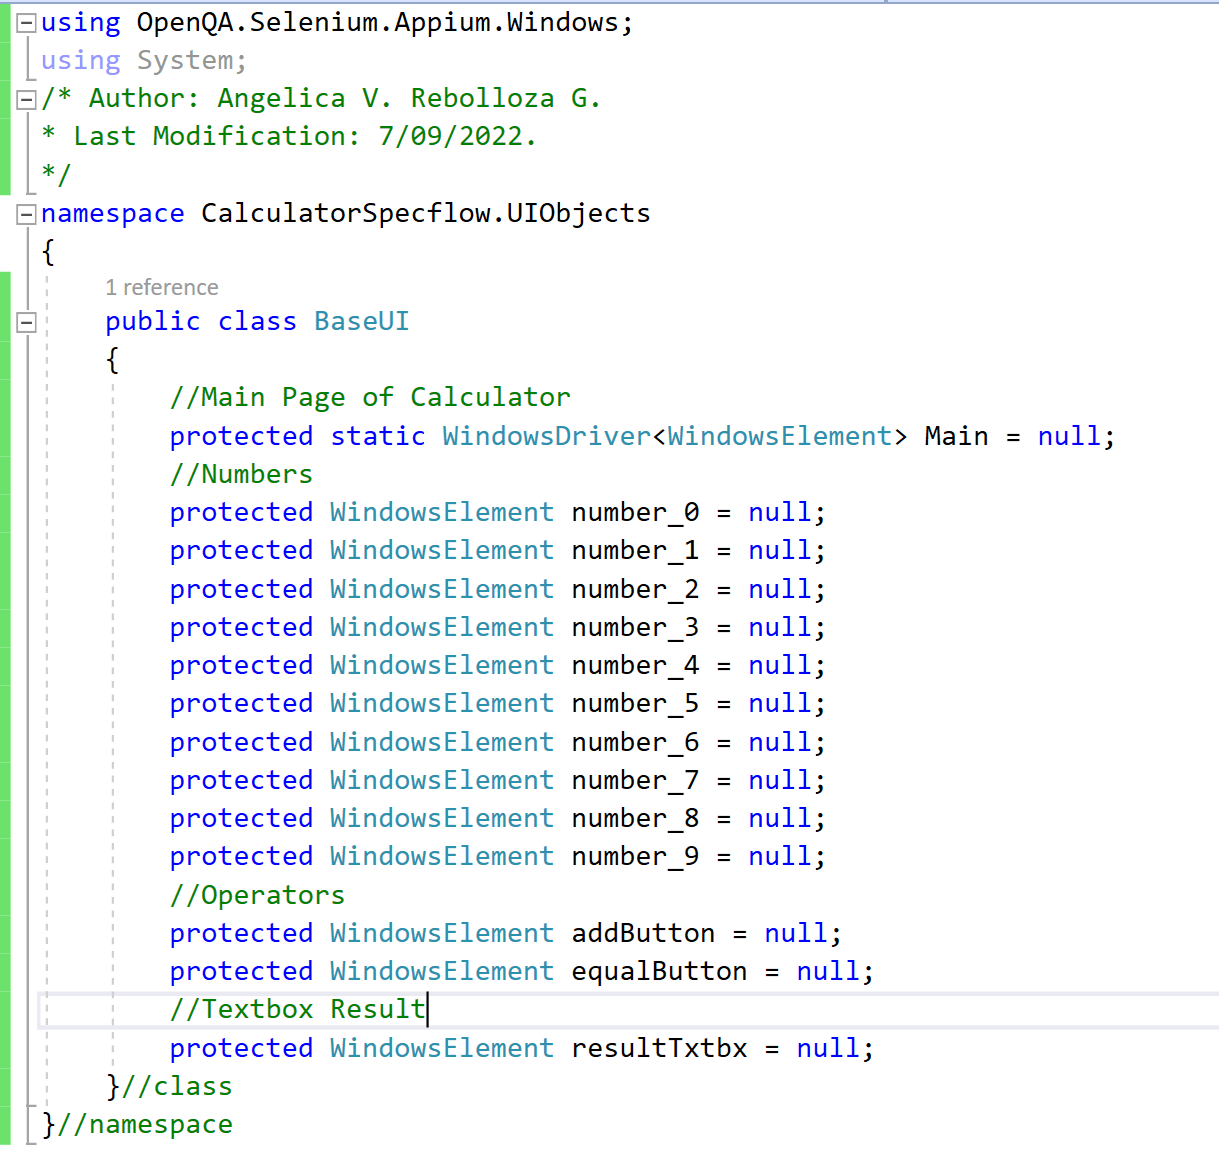
“CalculatorUI“ extends from “BaseUI“, under the same folder “UIObjects“, which contains the definition of all elements used on the Calculator Main Page, and these are initialized in “CalculatorUI“.
If we review “BaseUI“ it contains the definition of all elements used by “CalculatorUI“.
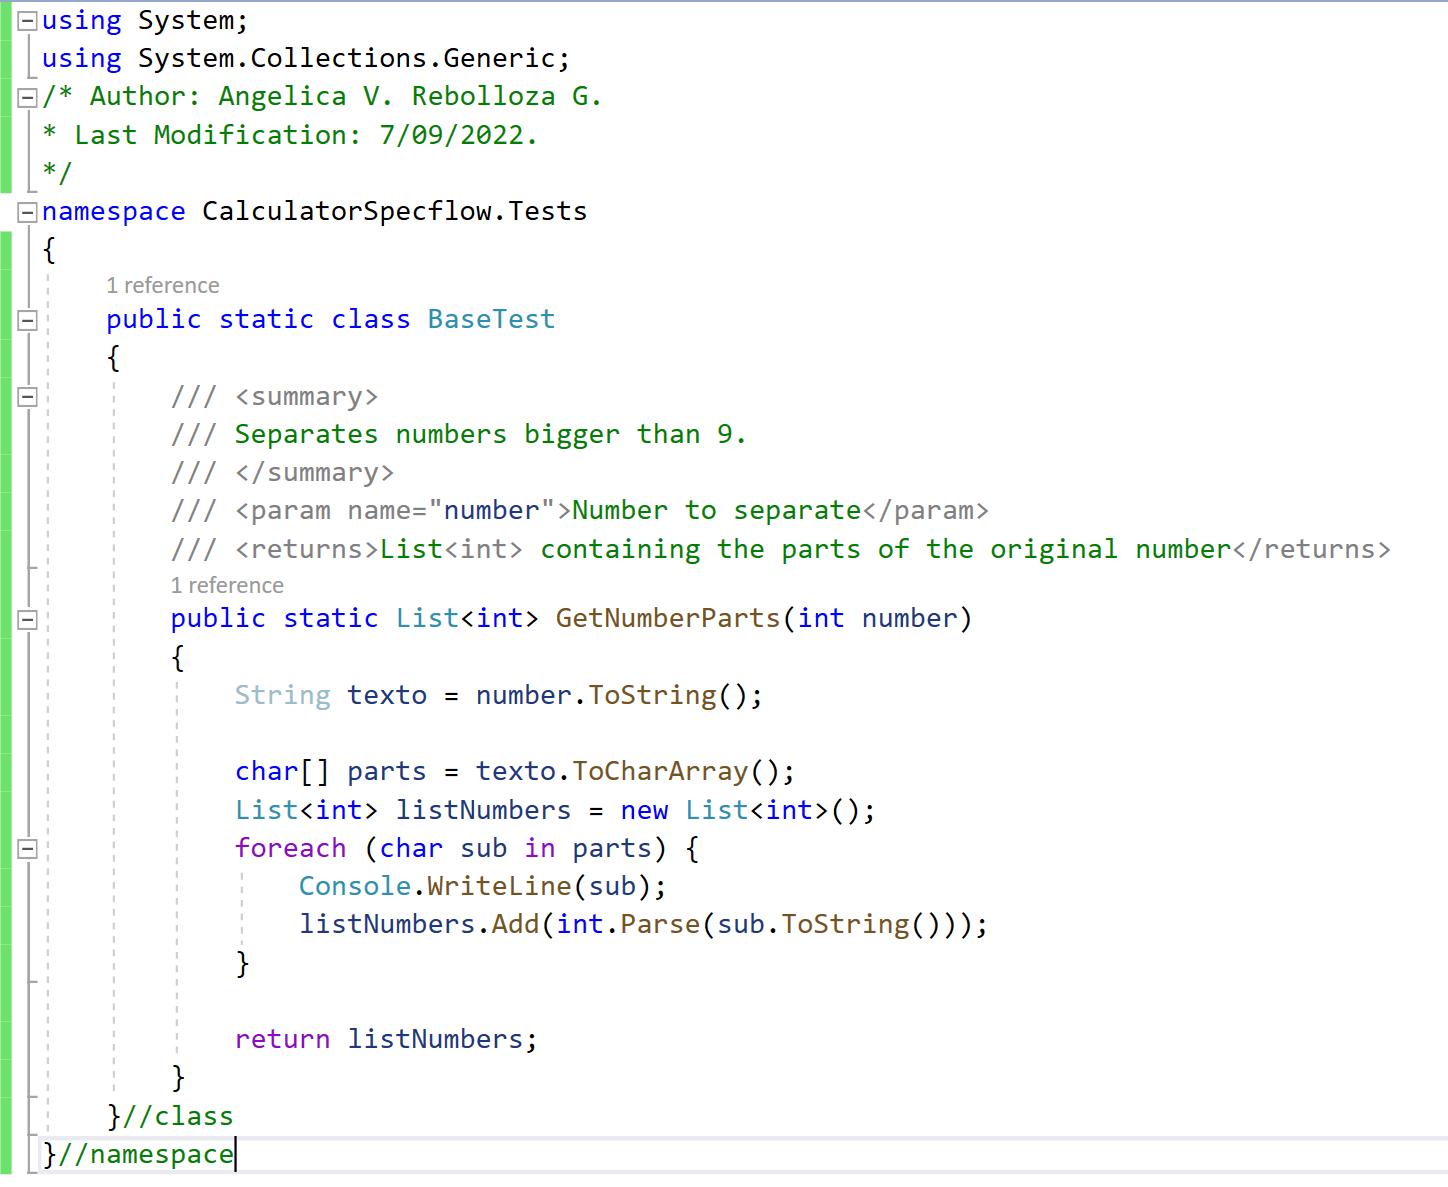
Additionally, to these classes, there is one more class called “BaseTest“, this is a static class that contains extra actions need it, like in this example, contains a special method to separate numbers bigger than 9, to be able to introduce them in the calculator.
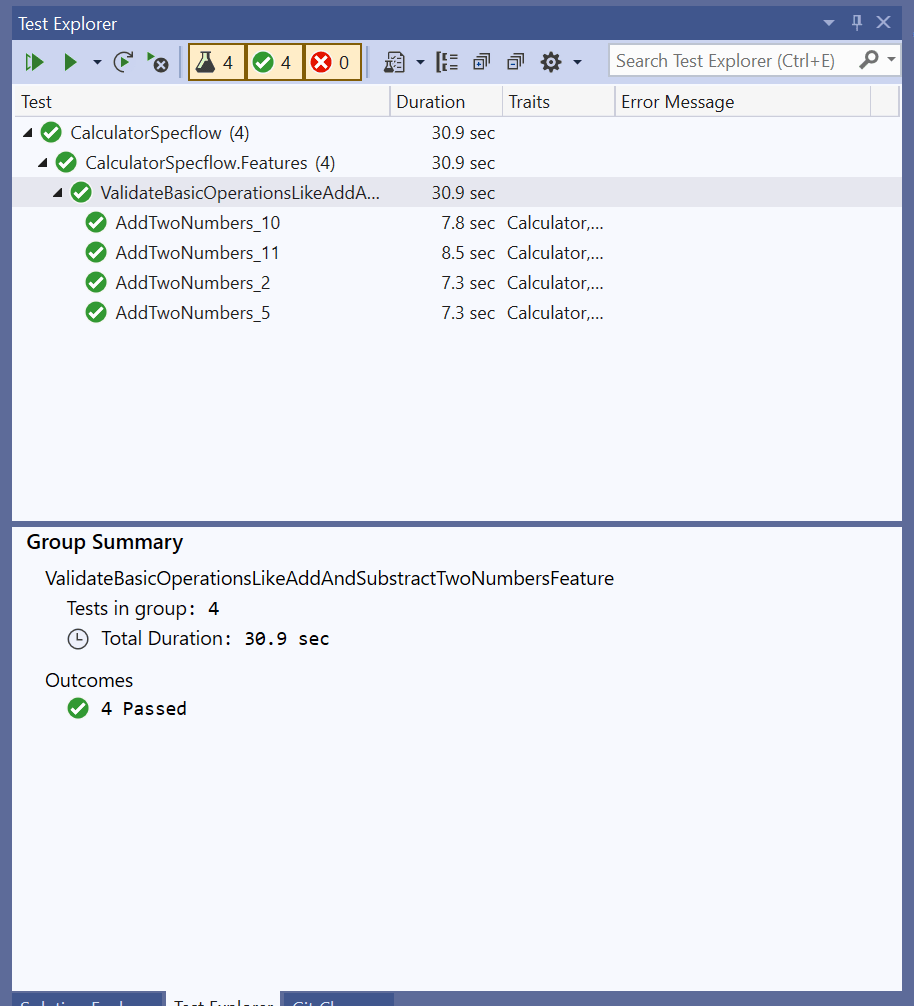
Finally, we can run the test, using “Test Explorer” from Tools in VS.
If you want to download the Project, it is available at Github.
Link of interest:
Automating with Appium – Selenium and TestNG
The Agile Team Approach
The Scrum Team Size
Speed Up Android Testing with TestProject AgentAny help is welcome to help us keeping this effort alive!BTC (Bech32): bc1qx6f8nczr5ram6d57svlnsfmk5mhu6lsr9q7mxwLTC: LdiiMfiJvqrXDw1xPMqDptXGFEkyADZzVVDOGE: DKehWtHnmrf7JTRWpEQ9LtqwqY8HdbdkbUSOL: 3f2RR9w2VwmBqjLm5DmbuUPwWfdYH7GXCbHVWhsq5sky
Angélica Viridiana Rebolloza
Computing Engineer specialized in Automation, working with different tools for Mobile and Web, using languages, tools, and platforms like JAVA, VBScript, JavaScript, C#, Appium, Protractor, UFT (QTP), Selenium, WinAppDriver, Jenkins among others.
Viridiana also has been working using practices like TDD & BDD under Cascade and Agile approaches.
Some certifications include: ISTQB Foundations Certification, SeU Selenium Certified, ITIL Foundations Certification.
No Comment
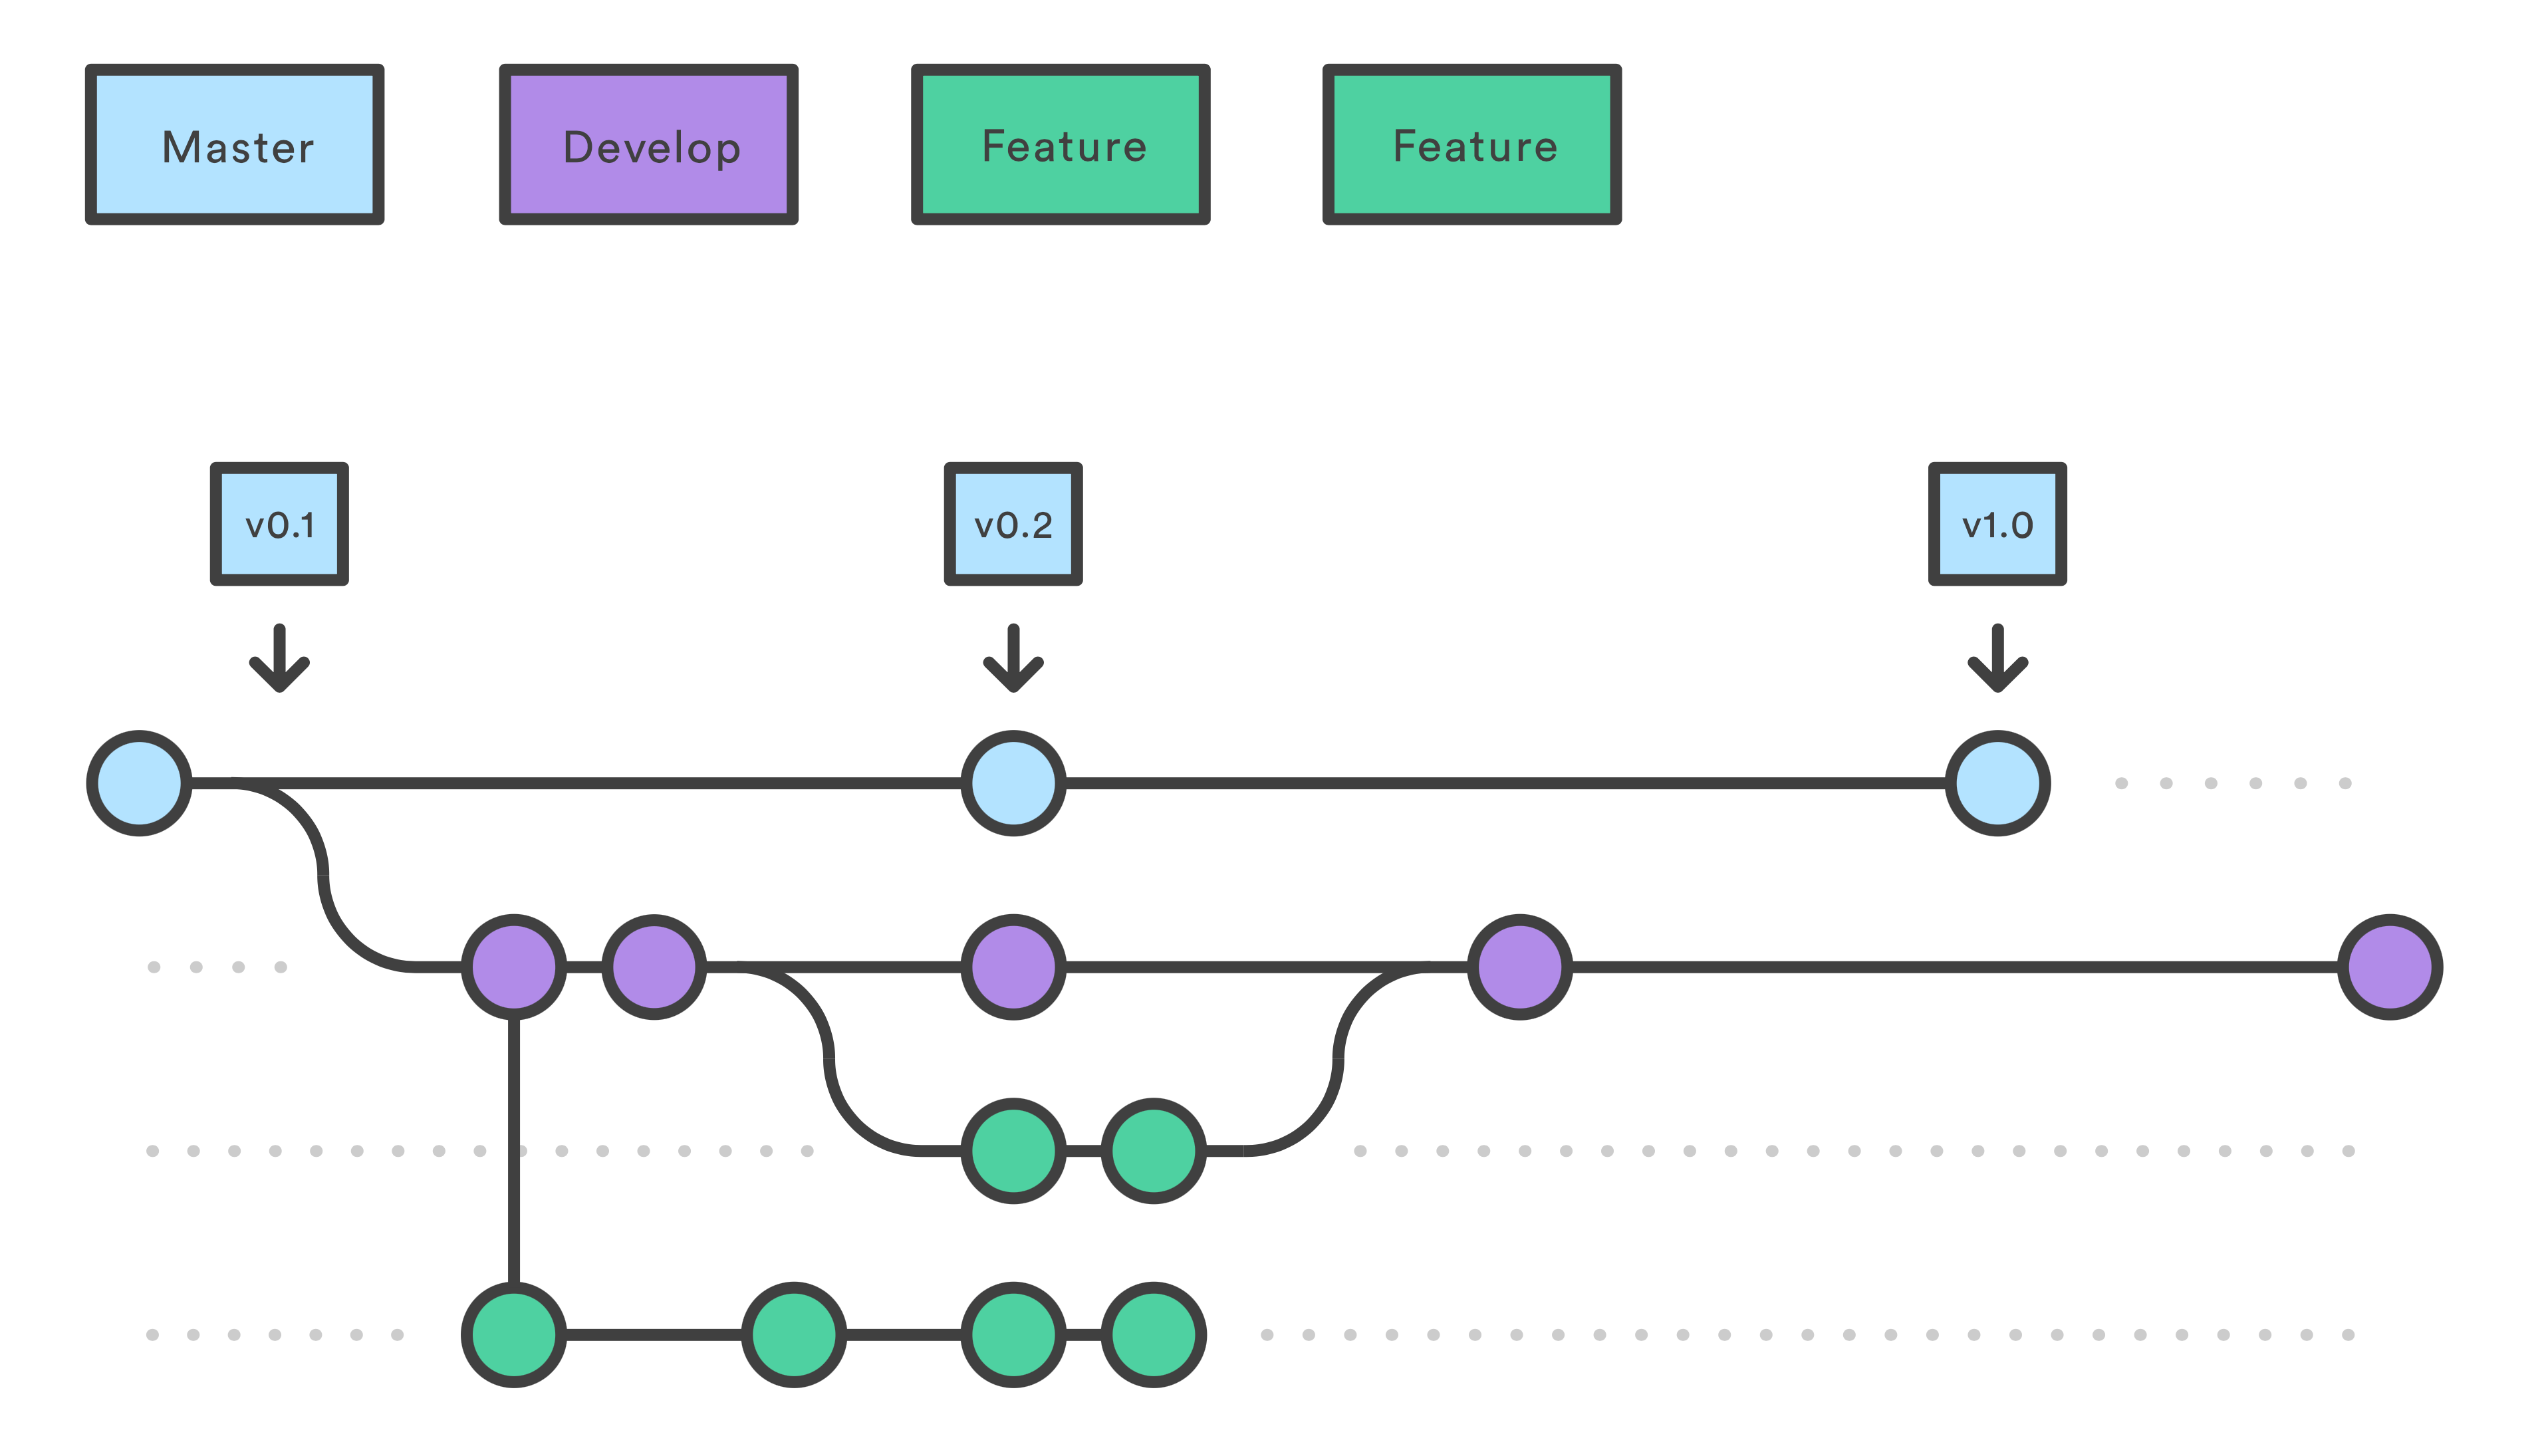
To have better control and management of our code deployments is highly recommended to upload a project to Github using the command line, in other words, have our code uploaded to a Cloud Repository like Github since is the most used cloud repository used out there, but we can also use other options like Bitbucket or an already implemented solution like Azure DevOps that integrates It’s own cloud repository but also has a connection with Github If is needed.
Github is a version control system, this helps us to manage modifications and keep them in a central repository, where a group of developers (contributors) can upload their changes, revert changes, and have to keep each version stored in branches to avoid code conflicts and assure the code integrity and stability.
It’s important to mention that our code repository is going to be stored in “Branches“, “Master Branch” is our main branch where the last stable and verified version of our code has to reside. The rest branches that we create along the way are where the changes like new functionalities, updates are going to be made for later merge them with the Master branch.
In this post, I’m going to teach you how to upload for the first time a workspace project to Github using the command line.
For later management I recommend you to install Github desktop at https://desktop.github.com
Let’s upload our React-Native mobile app called “Calculator“.
Create Repository
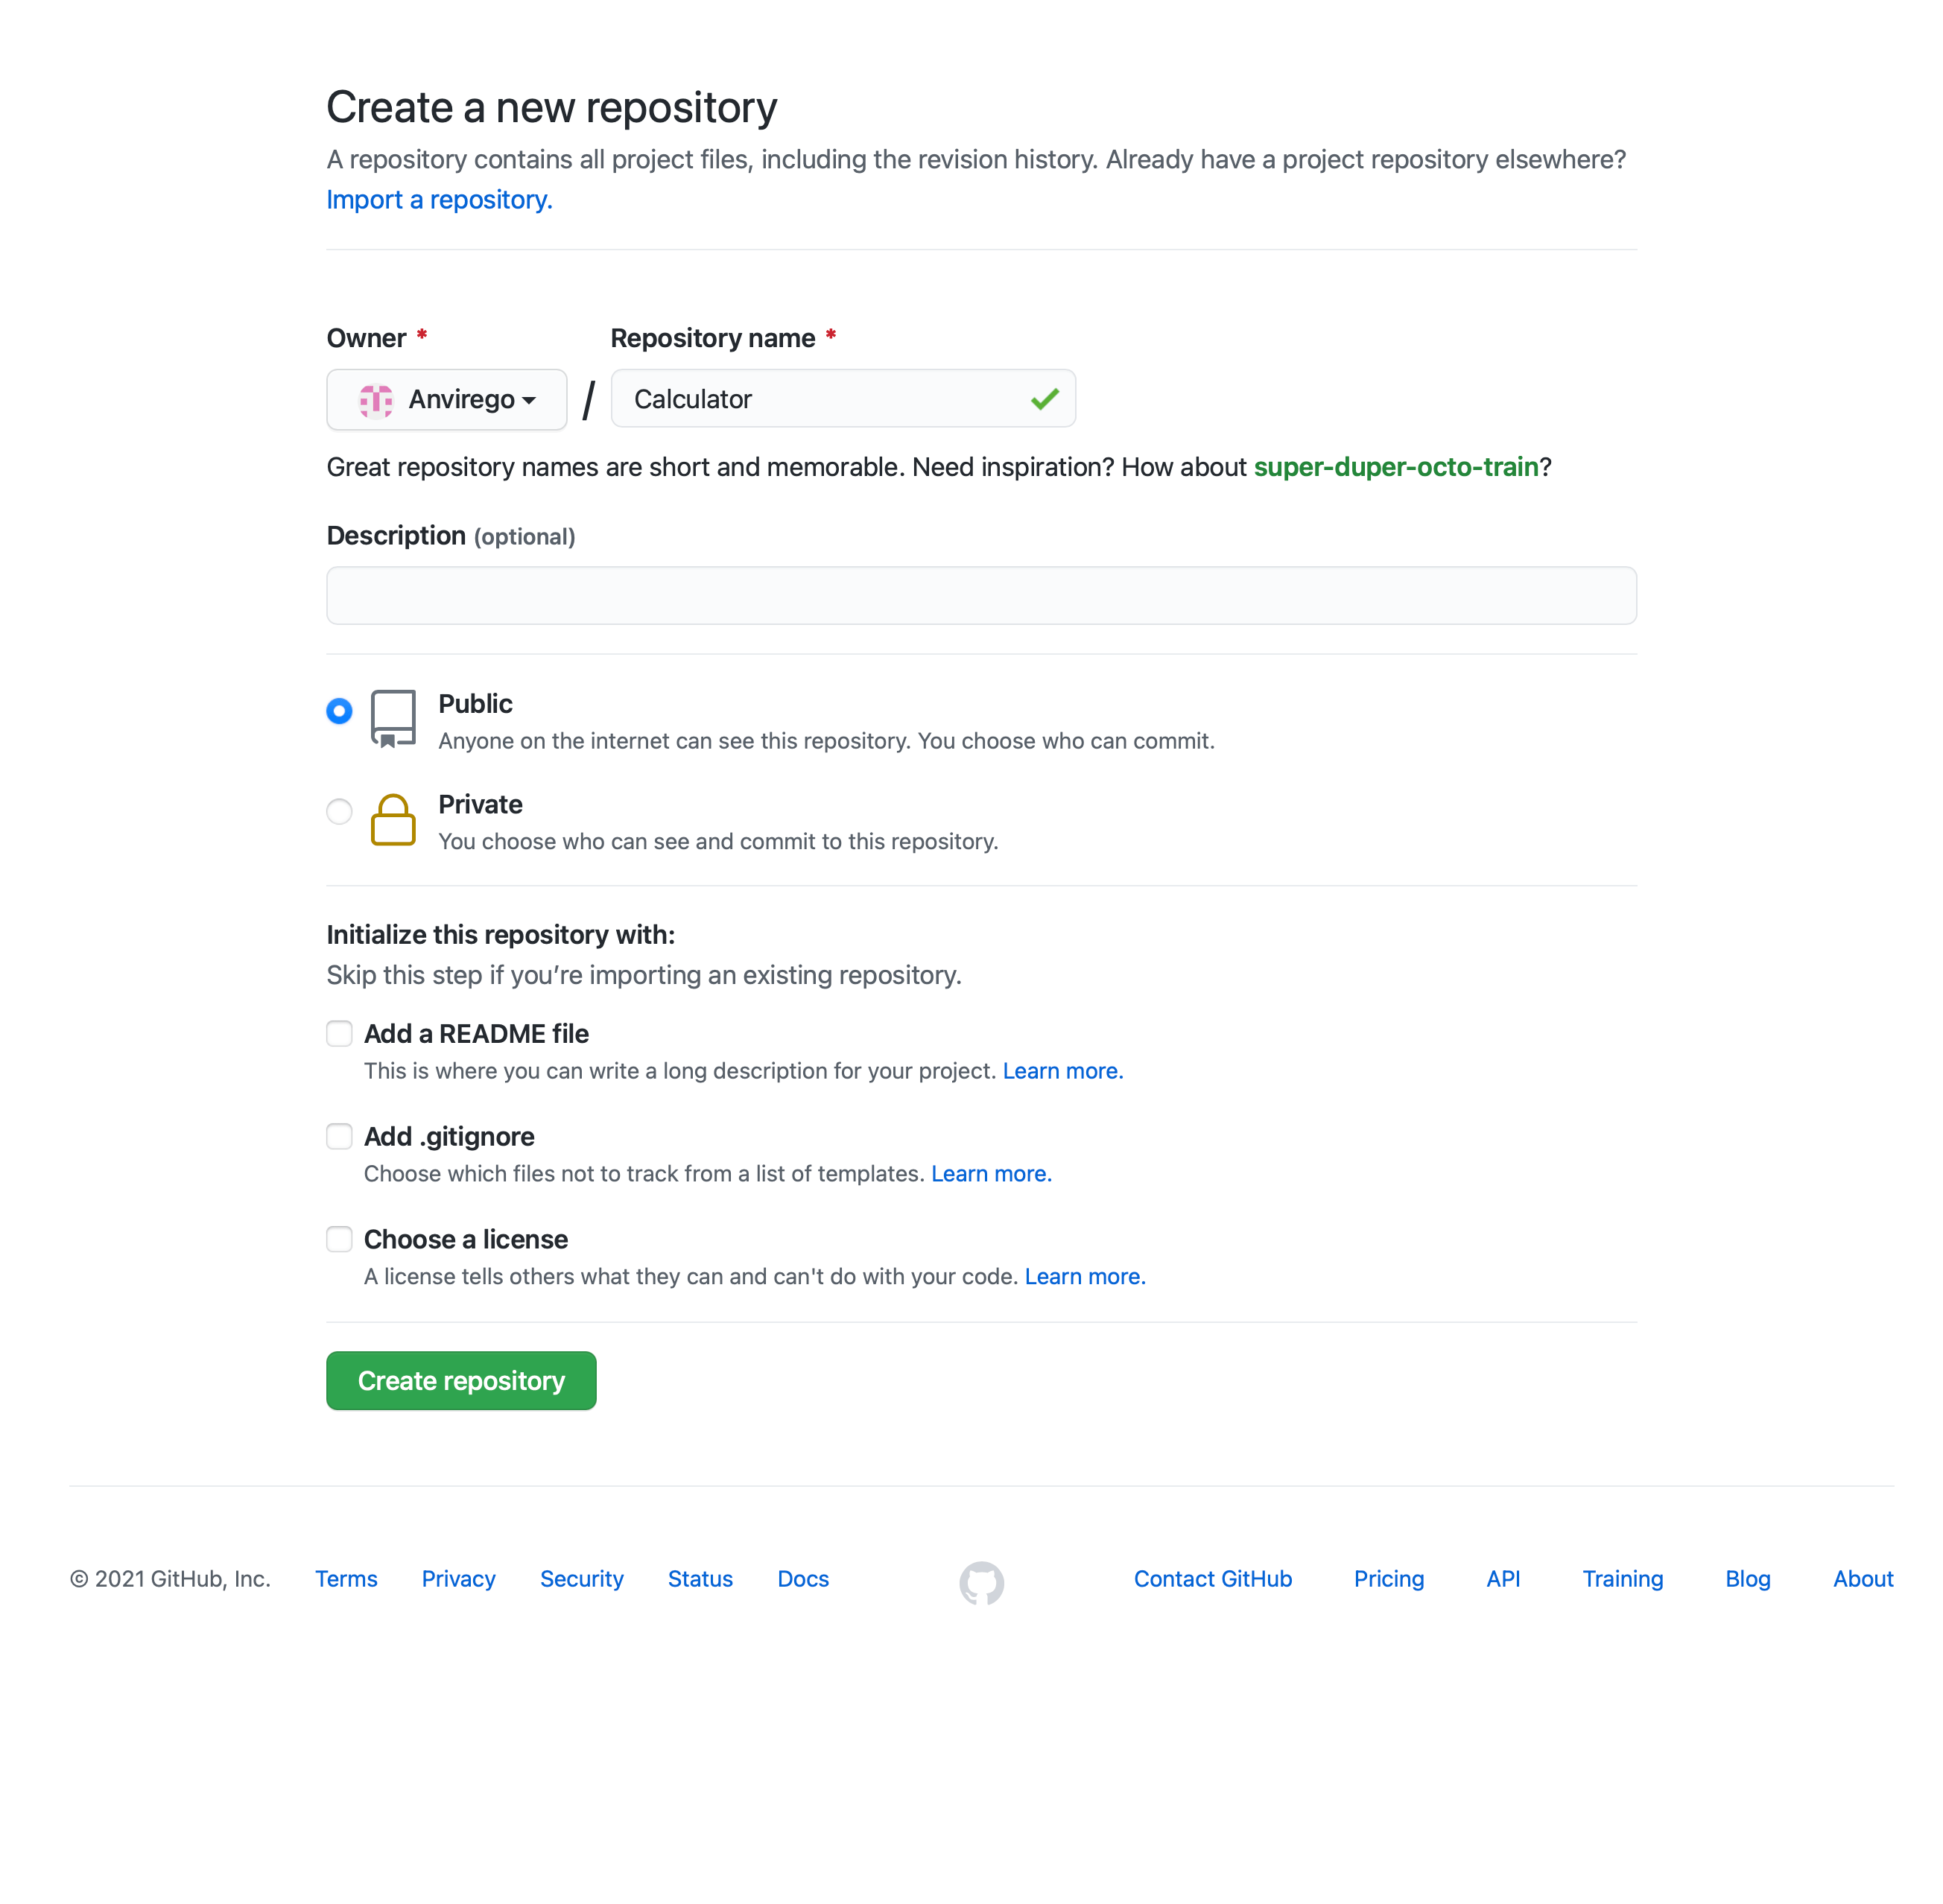
First, we need to create a new Repository, for this go to your main page in Github, and click “New“.
Insert the name of your Repository and choose whether is going to be “Private” or “Public“, for credential management is easier to have as public, if you want it to keep it as “Private” keep in mind that you will need to create an SSH Key to been able to log in with other apps like Jenkins.
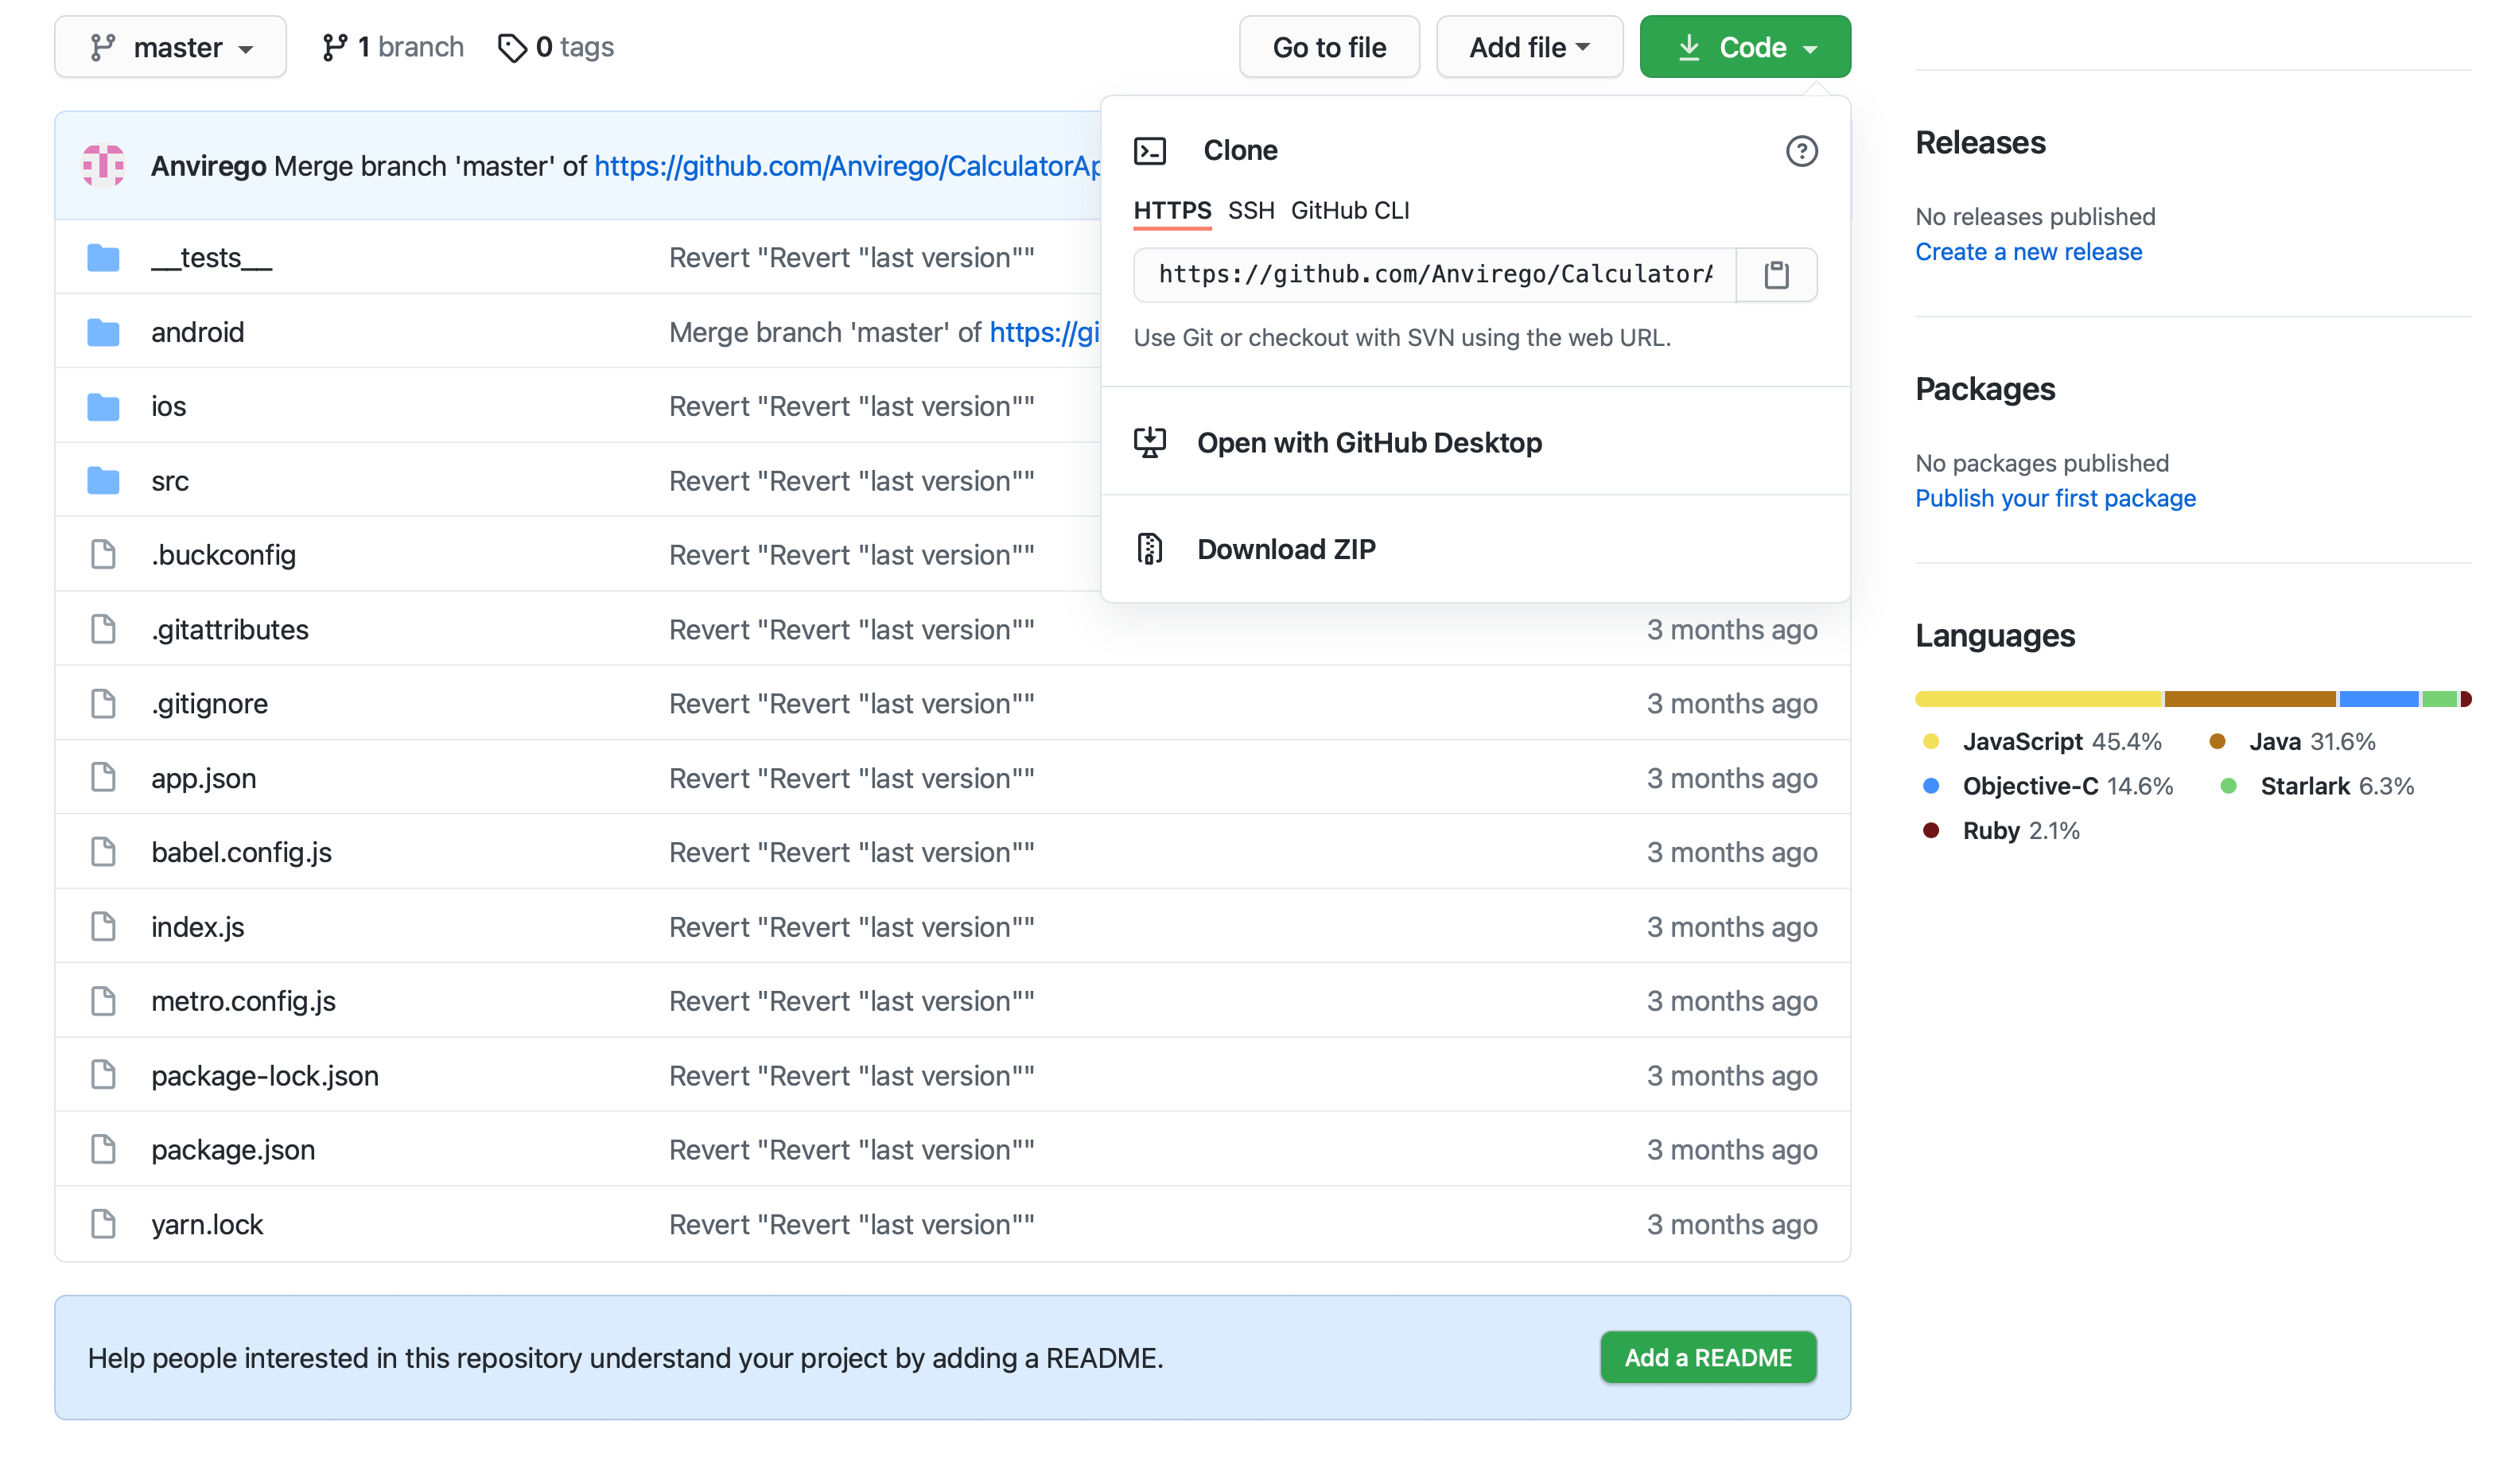
Once the repository is created go to this repo and save the URL of this repo, we’re going to need it later.
Command Line
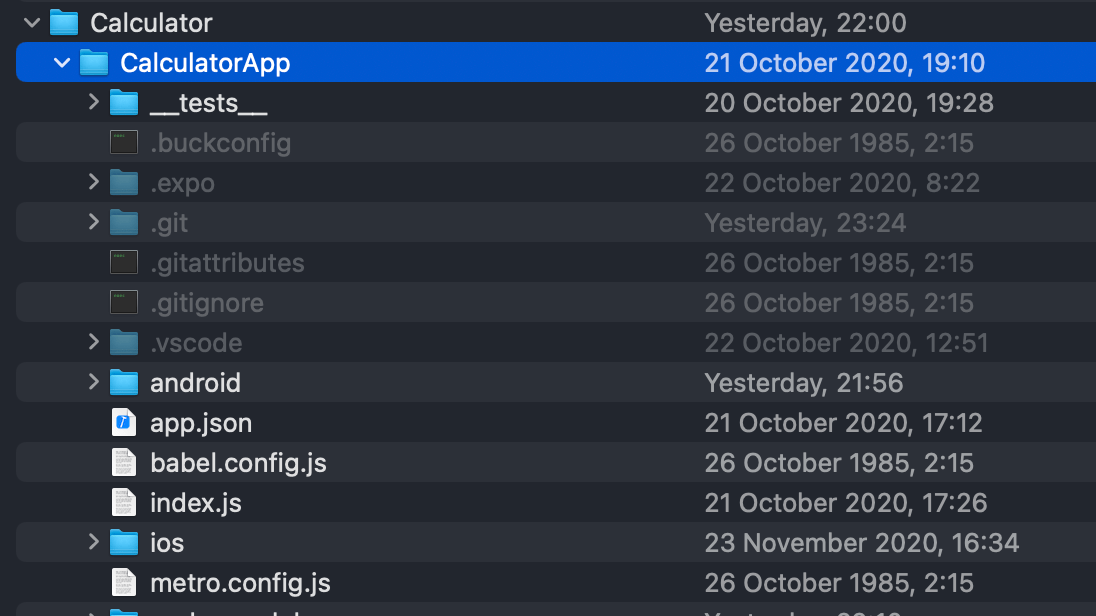
Open cmd and position on the workspace path, like “/Users/angelicaviridiana/eclipse-workspace/Calculator/CalculatorApp“.
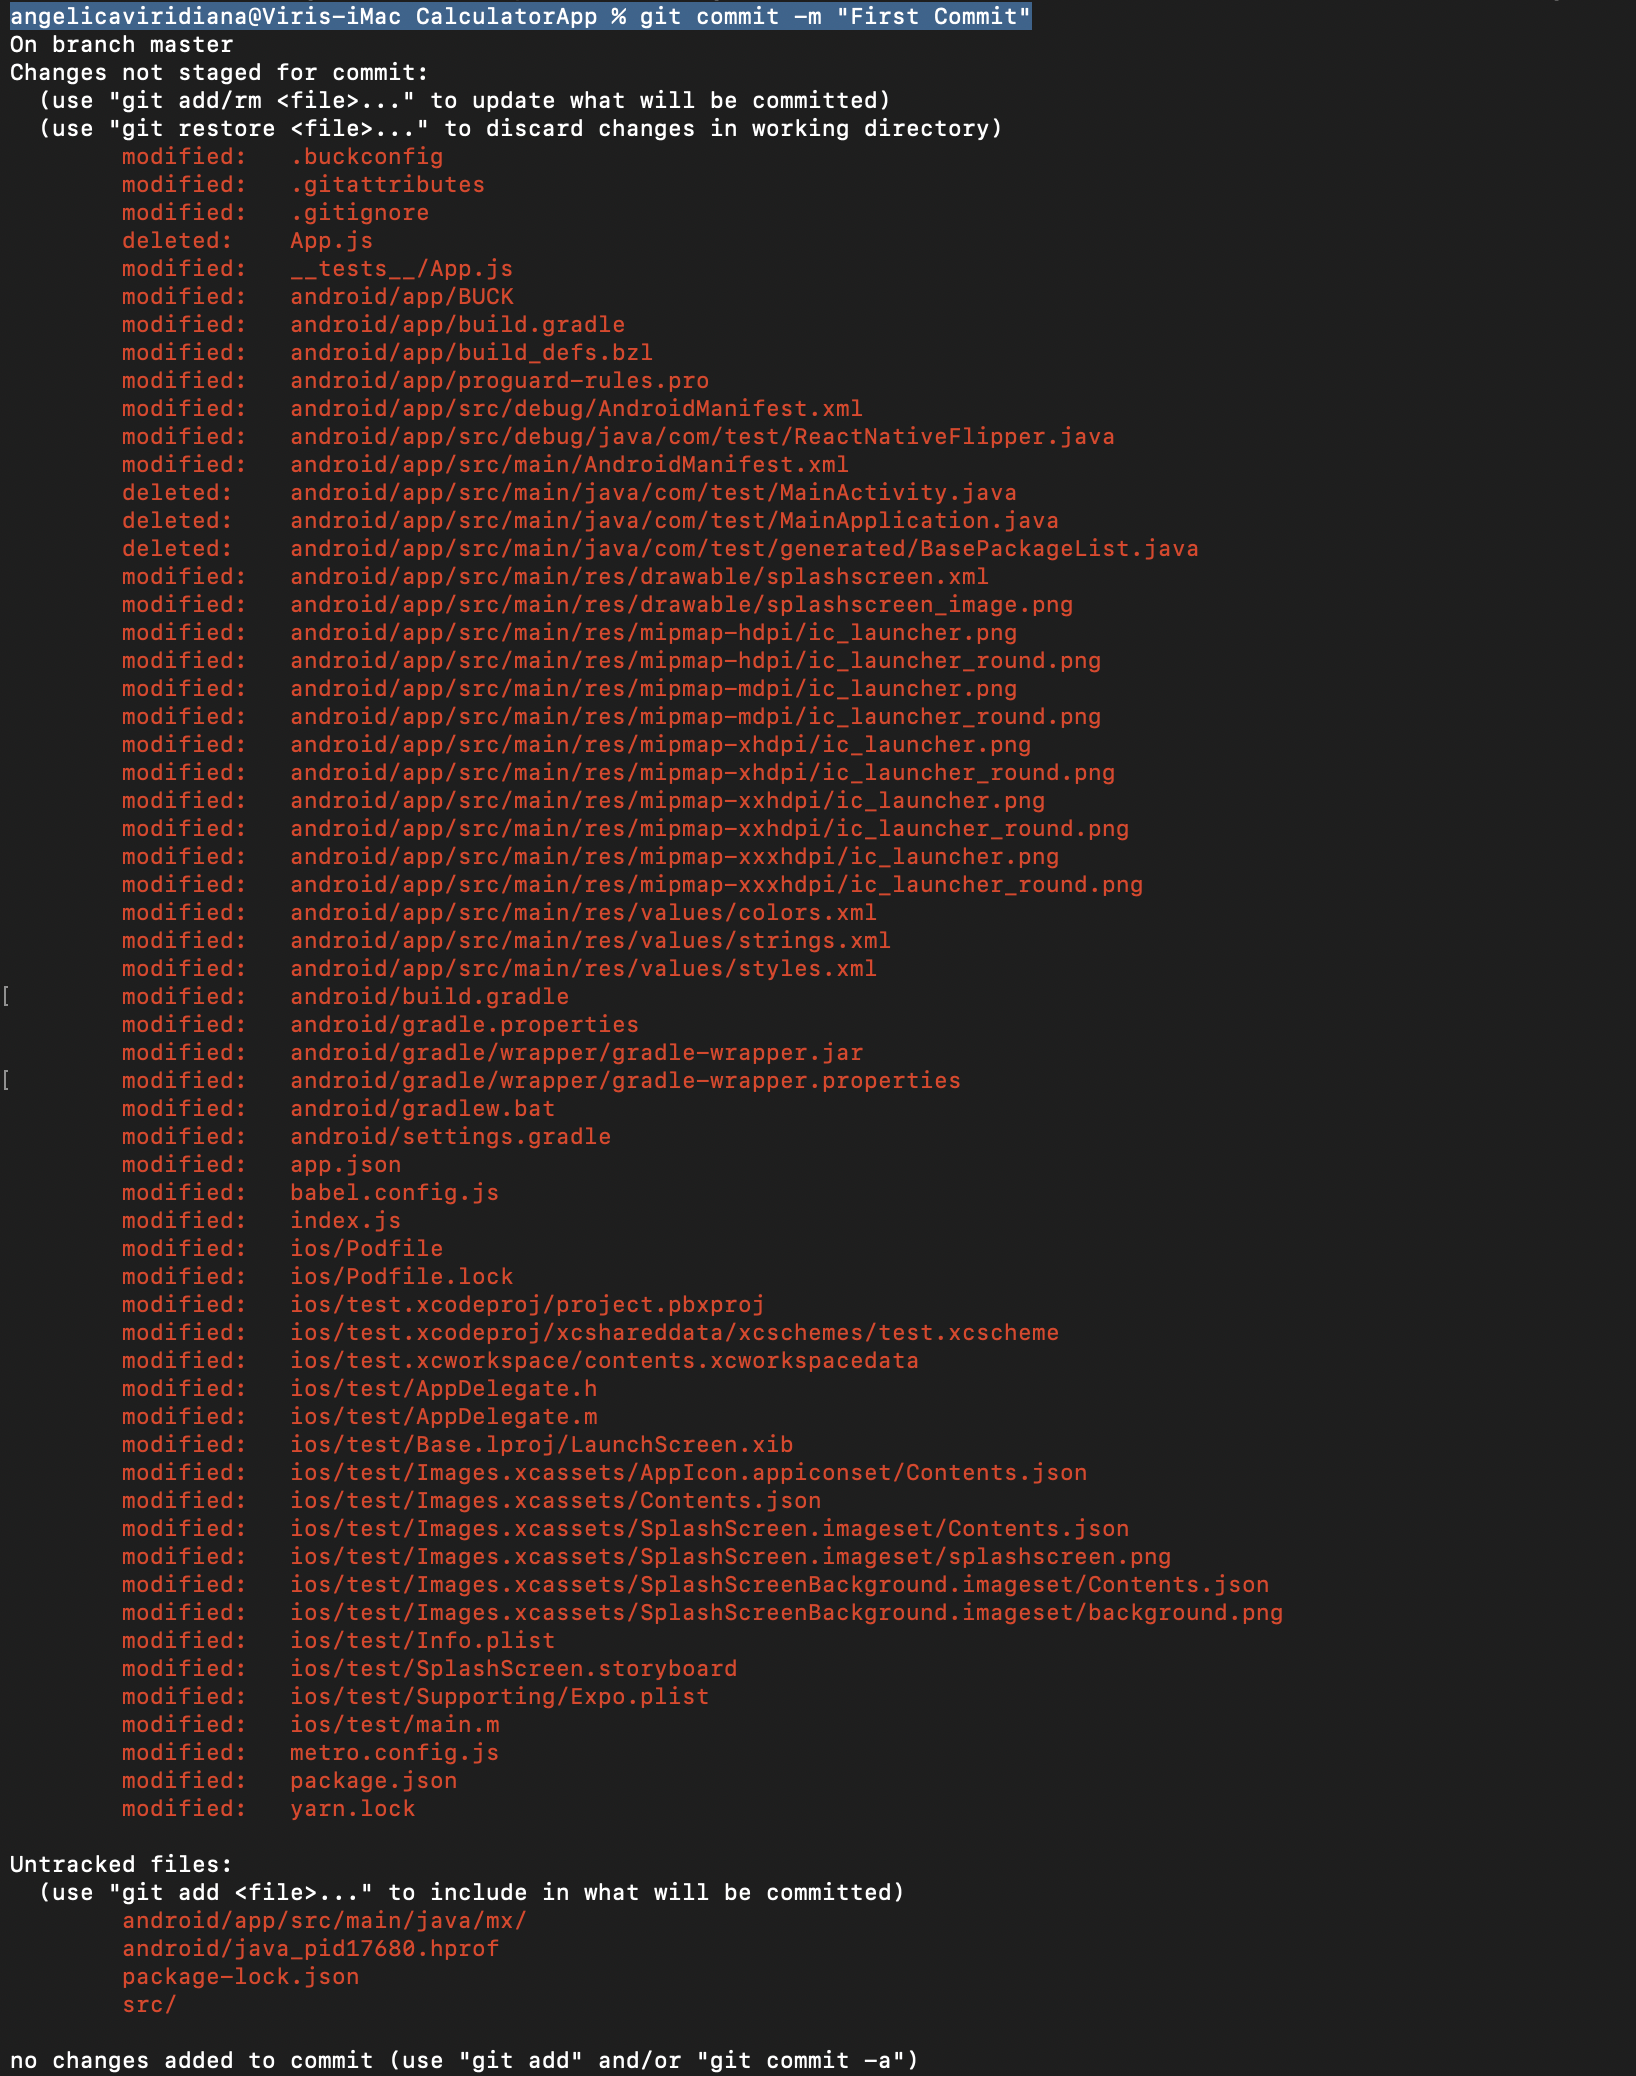
Type “git init“.
Then “git commit -m “First Commit”“, the text inside “” (First Commit) is the comment of the commit.
You’re going to see all the data inside your project.
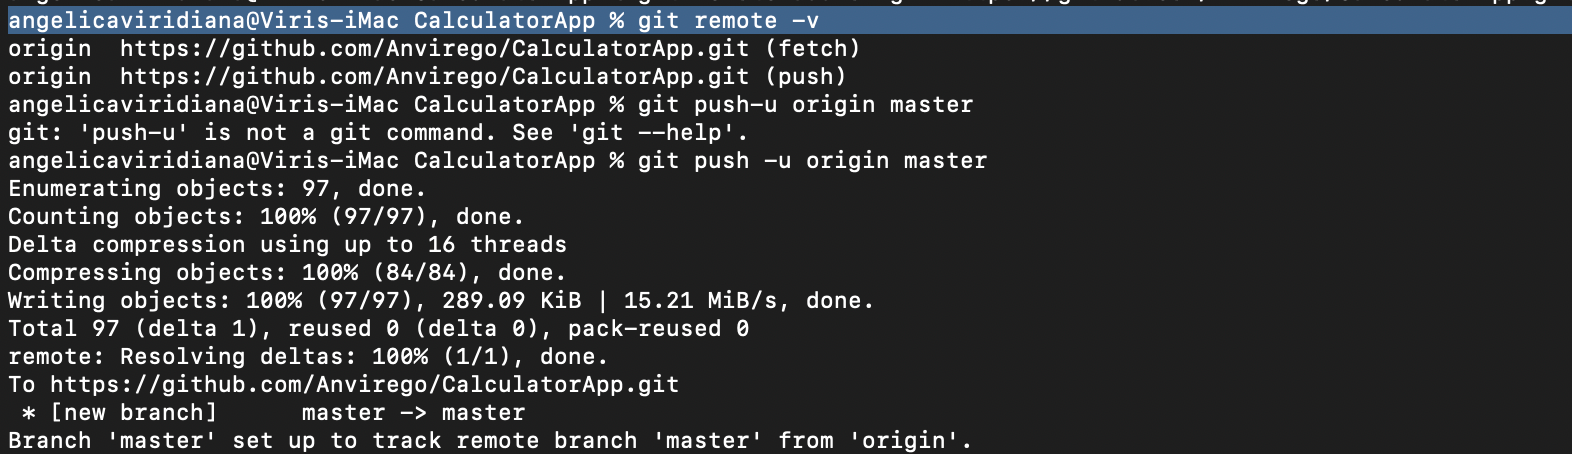
Next “git remote add origin https://github.com/USER/REPOSITORY_NAME.git”, this URL is found in Github, when creating a new repo.
Finally, type “git remote -v“, it’s going to show us to which destination is pointing and the name of this remote repository, in here it’s “origin”.
Finally, if there are no conflicts with our local and remote repository, we can proceed to upload our project using “git push -u origin master“, if everything goes correctly we’re going to see “Writing objects: 100% (84/84), done“.
Corroborate the project has been uploaded, go to your Github Repository.
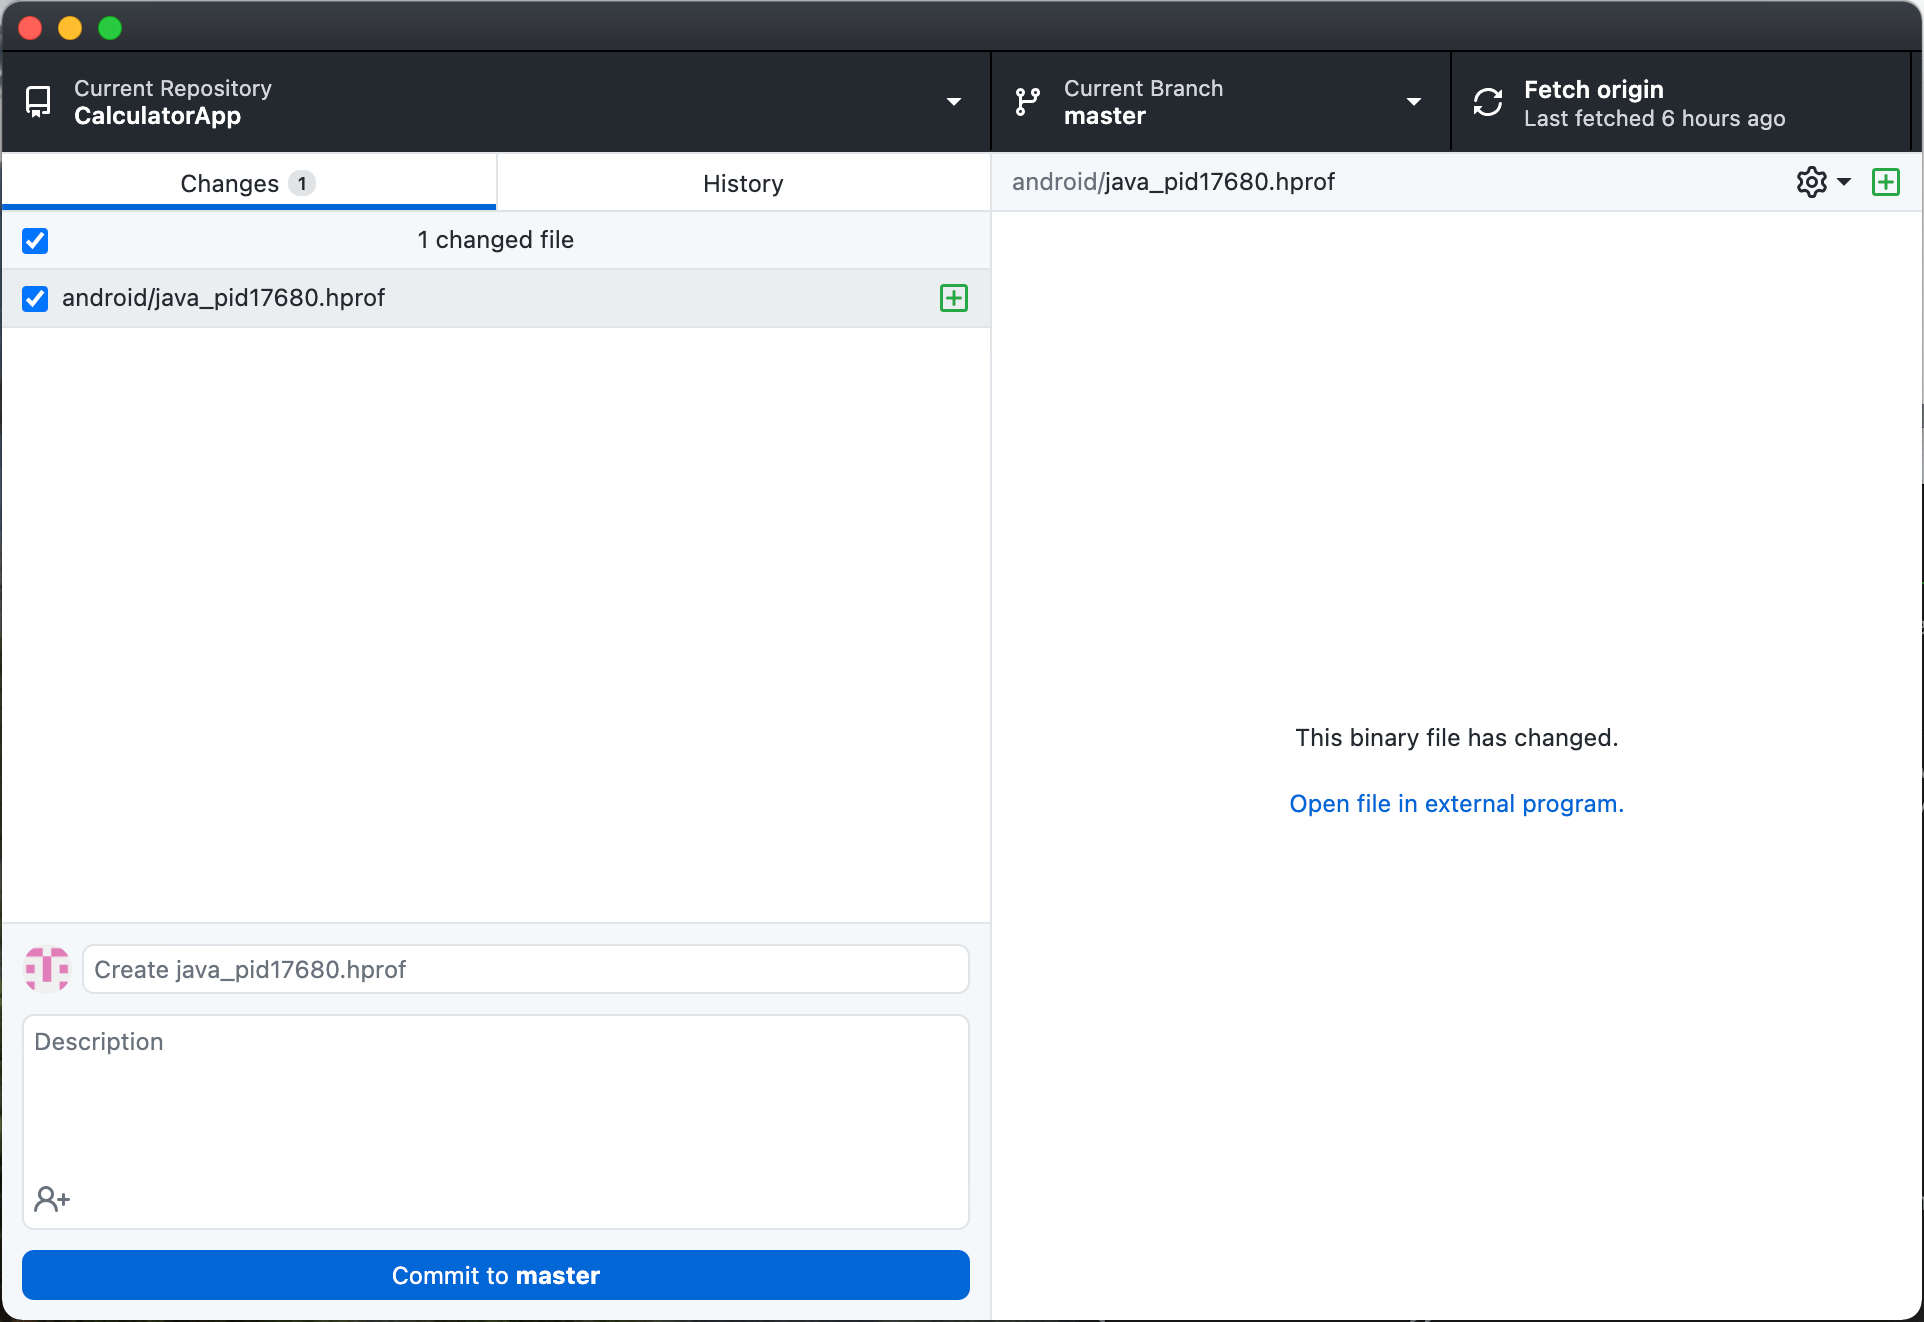
To have easier management with Github, we can use the Github App.
- Current Repository: Name of the Repository we’re managing.
- Current Branch: Branch of the Repository, remember to always create another branch when making changes in the code to later merge it with master. Master branch always has to be the stable version.
- Fetch Origin: Before make changes in our branch we need the last version updated in Github.
- Changes: Displays all the files that have been changed.
- History: History of all the commits made to that repository, we can rollback commits.
- Commit to master: Updates changes with a commit to upload it to Github.
Branches
One of the main functionalities and advantages of having our project to a Remote Repository like Github is the usage of Branches.
Branches help us to work in the same repository and collaborate with others, so let’s say we have our CalculatorApp, but Dev1 it’s working on adding a new feature called “Percentage” and Dev2 it’s working on adding “Trigonometrical Functions”.
To avoid conflicts between these two new functionalities we can create two more branches aside from Master, to push each of these functionalities, like the branch “Percentage” and branch “Trigonometrical”.
Also, this way of working can help us to identify conflicts in our repositories before merging them to our stable version in branch “Master”.
if you want to know more about how Github Branches work you can visit the link here.
Other useful commands:
Command Description git init Initiates a new Remote Repository git add. Adds all content of a Local Repository to be uploaded git rm -r “folderName” Removes specifically a folder, it can also be used with any file that we don’t want to include in the Remote Repository git commit -m “Comment” It’s used to add a commit to our changes git remote -v It’s the name of the Remote and the URL which is pointing git push -u origin master It uploads the Local Repository to the Remote Repository called “origin” in the Branch “Master”.
Links of interest:
Automating with Appium – Selenium and TestNG
Speed up Android Testing with Appium and SDK TestProject Agent
These are some recommended books to learn more:
Any help is welcome to help us keeping this effort alive!BTC (Bech32): bc1qx6f8nczr5ram6d57svlnsfmk5mhu6lsr9q7mxwLTC: LdiiMfiJvqrXDw1xPMqDptXGFEkyADZzVVDOGE: DKehWtHnmrf7JTRWpEQ9LtqwqY8HdbdkbUSOL: 3f2RR9w2VwmBqjLm5DmbuUPwWfdYH7GXCbHVWhsq5skyAngélica Viridiana Rebolloza
Computing Engineer specialized in Automation, working with different tools for Mobile and Web, using languages, tools, and platforms like JAVA, VBScript, JavaScript, C#, Appium, Protractor, UFT (QTP), Selenium, WinAppDriver, Jenkins among others.
Viridiana also has been working using practices like TDD & BDD under Cascade and Agile approaches.
Some certifications include: ISTQB Foundations Certification, SeU Selenium Certified, ITIL Foundations Certification.
No Comment

Jenkins and CI/CD it’s a great idea! let’s see why…
Jenkins and CI/CD, but what is Jenkins?
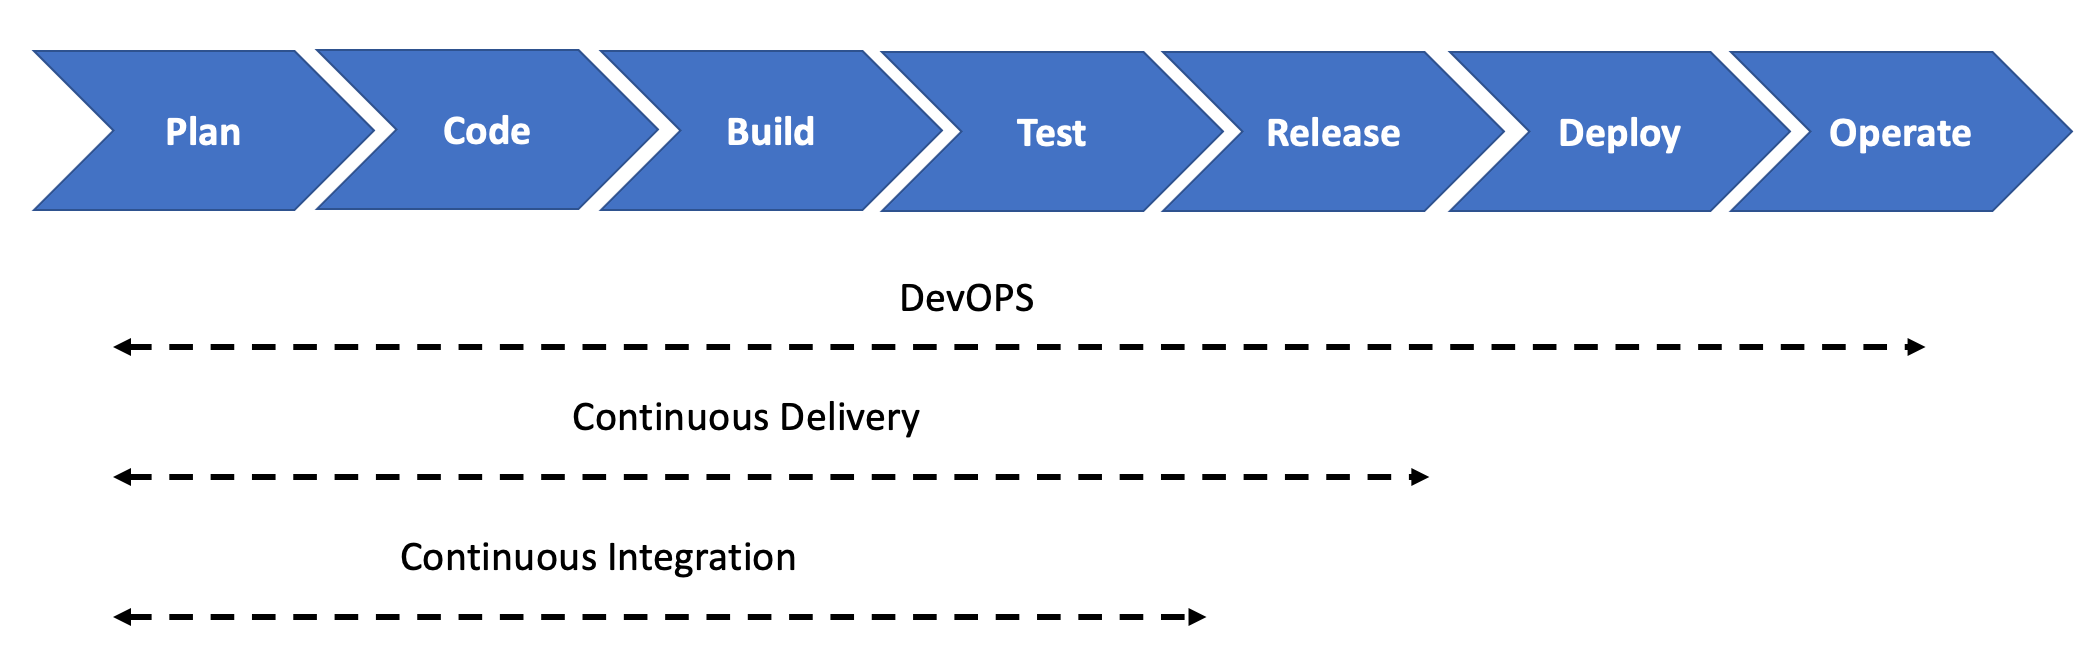
Jenkins is an open-source server that can automate all sorts of tasks whether in local or cloud (Docker) machines. It’s widely used to create Continuous Integration and Continuous Delivery flows (CI/CD).
What is CI/CD?
CONTINUOUS INTEGRATION (CI)
Continuous integration is the first step to Devops’s world (I’ll touch that matter later), basically is the process from when a Developer merges into a master branch new changes to the Run of the Automated Tests. To be totally automated, this process needs that the app’s building tasks, in the case of mobile apps, the deployment (locally or in a personal server) goes to a physical or emulator/simulator device.
CONTINUOUS DELIVERY (CD)
Continuous delivery takes one more step, that is deploy this new version of the app but to a “Testing Environment” such as Staging or UAT environments.
There’s another term, CONTINUOUS DEPLOYMENT, this is usually confused with Continuous Delivery, but it’s slightly different because it’s also deployment of the app but to “Production Environment” where clients can have access to the new app. All these processes need to be automated to be able to call it Continuous Deployment.
What is Devops?
Jenkins and CI/CD is good, but we also need understand somethings about Devops.
In short terms, DevOps it’s the management of all this process including the DEV side, just like technical implementation to the IT tools to create, maintain and apply it.
Enlarge

DevOps To create a Continuous Integration (CI) environment we need to install Jenkins. Take a look at the next steps:
Step 1.
Download Jenkins from the official page, easy 🙂
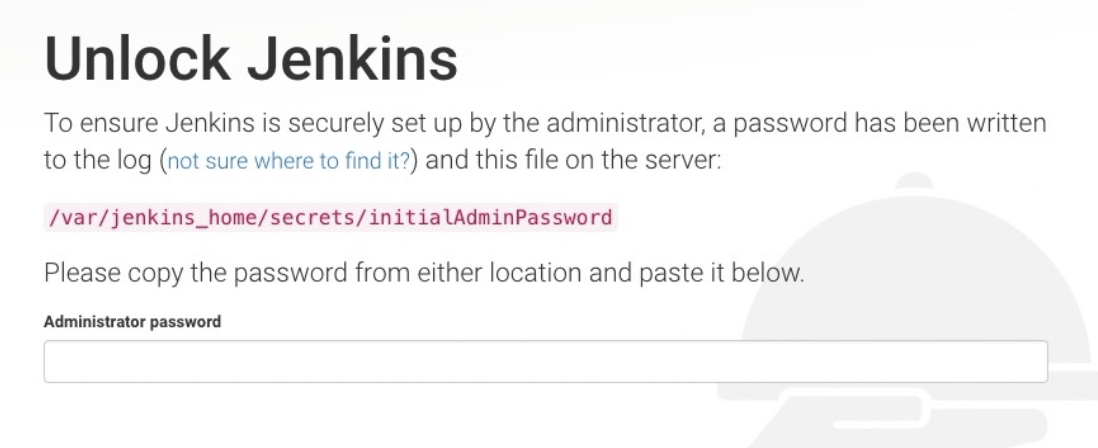
Step 2.
Once installed go to “http//localhost:8080/”, the first time a message like this will appear, so search the key in your computer under “/Users/username/.jenkins/secrets/initialAdminPassword”.
Enlarge

Unlock Jenkins Step 3
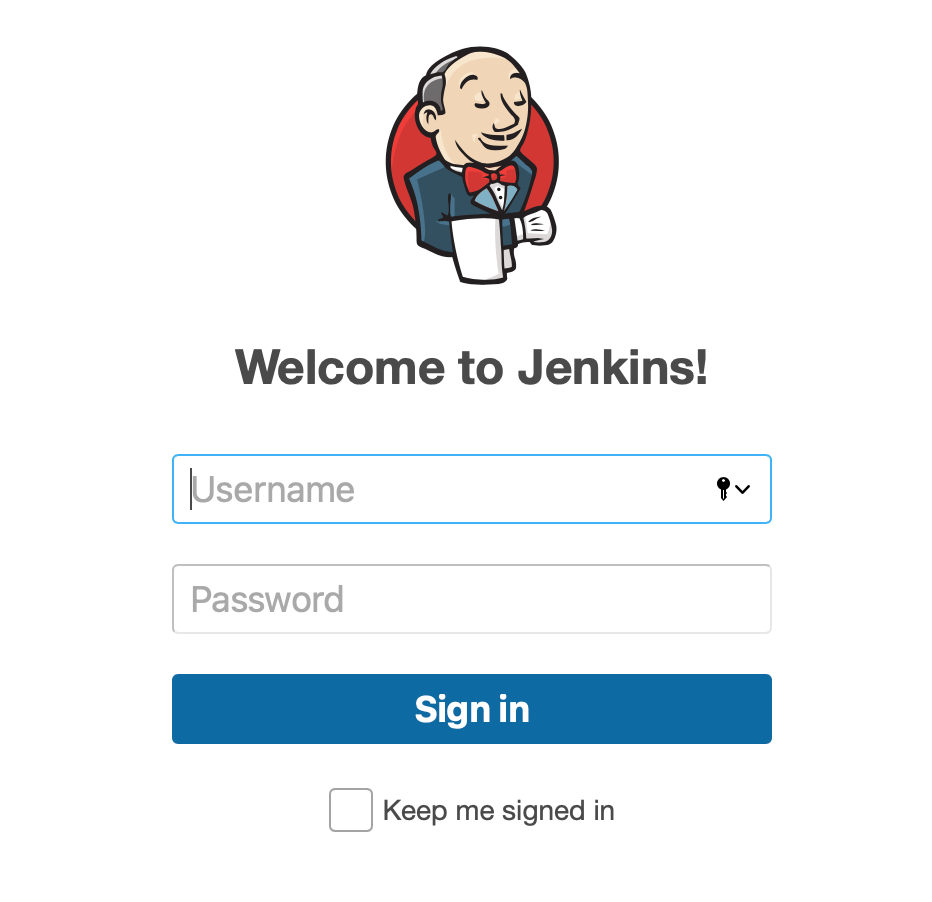
Once the password has been entered, Jenkins will ask you to create another admin password and then you’ll see the main page of Jenkins.
Enlarge

Welcome To Jenkins Step 4
Now, let’s go to the Code Repository, in this case, I’ll use Github, the process can change in some configurations with other repositories but not too much.
Step 5
The App should be already uploaded to a Github Repository, if you don’t know how to do this, you can check it out how in https://internet80.com/blog/upload-project-to-github/
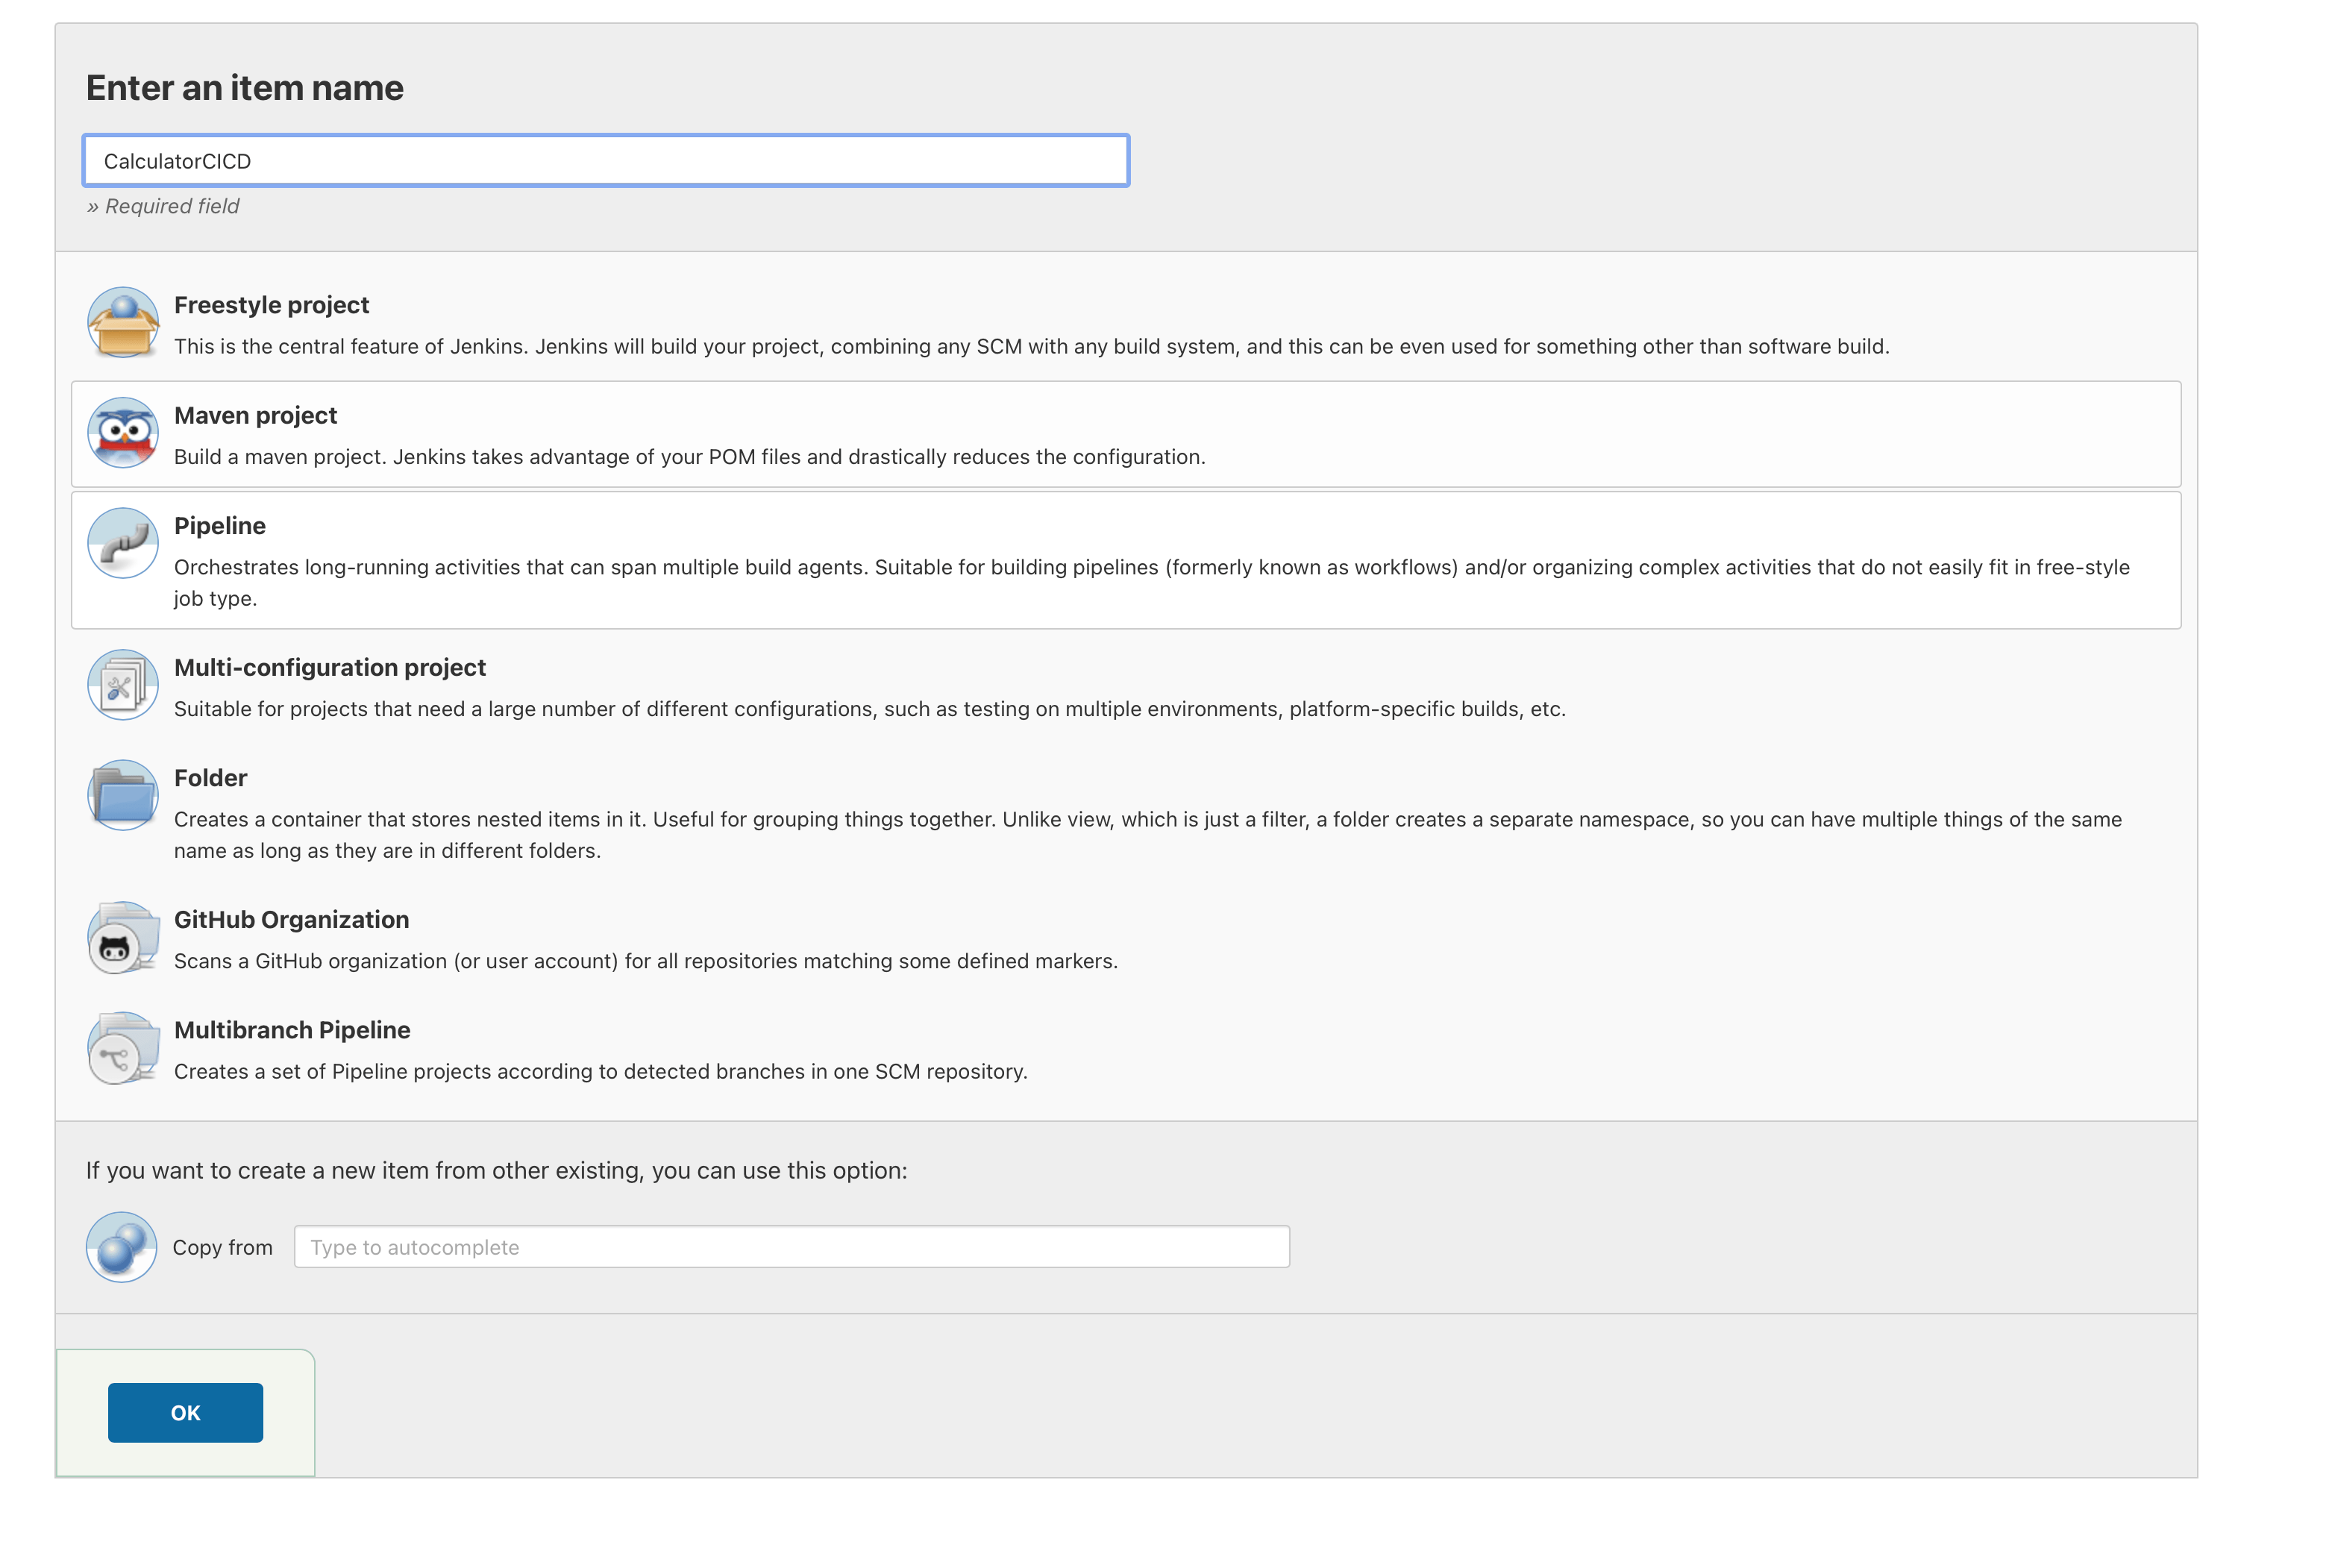
Create in Jenkins a “New Item” as “Pipeline”, in this case, it’s called “CalculatorCICD“.
Enlarge

CalculatorCICD Enlarge

CalculatorCICD 2 Step 6
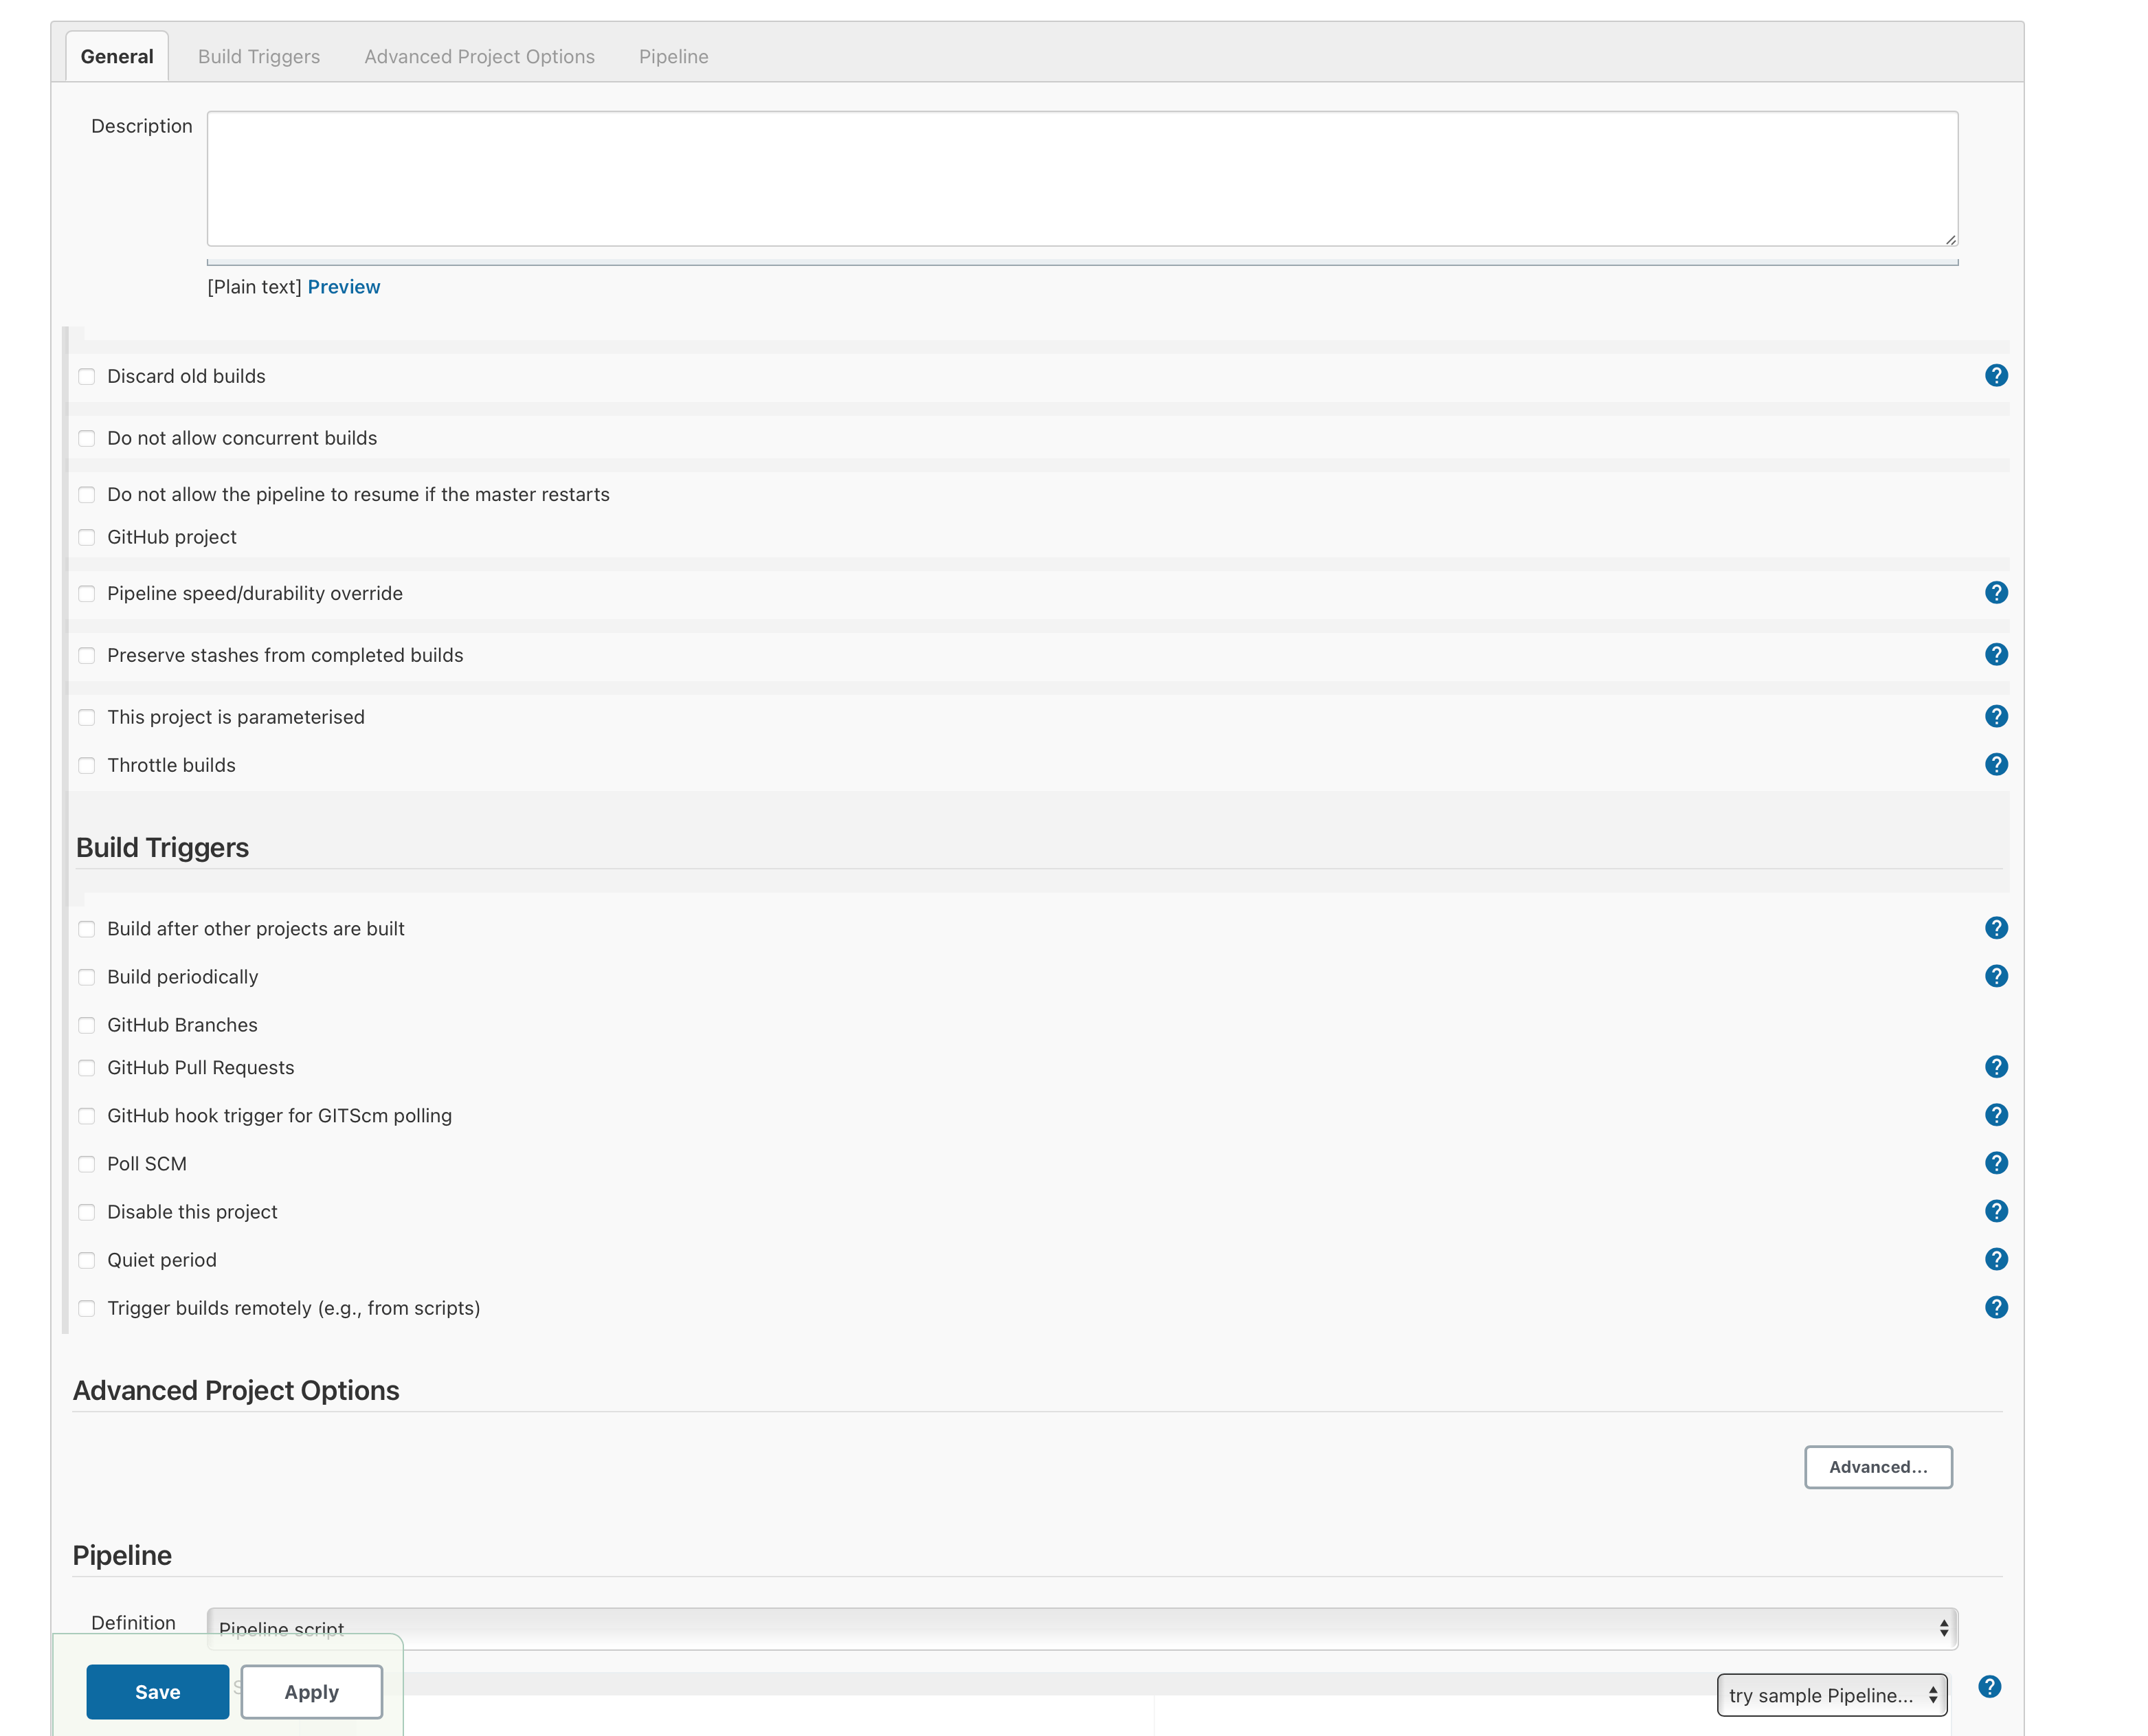
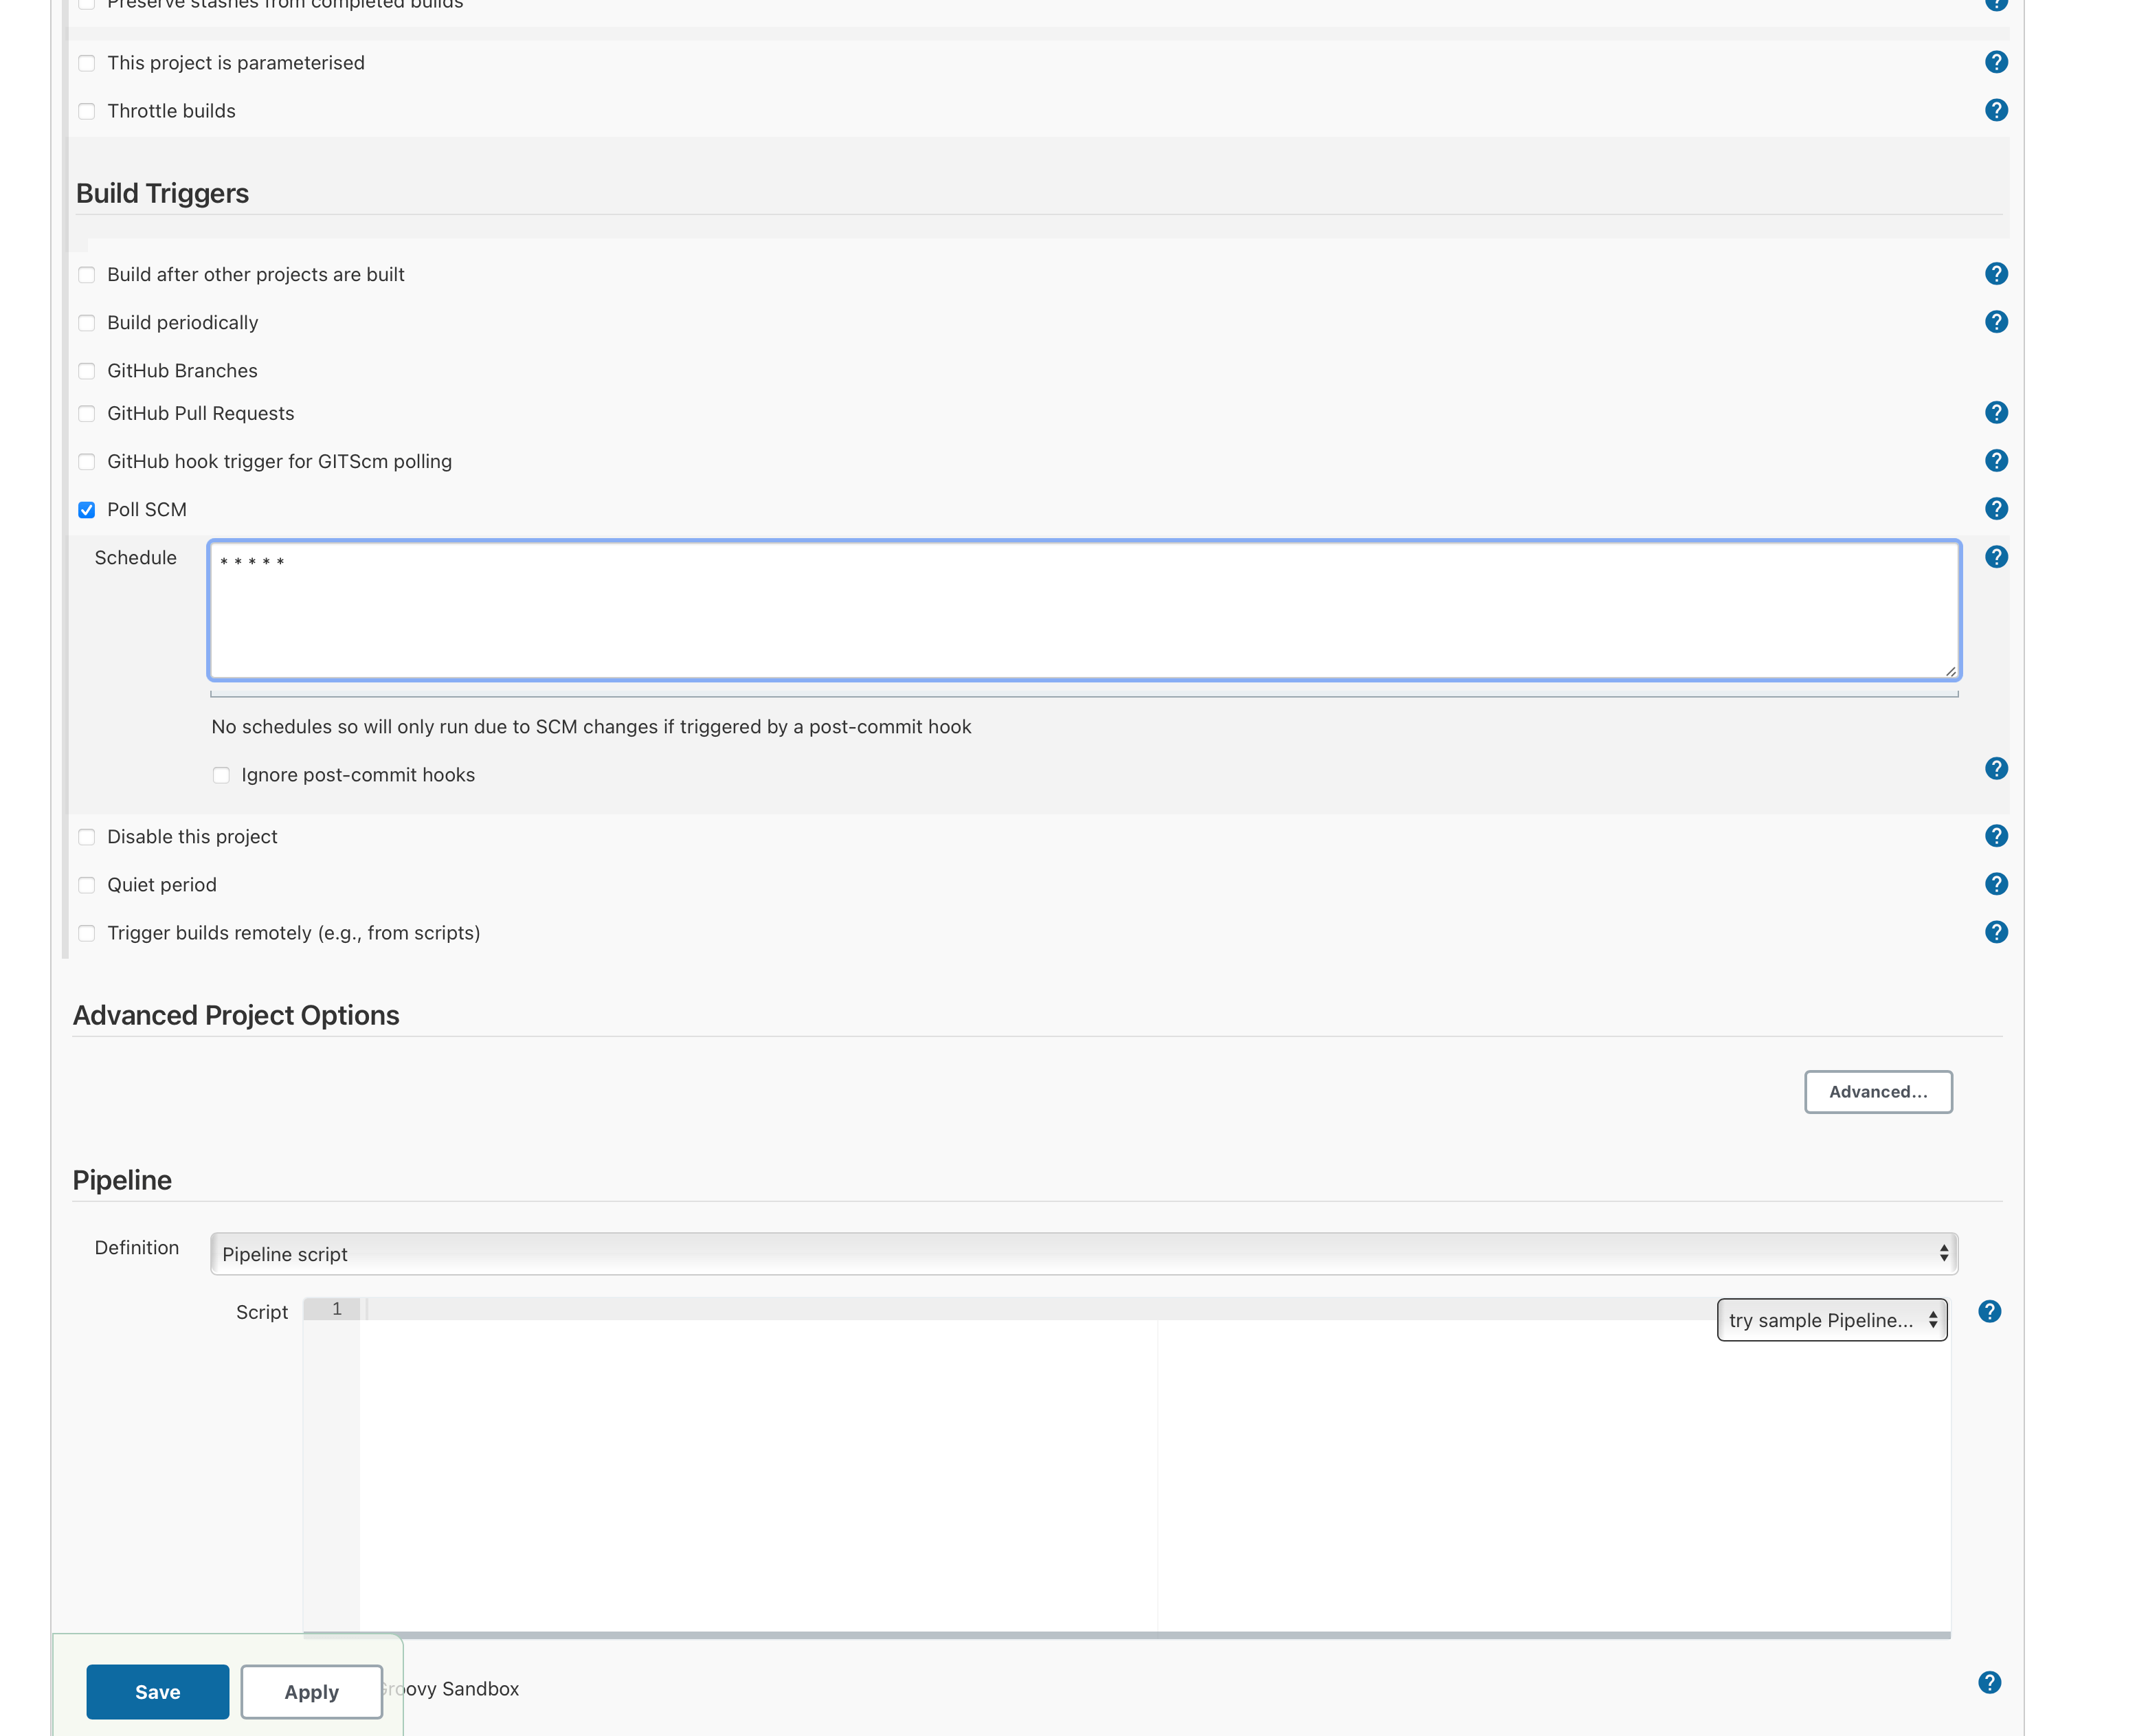
To tell Jenkins to run the pipeline every time there’s a new commit in the repo where the CalculatorApp’s code resides, add in the section “Build Triggers” -> “Poll SCM”, add “* * * * *”.
Enlarge

CalculatorCICD 2 Step 7
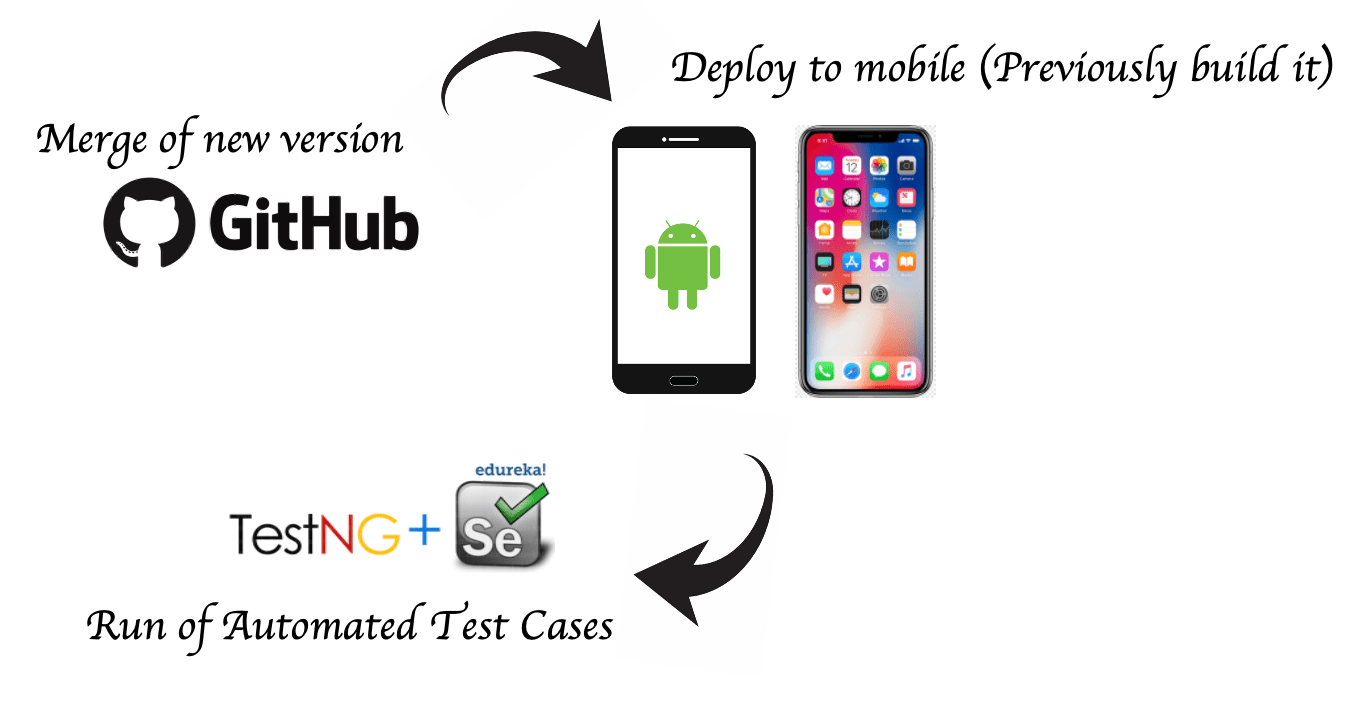
Now let’s create our first pipeline, to do this, we need to set the flow we’re going to follow. It’s important to mention that Pipelines in Jenkins have a main structure divided by “stages” each stage does a part of the CI/CD process. In this example we’re going to have 4 main stages “Checkout”, “Build”, “Deploy” and “Testing”.
- We need the “Checkout – Github” section to connect to Github Repo to download the code in our Jenkins workspace.
- The “Build Process”, is where once we have the last version of the code copied in our Jenkins workspace, we need to build the app.
- The “Deploy to Emulator”, in here we’re going to deploy the app to an emulator in Android (If you prefer you can deploy it to a physical device too).
- Finally, the last stage is to run our Automated Test Cases, the “Testing” stage.
Step 7.1
Checkout – Github
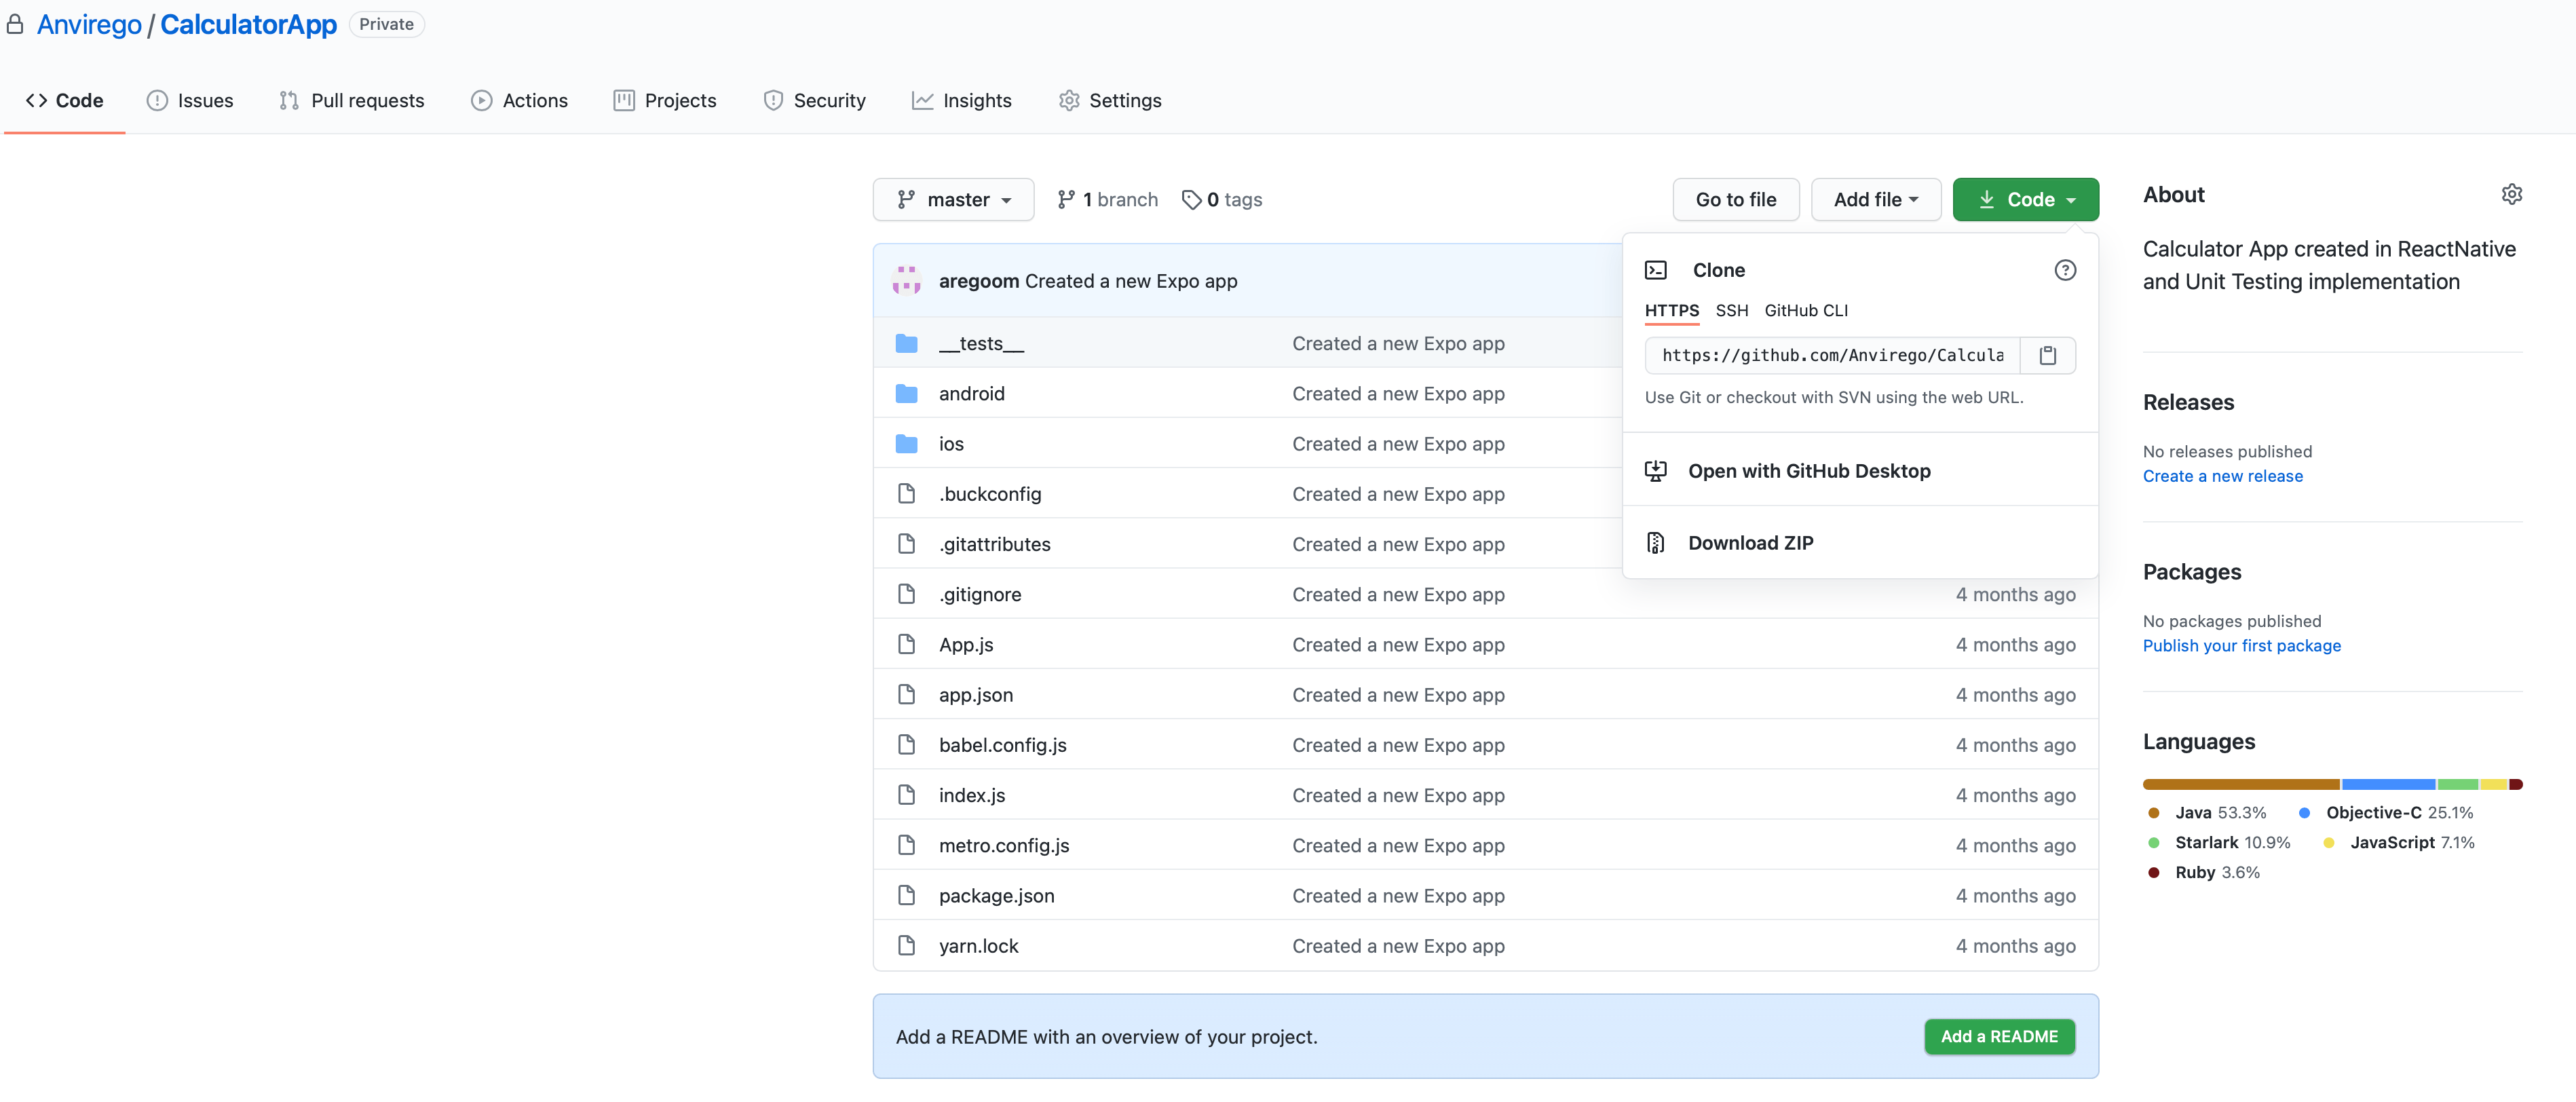
- Get the URL of the Repo in Github. “https://github.com/Anvirego/CalculatorApp.git”
Enlarge

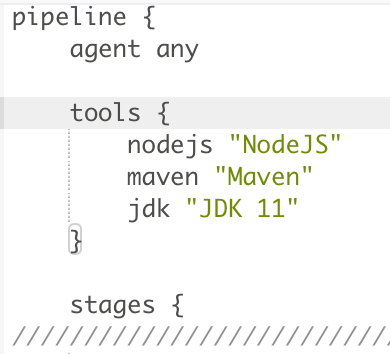
pipe jenking code 01 - To parametric our pipeline we’re going to define “GitHubRepositoryMobileApp” to pass the URL of the Github repo and “GithubBranch”.
Enlarge

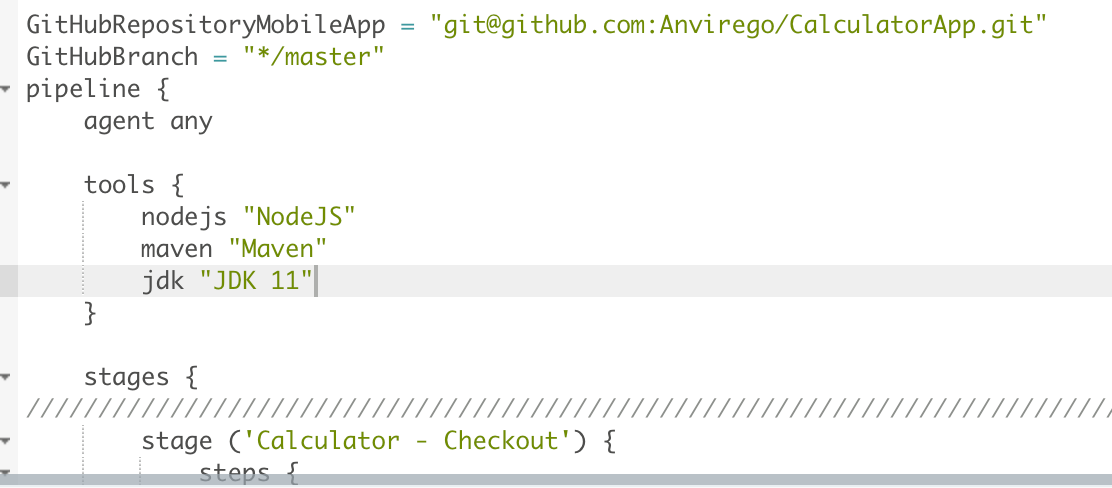
pipe jenking code 02 - Let define the logic under stage (‘Calculator – Checkout’). To authenticate with Jenkins and Github we’re using a “Personal Token” so the repo has to be Public, if you want to have access to a Private repo, you will need to create an SSH Credential in Github. For further information you can go to this link https://docs.github.com/en/authentication/connecting-to-github-with-ssh.
Enlarge

pipe jenking code 03 Step 7.2
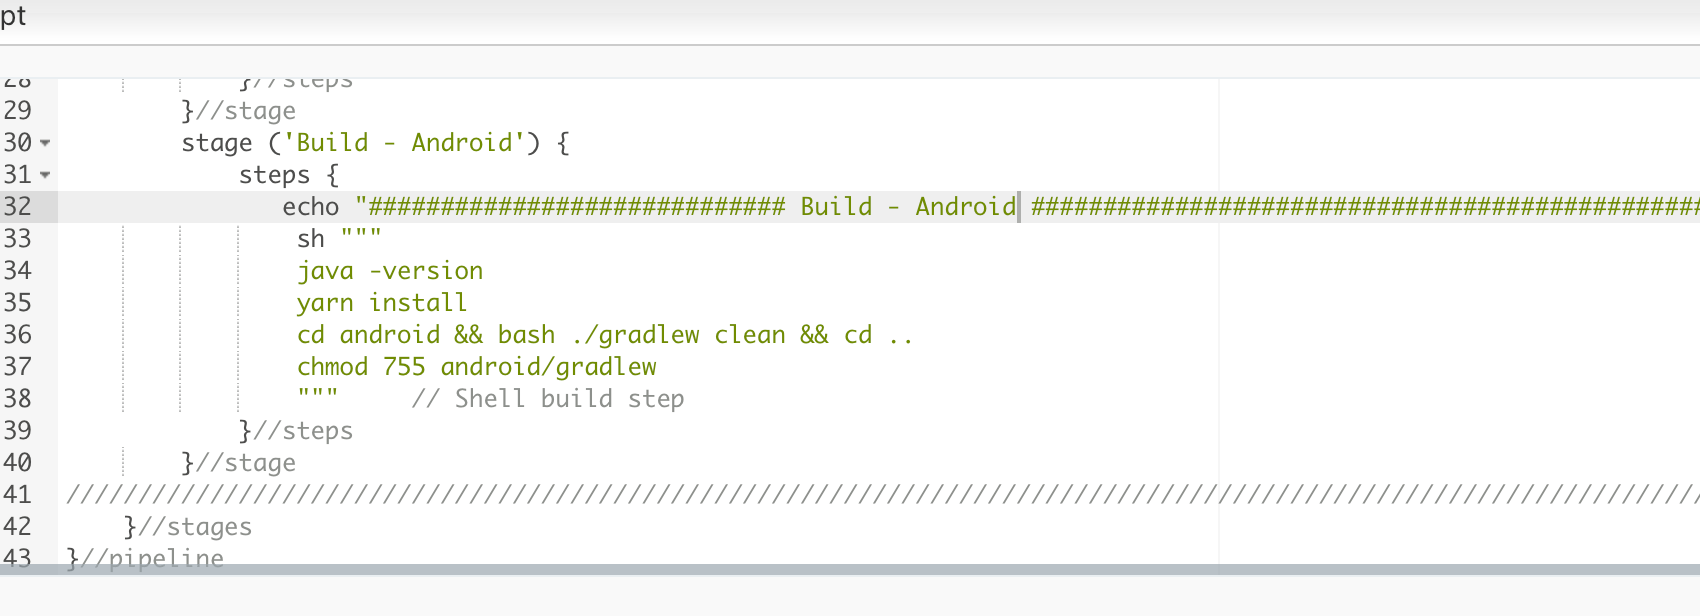
Build – Android
- In the next stage, we need to build the app, for that, we have to follow the steps used to build the app from command.
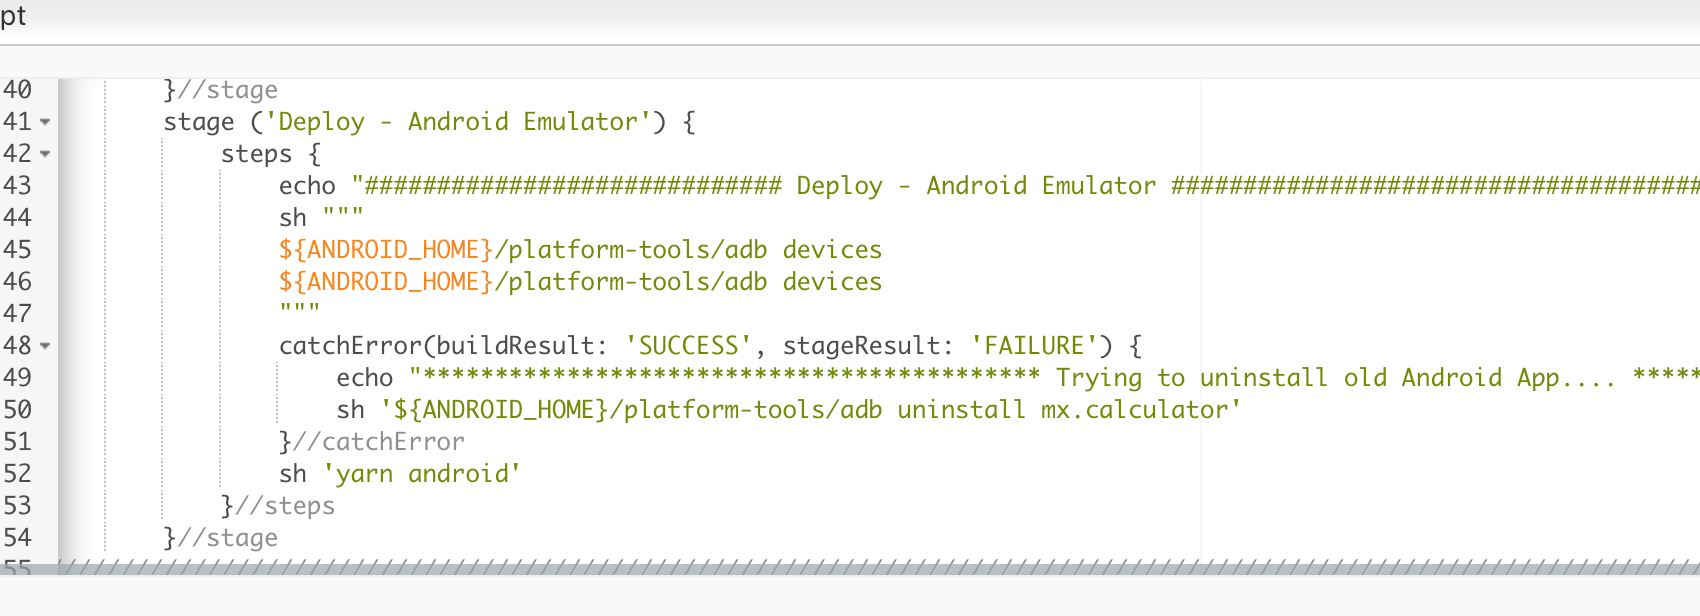
7.2 Deploy – Android Emulator
- In this step, we’re going to finish building the app and deploy it to our Emulator. Inside the cathError{} tries to uninstall the app if it’s already installed (Previous version of the app) and then installs the new version.
Enlarge

Android Emulator Step 7.3
Run Automated Test Cases
- Finally, we’re going to connect to our Test Repository (Local) to run the test cases. This step is going to change depending on how the Automation Framework is made. This automated framework runs using TestNG and Maven.
Enlarge

Run Automated Test To know how to create an Automation Framework using TestNG please go to the post Automating with Appium – Selenium and TestNG
Step 8
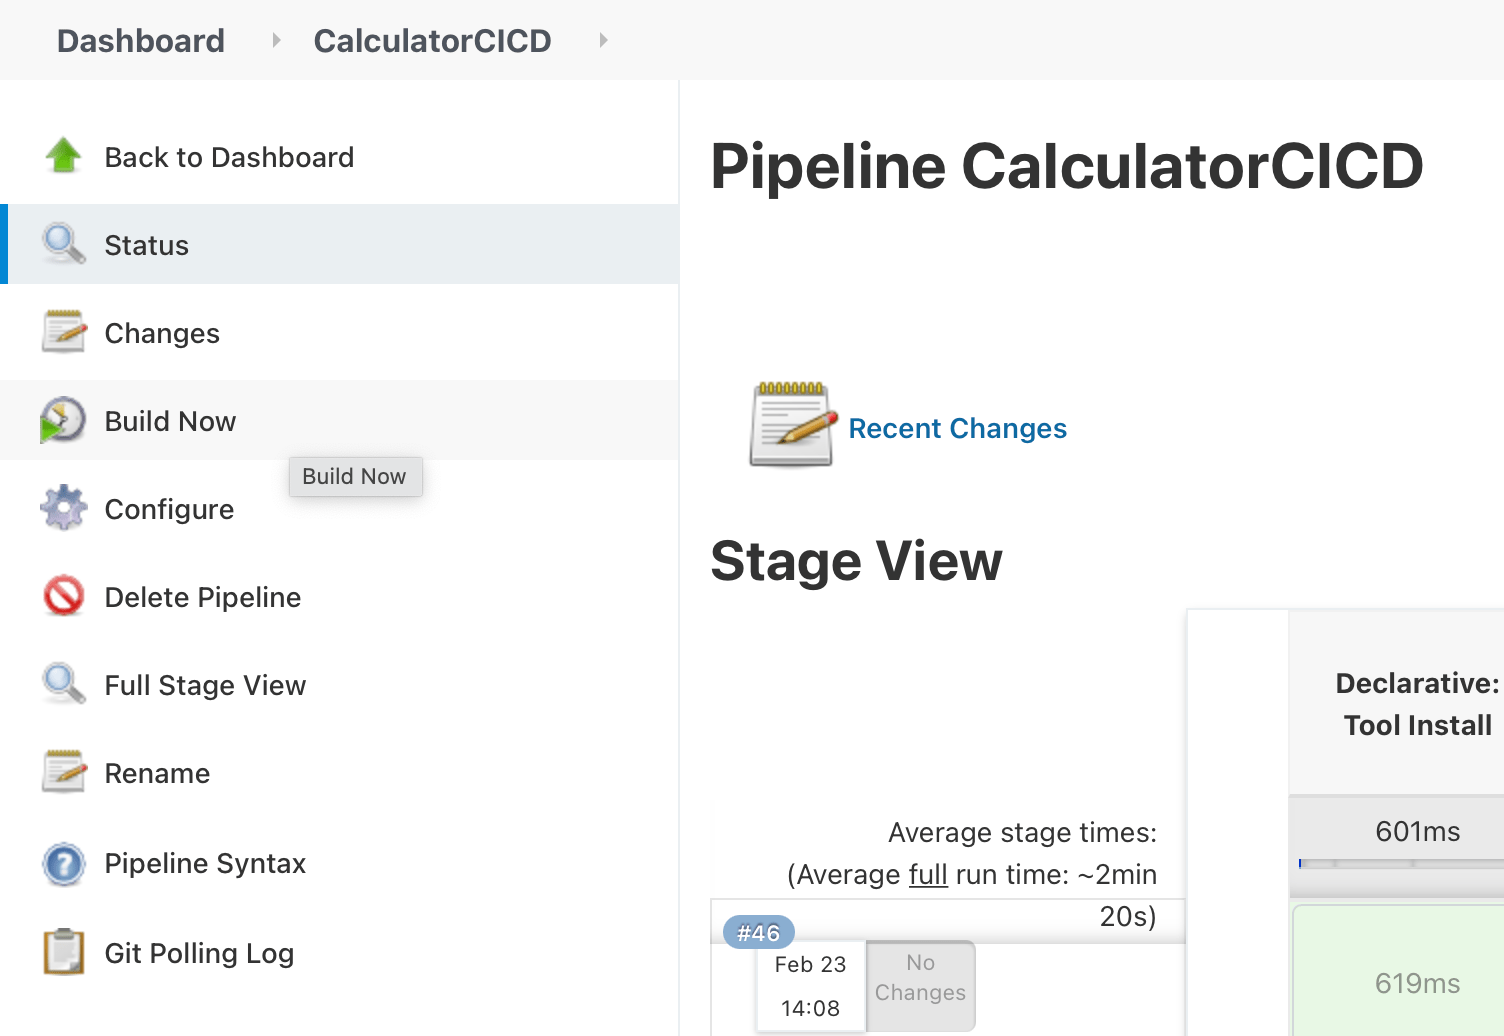
Let’s run our CI/CD Pipeline in Jenkins.
Enlarge

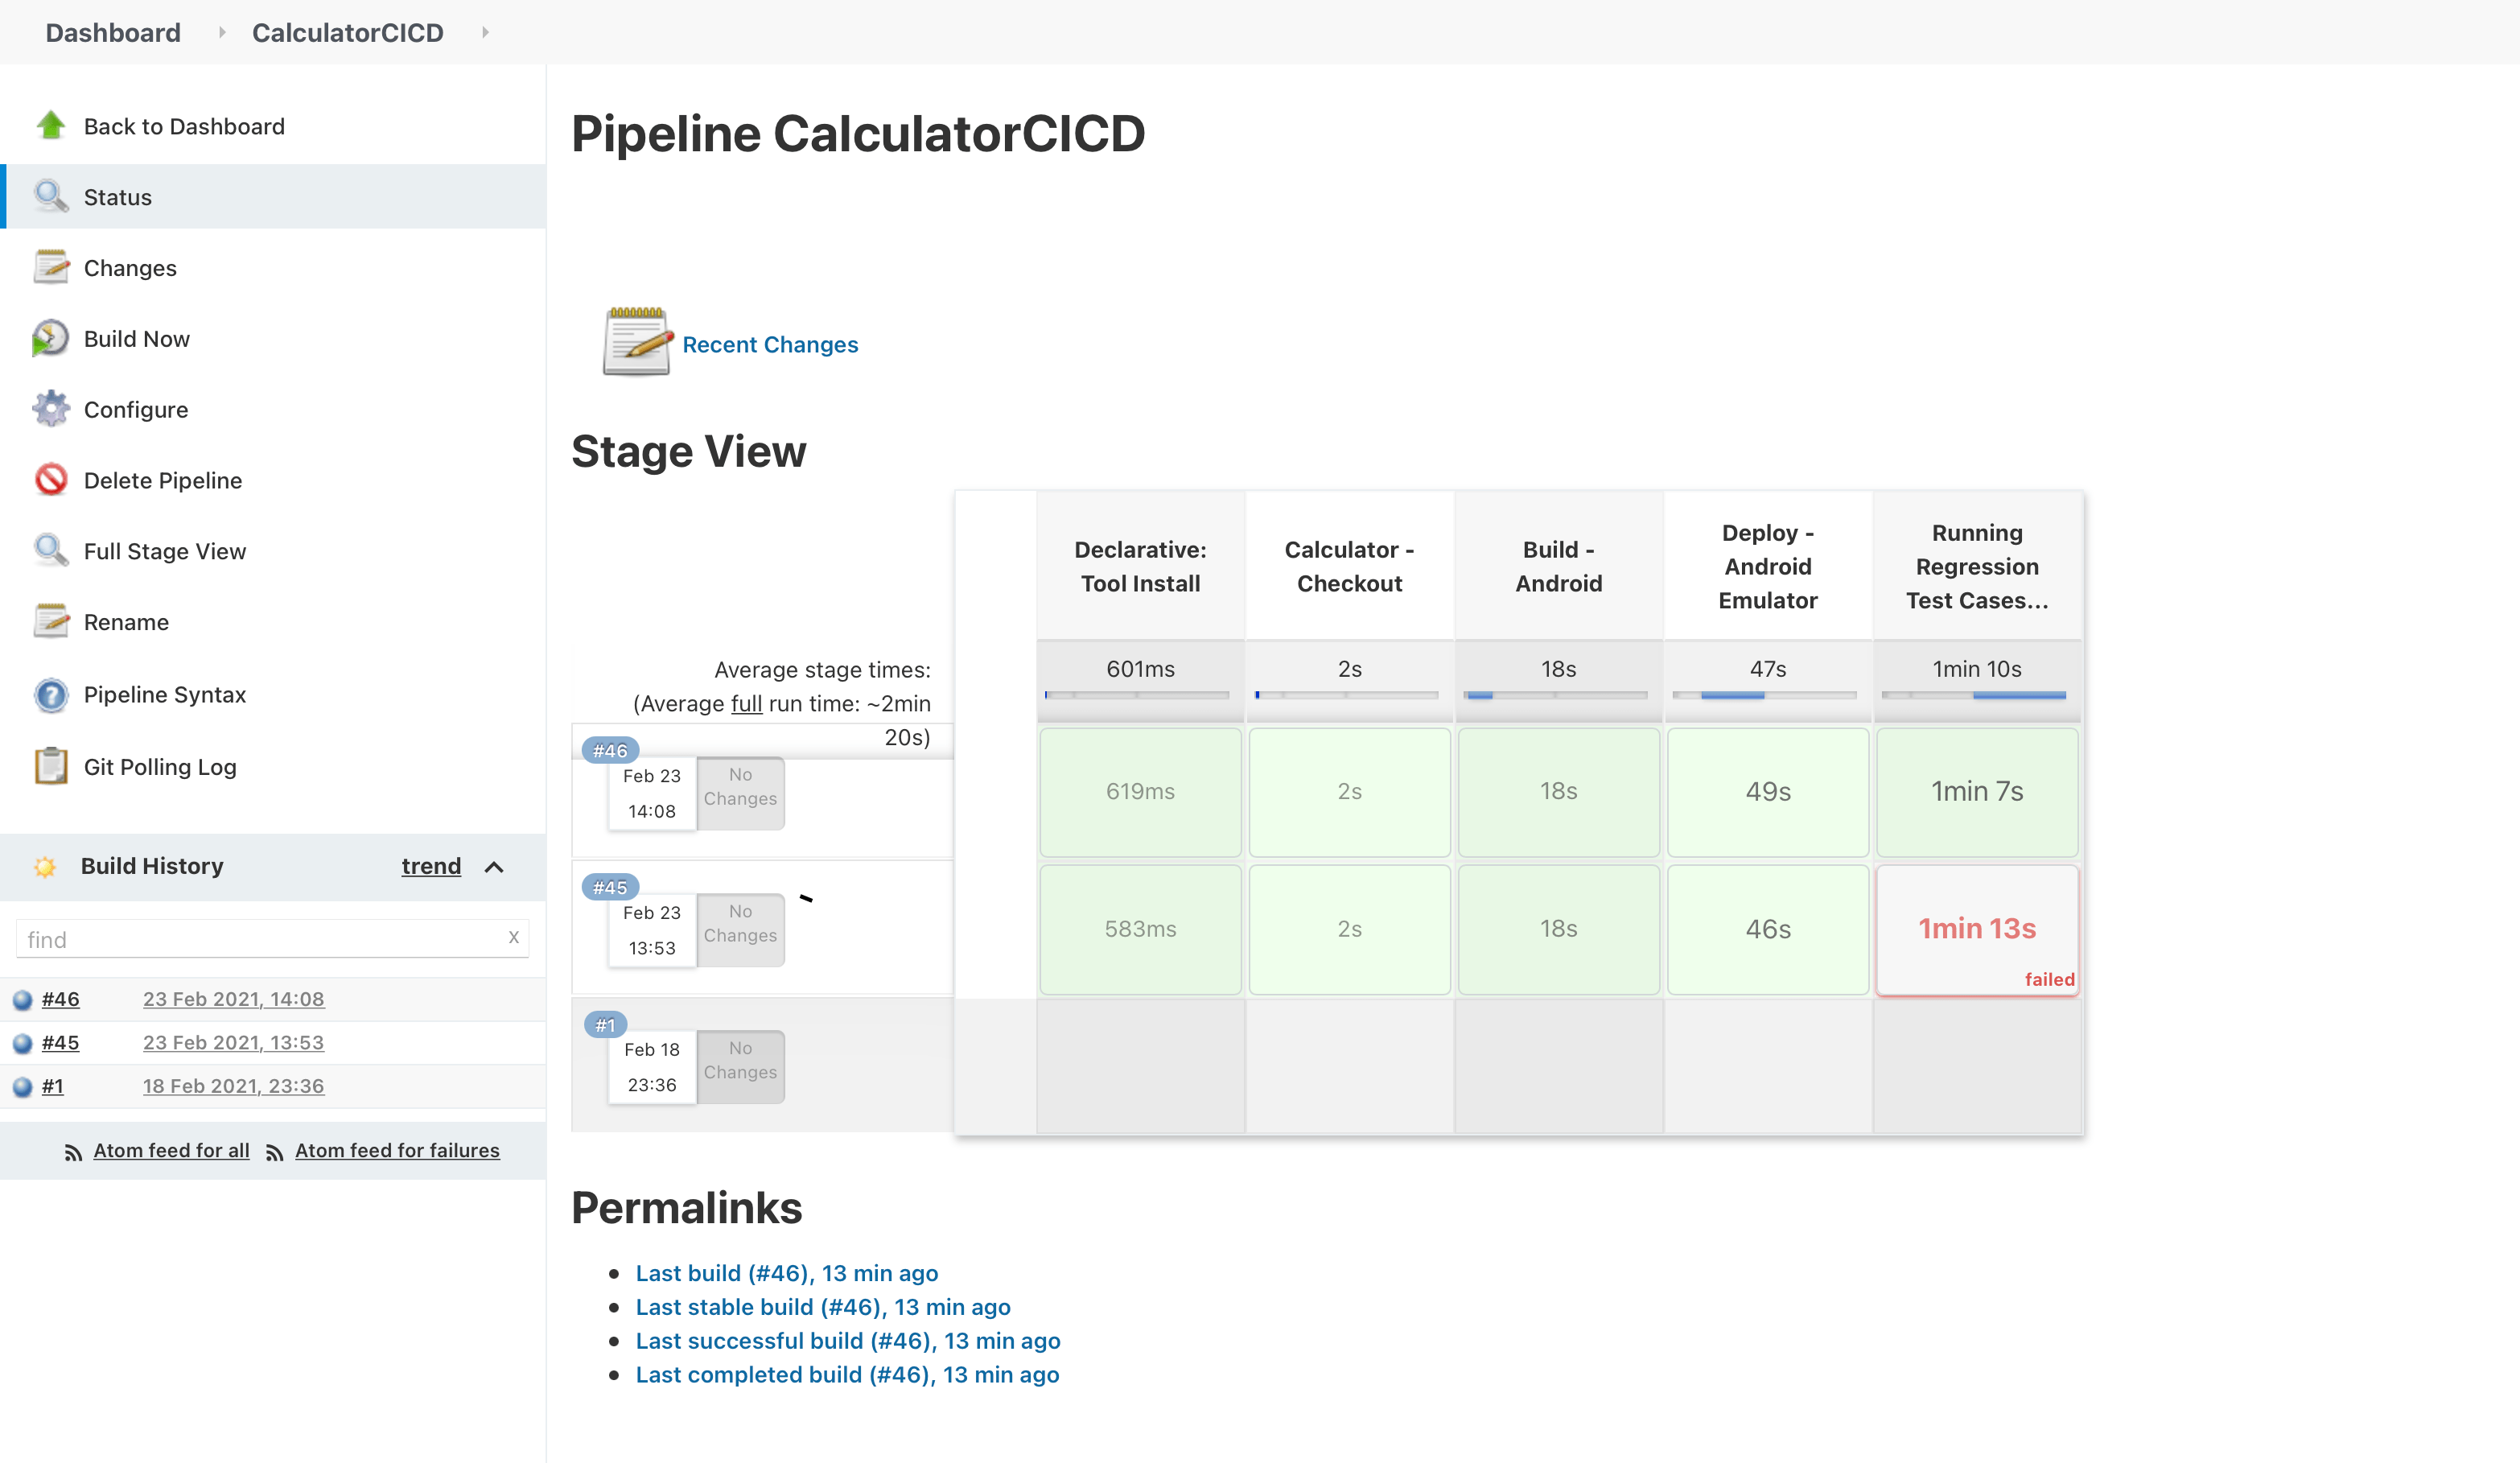
Run Pipeline Jenkins We’re going to see our pipeline results under our project’s dashboard, and the build number.
Enlarge

Run Pipeline Jenkins 02 As you can see create a local pipeline to implement a CI/CD env it’s really easy, from here you can customise your Jenkins pipeline using different plugins according to your needs.
Link of interest:
Automating with Appium – Selenium and TestNG
The Agile Team Approach
What Scrum Master Certification to Choose?
Speed Up Android Testing with TestProject AgentBooks to learn more about:
Any help is welcome to help us keeping this effort alive!
BTC (Bech32): bc1qx6f8nczr5ram6d57svlnsfmk5mhu6lsr9q7mxwBTC: 1DDcWbphm1bKMvWruotNKLSM8ypVaHg5NvETH: DKehWtHnmrf7JTRWpEQ9LtqwqY8HdbdkbUDOGE: 0x58D137fb142D946bCD815f0ded0fa3b3fE5AB3BFAngélica Viridiana Rebolloza
Computing Engineer specialized in Automation, working with different tools for Mobile and Web, using languages, tools, and platforms like JAVA, VBScript, JavaScript, C#, Appium, Protractor, UFT (QTP), Selenium, WinAppDriver, Jenkins among others.
Viridiana also has been working using practices like TDD & BDD under Cascade and Agile approaches.
Some certifications include: ISTQB Foundations Certification, SeU Selenium Certified, ITIL Foundations Certification.
No Comment

Nowadays Mobile Testing is so important to ensure Quality, but one of the most common problems is the speed of an automated test. There’s no point in automating a set of test cases if the execution time of a single Automated Test is more than one or more Manual Tests.
This problem is really common when automating Android Test Cases using Appium and UIAutomator or UIAutomator2, one solution is to use “Espresso Driver” but requires:
- App has to be an Android Native.
- It’s important to have the source code of the App.
But most of the time, Companies doesn’t always provide the source code (Commonly if the App was made by a third-party) or the App’s development is with a No-Native Android App using external frameworks as React-Native.
In these scenarios, there’s also another big problem, not all developers use unique and fast locators while developing an App, whether for Android or IOS like the usage of IDs. Most of the time we have to deal with XPaths, that is not only not recommended, due to the change of the DOM’s structure but also are extremely slow when are processed by Appium’s most common drivers like UIAutomator and UIAutomator2.

Here is where TestProject comes to help, even though I don’t recommend using the UI Interface of TestProject for big Projects because of the lack of maintainability and scalability. Using the UI of TestProject has a lot of dependency on the tool itself because it’s more focused on the “No Coding” Framework. Later on, if there’s a feature or functionality that TestProject doesn’t provide, we’re going to start coding, which it’s going to be more difficult to adapt the code generated by TestProject and adapt it to our necessities.
Anyhow, TestProject comes with an SDK for Java and Python, which easily (there’s almost none of the documentation) to integrate with our code to avoid using Appium and UIAutomator.
- We need to register in TestProject Web Page at https://testproject.io/ and Download the TestProject Agent.

TestProject Agent is available for Windows, Mac OS X and Linux (It’s also available in DockerHub). 2. To be able to run the Agent, we need to get our “Developer Token”, to get it, go to “https://app.testproject.io/#/integrations/sdk”, save this token for later.

3. In a Maven Project, let’s add these new dependencies, “io.testproject”, “org.slf4j” and “org.seleniumhq.selenium”. It’s also important to use the last version of Appium, there’re some libraries problems if the last version of Appium is not used.

This are all the dependencies used in this project. 4. In the class we create our old driver, in this case, it’s “Setup”, let’s remove Appium import and replace it with “io.testproject.sdk.drivers.android.AndroidDriver.

**Modify the Driver.

5. It’s important to add an environment variable called “TP_DEV_TOKEN” with the obtained token in Step 2, under Environment Variables > New System Variable.

6. Let run the TestProject Agent, by clicking on TestAgent.exe.


7. Now let’s run our test and see the performance improvement!. (Don’t forget to change the type of the new Driver in all classes.

In this basic example, there’s no much improvement on the performance and speed of the test, but for complex Apps and Test, the increseace of speed can go up to 50 %. For further information on how to use TestProject consult: “https://testproject.io“.
Links of interest:
Automating with Appium – Selenium and TestNG
The Agile Team Approach
What Scrum Master Certification to Choose?These are some recommended books to learn more:
Any help is welcome to help us keeping this effort alive! PayPal Account BTC (Bech32): bc1qx6f8nczr5ram6d57svlnsfmk5mhu6lsr9q7mxw BTC: 1DDcWbphm1bKMvWruotNKLSM8ypVaHg5Nv ETH: 0x58D137fb142D946bCD815f0ded0fa3b3fE5AB3BF
Angélica Viridiana Rebolloza
Computing Engineer specialized in Automation, working with different tools for Mobile and Web, using languages, tools, and platforms like JAVA, VBScript, JavaScript, C#, Appium, Protractor, UFT (QTP), Selenium, WinAppDriver, Jenkins among others.
Viridiana also has been working using practices like TDD & BDD under Cascade and Agile approaches.
Some certifications include: ISTQB Foundations Certification, SeU Selenium Certified, ITIL Foundations Certification.
No Comment

Nowadays Automation has grown so much, that even working in an environment of just ‘Manual Testing‘, it’s really important to ensure and improve the testing process to include a percentage of ‘Automation‘.
It’s important to mention that there’s impossible to cover 100 % of Automated Test Cases because automation has its limits like the abilities and knowledge about coding in a language programming of the Testers, the most used are Java, Python, and JavaScript, which not all actual Testers have.
Another important key is that not all the types of testing are able to automate like look and feel test.
So to keep it simple, if you want to automate a test you have to take the following points at least to start automating:
1. There are Regression Test Cases that you need to run always before a release.
2. There are flows that are just too large but also repetitive.
3. The scope of the Company is implement Continuous Integration (CI).
There are a lot of automation tools for different platforms like Android, IOS, and Web, but also for different scopes like Selenium, Mocha, Jazmine and Espresso.
Let’s start with Mobile (Android & IOS) using Selenium and TestNG with Java.
Create a Maven Project in Eclipse
For the next example, we’ll be using Eclipse as IDE and Maven of libraries management.
1. Create a Maven Project, it’ll look something like this.

2. In Folder “src/main/java“, create the packages “example.enviroment“, “example.pages” “example.test.base” and “example.pages.base“. This packages will contain our code.

3. Now let’s create the class “Setup” for the package “example.environment“, the class “BasePage” for the package “example.pages.base” and the class “BaseTest” for the package “example.test.base”.

4. It’s necessary to add de dependencies to the “pom.xml” file.

5. In Setup class we create de AppiumDriver that will interact with the device and our test.

To Appium to been able to connect your device is necessary to define the next capabilities: - udid = The ID of the device.
- device_Name = Generic name of the device usually just “My Phone”.
- appPackage = Is the name of the application’s package.
- appActivity = Is the name of the main activity (First Page) that the app loads when the app it’s launch.
- noReset = It’s an extra capability to avoid the information of the app got wiped out each time we run a test.
6. Let’s use ADB to obtain the previous capabilities.

By executing “adb devices” we obtain the UDID of the devices and emulator connected to our computer, in this case, is just one device “7MLNW18B29001109”.
To be able to see the device we must enable de “Developer Mode” and the “USB DEBUGGER”.
For the “appPackage” and “appActivity“, let’s type “adb shell” and then “dumpsys window windows | grep -E ‘mCurrentFocus‘”. It’s important to mention that the app to automate needs to be open on the device when we type the last command.
“com.huawei.android.FMRadio“: is the “appPackage” of the app.
“com.huawei.android.FMRadio.FMRadioMainActivity“: is the “appActivity” of the app.Create our First Test using TestNg
1. In class “BaseTest” we are going to call our driver (Setup class) each time a test is executed that’s why it is going to be called in BaseTest is going to be base for all the tests. With the tag @BeforeMethod, we assure that the Setup class and its method are always called before our tests. Also with the tag @AfterMethod we are going to set the close of the objects open, each time a test finishes. The tag @Parameters is going to help us to send the values from the xml file of TestNG.

2. Now let’s run Appium to inspect the elements of our app.

The host is our computer it can be assigned as 0.0.0.0 or 127.0.0.1 is the local host.
The port can be changed if it’s occupied or we want to run tests in parallel (I recommend separate the ports at least 10 units to avoid conflicts).
Now we have Appium Service running, we can use this console to debbug or use the Eclipse console. 3. Let’s click “Start inspection Session“.

4. Insert the next capabilities, click the button “Start Session“, and then we’ll see the app main activity, in this example the “Radio app“.


5. This main activity it’s going to be the “Principal Page“.

We are going to use “Page object Model” (POM) and “Page Factory” for the implementation of the test.
POM is a framework to organize the elements of an application in a way that it’s easier to understand and to maintain via “Pages”, in each page (Class) it’s defined the elements of only that page, in this example, we are only going to have two pages, the “Principal Page” and the “Radio Channels Page“.6. Let’s inspect and get the locators of the elements of “Principal Page“.

The most common locators are “ID” and “XPath“.
The ID locator is a unique locator that avoids having issues like duplicate elements if it is available de ID locator is much better to use it always.
The XPath locator depends on the DOM of the app source, so it’s not recommended to use it because it can change and also affects the performance because it has to go through all the DOM to find an element.
There are other locators like “name“, “class” and “text“, this locator it’s better to use them as a complement of each other because it’s possible that two or more elements have the same name, class, and text.
In this example:
The previous buttons ID is: “com.huawei.android.FMRadio:id/iv_prev“.
The next button ID is: “
com.huawei.android.FMRadio:id/iv_next“.
The Power button ID is: “com.huawei.android.FMRadio:id/btnPower”. 
The stations button menu ID is: “com.huawei.android.FMRadio:id/action_stations“. 7. Now let’s create our methods in the class “PrincipalPage“, create a package called “example.pages.java” and the class “PrincipalPage“.


The first part of the PrincipalPage consists of the following: - This class extends BasePage that will have the methods used by all the pages.
- In the Class’s Constructor it’s defined the “driver” that we create in Setup.
- PageFactory.initElements: Initialize the elements of the page, this is the main function of Page Factory, at the moment it’s instantiated the class PrincipalPage all the elements of the page are initialized.
- The structure to create these page elements are by the tag @FindBy and the type of locator to use like id, XPath, class, name etcetera; and the value of the locator.
Finally, it only needs the name of the element in our case a WebElement.

The last part is the definition of the methods aka actions of the elements.
In these examples the actions of each element are just clicks, this “Click” method/action is defined by Selenium as other many actions like sendKeys, clear, getText, getLocation, and many others.
The failedMethod and staticWait are not declared on this page because it comes from BasePage.8. Let’s define the actions in BasePage.

In this class is defined the methods “failedMethod” that prints the exceptions encountered on each method of the pages, and the method “staticWait” it converts from miliseconds to seconds, is a static wait to see the execution of the test, without it it’s not possible to see the actions. 9. Let’s create the last package where our Test Suites will be called as package “example.test.java” and class “FirstTest“.

10. The main test script resides in FirstTest.

This is the script of the test, where are just called the methods to make the actions. 11. Finally, let’s create the “PossitiveTests.xml” that TestNG will use to execute the tests and also is where the input parameters are defined.

The parameters are the input data of the test in Setup.
The class name is composed: package_name.class_name.
The methods include name is composed : method_name_of_FirstTest_class12. Lets just run it!

Right click on “PossitiveTests.xml“, select “Run As” and then “TestNG Suite”.
If there’s a problem finding this option be sure to have installed TestNG on the IDE, for more information about the installation of TestNG refers to https://testng.org/doc/download.html.
These are the result displayed in TestNG.
Links of interest:
Speed up Android Testing with TestProject Agent
Upload a File With HTML5
The Agile Team Approach
What Scrum Master Certification to Choose?These are some recommended books to learn more:
Any help is welcome to help us keeping this effort alive! PayPal Account BTC (Bech32): bc1qx6f8nczr5ram6d57svlnsfmk5mhu6lsr9q7mxw BTC: 1DDcWbphm1bKMvWruotNKLSM8ypVaHg5Nv ETH: 0x58D137fb142D946bCD815f0ded0fa3b3fE5AB3BF
Angélica Viridiana Rebolloza
Computing Engineer specialized in Automation, working with different tools for Mobile and Web, using languages, tools, and platforms like JAVA, VBScript, JavaScript, C#, Appium, Protractor, UFT (QTP), Selenium, WinAppDriver, Jenkins among others.
Viridiana also has been working using practices like TDD & BDD under Cascade and Agile approaches.
Some certifications include: ISTQB Foundations Certification, SeU Selenium Certified, ITIL Foundations Certification.